| Package | Version | Title | Description |
|---|---|---|---|
| rhino | 1.11.0 | A Framework for Enterprise Shiny Applications | A framework that supports creating and extending enterprise Shiny applications using best practices. |
| box | 1.2.1 | Write Reusable, Composable and Modular R Code | A modern module system for R. Organise code into hierarchical, composable, reusable modules, and use it effortlessly across projects via a flexible, declarative dependency loading syntax. |
The rhino framework
rhino takes a completely novel approach to Shiny applications. Unlike golem and leprechaun, rhino apps aren’t R packages. Instead, rhino structures the application into box modules, which minimizes dependencies and separates the code into a clear ‘division of labor.’ rhino has utilities for easily adding JavaScript and SCSS, and comes with end-to-end testing.1
Package versions
The versions of rhino and box used in this example are below:
Getting started
To create a new rhino application in RStudio ![]() , select Project > New Project > New Directory, and Shiny Application using rhino.
, select Project > New Project > New Directory, and Shiny Application using rhino.
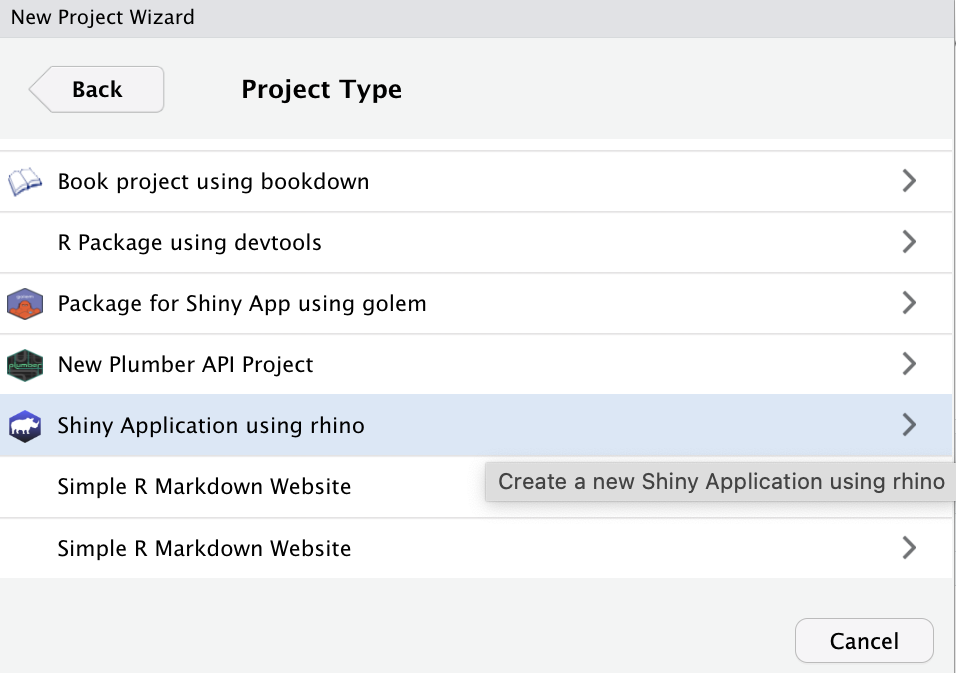
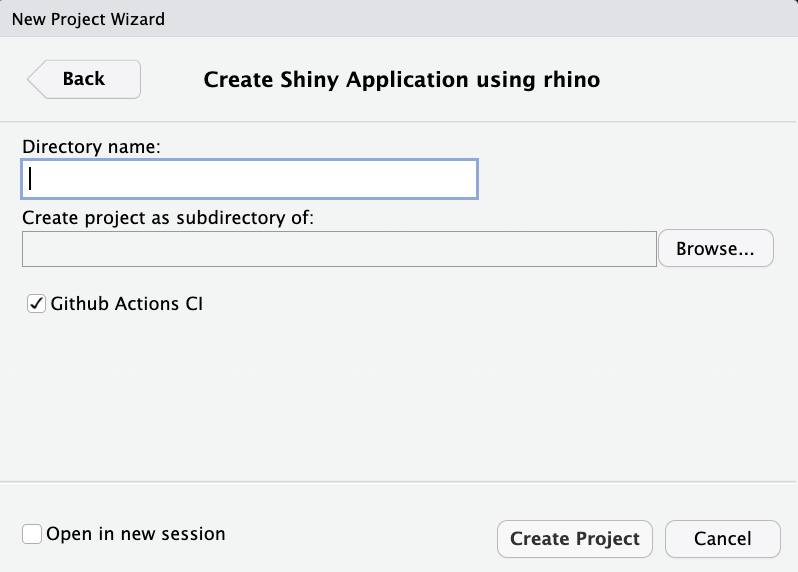
rhino appThe New Project Wizard will require a Directory name and subdirectory and Github Actions CI (selected by default)
After clicking Create Project, rhino will set up our new app (and you should see something like the following output in the Console):
Installing dependencies:
- Linking packages into the project library ... Done!
- Resolving missing dependencies ...
# Installing packages -------------------------------
- Installing treesitter ...     OK [linked from cache]
- Installing treesitter.r ...   OK [linked from cache]
Updating renv lockfile:
The following package(s) will be updated in the lockfile:

# CRAN --------------------------------------------------
<packages>

# RSPM --------------------------------------------------
<packages>

The version of R recorded in the lockfile will be updated:
<R version>

- Lockfile written to "~/projects/apps/R/rap/renv.lock".
- Project '~/projects/apps/R/rap' loaded. [renv 1.1.8]
Application structure, tests, and CI/CD:
✔ Initialized renv.
✔ Application structure created.
✔ Unit tests structure created.
✔ E2E tests structure created.
✔ Github Actions CI added.
This initializes the new rhino app by opening the .Rproj file in RStudio ![]() . If you’re using Positron
. If you’re using Positron ![]() To create a
To create a rhino application from the console, use the following:
install.packages("rhino")
rhino::init("/path/to/rhino/app")
rhino files
The initial folder structure for a new rhino app is below:
rap/
├── app
│   ├── js/
│   │   └── index.js
│   ├── logic/
│   │   └── __init__.R
│   ├── main.R
│   ├── static/
│   │   └── favicon.ico
│   ├── styles/
│   │   └── main.scss
│   └── view/
│       └── __init__.R
├── app.R
├── config.yml
├── dependencies.R
├── rap.Rproj
├── renv
│   ├── activate.R
│   ├── library/
│   └── settings.json
├── renv.lock
├── rhino.yml
└── tests
    ├── cypress
    │   └── e2e
    │       └── app.cy.js
    ├── cypress.config.js
    ├── testthat
    │   └──  test-main.R
    └── testthat.R
The rhino package website has excellent documentation on their approach and philosophy to app development, and it’s worth reading through this before getting started. I’ll do my best to summarize the application’s files below:
App code
The app/ folder contains the primary folder and files:
app
├── js
│   └── index.js
├── logic
│   └── __init__.R
├── main.R
├── static
│   └── favicon.ico
├── styles
│   └── main.scss
└── view
    └── __init__.R

6 directories, 6 files
The subfolders in app/ contain the following files:
app/js/ initially contains a blank index.js script.
app/js
└── index.js

1 directory, 1 file
app/logic/ contains utility functions and code independent from Shiny.
app/logic/
└── __init__.R

1 directory, 1 file
app/static/ stores external resources (like JavaScript files) and is similar to the sub-folders in inst/ from golem and leprechaun.
app/static/
└── favicon.ico

1 directory, 1 file
app/styles/ holds custom styles (CSS and HTML) in the app/styles/main.css file (which is initially blank).
app/styles/
└── main.scss

1 directory, 1 file
app/view/ will hold all the code used to build the application and relies upon the reactive capabilities of Shiny.
app/view/
└── __init__.R

1 directory, 1 file
app/main.R contains the primary ui and server code (similar to app_ui and app_server in a golem application).
app/
  └── main.R

1 directory, 1 file
The initial main.R file contains the following code:
show/hide initial app/main.R
box::use(
  shiny[bootstrapPage, div, moduleServer, NS, renderUI, tags, uiOutput],
)

#' @export
ui <- function(id) {
  ns <- NS(id)
  bootstrapPage(
    uiOutput(ns("message"))
  )
}

#' @export
server <- function(id) {
  moduleServer(id, function(input, output, session) {
    output$message <- renderUI({
      div(
        style = "display: flex; justify-content: center; align-items: center; height: 100vh;",
        tags$h1(
          tags$a("Check out Rhino docs!", href = "https://appsilon.github.io/rhino/")
        )
      )
    })
  })
}app.R will run the application and contains the rhino::app() function:2
# Rhino / shinyApp entrypoint. Do not edit.
rhino::app()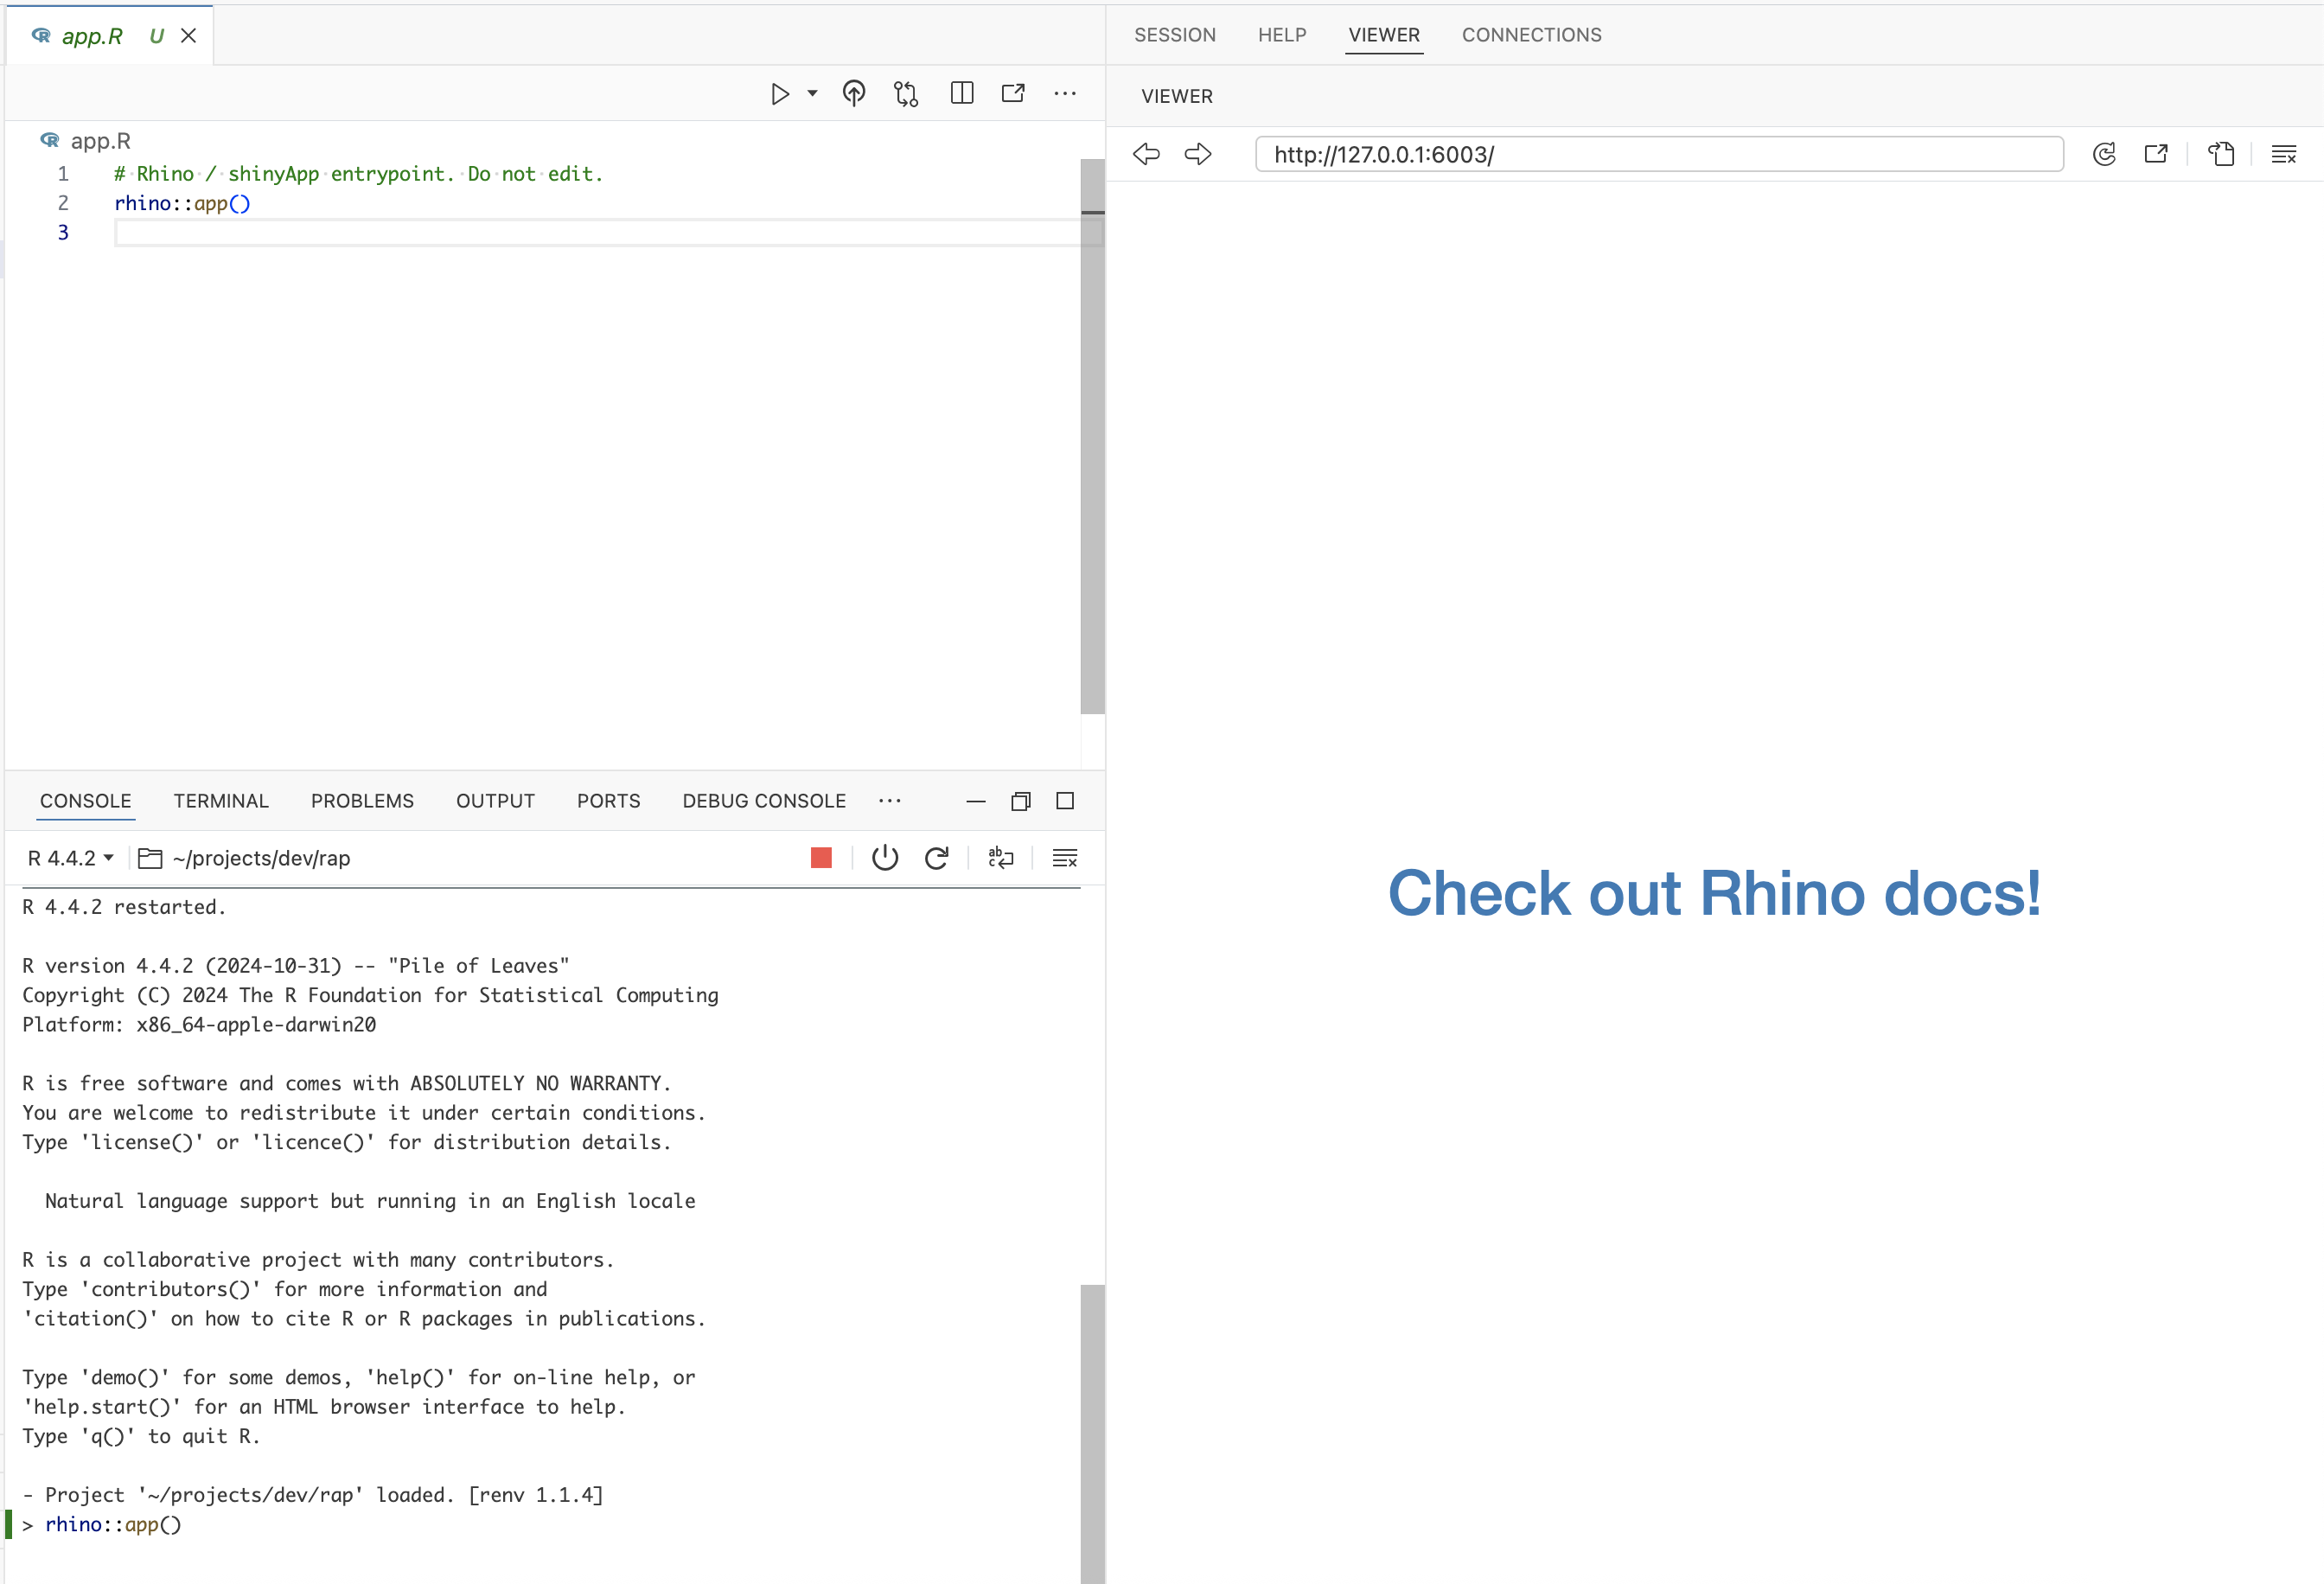
rhino appYAML files
New rhino apps begin with two .yml configuration files:
config.yml is a YAML file that follows the config package format and initially contains two calls to rhinos environment variables:3
default:
  rhino_log_level: !expr Sys.getenv("RHINO_LOG_LEVEL", "INFO")
  rhino_log_file: !expr Sys.getenv("RHINO_LOG_FILE", NA)
rhino.yml is a configuration file that contains options for 1) Sass build settings, and 3) import a legacy application structure to rhino.4
sass: string               # required | one of: "node", "r"
legacy_entrypoint: string  # optional | one of: "app_dir", "source", "box_top_level"
dependencies.R
rhino apps manage dependencies with the dependencies.R file and renv package.
dependencies.R is used during deployment (as we can see from the comments) and contains any add-on packages used in the application.5
# This file allows packrat (used by rsconnect
# during deployment) to pick up dependencies.
library(rhino)
library(treesitter)
library(treesitter.r)
The renv/ folder stores the R package versions used in the application. renv.lock contains the packages and R version used in our application.6
rap/
  ├── renv/
  │    ├── activate.R
  │    ├── library/
  │    ├── sandbox/
  │    └── settings.dcf
  └── renv.lock
We know we’ll be using ggplot2, stringr, and rlang in the app, so we’ll load these packages here:
rhino::pkg_install(c("ggplot2", "stringr", "rlang"))Adding packages with rhino::pkg_install() will automatically update dependencies.R and renv.
Tests
The tests/ folder initially contains two sub-folders, cypress/ and testthat/, and the cypress.json file.
tests
├── cypress
│   └── e2e
│       └── app.cy.js
├── cypress.config.js
└── testthat
    └── test-main.R

4 directories, 3 files
tests/cypress/ holds folders for using the Cypress web and component testing framework.7
tests/cypress
        └── e2e
              └── app.cy.js

2 directories, 1 fileDevelopment
Now that we’ve covered the initial file and folder structure of a new rhino application, we’re going to cover how to convert our movie review Shiny app into the rhino structure.
We’ll have to 1) load the movies data, and 2) create/call the scatter_plot() utility function, and 3) convert the contents of app.R into modules.
NoteApplication files
I’ve included the original application files below:
show/hide monolithlic app.R file
ui <- shiny::fluidPage(
  theme = shinythemes::shinytheme("spacelab"),
  shiny::sidebarLayout(
    shiny::sidebarPanel(
      shiny::selectInput(
        inputId = "y",
        label = "Y-axis:",
        choices = c(
          "IMDB rating" = "imdb_rating",
          "IMDB number of votes" = "imdb_num_votes",
          "Critics Score" = "critics_score",
          "Audience Score" = "audience_score",
          "Runtime" = "runtime"
        ),
        selected = "audience_score"
      ),

      shiny::selectInput(
        inputId = "x",
        label = "X-axis:",
        choices = c(
          "IMDB rating" = "imdb_rating",
          "IMDB number of votes" = "imdb_num_votes",
          "Critics Score" = "critics_score",
          "Audience Score" = "audience_score",
          "Runtime" = "runtime"
        ),
        selected = "critics_score"
      ),

      shiny::selectInput(
        inputId = "z",
        label = "Color by:",
        choices = c(
          "Title Type" = "title_type",
          "Genre" = "genre",
          "MPAA Rating" = "mpaa_rating",
          "Critics Rating" = "critics_rating",
          "Audience Rating" = "audience_rating"
        ),
        selected = "mpaa_rating"
      ),

      shiny::sliderInput(
        inputId = "alpha",
        label = "Alpha:",
        min = 0, max = 1,
        value = 0.4
      ),

      shiny::sliderInput(
        inputId = "size",
        label = "Size:",
        min = 0, max = 5,
        value = 3
      ),

      shiny::textInput(
        inputId = "plot_title",
        label = "Plot title",
        placeholder = "Enter text to be used as plot title"
      ),

      shiny::actionButton(
        inputId = "update_plot_title",
        label = "Update plot title"
      )
    ),

    shiny::mainPanel(
      shiny::br(),
      shiny::p(
        "These data were obtained from",
        shiny::a("IMBD", href = "http://www.imbd.com/"), "and",
        shiny::a("Rotten Tomatoes", href = "https://www.rottentomatoes.com/"), "."
      ),
      shiny::p("The data represent",
        nrow(movies),
        "randomly sampled movies released between 1972 to 2014 in the United States."),
      shiny::plotOutput(outputId = "scatterplot"),
      shiny::hr(),
        shiny::p(shiny::em("The code for this shiny application comes from",
          shiny::a("Building Web Applications with shiny",
            href = "https://rstudio-education.github.io/shiny-course/"))
          )
    )
  )
)

server <- function(input, output, session) {

  new_plot_title <- shiny::reactive({
      tools::toTitleCase(input$plot_title)
    }) |>
    shiny::bindEvent(input$update_plot_title,
                     ignoreNULL = FALSE,
                     ignoreInit = FALSE)


  output$scatterplot <- shiny::renderPlot({
    scatter_plot(
        df = movies,
        x_var = input$x,
        y_var = input$y,
        col_var = input$z,
        alpha_var = input$alpha,
        size_var = input$size
      ) +
      ggplot2::labs(title = new_plot_title()) +
      ggplot2::theme_minimal() +
      ggplot2::theme(legend.position = "bottom")
  })
}

shiny::shinyApp(ui = ui, server = server)
show/hide scatter_plot.R utility function
scatter_plot <- function(df, x_var, y_var, col_var, alpha_var, size_var) {
    ggplot2::ggplot(data = df,
      ggplot2::aes(x = .data[[x_var]],
          y = .data[[y_var]],
          color = .data[[col_var]])) +
      ggplot2::geom_point(alpha = alpha_var, size = size_var)

}
Download the movies dataset.
box modules
![]()
Unlike R packages, rhino applications don’t use the NAMESPACE and DESCRIPTION to manage dependencies. Instead, they use the box modules to explicitly import packages and functions. box is designed for writing “reusable, composable and modular R code”
Dependency refresher
In standard Shiny app development, add-on package functions are used with the following steps:
install the package using
install.packages('pkg')run
library(pkg), which loads the package namespace ‘and attach[es] it on the search list’
If/when the app is converted into an R package, add-on packages are managed by:
including the package in the
DESCRIPTIONfileusing
pkg::fun()in code belowR/9
The methods above might prompt the following questions:
Why do we load and attach the entire package namespace and if we only need a single function during standard (i.e., non-package) R development? 10
Why do we install the entire package in the
DESCRIPTIONif we’re only accessing a single function below R withpkg::fun()in our R package? 11
This is where box comes in–it’s designed to ‘completely replace the base R library and require functions’.
How box modules work
Below is a quick demonstration of box modules using tidyverse::tidyverse_logo(). If we attempted to use the tidyverse_logo() function without installing or loading the tidyverse meta-package, we see the following error:12
tidyverse_logo()Error in tidyverse_logo(): could not find function "tidyverse_logo"This is expected, because even if tidyverse has been installed, it hasn’t been loaded with libaray(tidyverse). box modules allow us to encapsulate and explicitly import packages and functions.13
Below is a quick demonstration of how they work:
Create folder: Create a new box module named tidy (which again, is just a folder named tidy)
└──tidy/
└─logo.R Import: import the tidyverse_logo() from tidyverse by creating a logo.R file with the following code
#' @export
box::use(
  tidyverse[tidyverse_logo]
)
Use module: call box::use(tidy/logo) to access the logo object from the tidy module
box::use(
  tidy/logo
)
box::use() creates and accesses box modules. The first call to box::use() in tidy/logo.R places tidyverse_logo() in a tidy module, and the second call to box::use() allows us to use the logo object.
Use ls() on logo to return the object(s) it imports:
ls(logo)[1] "tidyverse_logo"To access the objects within a box module, use the $ operator.
logo$tidyverse_logo()⬢ __ _ __ . ⬡ ⬢ .
/ /_(_)__/ /_ ___ _____ _______ ___
/ __/ / _ / // / |/ / -_) __(_-</ -_)
\__/_/\_,_/\_, /|___/\__/_/ /___/\__/
⬢ . /___/ ⬡ . ⬢ box modules are self-contained, meaning the tidyverse_logo() function only exists inside the logo module. Explicitly listing the packages and functions we intend to use with box::use() means we no longer need to include calls to install.packages() and library() or require().
Note what happens when I try to access the tidyverse_logo() function by itself:
tidyverse_logo()Error in tidyverse_logo(): could not find function "tidyverse_logo"This was a very brief overview of box, and I highly recommend consulting the box website and vignettes. The rhino website also has a great overview on using box with Shiny apps.14
Utility functions
We’ll start developing rap by creating a box module for our plotting utility function, scatter_plot(). Recall that the app/logic folder contains the non-Shiny code and functions:15
app/logic/plot.R
app/logic/
├── __init__.R
└── plot.R

1 directory, 2 files
In app/logic/plot.R, we’ll include the ggplot2 and rlang functions used in scatter_plot() with box::use() :
# contents of app/logic/plot.R
#' scatter plot function
#' @export
scatter_plot <- function(df, x_var, y_var, col_var, alpha_var, size_var) {
box::use(
ggplot2[ggplot, aes, geom_point],
rlang[.data]
)
ggplot(
data = df,
aes(
x = .data[[x_var]],
y = .data[[y_var]],
color = .data[[col_var]]
)
) +
geom_point(alpha = alpha_var, size = size_var)
}- 1
-
Add
ggplot2functions - 2
-
Add
rlangfunctions - 3
-
Use
ggplot2functions - 4
-
Use
rlangfunctions
Data
We’ll also include a box module for importing the movies data in app/logic/data.R. This module will read the movies data from a .csv file stored in a previous branch of the sap package.16
# contents of app/logic/data.R
#' @export
box::use(
vroom[vroom, cols, col_skip]
)
#' import movies data
#' @export
movies_data <- function() {
raw_csv_url <- "https://tinyurl.com/5cdmpuzy"
vroom(raw_csv_url,
col_types = cols(...1 = col_skip()))
}- 1
-
Add
vroomfunctions - 2
-
Call
vroomfunctions
In app/logic/data.R, the necessary vroom functions are included with box::use() to import movies.csv from GitHub.
Now that we have modules for our utility function and data, we want to make them available to our Shiny (box) modules. We can do this in the app/logic/__init__.R file:
# Logic: application code independent from Shiny.
# https://go.appsilon.com/rhino-project-structure
#' @export
box::use(
  app / logic / data,
  app / logic / plot
)
Including the folder paths in box::use() in app/logic/__init__.R will export the plot and data modules we created above:17
Now we can use use app/logic/data and app/logic/plot in our Shiny (box) modules below.
Modules
To convert contents of our monolithic app.R file into Shiny (box) modules, we’ll start by creating files for each module in the app/view/ folder.
First we’ll create the app/view/var_inputs module for collecting the user variable inputs:
app/view/var_inputs.R
app/view/
├── __init__.R
└── var_inputs.R

1 directory, 2 files
rhino modules are still broken into ui and server functions, and box::use() is called within each function to add the necessary package[function]
show/hide app/view/var_inputs.R
## app/view/var_inputs.R

# define module functions

#' variable input values ui
#' @export
ui <- function(id) {
  box::use(
    shiny[
      NS, tagList, selectInput
    ],
  )
  ns <- NS(id)
  tagList(
    selectInput(
      inputId = ns("y"),
      label = "Y-axis:",
      choices = c(
        "IMDB rating" = "imdb_rating",
        "IMDB number of votes" = "imdb_num_votes",
        "Critics Score" = "critics_score",
        "Audience Score" = "audience_score",
        "Runtime" = "runtime"
      ),
      selected = "audience_score"
    ),
    selectInput(
      inputId = ns("x"),
      label = "X-axis:",
      choices = c(
        "IMDB rating" = "imdb_rating",
        "IMDB number of votes" = "imdb_num_votes",
        "Critics Score" = "critics_score",
        "Audience Score" = "audience_score",
        "Runtime" = "runtime"
      ),
      selected = "imdb_rating"
    ),
    selectInput(
      inputId = ns("z"),
      label = "Color by:",
      choices = c(
        "Title Type" = "title_type",
        "Genre" = "genre",
        "MPAA Rating" = "mpaa_rating",
        "Critics Rating" = "critics_rating",
        "Audience Rating" = "audience_rating"
      ),
      selected = "mpaa_rating"
    )
  )
}

#' variable input values server
#' @export
server <- function(id) {
  box::use(
    shiny[moduleServer, reactive],
  )

  moduleServer(id, function(input, output, session) {
    return(
      reactive({
        list(
          "x" = input$x,
          "y" = input$y,
          "z" = input$z
        )
      })
    )
  })
}
The server function in app/view/var_inputs returns a reactive list of column names from the UI.
We’ll also create aes_inputs module for collecting the graph ‘aesthetics’ inputs:
app/view/aes_inputs.R
app/view/
├── __init__.R
├── aes_inputs.R
└── var_inputs.R

1 directory, 3 files
Note that each module explicitly lists the functions it uses in the box::use() section:
show/hide app/view/aes_inputs.R
# app/view/aes_inputs.R

# define module functions

#' aesthetic input values ui
#' @export
ui <- function(id) {
  box::use(
    shiny[
      NS, tagList,
      sliderInput, textInput
    ],
  )
  ns <- NS(id)
  tagList(
    sliderInput(
      inputId = ns("alpha"),
      label = "Alpha:",
      min = 0, max = 1, step = 0.1,
      value = 0.5
    ),
    sliderInput(
      inputId = ns("size"),
      label = "Size:",
      min = 0, max = 5,
      value = 2
    ),
    textInput(
      inputId = ns("plot_title"),
      label = "Plot title",
      placeholder = "Enter plot title"
    )
  )
}

#' aesthetic input values server
#' @export
server <- function(id) {
  box::use(
    shiny[moduleServer, reactive],
  )

  moduleServer(id, function(input, output, session) {
    return(
      reactive({
        list(
          "alpha" = input$alpha,
          "size" = input$size,
          "plot_title" = input$plot_title
        )
      })
    )
  })
}
The final display module contains the code for collecting the variable and aesthetic inputs and rendering the graph.
app/view/display
├── __init__.R
├── aes_inputs.R
├── display
└── var_inputs.R

1 directory, 4 files
The app/logic/data and app/logic/plot modules are added to app/view/display with box::use():
# app/view/display.R

# import data and plot modules
box::use(
  app / logic / data,
  app / logic / plot
)
The ui in app/view/display includes the necessary shiny functions with box::use():
#' display ui
#' @export
ui <- function(id) {
box::use(
shiny[NS, tagList, tags, plotOutput]
)
ns <- NS(id)
# use data$movies_data() ----
tagList(
tags$br(),
tags$p(
"These data were obtained from",
tags$a("IMBD", href = "http://www.imbd.com/"), "and",
tags$a("Rotten Tomatoes", href = "https://www.rottentomatoes.com/"),
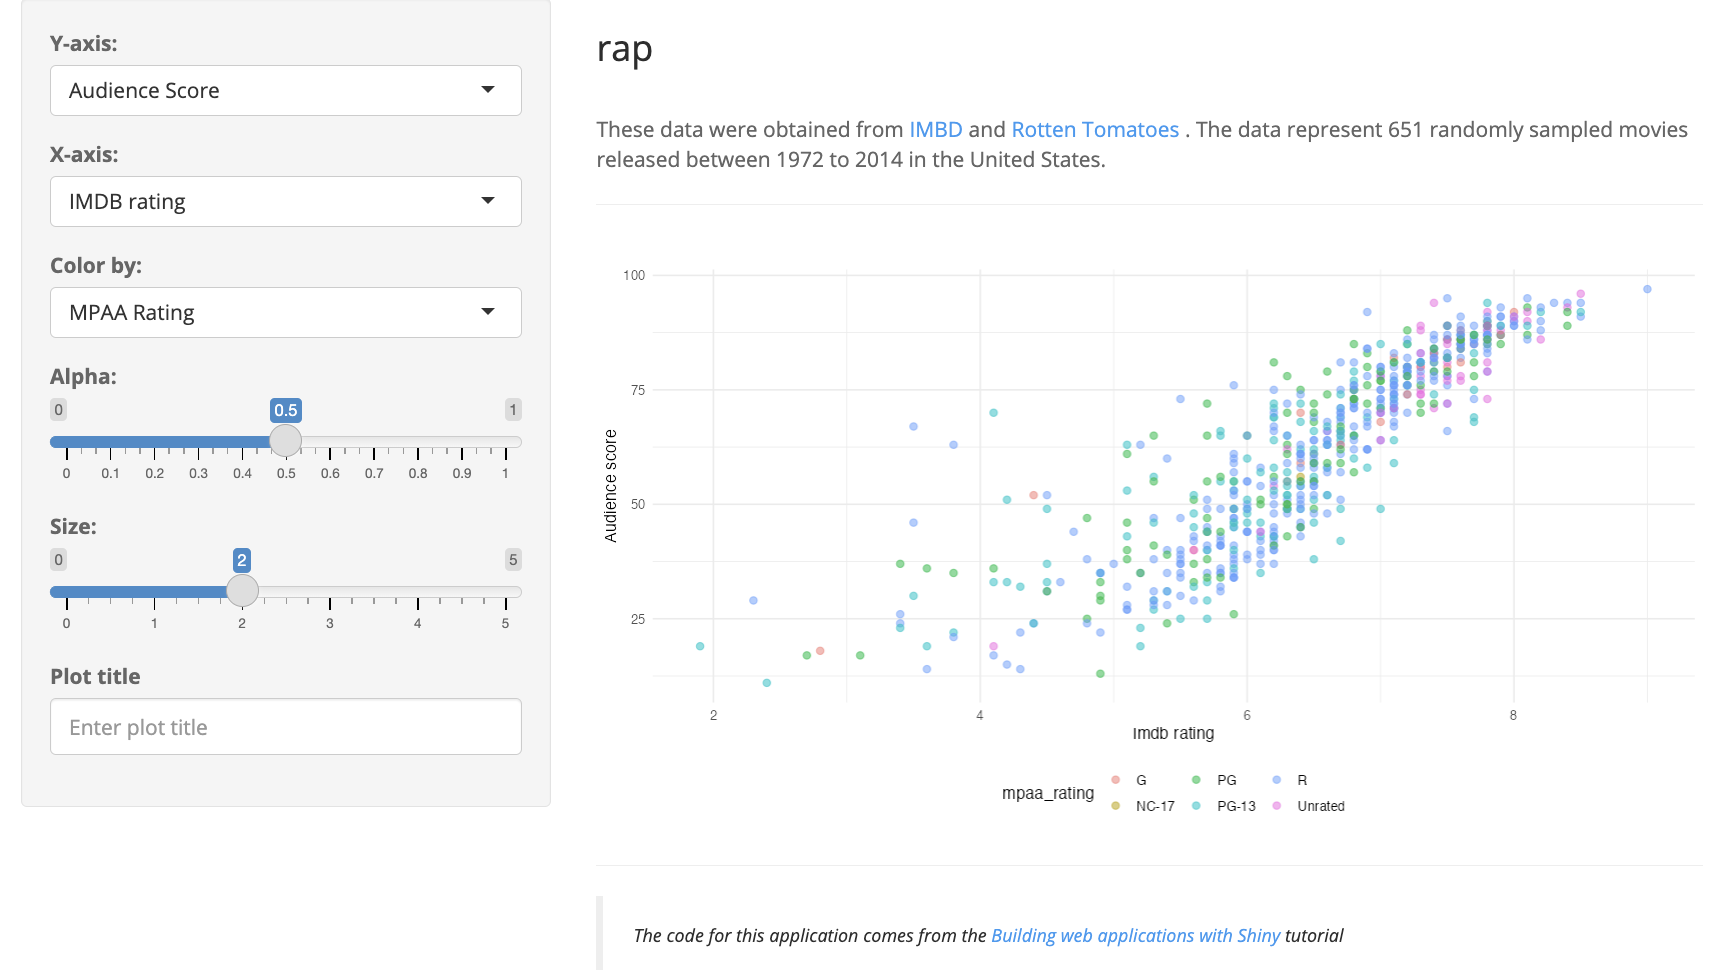
". The data represent 651 randomly sampled movies released between
1972 to 2014 in the United States."
),
tags$hr(),
plotOutput(outputId = ns("scatterplot")),
tags$hr(),
tags$blockquote(
tags$em(
tags$h6(
"The code for this application comes from the ",
tags$a("Building web applications with Shiny",
href = "https://rstudio-education.github.io/shiny-course/"
),
"tutorial"
)
)
)
)
}The server function adds the ggplot2, shiny, tools, and stringr functions with box::use() for creating the plot output, and imports the movies data with data$movies_data():
#' display server
#' @export
server <- function(id, var_inputs) {

  # load
  box::use(
    ggplot2[labs, theme_minimal, theme],
    shiny[NS, moduleServer, plotOutput, reactive, renderPlot],
    tools[toTitleCase],
    stringr[str_replace_all]
  )

  moduleServer(id, function(input, output, session) {

    # use data$movies_data() ----
    movies <- data$movies_data()

    inputs <- reactive({
      plot_title <- toTitleCase(var_inputs()$plot_title)
      list(
        x = var_inputs()$x,
        y = var_inputs()$y,
        z = var_inputs()$z,
        alpha = var_inputs()$alpha,
        size = var_inputs()$size,
        plot_title = plot_title
      )
    })

    output$scatterplot <- renderPlot({
      # use plot$scatter_plot() ----
      plot <- plot$scatter_plot(
        df = movies,
        x_var = inputs()$x,
        y_var = inputs()$y,
        col_var = inputs()$z,
        alpha_var = inputs()$alpha,
        size_var = inputs()$size
      )
      plot +
        labs(
          title = inputs()$plot_title,
          x = str_replace_all(
            toTitleCase(inputs()$x ), "_", " " ),
          y = str_replace_all(
            toTitleCase(inputs()$y), "_", " " )
        ) +
        theme_minimal() +
        theme(legend.position = "bottom")
    })
  })
}
After creating the app/view/display.R module, I’ll add testthat tests for the app/logic/ and app/view modules.
Unit tests
The unit tests for the box modules in app/logic/ and app/view/ are in the tests/testthat/ folder:
tests/testthat/
tests/testthat/
        ├── test-data.R
        └── test-plot.R

1 directory, 2 files
Unit tests with rhino applications are similar to unit tests in R packages, with a few important differences:
We don’t have access to the
usethisanddevtoolsfunctions for creating or running test files, so we’ll need to import the necessarytestthatfunctions withbox::use()To run the tests in
rap, we can use therhino::test_r()function (test_r()will run the unit tests intests/testthat/)
The first test for app/logic/data.R is below:
# import testthat
box::use(
  testthat[describe, it, expect_equal, expect_true]
)

# import data module
box::use(
  app / logic / data
)

describe("Feature: Movies Data Dimensions Verification
  As a data analyst,
  I want to ensure the movies data frame has the correct dimensions
  So that I can rely on its structure for further analysis.",
  code = {
  it("Scenario: Checking the dimensions of the movies data frame
    Given a function to import movies data
    When I call the function to retrieve the movies data
    Then the data frame should have 651 rows and 34 columns
    And the data frame should be of type 'data.frame'",
    code = {
    # call function to import movies data
    movies <- data$movies_data()
    # test dimensions
    expect_equal(
      object = dim(movies),
      expected = c(651L, 34L))
    # test class
    expect_true(object = is.data.frame(movies))
  })
})
The test for app/logic/plot.R is below. Note this test imports the app/logic/data and app/logic/plot modules:
# import testthat and ggplot2 function
box::use(
  testthat[describe, it, expect_equal, expect_true],
  ggplot2[is.ggplot]
)
# import data and plot modules
box::use(
  app / logic / data,
  app / logic / plot
)


describe("Feature: Scatter Plot Generation Verification
  As a data analyst,
  I want to ensure that scatter_plot() generates a valid scatter plot
  So that I can use it for visualizing relationships in movies data.",
  code = {
  it("Scenario: Generating a scatter plot with specified parameters
    Given a function to import movies data
    And a function scatter_plot() from the plot module
    When I call scatter_plot() with movies data
    And specify x_var as 'critics_score'
    And specify y_var as 'imdb_rating'
    And specify col_var as 'mpaa_rating'
    And set alpha_var to 2 / 3
    And set size_var to 2
    Then the function should return a ggplot object with a scatter plot",
    code = {
    # call function to import movies data
    movies <- data$movies_data()
    # test point plot
    expect_true(
      is.ggplot(
          # call scatter_plot() from plot module
          plot$scatter_plot(
            df = movies,
            x_var = 'critics_score',
            y_var = 'imdb_rating',
            col_var = 'mpaa_rating',
            alpha_var = 2 / 3,
            size_var = 2
          )
        )
      )
  })
})
Running the testthat tests in rap app is slightly different than executing tests in an R package. The standard devtools functions and keyboard shortcuts aren’t available, but rhino comes with a rhino::test_r() helper function to run all the tests in the testthat/ folder:
rhino::test_r()══ Results ════════════════════════════
[ FAIL 0 | WARN 0 | SKIP 0 | PASS 4 ]
> rhino::test_r()
✔ | F W S OK | Context
✔ | 2 | data
✔ | 1 | main
✔ | 1 | plot
══ Results ════════════════════════════
[ FAIL 0 | WARN 0 | SKIP 0 | PASS 4 ]Module tests
We can test the application modules with Shiny’s testServer() function. We’ll test that the reactive list of inputs is returned from app/view/var_inputs and app/view/aes_inputs:
show/hide tests/testthat/test-var_inputs.R
# import testthat and shiny's testServer()
box::use(
  testthat[describe, it, expect_equal],
  shiny[testServer]
)

# import inputs module
box::use(
  app / view / var_inputs
)

describe("Feature: Server Reactive Values Verification
  As a Shiny app developer,
  I want to ensure the var_inputs module returns a list of reactive values
  So that I can confirm the server's responsiveness to input changes.",
  code = {
  it("Scenario: Checking the return values of the server function
    Given a server function var_inputs$server for handling reactive inputs
    When I create a server object and set reactive input values as:
      | input       | value            |
      | x           | audience_score   |
      | y           | imdb_rating      |
      | z           | mpaa_rating      |
    And I compare the returned values from the server
    Then the returned values should match the following list:
      | key        | value            |
      | x          | audience_score   |
      | y          | imdb_rating      |
      | z          | mpaa_rating      |",
    code = {
    # create server object
    testServer(app = var_inputs$server, expr = {
      # create list of output vals
      test_vals <- list(
        x = "audience_score",
        y = "imdb_rating",
        z = "mpaa_rating")
      # change inputs
      session$setInputs(x = "audience_score",
                        y = "imdb_rating",
                        z = "mpaa_rating")
      # test class
      expect_equal(
        object = session$returned(),
        expected = test_vals
      )
   })
  })
})
show/hide tests/testthat/test-aes_inputs.R
# import testthat and shiny's testServer()
box::use(
  testthat[describe, it, expect_equal],
  shiny[testServer]
)

# import inputs module
box::use(
  app / view / aes_inputs
)

describe("Feature: Server Reactive Values Verification
  As a Shiny app developer,
  I want to ensure the aes_inputs module returns a list of reactive values
  So that I can confirm the server's responsiveness to input changes.",
  code = {
  it("Scenario: Checking the return values of the server function
    Given a server function aes_inputs$server for handling reactive inputs
    When I create a server object and set reactive input values as:
      | alpha      | 0.5              |
      | size       | 2                |
      | plot_title | Enter Plot Title |
    And I compare the returned values from the server
    Then the returned values should match the following list:
      | alpha      | 0.5              |
      | size       | 2                |
      | plot_title | Enter Plot Title |",
    code = {
    # create server object
    testServer(app = aes_inputs$server, expr = {
      # create list of output vals
      test_vals <- list(
        alpha = 0.5,
        size = 2,
        plot_title = "Enter Plot Title")
      # change inputs
      session$setInputs(alpha = 0.5,
                        size = 2,
                        plot_title = "Enter Plot Title")
      # test class
      expect_equal(
        object = session$returned(),
        expected = test_vals
      )
   })
  })
})
We’ll also want to make sure the reactive inputs are passed from the app/view/inputs/ module to the app/view/display/ module.
# import testthat and shiny's testServer()
box::use(
  testthat[describe, it, expect_equal],
  shiny[testServer]
)

# import inputs module
box::use(
  app / view / display,
  app / view / var_inputs,
  app / view / aes_inputs
)

describe("Feature: Server Acceptance of Reactive Values
  As a Shiny app developer,
  I want to verify that the display server can accept a list of reactive values
  So that I can ensure the interactive elements of the app respond as expected.",
  code = {
  it("Scenario: Confirming the server's handling of reactive input values
    Given a server function display$server for processing reactive inputs
    When I test the server with a list of reactive inputs:
      | input      | value            |
      | x          | critics_score    |
      | y          | imdb_rating      |
      | z          | mpaa_rating      |
      | alpha      | 0.5              |
      | size       | 2                |
      | plot_title | 'Plot Title'     |
    Then the server should correctly receive and process the reactive inputs
    And the inputs received by the server should match the specified values",
    code = {
    # test inputs to display$server
    testServer(
      app = display$server,
      args = list(
        var_inputs =
          reactive(
            list(
                x = "critics_score",
                y = "imdb_rating",
                z = "mpaa_rating"
              )
            ),
          aes_inputs =
            reactive(
              list(
                alpha = 0.5,
                size = 2,
                plot_title = "plot title"
                )
              )
      ),
      expr = {
        expect_equal(
          # test against input reactive list
          object = inputs(),
          expected = list(
            x = "critics_score",
            y = "imdb_rating",
            z = "mpaa_rating",
            alpha = 0.5,
            size = 2,
            plot_title = "Plot Title"
          )
        )
    })
  })
})
tests/testthat/
tests/testthat/
├── test-data.R
├── test-display.R
├── test-inputs.R
├── test-main.R
└── test-plot.R

1 directory, 5 filesrhino::test_r()✔ | F W S OK | Context
✔ | 1 | aes_inputs
✔ | 2 | data
✔ | 1 | display
✔ | 1 | plot
✔ | 1 | var_inputs
══ Results ═══════════════════════════
[ FAIL 0 | WARN 0 | SKIP 0 | PASS 6 ]These tests confirm the reactive values are passed between the app/view/inputs and the app/view/display modules.
Launch
After the app/logic/ and app/view/ code has been written and tested, we can add the modules and layout functions to app/main.R:
# app/main.R

# shiny functions
box::use(
  shiny[
    NS, tags, icon, moduleServer
  ],
  # bslib functions
  bslib[
    page_fillable, layout_sidebar, sidebar,
    card, card_header, card_body, bs_theme
  ]
)

# import modules ----
box::use(
  ## load inputs module
  app / view / var_inputs,
  app / view / aes_inputs,
  ## load display module
  app / view / display
)
The ui() and server() functions in app/main look very similar to golem and leprechaun UI and server functions, except we access the modules using the $ operator.
The ui() function includes var_inputs$ui(), aes_inputs$ui() and display$ui().
#' rap ui
#' @export
ui <- function(id) {
  ns <- NS(id)
  page_fillable(
    # theme
    theme = bs_theme(
        bg = "#202123",
        fg = "#B8BCC2",
        primary = "#EA80FC",
        secondary = "#48DAC6",
        base_font = c("Proxima Nova", "sans-serif"),
        code_font = c("Hack", "monospace"),
        heading_font = c("Optima", "sans-serif")
    ),
    layout_sidebar(
      sidebar = sidebar(
        var_inputs$ui(ns("vals")),
        aes_inputs$ui(ns("aes"))
        ),
        card(
          full_screen = TRUE,
        card_body(
            display$ui(ns("disp"))
          )
        )
      )
    )
}
The help-button will be covered below in the rhino::build_sass() and rhino::build_js().
The server function in app/main.R calls the var_inputs$server() and aes_inputs$server(), collects the input values as selected_vars and selected_aes, then passes these to display$server():
#' rap server
#' @export
server <- function(id) {
moduleServer(id, function(input, output, session) {
# collect variable inputs module server ----
selected_vars <- var_inputs$server(id = "vals")
# collect aesthetic inputs module server ----
selected_aes <- aes_inputs$server(id = "aes")
# pass to display module server ----
display$server(
id = "disp",
var_inputs = selected_vars,
aes_inputs = selected_aes
)
})
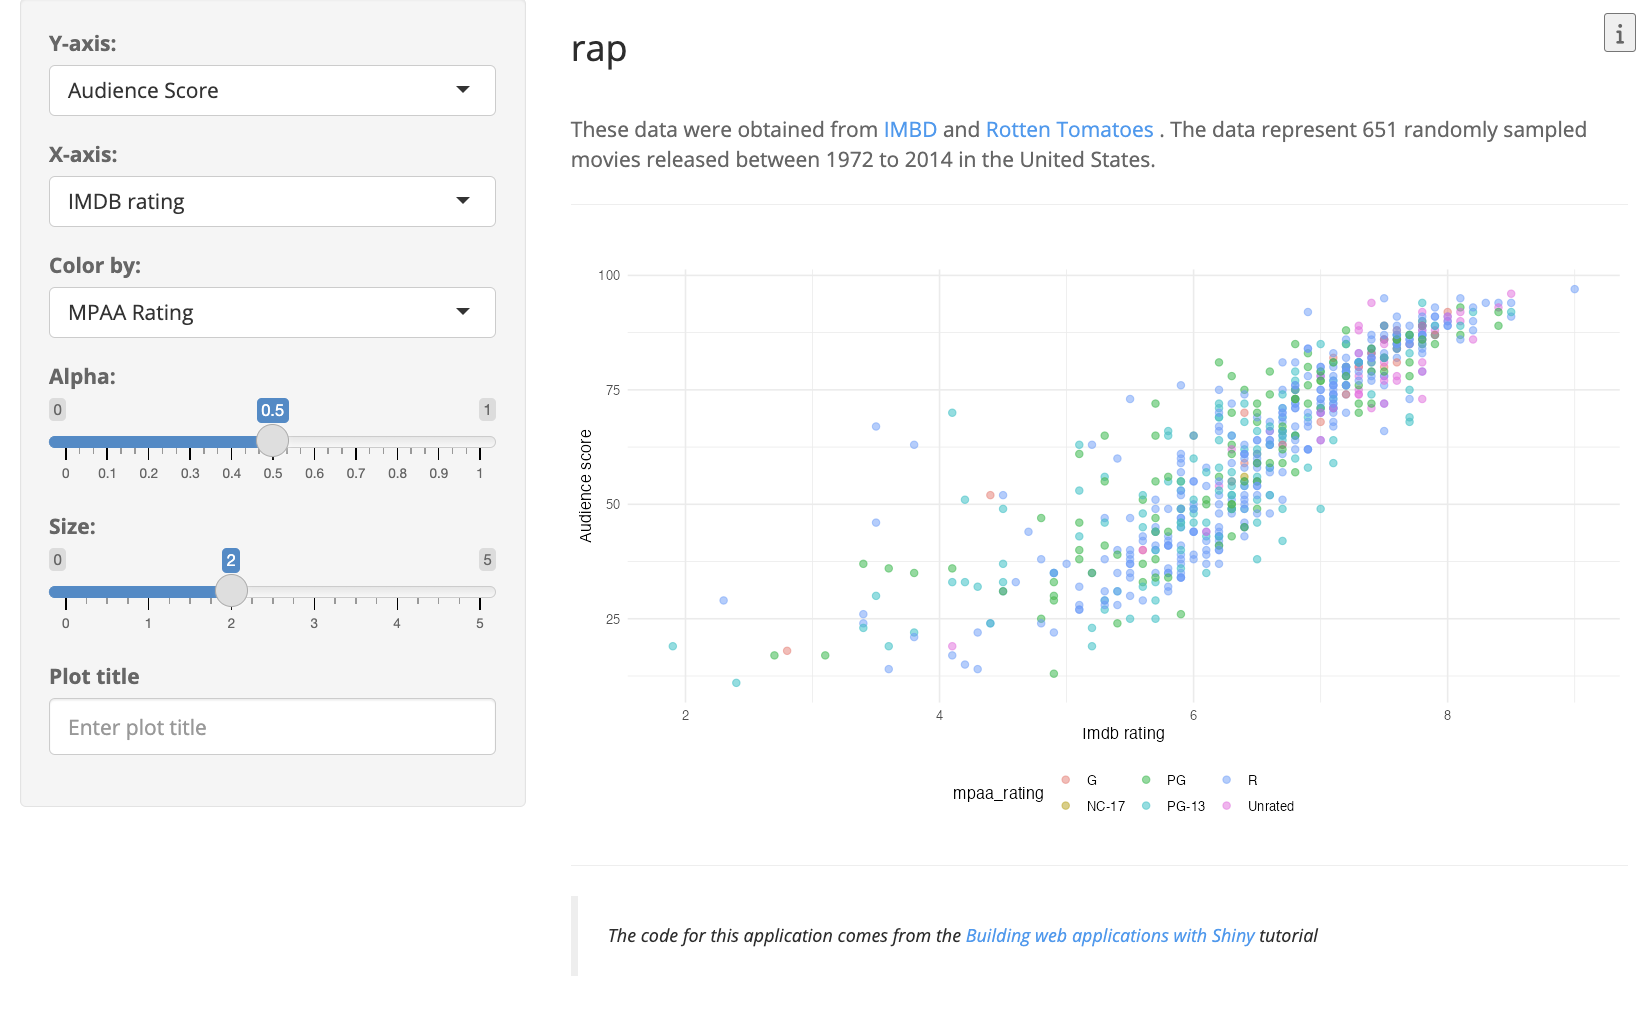
}After saving all the module files and app/main.R, we can run the app using app.R:
rap appAdding resources
It’s fairly straightforward to add external resources (i.e., JavaScript, CSS, Sass, etc.) to rhino apps. We’ll cover the examples from the website to demonstrate adding both CSS and JavaScript to the rap codebase. Be sure to download and install Node.js.
ImportantNode.js in Positron 
While developing in Positron, I kept getting the following error when trying to execute build_sass() and build_js():
Error in `value[[3L]]()`:
! Do you have Node.js installed?
Check https://go.appsilon.com/rhino-system-dependencies for details.
ℹ If you can't use Node.js, try using sass: 'r' configuration.
Both functions worked in RStudio, so I was able to add both SASS and JavaScript to the app.
The path for my nvm/node versions are below:
In RStudio ![]()
Bash@MacBook rap$ which npm
/Users/mjfrigaard/.nvm/versions/node/v22.14.0/bin/npm
Bash@MacBook rap$ which node
/Users/mjfrigaard/.nvm/versions/node/v22.14.0/bin/node
In Positron ![]()
(3.9.15) Bash@MacBook rap$ which npm
/Users/mjfrigaard/.nvm/versions/node/v22.14.0/bin/npm
(3.9.15) Bash@MacBook rap$ which node
/Users/mjfrigaard/.nvm/versions/node/v22.14.0/bin/node
Update the card_header() to include the title, info button, and display module in app/main.R:
Help button
card_header(
  tags$button(id = "help-button",
    icon("info"),
    # add 'onclick' after
    # rhino::build_sass() and
    # rhino::build_js()
    onclick = "App.showHelp()")
)
The following CSS is added to app/styles/main.css in the container for the button.
app/styles/main.css
// app/styles/main.scss

.components-container {
    display: inline-grid;
    grid-template-columns: 1fr 1fr;
    width: 100%;

    .component-box {
      padding: 10px;
      margin: 10px;
      box-shadow:
        0 4px 8px 0 #00000033,
        0 6px 20px 0 #00000030;
    }
  }

  h1 {
    text-align: center;
    font-weight: 900;
  }

  #help-button {
    position: fixed;
    top: 0;
    right: 0;
    margin: 10px;
  }
Run rhino::build_sass() to create the app/static/css/app.min.css file (requires node.js)
rhino::build_sass()ℹ Initializing Node.js directory...
ℹ Installing Node.js packages with npm...
added 761 packages in 23s
> build-sass
> sass --no-source-map --style=compressed
../app/styles/main.scss:
../app/static/css/app.min.cssThis tells me app.min.css has been added to in app/static/css/
app/static/
      └── css
           └── app.min.css
Add the following to app/js/index.js:
export function showHelp() {
alert('Learn more about shiny frameworks: https://mjfrigaard.github.io/posts/my-rhino-app/');
}
Run rhino::build_js() to build the app/static/js/app.min.js (requires node.js)
rhino::build_js()build-js
webpack
asset app.min.js 502 bytes [emitted]
[minimized] (name: main)
runtime modules 670 bytes 3 modules
../app/js/index.js 126 bytes [built] [code generated]
webpack 5.69.0 compiled successfully in 1300 msThe output tells me the app.min.js has been created in app/static/js
app/static/
      └── js
          └── app.min.js
Now when I save everything and click ‘Run App’ in app.R I should see the info button (and message):
.js to app/js/index.jsUpdate main.R test
The message from our info-button has changed, so we’ll want to update the test to include the correct string match:
box::use(
  shiny[testServer],
  testthat[expect_true, test_that],
)
box::use(
  app/main[server],
)

test_that("main server works", {
  testServer(server, {
    expect_true(
      grepl(x = output$message$html,
            pattern = "Learn more about shiny frameworks: https://mjfrigaard.github.io/posts/my-rhino-app/"))
  })
})
System tests (shinytest2)
System tests can also be written using shinytest2. The tests below come from System tests chapter of Shiny App-Packages.18
Start by installing shinytest2 and shinyvalidate:19
rhino::pkg_install(c("shinytest2", "shinyvalidate"))Create new tests with shinytest2::record_test() the same way you would for a standard Shiny app:
shinytest2::record_test()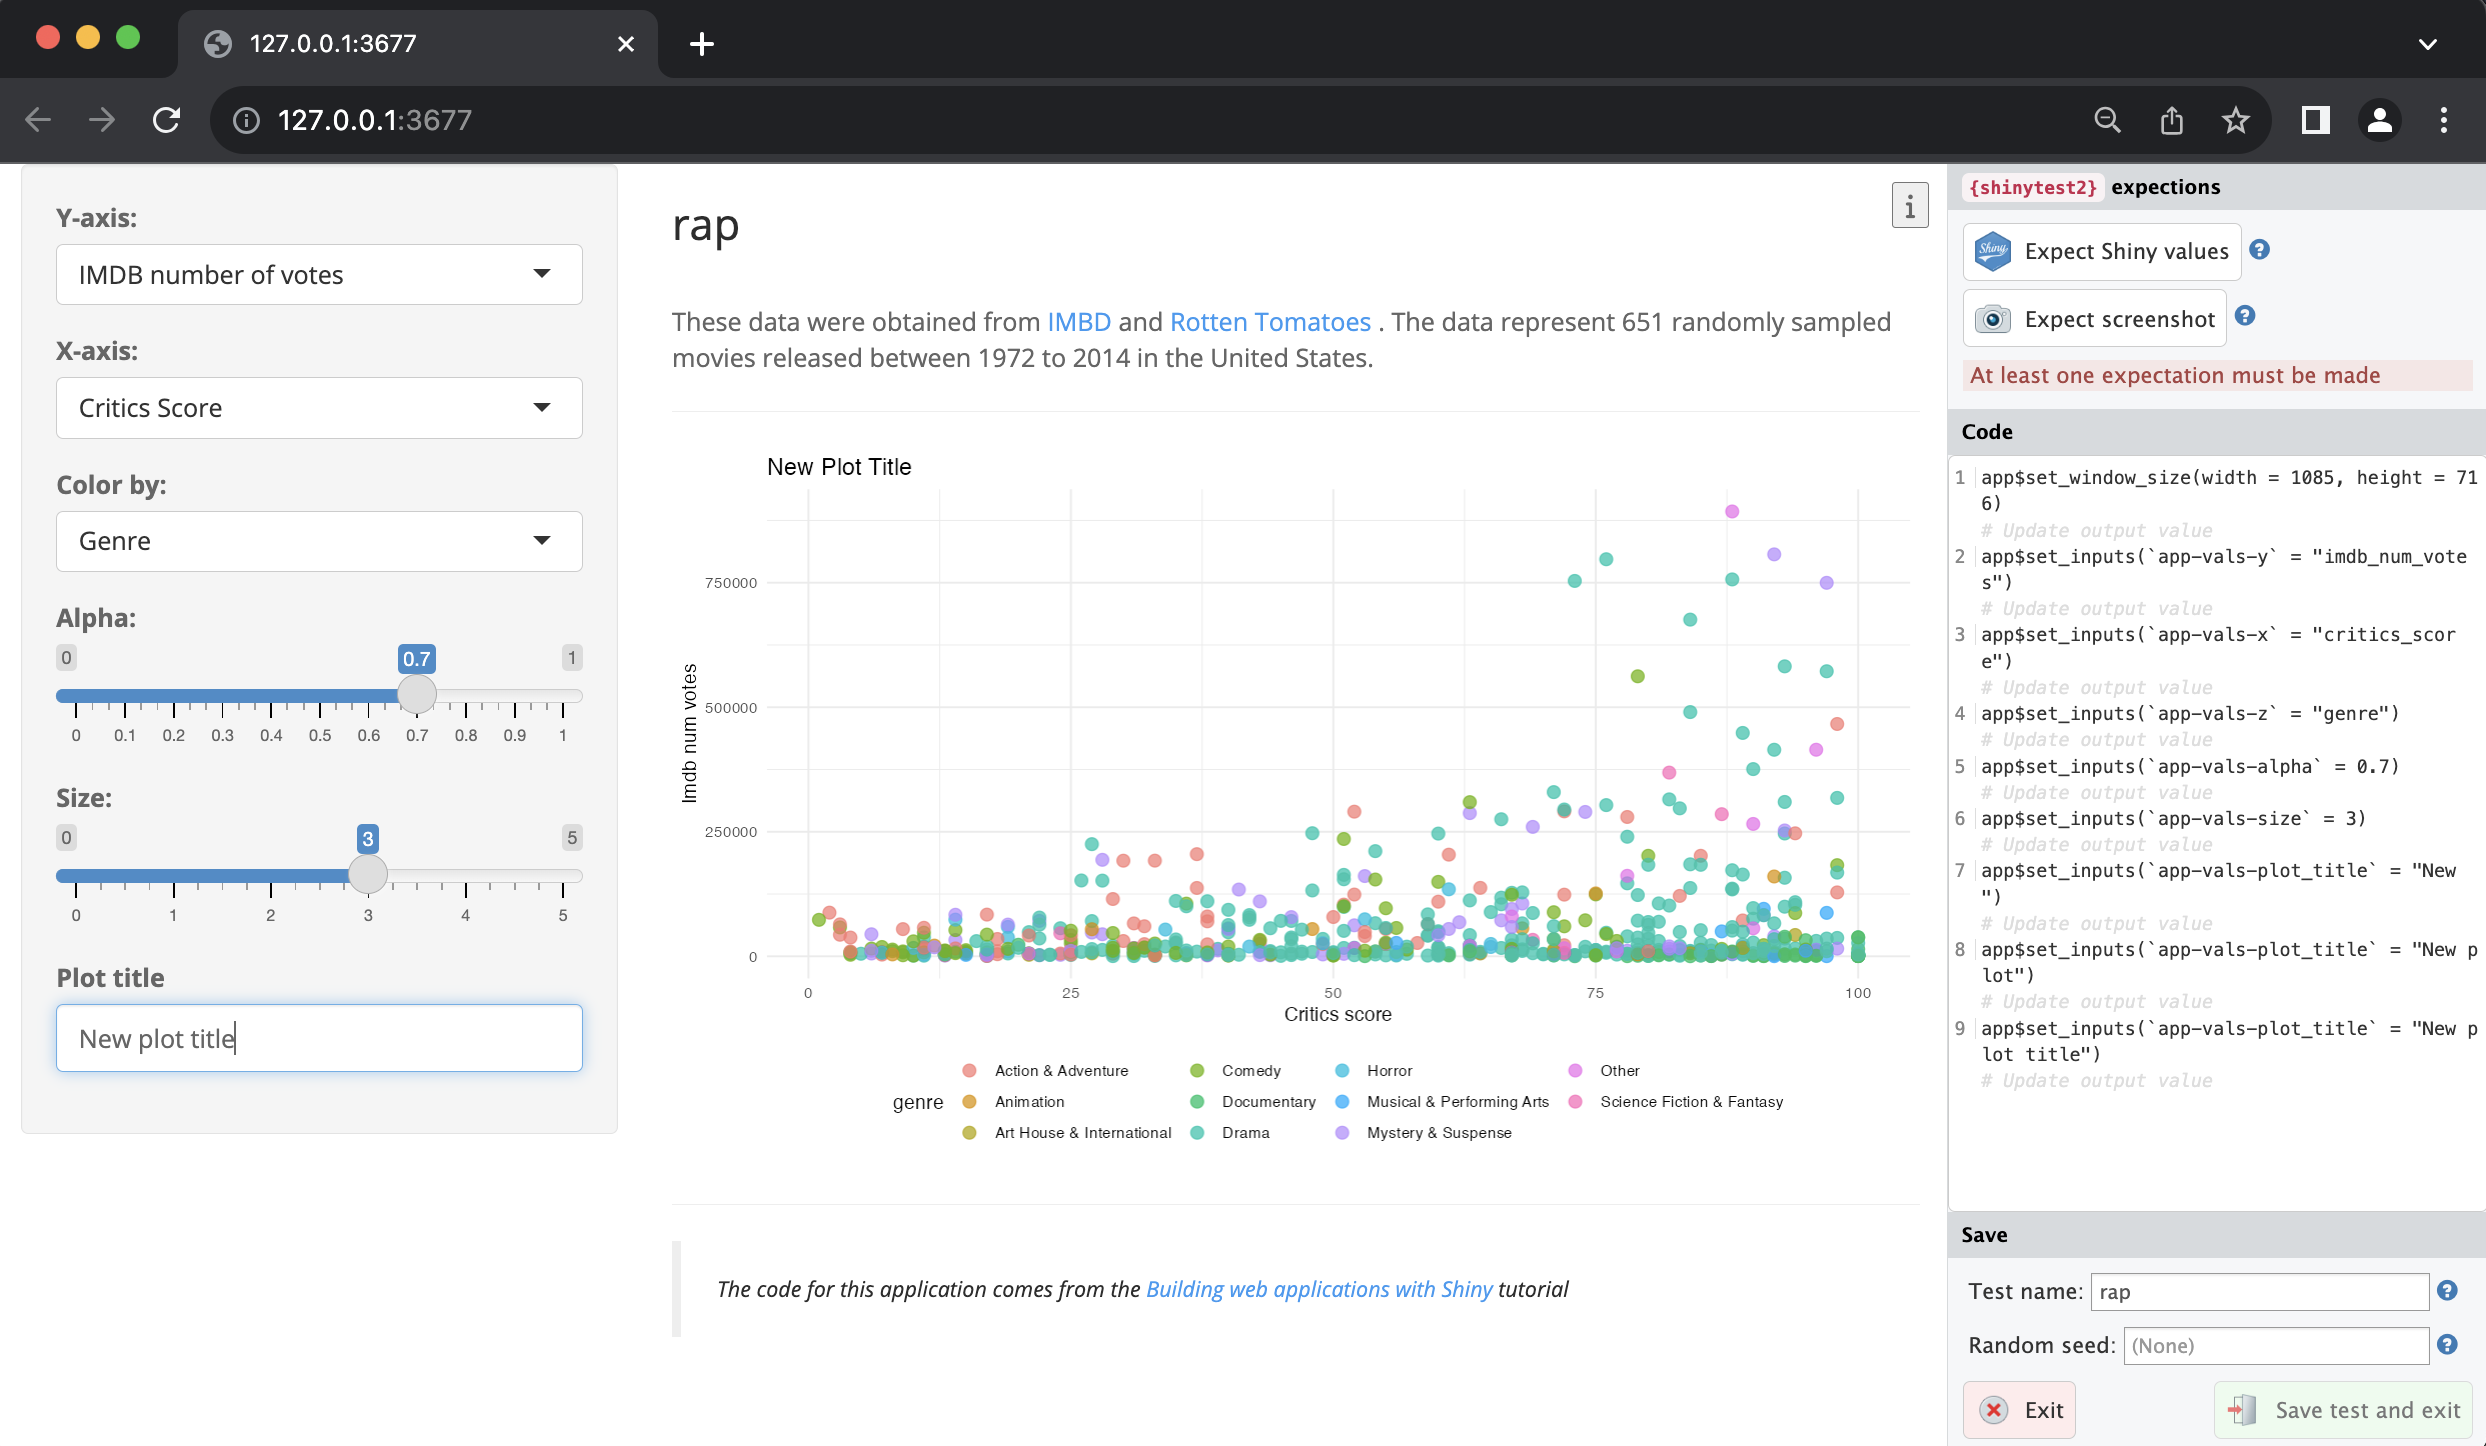
This produces the following in the Console:
Loading required package: shiny

Listening on http://127.0.0.1:5800
{shiny} R stderr ----------- Loading required package: shiny
{shiny} R stderr ----------- Running application in test mode.
{shiny} R stderr -----------
{shiny} R stderr ----------- Listening on http://127.0.0.1:6435
• Saving test runner: tests/testthat.R
• Saving test file: tests/testthat/test-shinytest2.R
• Adding shinytest2::load_app_env() to tests/testthat/setup-shinytest2.R
• Running recorded test: tests/testthat/test-shinytest2.R
Loading required package: testthat
✔ | F W  S  OK | Context
✔ |   2      1 | shinytest2 [11.9s]
────────────────────────────────────────────────────────────────────────────────
Warning (test-shinytest2.R:11:3): {shinytest2} recording: rap
Adding new file snapshot: 'tests/testthat/_snaps/rap-001_.png'

Warning (test-shinytest2.R:11:3): {shinytest2} recording: rap
Adding new file snapshot: 'tests/testthat/_snaps/rap-001.json'
────────────────────────────────────────────────────────────────────────────────

══ Results ═════════════════════════════════════════════════════════════════════
Duration: 12.0 s

[ FAIL 0 | WARN 2 | SKIP 0 | PASS 1 ]
rhino Shiny modules
When setting inputs with app$set_inputs() in sap, the variable inputIds are nested inside the module namespaces:
app$set_inputs(`vars-y` = "imdb_num_votes")
app$set_inputs(`vars-x` = "critics_score")
app$set_inputs(`vars-z` = "genre")
In rap, the box modules have another level of encapsulation (i.e., vars-y becomes app-vals-y):
app$set_inputs(`app-vals-y` = "imdb_num_votes")
app$set_inputs(`app-vals-x` = "critics_score")
app$set_inputs(`app-vals-z` = "genre")
It’s important to keep these differences in mind when writing shinytest2 tests.20
BDD system tests
I’ve provided a few shinytest2 example tests for the data visualization user-input features using testthats BDD functions:21
show/hide contents of tests/testthat/test-rap-feature-01.R
library(shinytest2)
describe("Feature 1: Scatter plot data visualization dropdowns
           As a film data analyst
           I want to explore variables in the movie review data
           So that I can analyze relationships between movie reivew sources", {

  describe("Scenario A: Change dropdown values for plotting
             Given the movie review application is loaded
             When I choose the variable [critics_score] for the x-axis
             And I choose the variable [imdb_num_votes] for the y-axis
             And I choose the variable [genre] for the color", {
    it("Then the scatter plot should show [critics_score] on the x-axis
         And the scatter plot should show [imdb_num_votes] on the y-axis
         And the points on the scatter plot should be colored by [genre]", {
              app <- AppDriver$new(name = "feature-01-senario-a",
                                     height = 800, width = 1173)
                app$set_inputs(`app-vars-y` = "imdb_num_votes")
                app$set_inputs(`app=vars-x` = "critics_score")
                app$set_inputs(`app-vars-z` = "genre")
                app$expect_values()
       })
   })

  describe("Scenario B: Change dropdown values for plotting
              Given the movie review application is loaded
              When I choose the size of the points to be [0.7]
              And I choose the opacity of the points to be [3]
              And I enter '[New plot title]' for the plot title", {
         it("Then the size of the points on the scatter plot should be [3]
              And the opacity of the points on the scatter plot should be [0.7]
              And the title of the plot should be '[New Plot Title]'", {
              app <- AppDriver$new(name = "feature-01-senario-b",
                                     height = 800, width = 1173)
                app$set_inputs(`app-vars-alpha` = 0.7)
                app$set_inputs(`app-vars-size` = 3)
                app$set_inputs(`app-vars-plot_title` = "New plot title")
                app$expect_values()
        })
    })
})
Note that these tests combine testthat’s describe() and it() functions with the Gherkin syntax.
The output from the rhino::test_r() function now shows:
Loading required package: shiny
✔ | F W  S  OK | Context
✔ |          1 | aes_inputs
✔ |          2 | data [1.3s]
✔ |          1 | display [1.2s]
✔ |          2 | main
✔ |          1 | plot
✔ |          2 | rap-feature-01 [39.0s]
✔ |          1 | shinytest2 [17.3s]
✔ |          1 | var_inputs

══ Results ════════════════════════════════════════════════════════════════════
Duration: 59.8 s

[ FAIL 0 | WARN 0 | SKIP 0 | PASS 11 ]

You are a coding rockstar!
System tests (Cypress)
rhino apps extend the test suite to include the Cypress test framework. The Cypress testing framework relies on node.js. Every machine/setup is a little different, but I use homebrew, so I installed node with the following:
# remove to get a fresh start
brew uninstall node
# update homebrew
brew update
brew upgrade
# file cleanup
brew cleanup
Install node:
brew install nodeLink node (I had to use the --overwrite flag):
brew link --overwrite nodeLinking /usr/local/Cellar/node/21.5.0... 112 symlinks created.Run the post-install:
brew postinstall node==> Postinstalling nodeVerify versions:
node --versionv22.14.0npm -v10.9.2Click & message
The Cypress tests below follow the example from the rhino website. Below are two modules (clicks.R and message.R) that have been included in app/view (as app/view/message.R and app/view/clicks.R).
Both modules contain an actionButton() and textOutput():
show/hide app/view/message.R
# app/view/message.R

box::use(
  shiny[actionButton, div,
    moduleServer, NS, renderText,
    req, textOutput],
)

#' @export
ui <- function(id) {
  ns <- NS(id)
  div(
    class = "message",
    actionButton(
      ns("show_message"),
      "Show message"
    ),
    textOutput(ns("message_text"))
  )
}

#' @export
server <- function(id) {
  moduleServer(id, function(input, output, session) {
    output$message_text <- renderText({
      req(input$show_message)
      "This is a message"
    })
  })
}
show/hide app/view/clicks.R
# app/view/clicks.R

box::use(
  shiny[actionButton, div,
    moduleServer, NS,
    renderText, textOutput]
)

#' @export
ui <- function(id) {
  ns <- NS(id)
  div(
    class = "clicks",
    actionButton(
      ns("click"),
      "Click me!"
    ),
    textOutput(ns("counter"))
  )
}

#' @export
server <- function(id) {
  moduleServer(id, function(input, output, session) {
    output$counter <- renderText(input$click)
  })
}
Updated app/main.R
Using app/view/clicks and app/view/message also requires adding the modules to the app/main.R file with box::use():
show/hide app/main.R
# app/main.R
# shiny functions
box::use(
shiny[
NS, span, tags, icon, moduleServer
],
# bslib functions
bslib[
page_fillable, layout_sidebar, sidebar,
card, card_header, card_body, bs_theme
]
)
# import modules ----
box::use(
## load inputs module
app / view / var_inputs,
app / view / aes_inputs,
## load display module
app / view / display,
## load clicks module
app / view / clicks,
## load message module
app / view / message
)
#' rap ui
#' @export
ui <- function(id) {
ns <- NS(id)
page_fillable(
# theme
theme = bs_theme(
bg = "#202123",
fg = "#B8BCC2",
# accent colors (e.g., hyperlink, button, etc)
primary = "#EA80FC",
secondary = "#48DAC6",
# fonts
base_font = c("Proxima Nova", "sans-serif"),
code_font = c("Hack", "monospace"),
heading_font = c("Optima", "sans-serif")
),
layout_sidebar(
sidebar = sidebar(
# input modules
var_inputs$ui(ns("vals")),
aes_inputs$ui(ns("aes"))
),
card(
full_screen = TRUE,
card_header(
tags$button(id = "help-button",
icon("info"),
# add 'onclick' after rhino::build_sass()
# and rhino::build_js()
onclick = "App.showHelp()"),
),
card_body(
span(
# use clicks
clicks$ui(ns("clicks")),
# use message
message$ui(ns("message")),
),
display$ui(ns("disp"))
)
)
)
)
}
#' rap server
#' @export
server <- function(id) {
moduleServer(id, function(input, output, session) {
# collect variable inputs module server ----
selected_vars <- var_inputs$server(id = "vals")
# collect aesthetic inputs module server ----
selected_aes <- aes_inputs$server(id = "aes")
# pass to display module server ----
display$server(
id = "disp",
var_inputs = selected_vars,
aes_inputs = selected_aes
)
})
moduleServer(id, function(input, output, session) {
clicks$server("clicks")
message$server("message")
})
}- 1
-
include
app/view/clicks.Randapp/view/message.Rmodules in UI
- 2
-
include
app/view/clicks.Randapp/view/message.Rmodules in server
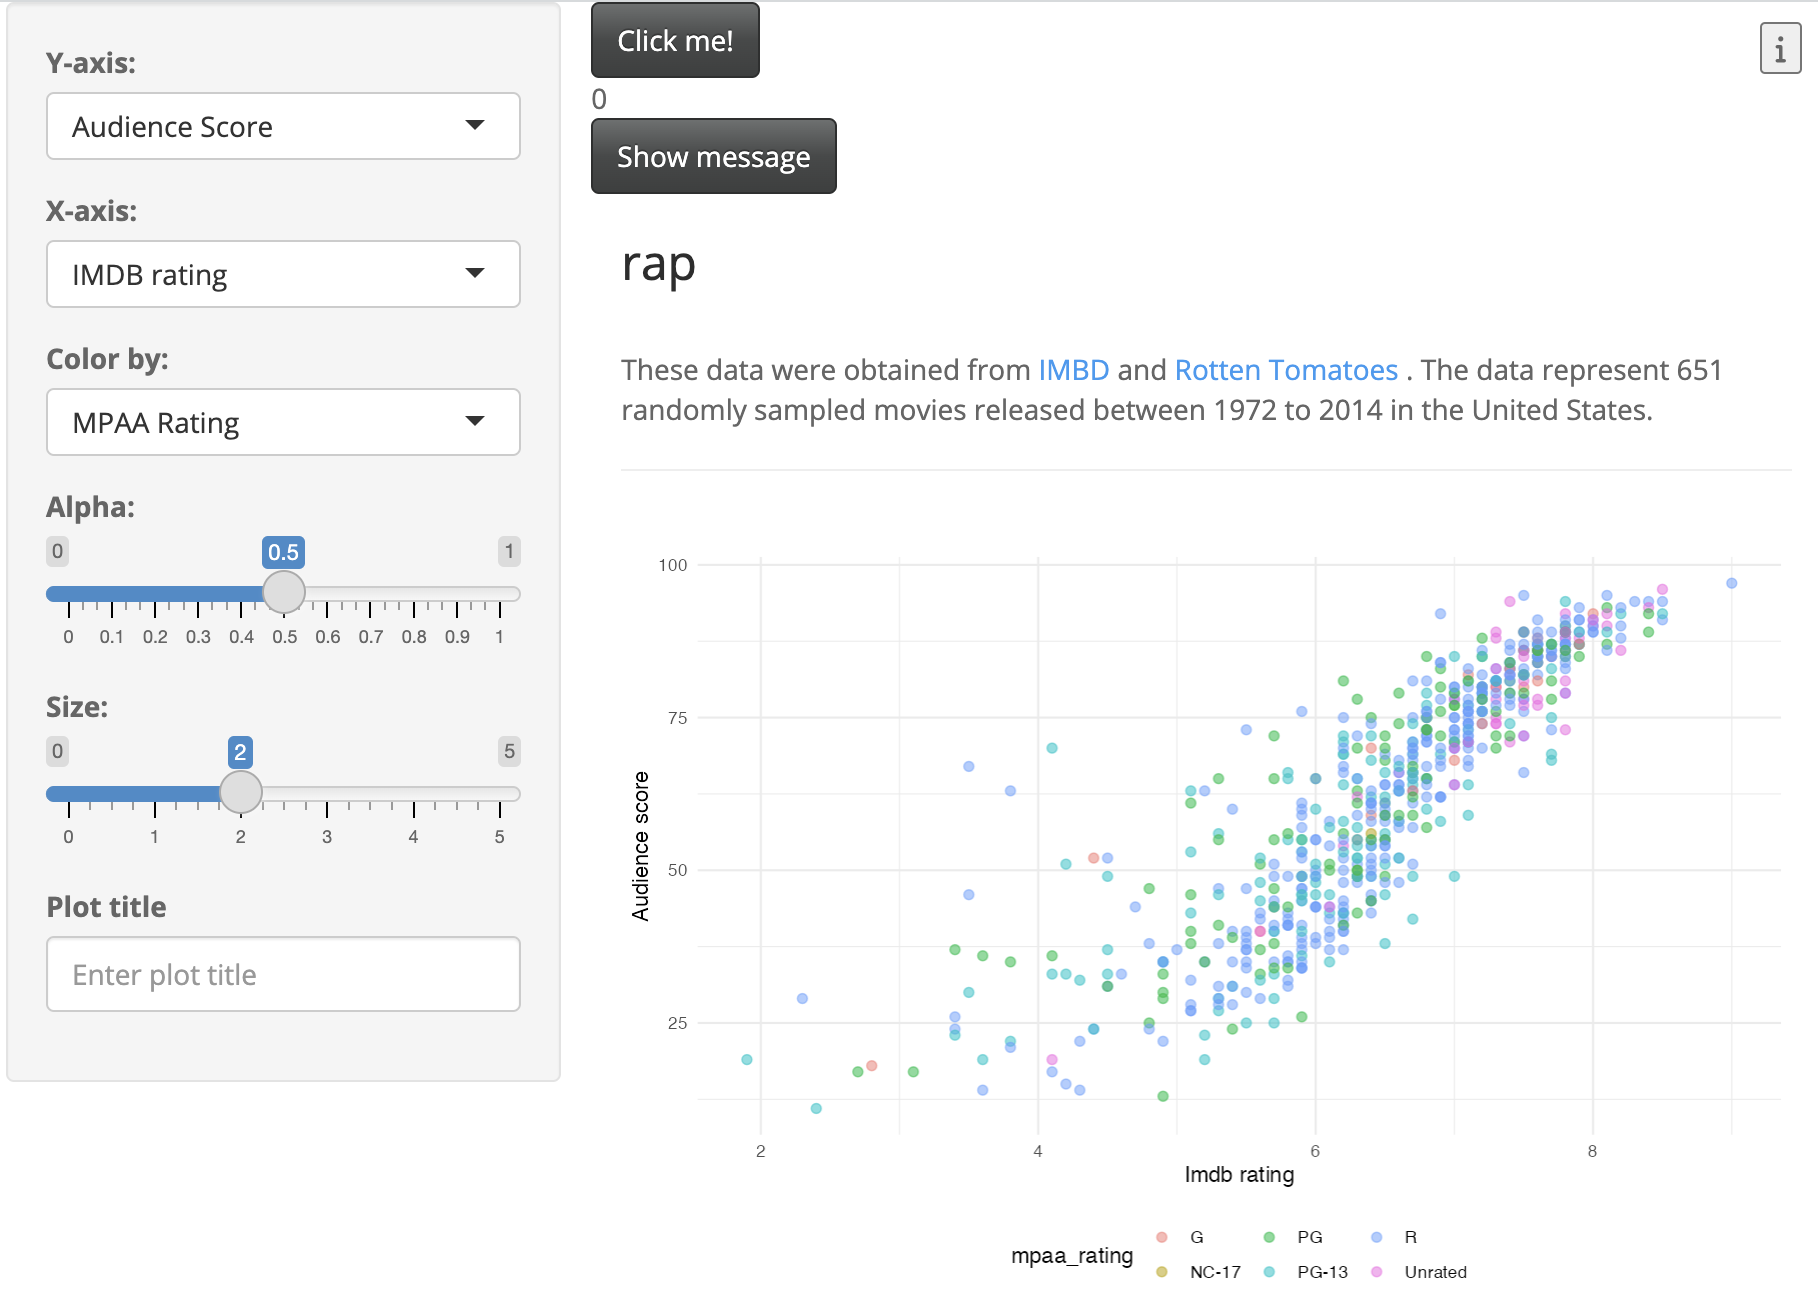
The new ‘clicks’ and ‘message’ buttons are visible when we launch our app:
Running Cypress tests
Cypress tests are stored in the tests/cypress/e2e/ folder:
tests
 └── cypress
        └── e2e
             └── app.cy.js
The initial call to rhino::test_e2e() should note if it is your first time using cypress (and might include an update or two).22
rhino::test_e2e()> test-e2e
> start-server-and-test run-app http://localhost:3333 run-cypress
1: starting server using command "npm run run-app"
and when url "[ 'http://localhost:3333' ]" is responding with HTTP status code 200
running tests using command "npm run run-cypress"
> run-app
> cd .. && Rscript -e "shiny::runApp(port = 3333)"
Loading required package: shiny
Listening on http://127.0.0.1:3333> run-cypress
> cypress run --project ../tests
It looks like this is your first time using Cypress: 13.6.2
[STARTED] Task without title.
[TITLE] Verified Cypress! /Users/mjfrigaard/Library/Caches/Cypress/13.6.2/Cypress.app
[SUCCESS] Verified Cypress! /Users/mjfrigaard/Library/Caches/Cypress/13.6.2/Cypress.app
Opening Cypress...
DevTools listening on ws://127.0.0.1:51925/devtools/browser/a47246ab-14bd-4c51-ad24-fec911eeb2d8
Opening `/dev/tty` failed (6): Device not configured
resize: can't open terminal /dev/tty
================================================================================
(Run Starting)
┌────────────────────────────────────────────────────────────────────────────────────────────────┐
│ Cypress: 13.6.2 │
│ Browser: Electron 114 (headless) │
│ Node Version: v23.11.0 (/usr/local/Cellar/node/23.11.0/bin/node) │
│ Specs: 1 found (app.cy.js) │
│ Searched: cypress/e2e/**/*.cy.{js,jsx,ts,tsx} │
└────────────────────────────────────────────────────────────────────────────────────────────────┘
────────────────────────────────────────────────────────────────────────────────────────────────────
Running: app.cy.js (1 of 1)
app
✓ starts (855ms)
1 passing (900ms)
(Results)
┌────────────────────────────────────────────────────────────────────────────────────────────────┐
│ Tests: 1 │
│ Passing: 1 │
│ Failing: 0 │
│ Pending: 0 │
│ Skipped: 0 │
│ Screenshots: 0 │
│ Video: false │
│ Duration: 0 seconds │
│ Spec Ran: app.cy.js │
└────────────────────────────────────────────────────────────────────────────────────────────────┘
Opening `/dev/tty` failed (6): Device not configured
resize: can't open terminal /dev/tty
================================================================================
(Run Finished)
Spec Tests Passing Failing Pending Skipped
┌────────────────────────────────────────────────────────────────────────────────────────────────┐
│ ✔ app.cy.js 903ms 1 1 - - - │
└────────────────────────────────────────────────────────────────────────────────────────────────┘
✔ All specs passed! 903ms 1 1 - - - The Cypress output lists the test file name as Spec or Specs, and gives us a detailed report of the test result and any artifacts (like videos or images).
Writing Cypress tests
I’ll include the first test for the app/view/message module from the rhino cypress tutorial in the tests/cypress/e2e/ folder:
// tests/cypress/integration/message.cy.js

describe("Show message", () => {
  beforeEach(() => {
    cy.visit("/");
  });

  it("'Show message' button exists", () => {
    cy.get(".message button").should("have.text", "Show message");
  });

});
I love the use of testthat’s BDD functions with cypress, because we can see the feature and scenario described in the test itself.
After adding the test to tests/cypress/ and running the test with rhino::test_e2e(), we see the following output:
> test-e2e
> start-server-and-test run-app http://localhost:3333 run-cypress

1: starting server using command "npm run run-app"
and when url "[ 'http://localhost:3333' ]" is responding with HTTP status code 200
running tests using command "npm run run-cypress"


> run-app
> cd .. && Rscript -e "shiny::runApp(port = 3333)"


> run-cypress
> cypress run --project ../tests

It looks like this is your first time using Cypress: 13.6.2

[STARTED] Task without title.
- The project is out-of-sync -- use `renv::status()` for details.
Loading required package: shiny

Listening on http://127.0.0.1:3333
[TITLE]  Verified Cypress!       /Users/mjfrigaard/Library/Caches/Cypress/13.6.2/Cypress.app
[SUCCESS]  Verified Cypress!       /Users/mjfrigaard/Library/Caches/Cypress/13.6.2/Cypress.app

Opening Cypress...

DevTools listening on ws://127.0.0.1:63378/devtools/browser/40f34544-11e4-4b1e-a919-caa05400f0f2

Opening `/dev/tty` failed (6): Device not configured
resize:  can't open terminal /dev/tty
================================================================================

  (Run Starting)

  ┌────────────────────────────────────────────────────────────────────────────────────────────────┐
  │ Cypress:        13.6.2                                                                         │
  │ Browser:        Electron 114 (headless)                                                        │
  │ Node Version:   v25.8.1 (/usr/local/Cellar/node/25.8.1_1/bin/node)                             │
  │ Specs:          2 found (app.cy.js, message.cy.js)                                             │
  │ Searched:       cypress/e2e/**/*.cy.{js,jsx,ts,tsx}                                            │
  └────────────────────────────────────────────────────────────────────────────────────────────────┘


────────────────────────────────────────────────────────────────────────────────────────────────────

  Running:  app.cy.js                                                                       (1 of 2)


  app
    ✓ starts (3631ms)


  1 passing (4s)


  (Results)

  ┌────────────────────────────────────────────────────────────────────────────────────────────────┐
  │ Tests:        1                                                                                │
  │ Passing:      1                                                                                │
  │ Failing:      0                                                                                │
  │ Pending:      0                                                                                │
  │ Skipped:      0                                                                                │
  │ Screenshots:  0                                                                                │
  │ Video:        false                                                                            │
  │ Duration:     3 seconds                                                                        │
  │ Spec Ran:     app.cy.js                                                                        │
  └────────────────────────────────────────────────────────────────────────────────────────────────┘


────────────────────────────────────────────────────────────────────────────────────────────────────

  Running:  message.cy.js                                                                   (2 of 2)


  Show message
    ✓ 'Show message' button exists (760ms)
    ✓ 'Show message' button shows the message' (1158ms)


  2 passing (2s)


  (Results)

  ┌────────────────────────────────────────────────────────────────────────────────────────────────┐
  │ Tests:        2                                                                                │
  │ Passing:      2                                                                                │
  │ Failing:      0                                                                                │
  │ Pending:      0                                                                                │
  │ Skipped:      0                                                                                │
  │ Screenshots:  0                                                                                │
  │ Video:        false                                                                            │
  │ Duration:     2 seconds                                                                        │
  │ Spec Ran:     message.cy.js                                                                    │
  └────────────────────────────────────────────────────────────────────────────────────────────────┘


Opening `/dev/tty` failed (6): Device not configured
resize:  can't open terminal /dev/tty
================================================================================

  (Run Finished)

       Spec                                              Tests  Passing  Failing  Pending  Skipped
  ┌────────────────────────────────────────────────────────────────────────────────────────────────┐
  │ ✔  app.cy.js                                00:03        1        1        -        -        - │
  ├────────────────────────────────────────────────────────────────────────────────────────────────┤
  │ ✔  message.cy.js                            00:02        2        2        -        -        - │
  └────────────────────────────────────────────────────────────────────────────────────────────────┘
    ✔  All specs passed!                        00:05        3        3        -        -        -


Execution halted
Interactive tests
After adding the second test for the app/view/message module, we’ll run the test using interactive = TRUE, which opens the Cypress app window:
rhino::test_e2e(interactive = TRUE)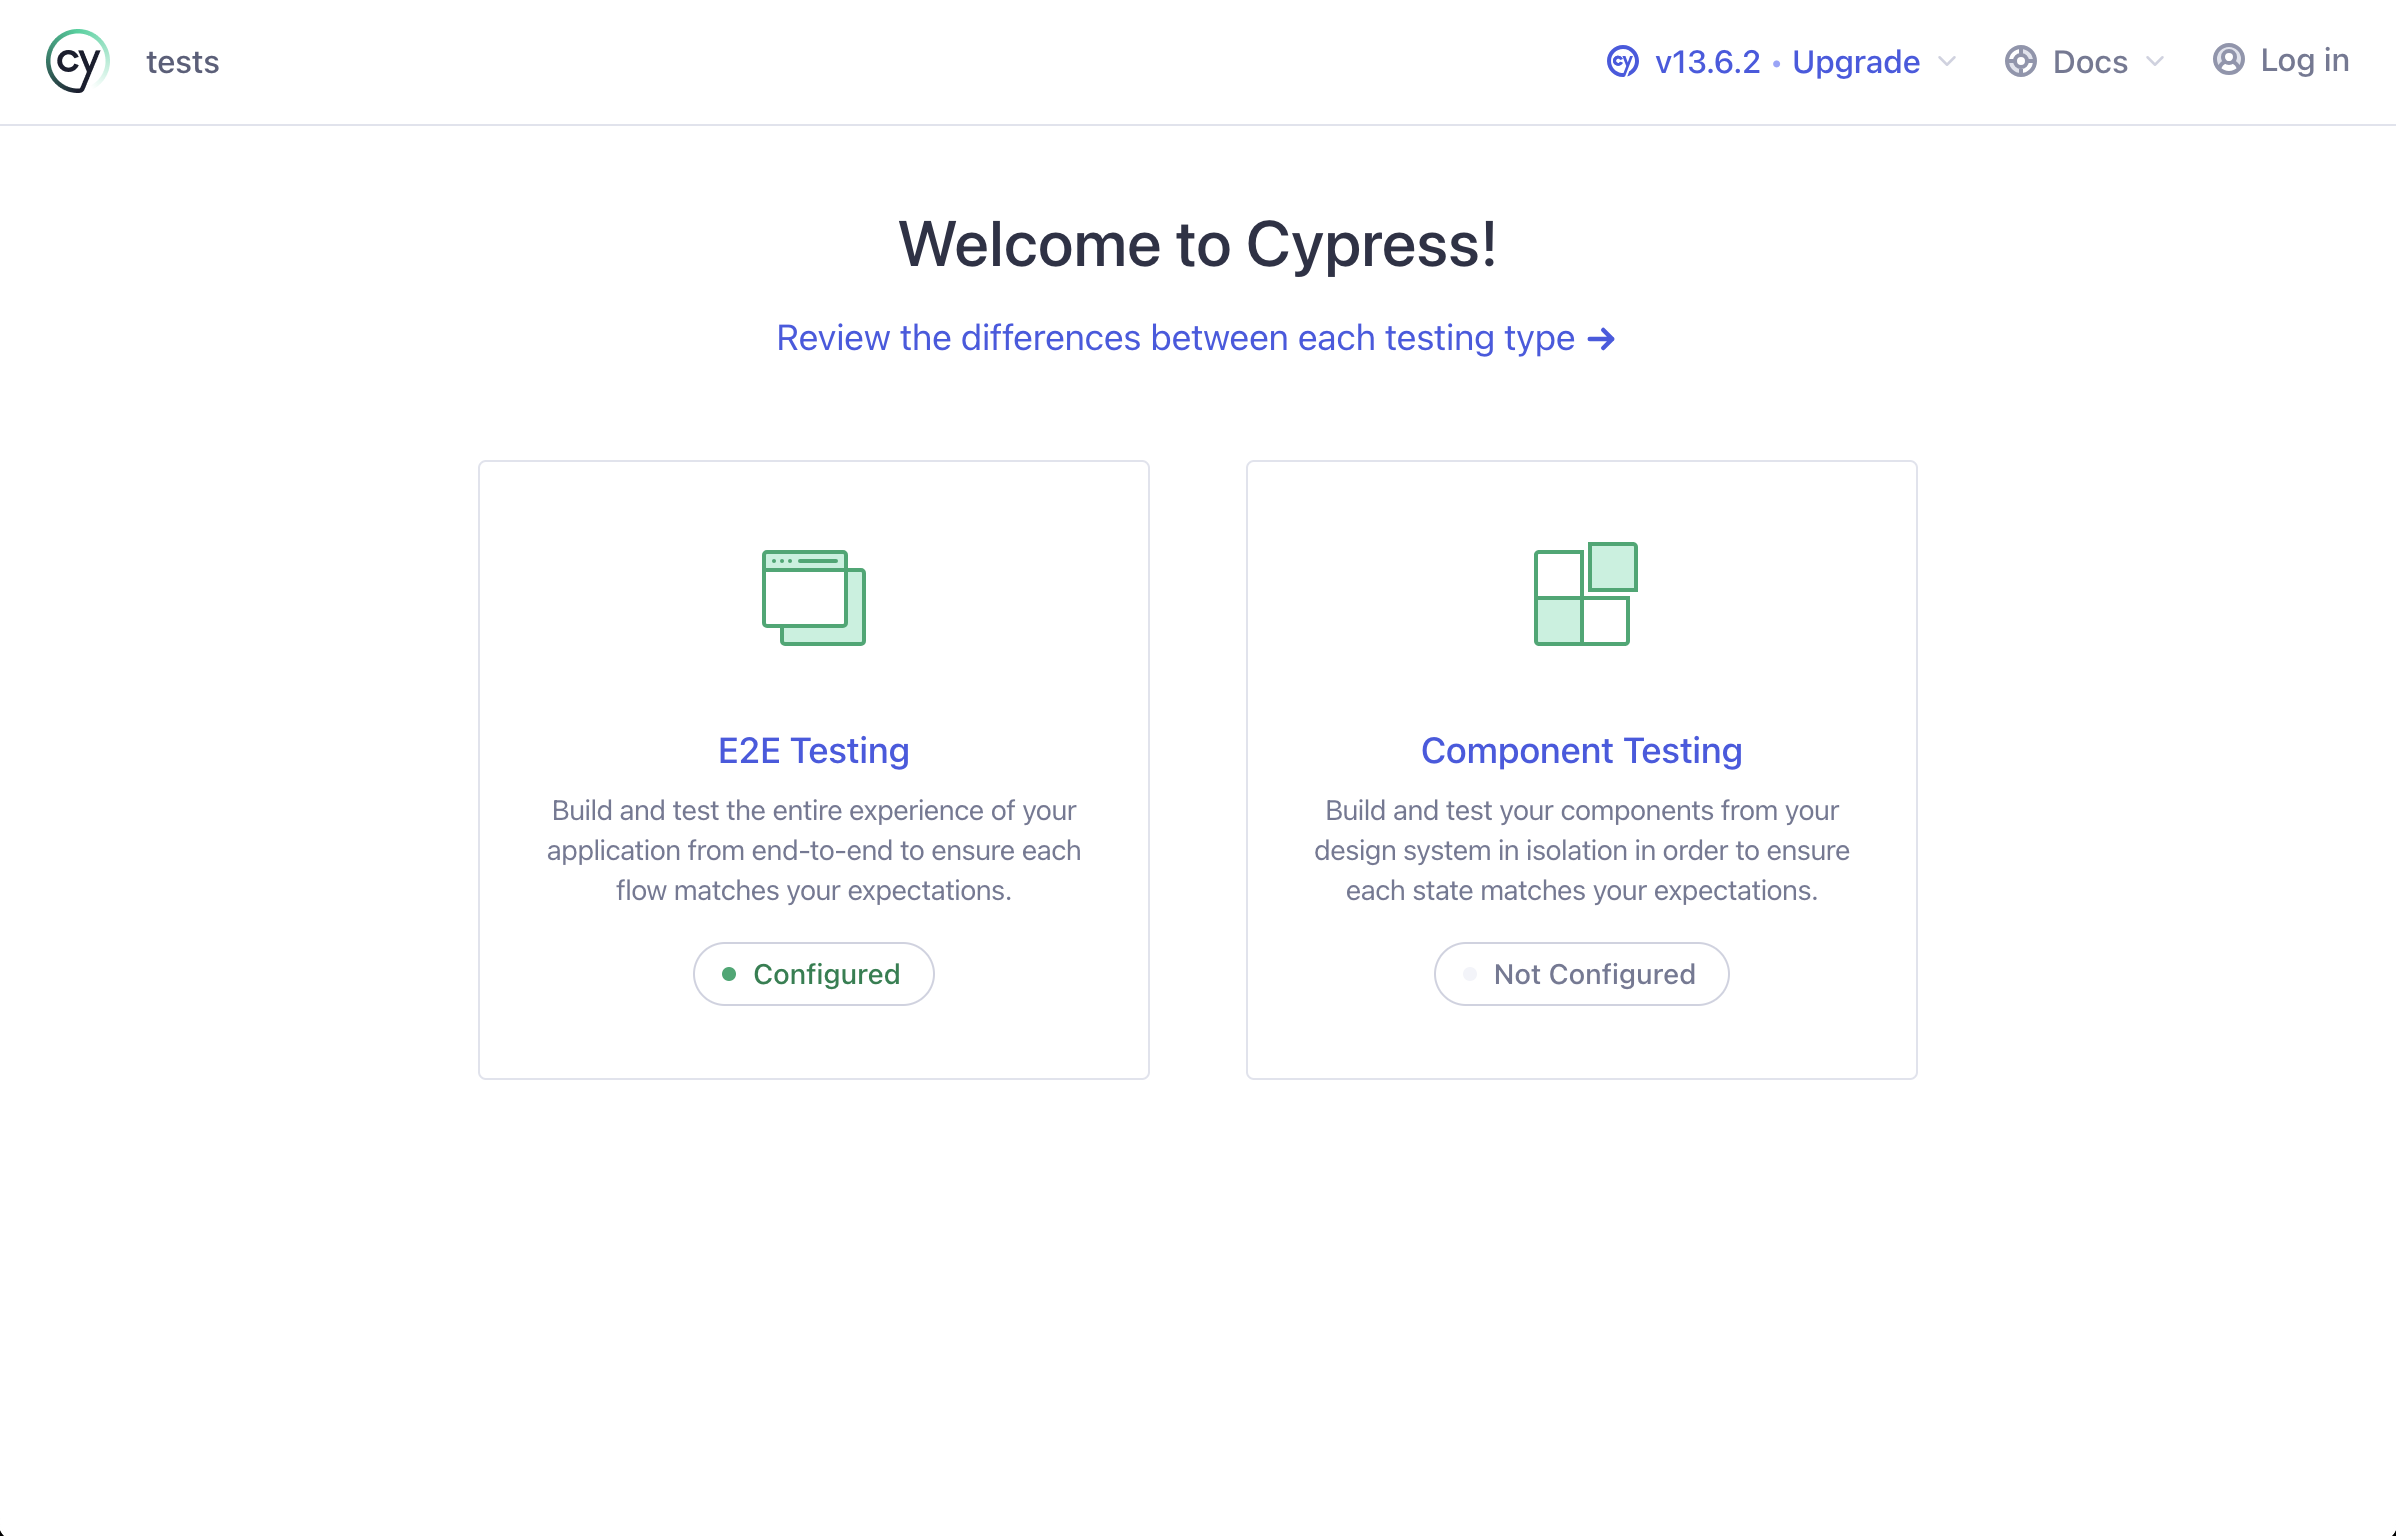
After the application opens, you’ll be able to select the browser (I have Chrome selected).
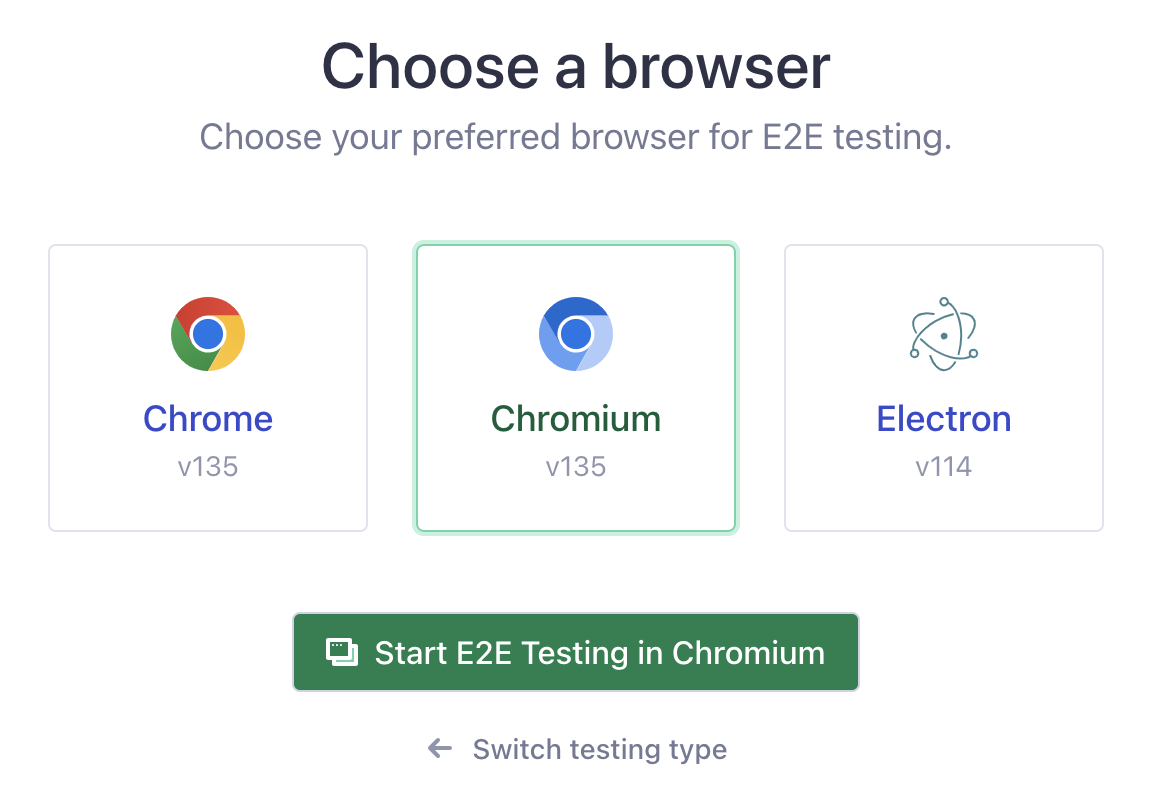
After clicking on Start E2E Testing in Chromium, Cypress will launch the application in Chromium. You’ll see the tests in the sidebar:
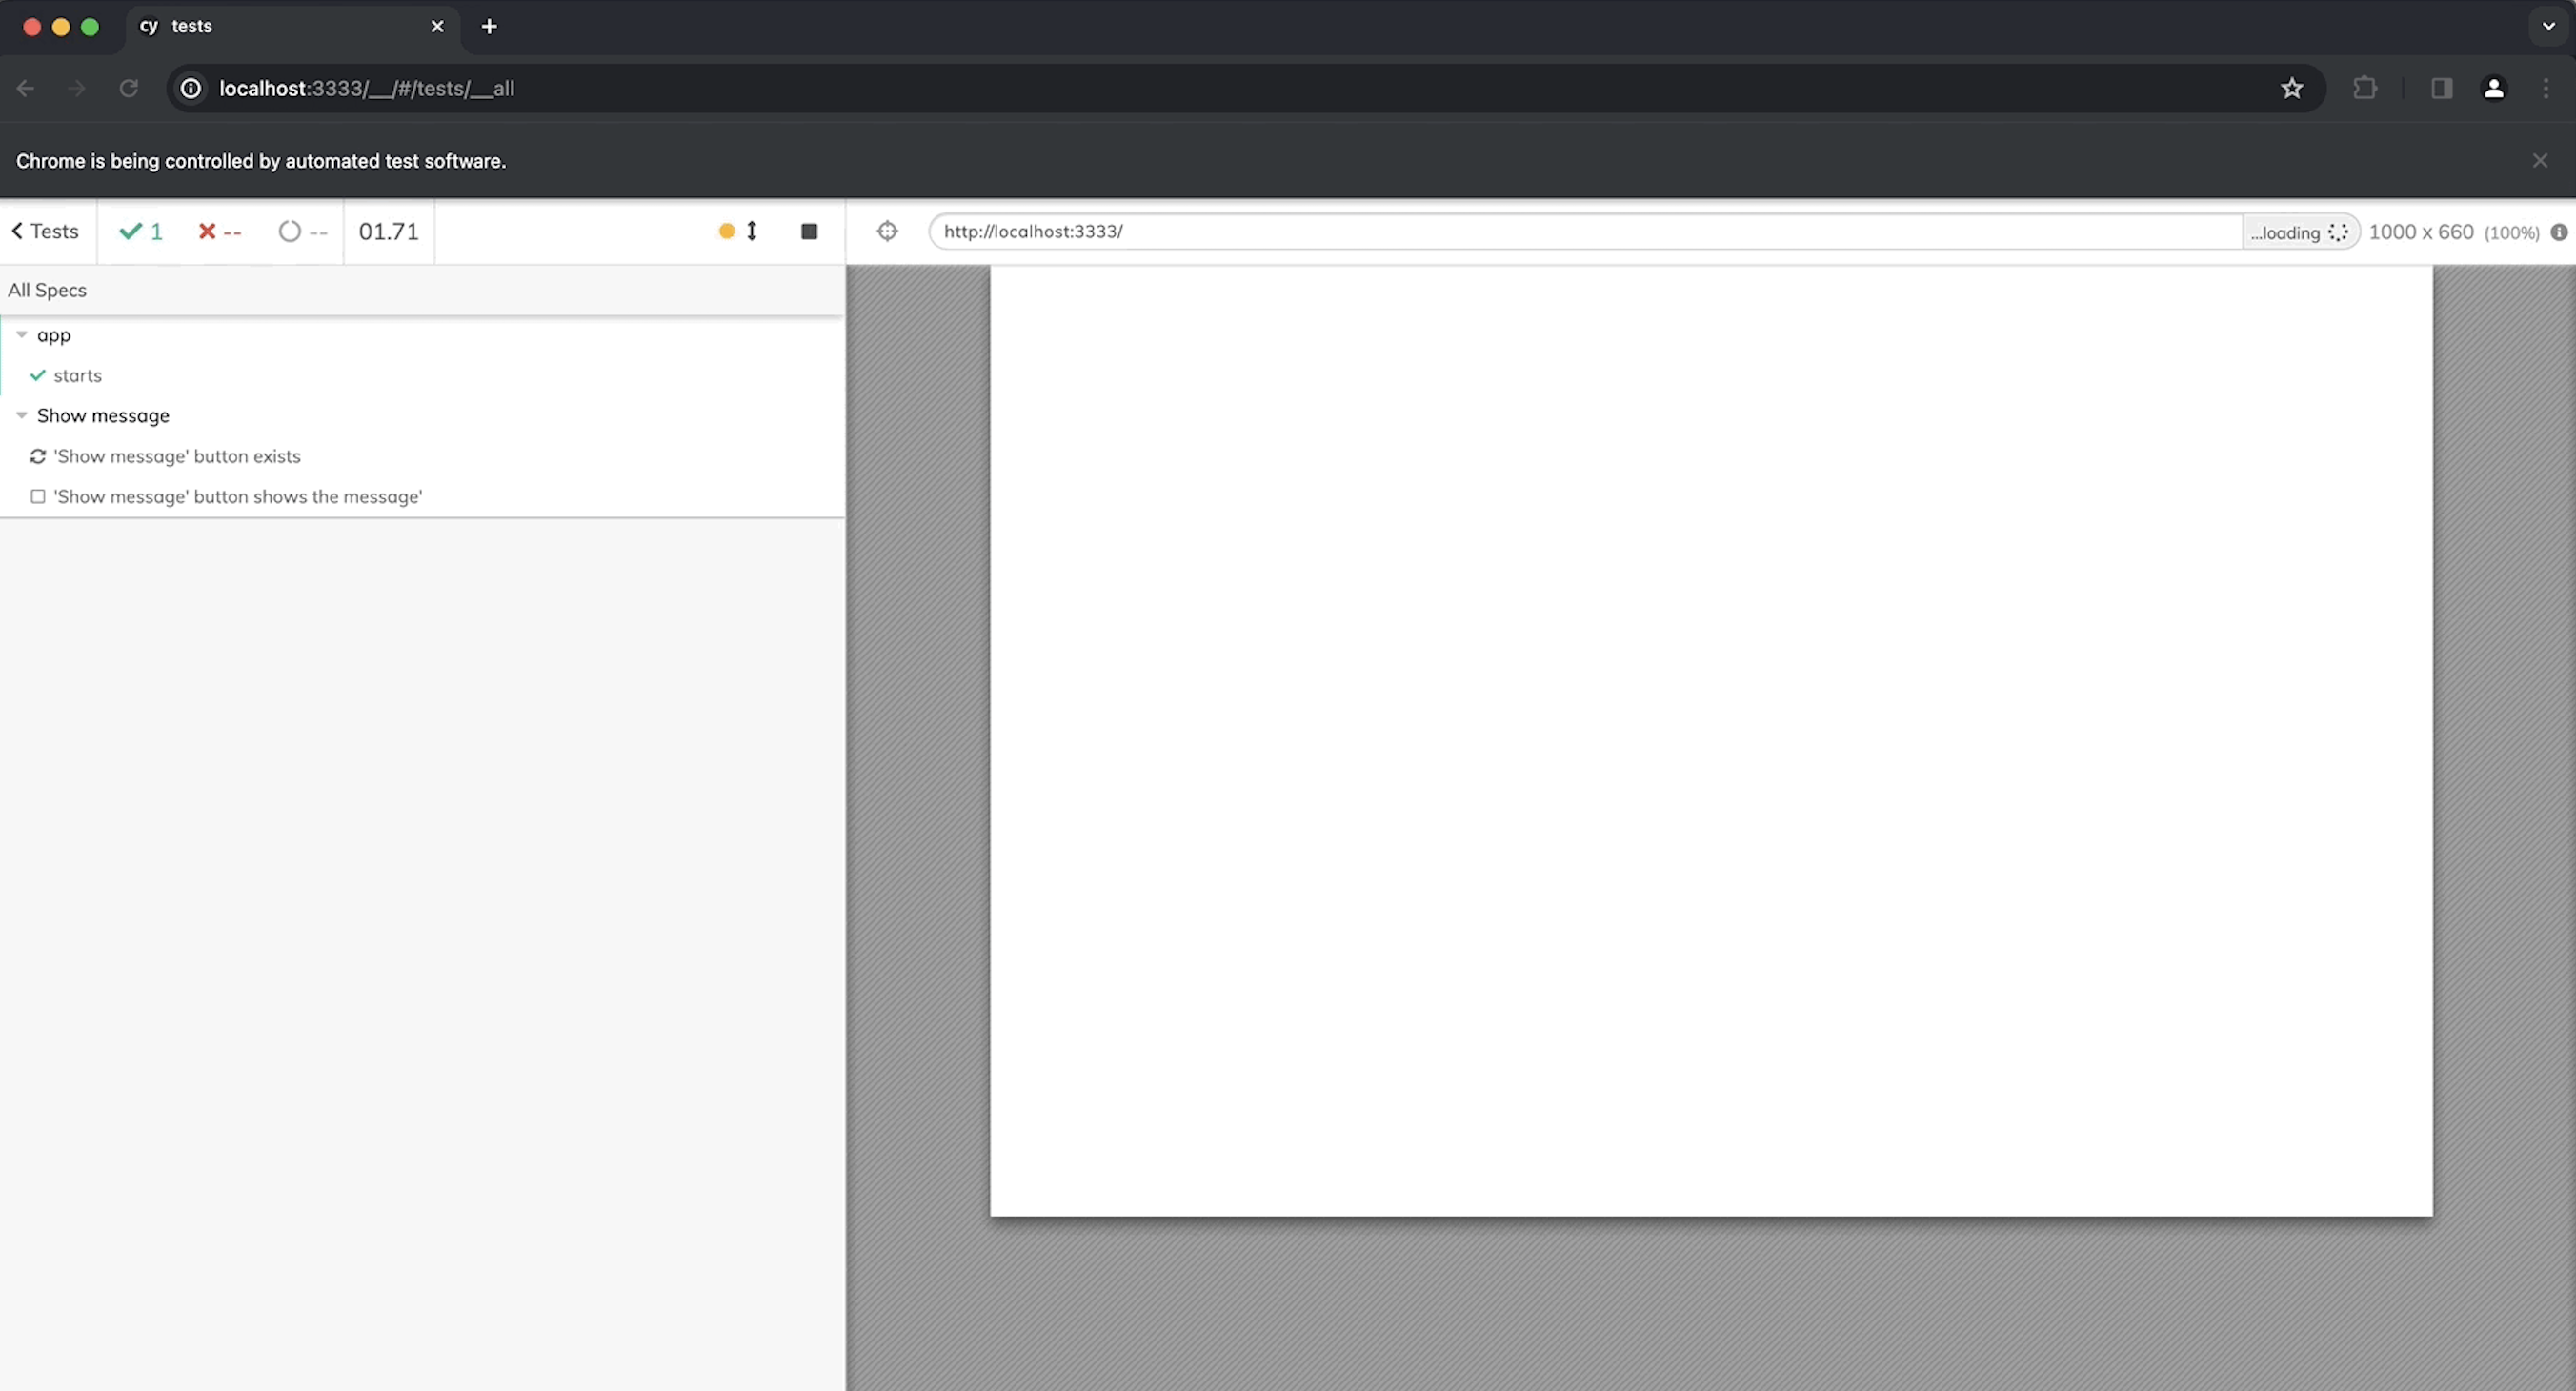
Select a test to open it and click on Run All Tests:
The Cypress documentation is worth reading through, because there are other features I haven’t covered here.
Recap
Most of the development takes place in
app/logicandapp/view(usingboxmodules). The separation of the ‘business logic’ workflow from the ‘app view’ code provides a nice division of labor for each module, and the use ofboxmodules make it easy to move components into the application inapp/main.R.New JavaScript or CSS code requires a corresponding
rhino(rhino::build_js()orrhino::build_sass()), and requires installing node.js.- These functions create output files in
app/static/js/app.min.jsandapp/static/css/app.min.cssthat are used in the application.
- These functions create output files in
Testing with
testthatis similar to a standard R package, but usingboxmodules in tests takes some getting used to.- Cypress tests are an excellent way to perform end-to-end tests (faster than
shinytest2), but requires some overhead in learning the syntax (which combinestestthatfunctions with CSS selectors, etc.).
- Cypress tests are an excellent way to perform end-to-end tests (faster than
Footnotes
rhinohas a ‘minimalapp.R’ philosophy, and the call torhino::app()performs multiple operations beyondshiny::runApp()↩︎Read more about how to use
config.ymlin the Environments section of the How to: Manage secrets and environments vignette.↩︎Read more about
rhino.ymlin the Explanation: Configuring Rhino - rhino.yml vignette. The code below showcases the optional arguments (and is not included in the application).↩︎dependencies.Ris covered in the Manage Dependencies vignette on the package website.↩︎Read more about getting started with
renv.↩︎Testing with Cypress is also covered in the ‘Use
shinttest2vignette’.↩︎Read more about
rhinounit tests↩︎Add-on packages can also be included in R packages by adding the
@importFromor@importtags fromroxygen2, which writes theNAMESPACEdirectives↩︎install.packages()downloads and installs packages from a repo like CRAN or GitHub, andlibrary(orrequire) loads and attaches the add-on packages to the search list.↩︎Adding a package to the
Importsfield in theDESCRIPTIONwill download/install the add-on package when your package is installed, but not attach it to the search list (theDependsfield will install and attach the package).↩︎library(tidyverse)is typically used to install the core tidyverse packages (ggplot2,dplyr,tidyr,readr,purrr,tibble,stringr,forcats), but this is not advised during package development.↩︎This is how
box“completely replaces the base Rlibraryandrequirefunctions” -boxdocumentation.↩︎I’d start with “the hierarchy of module environments” vignette. I’ve also created a collection of
boxmodule examples in therboxrepo.↩︎rhinoapps come with anapp/logic/folder, which is used to store code for “data manipulation, generating non-interactive plots and graphs, or connecting to an external data source, but outside of definable inputs, it doesn’t interact with or rely on shiny in any way.”↩︎The
movies.csvfile comes from the07_databranch of sap.↩︎The
__init__.Rfiles are covered on therhinowebsite↩︎These system tests are written for a Shiny app in a standard R package.↩︎
These steps are covered in the Appsilon article, ‘How-to: Use shinytest2’.↩︎
This is referenced in the Cypress tutorial when trying to identify the text output from the
app/view/messagemodule.↩︎This test is covered in BDD test templates section of Shiny App-Packages.↩︎
The
rhinodocumentation also mentions updates, ‘since this is the first time you use one of the functionalities that depend on Node.js, it needs to install all the required libraries. Don’t worry, this is just a one-time step and is done automatically.’↩︎