%%{init: {'theme': 'base', 'themeVariables': {'fontFamily': 'monospace'}}}%%
graph TD
subgraph T1["<strong>API Server</strong>"]
RunApi("<strong>Run<br>mod-api.py</strong>") --"create"--> VetMod("<strong>VetiverModel</strong>")
VetMod --"convert to"--> VetAPI("<strong>VetiverAPI</strong>")
VetAPI --"extract"--> FastAPI("<strong>FastAPI</strong>")
end
style RunApi stroke-width:1px, rx:20, ry:20, font-size:16px
subgraph Browse["<strong>Browser</strong>"]
Http("`Got to <strong>http://</strong><strong>127.0.0.1:8080/</strong>`") --"<code>/docs</code>"--> Docs("API Docs")
Http --"<code>/ping</code>"--> Health("<strong>Health Check</strong>")
Http --"<code>/metadata</code>"--> Info("<strong>Model Info</strong>")
Docs & Health & Info --> FastAPI
end
style T1 fill:#fbf7ec,stroke:#5B8C5A,color:#000000
style RunApi fill:#5B8C5A,stroke:#000000,stroke-width:1px,color:#ffffff
style VetMod fill:#D2562B,stroke:#000000,stroke-width:1px,color:#ffffff
style VetAPI fill:#D2562B,stroke:#000000,stroke-width:1px,color:#ffffff
style FastAPI fill:#2A6F77,stroke:#000000,stroke-width:1px,color:#ffffff
style Browse fill:#fbf7ec,stroke:#2A6F77,color:#1B2A41
style Http fill:#5B8C5A,stroke:#000000,stroke-width:1px,color:#ffffff
style Docs fill:#D2562B,stroke:#000000,stroke-width:1px,color:#ffffff
style Health fill:#D2562B,stroke:#000000,stroke-width:1px,color:#ffffff
style Info fill:#D2562B,stroke:#000000,stroke-width:1px,color:#ffffff
Python App & API
In lab 2, we created a Python model with scikit-learn, converted it into a VetiverModel, saved it in a pins board folder, then created a VetiverAPI. The files we created in lab 2 are displayed in the folder tree below:1
_labs/lab02/model-vetiver/
├── model-vetiver.html
├── model-vetiver.qmd
├── models
│   └── penguin_model
│       └── 20250808T102850Z-aba30
│           ├── data.txt
│           └── penguin_model.joblib
└── my-db.duckdb
Set up
In this lab, I’ll be using Positron to develop the Vetiver API amd Shiny for Python app. I’m still new to programming in Python, so it took a bit longer to get the Vetiver API and Shiny app working together.
Below are a few pointers to help you avoid making some of the mistakes I made:
- Set up the API and app in different folders
- Create and activate Python virtual environments (
venv) in each project
- Create prototype data for API
- Run the API (
mod-api.py) and confirm API is working
- Launch app and confirm API requests
API
The Python script _labs/lab03/Python/api/mod-api.py will run the code for our Vetiver/FastAPI in a dedicated Positron/Terminal session. I’ve made a few changes to this version, but it creates an API with the same endpoints:
Libraries, warnings, and environment variables
First, we’ll import warnings use warnings.filterwarnings() to silence the SSL compatibility warnings between LibreSSL (macOS) and urllib3 (this is probably specific to my machine).
Then we’ll include os.environ['PINS_ALLOW_PICKLE_READ'] = '1' to set an environment variable that allows reading pickle/joblib files (this is like a ‘security override’).
Third, we’ll also add uvicorn and pandas to the core libraries for ML serving, and model storage.
# pkgs
import warnings
warnings.filterwarnings("ignore", message=".*urllib3 v2 only supports OpenSSL.*")

import os
os.environ['PINS_ALLOW_PICKLE_READ'] = '1'

import vetiver
import pins
import uvicorn
import pandas as pd
Read ‘pinned’ model
pins.board_folder() creates a connection to the file-based model registry from lab 2. It will locate the specific model version (using the timestamp-based folders).
model_board.pin_read() deserializes the joblib file back into a live Python object and returns the raw scikit-learn model (NOT a vetiver object yet).
model_board = pins.board_folder("../../../lab02/model-vetiver/models/")
sklearn_model = model_board.pin_read("penguin_model")
print(f":-] Successfully loaded model: {type(sklearn_model)}")- 1
- connect to model board from lab02
- 2
-
read pinned model
- 3
- print model type for confirmation
print() gives us a message (or some debugging info) after the model is read from the pins board:
:-] Successfully loaded model: <class 'sklearn.linear_model._base.LinearRegression'>Model schema
The if condition below will check if the model remembers the names of the input columns (feature_names_in_) it was trained with.2
if hasattr(sklearn_model, 'feature_names_in_'):
feature_names = sklearn_model.feature_names_in_
print(f"Model expects features: {list(feature_names)}")- 1
- check what features model expects
If so, it will store these columns we expect in feature_names and we’ll see:
Model expects features: ['bill_length_mm', 'species_Chinstrap', 'species_Gentoo', 'sex_male']Create prototype data
Now we’ll create prototype_data with pandas.DataFrame() and the fill it in the with realistic example values:
# ... continued from above...
def get_prototype_value(column_name):
"""Get appropriate default value for each column type"""
if 'bill_length' in column_name:
return 45.0
elif 'species_Gentoo' in column_name:
return 1
elif 'sex_male' in column_name:
return 1
else:
return 0
prototype_data = pd.DataFrame({
name: [get_prototype_value(name)] for name in feature_names
})- 1
-
Define prototype value logic
- 2
-
set reasonable defaults (based on penguin data)
- 3
-
Create prototype data directly
- 4
-
Create
prototype_datausing model’s expected features
However, if our model doesn’t have the feature_names_in_, we’ll create a ‘best guess’ prototype_data (based on what we know about the penguins dataset).
# ... continued from above...
else:
print("Model doesn't have feature_names_in_, using estimated prototype")
prototype_data = pd.DataFrame({
"bill_length_mm": [45.0],
"species_Chinstrap": [0],
"species_Gentoo": [1],
"sex_male": [1]
})- 1
- original R model structure
Print outputs
I’ve written four print() statements below to provide confirmation (or debugging info) for prototype_data’s 1) shape (dimensions), 2) column names, and 3) the full structure:
print("Prototype data shape:", prototype_data.shape)Prototype data shape: (1, 4)print("Prototype columns:", list(prototype_data.columns))Prototype columns: ['bill_length_mm', 'species_Chinstrap', 'species_Gentoo', 'sex_male']print("Sample data:")
print(prototype_data)Sample data:
bill_length_mm species_Chinstrap species_Gentoo sex_male
0 45.0 0.0 1 1The prototype_data can be used for API input validation and documentation.
Create VetiverModel
The code below will convert the scikit-learn model (as sklearn_model) into a Vetiver Model again, using the prototype_data. This is stored as v:
# wrap as VetiverModel
v = vetiver.VetiverModel(
    model=sklearn_model,
    model_name="penguin_model",
    prototype_data=prototype_data
)
print(f":-] Created VetiverModel: {type(v)}")
If successful, we’ll see the output below list vetiver.vetiver_model.VetiverModel as the class of type(v):
:-] Created VetiverModel: <class 'vetiver.vetiver_model.VetiverModel'>Recall that vetiver.VetiverModel() wraps the raw model with MLOps metadata and adds the input validation schema based on prototype_data. Now we have a standardized API and prediction interface.
Create API
Below we create vetiver_api and app:
vetiver.VetiverAPI()automatically generates REST API endpoints around the model, generating routes with standard ML serving endpoints
check_prototype=Trueensures requests match training data format.We can extract the
FastAPIinstance with.app
vetiver_api = vetiver.VetiverAPI(v, check_prototype=True)
app = vetiver_api.app- 1
-
VetiverAPIconverts our Vetiver model (v) to an API
- 2
-
.appis the actual web application object for serving the API
The print() statement below will tell us if the .app extracted the FastAPI app:
print(f"FastAPI app type: {type(app)}")FastAPI app type: <class 'fastapi.applications.FastAPI'>The diagram below gives an overview of how the VetivierModel() is converted into an API, then the FastAPI web application is extracted.
%%{init: {'theme': 'base', 'themeVariables': {'fontFamily': 'monospace'}}}%%

graph TB
    Mod("<strong>VetiverModel</strong>") --> VApiCon("<strong>VetiverAPI<br>Wrapper</strong>")
    VApiCon --"generates"--> FastAPI("<strong>FastAPI<br>Routes</strong>")

    FastAPI --> Post("<strong>POST /predict</strong>")
    FastAPI --> GetPing("<strong>GET /ping</strong>")
    FastAPI --> GetMeta("<strong>GET /metadata</strong>")
    FastAPI --> GetDocs("<strong>GET /docs</strong>")

    CheckProt("<strong>check_prototype=True</strong>") --> Input("<strong>Enable Input<br>Validation</strong>")

    VApiCon --"creates"--> VApiObj("<strong>VetiverAPI<br>object</strong>")
    VApiObj --"with"--> AppAttr("<strong>.app attribute</strong>")

    AppAttr --"contains"--> FastAPIApp("<strong>FastAPI<br>application</strong> ")

    style Mod fill:#5B8C5A,stroke:#000000,stroke-width:1px,color:#ffffff
    style CheckProt fill:#5B8C5A,stroke:#000000,stroke-width:1px,color:#ffffff
    style Input fill:#2A6F77,stroke:#000000,stroke-width:1px,color:#ffffff
    style VApiCon fill:#D2562B,stroke:#000000,stroke-width:1px,color:#ffffff
    style FastAPI fill:#2A6F77,stroke:#000000,stroke-width:1px,color:#ffffff

    style Post fill:#485466,stroke:#000000,stroke-width:1px,color:#ffffff
    style GetPing fill:#485466,stroke:#000000,stroke-width:1px,color:#ffffff
    style GetMeta fill:#485466,stroke:#000000,stroke-width:1px,color:#ffffff
    style GetDocs fill:#485466,stroke:#000000,stroke-width:1px,color:#ffffff

    style VApiObj fill:#D2562B,stroke:#000000,stroke-width:1px,color:#ffffff
    style AppAttr fill:#D2562B,stroke:#000000,stroke-width:1px,color:#ffffff

    style FastAPIApp fill:#2A6F77,stroke:#000000,stroke-width:1px,color:#ffffff
Print outputs
The print statements below will provide messages/debugging information and links to the documents/health check/metadata.
if __name__ == "__main__":
    print(":-] Starting Penguin Model API...")
    print(":-] API Documentation: http://127.0.0.1:8080/docs")
    print(":-] Health Check: http://127.0.0.1:8080/ping")
    print(":-] Model Info: http://127.0.0.1:8080/metadata")
    uvicorn.run(app, host="127.0.0.1", port=8080)
Launch the API
In a new Terminal, run the following:
python3 mod-api.pyIn the console, you’ll see the following:
:-] Created VetiverModel: <class 'vetiver.vetiver_model.VetiverModel'>
FastAPI app type: <class 'fastapi.applications.FastAPI'>
:-] Starting Penguin Model API...
:-] API Documentation: http://127.0.0.1:8080/docs
:-] Health Check: http://127.0.0.1:8080/ping
:-] Model Info: http://127.0.0.1:8080/metadata
INFO:     Started server process [74880]
INFO:     Waiting for application startup.
INFO:     VetiverAPI starting...
INFO:     Application startup complete.
INFO:     Uvicorn running on http://127.0.0.1:8080 (Press CTRL+C to quit)
The FastAPI UI is automatically generated and provides interactive API documentation, and the Vetiver will be useful for developing our Shiny for Python app.
FastAPI Interface
If you click on the link for the API Documentation (http://127.0.0.1:8080/docs), you’ll see the following:
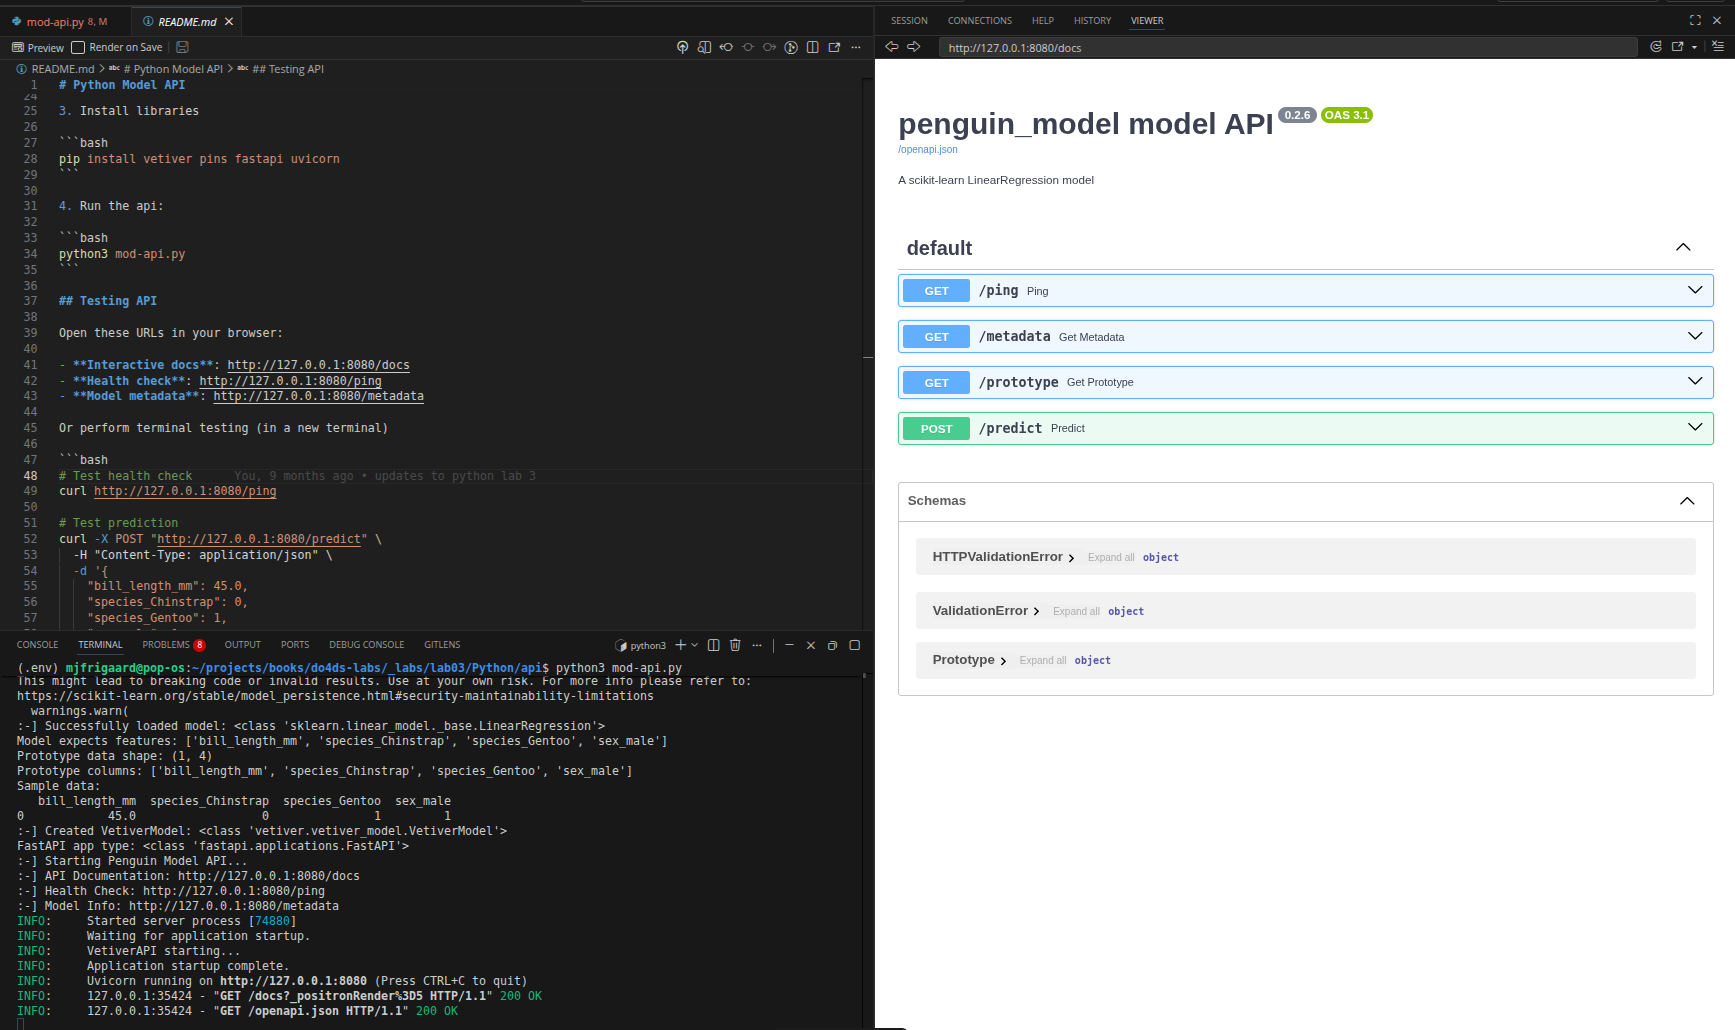
The FastAPI UI shows four automatically created endpoints:
| Endpoint | Description | Purpose | Return/Input | Shiny Use |
|---|---|---|---|---|
GET /ping |
Health check | Verify API is running | Returns: Simple OK status | Connection validation before predictions |
GET /metadata |
Model info | Get model details, version, training info | Returns: Model metadata | Display model info to users, debugging |
GET /prototype |
Input schema | Shows expected input format | Returns: Example of required data structure | Validate the app sends correct format |
POST /predict |
Make predictions | The main endpoint for predictions | Input: List of penguin feature records Returns: Prediction results |
Core functionality of the app |
The bottom three sections of the FastAPI UI shows the Schema Information:
- HTTPValidationError: What error responses look like
- ValidationError: Specific field validation failures
- Prototype: Exact input schema expected
Vetiver Interface
The Vetiver UI (at http://127.0.0.1:8080/) is the model card landing page generated by VetiverAPI.
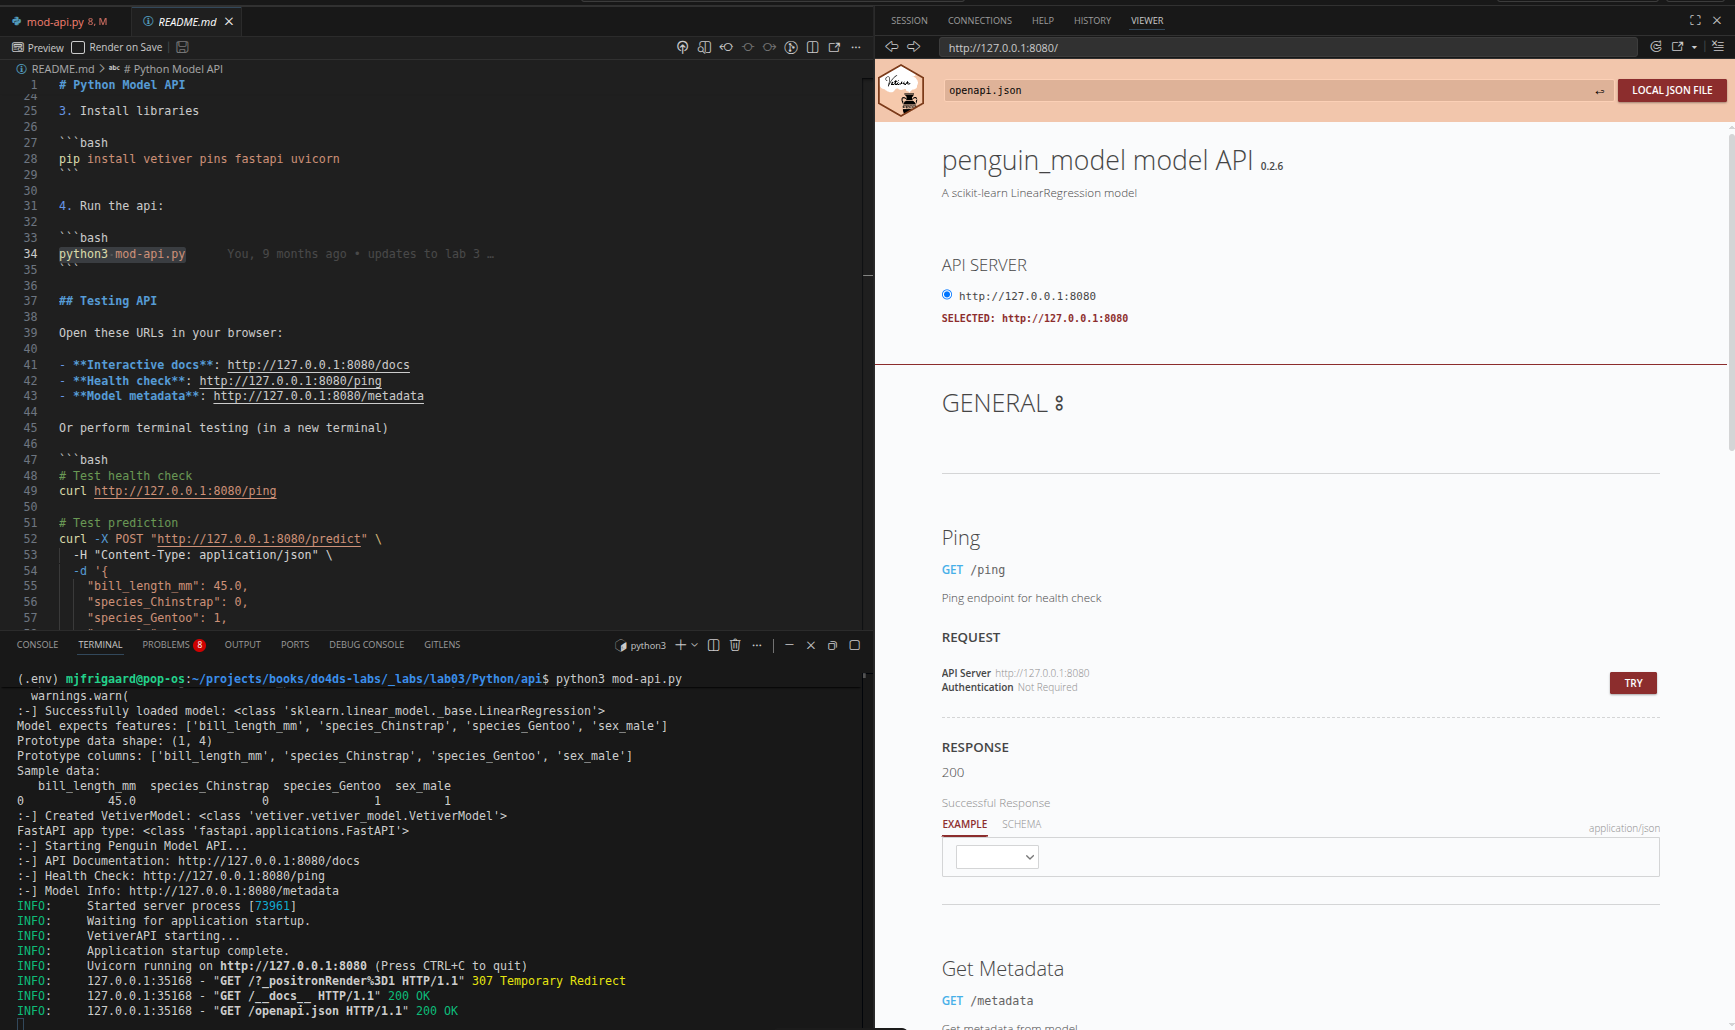
It shows the deployed model’s identity and input contract rather than the raw HTTP endpoint list:
| Section | Description | Content | Purpose |
|---|---|---|---|
| Model Name | Deployed model ID | penguin_model |
Confirm the correct model is loaded |
| Model Type | ML framework class | sklearn.linear_model.LinearRegression |
Verify the model class matches training |
| Prototype | Input schema | Column names and types: bill_length_mm, species_Chinstrap, species_Gentoo, sex_male |
Validate the app sends the correct fields and data types |
| API Documentation link | Route to Swagger | Link to /docs |
Open the interactive FastAPI UI |
| Health check link | Route to ping | Link to /ping |
Confirm API is live before making calls |
| Model metadata link | Route to metadata | Link to /metadata |
Inspect version, packages, Python info |
The key difference between the two UIs: the Vetiver page documents what the model is (identity, prototype, links); the FastAPI /docs page documents how to call it (HTTP verbs, request bodies, response schemas).
Test the API
To test, create multiple Terminal sessions: one to run the API and a second for API testing (and a third to run the Shiny App). Also, preview the API links in the browser.
%%{init: {'theme': 'base', 'themeVariables': {'fontFamily': 'monospace'}}}%%

graph TD
    subgraph T1["<strong>API</strong>"]
        RunApi("Run<br>mod-api.py") --"create"--> VetMod("<strong>VetiverModel</strong>")
        VetMod --"convert to"--> VetAPI("<strong>VetiverAPI</strong>")
        VetAPI --"extract"--> FastAPI("<strong>FastAPI</strong>")
    end

    subgraph T2["<strong>Test</strong>"]
        Curl("<strong>curl</strong><br>commands") --> ManPostReq("Manual<br>POST<br>request")
        ManPostReq --> FastAPI
        FastAPI --> JSONReq("JSON<br>Response<br>Test")
        JSONReq --> VerAPI("Verify<br>API Works")
    end

    subgraph Browse["<strong>Browser</strong>"]
        Http("`Got to <strong>http://</strong><strong>127.0.0.1:8080/</strong>`") --"<strong>/docs</strong>"--> Docs("API Docs")
        Http --"<strong>/ping</strong>"--> Health("Health Check")
        Http --"<strong>/metadata</strong>"--> Info("Model Info")
        Docs & Health & Info --> FastAPI
    end

    style T1 fill:#fbf7ec,stroke:#5B8C5A,color:#1B2A41
    style RunApi fill:#5B8C5A,stroke:#000000,stroke-width:1px,color:#ffffff
    style VetMod fill:#D2562B,stroke:#000000,stroke-width:1px,color:#ffffff
    style VetAPI fill:#D2562B,stroke:#000000,stroke-width:1px,color:#ffffff
    style FastAPI fill:#2A6F77,stroke:#000000,stroke-width:1px,color:#ffffff

    style T2 fill:#fbf7ec,stroke:#2A6F77,color:#1B2A41
    style Curl fill:#5B8C5A,stroke:#000000,stroke-width:1px,color:#ffffff
    style ManPostReq fill:#D2562B,stroke:#000000,stroke-width:1px,color:#ffffff
    style JSONReq fill:#485466,stroke:#000000,stroke-width:1px,color:#ffffff
    style VerAPI fill:#485466,stroke:#000000,stroke-width:1px,color:#ffffff

    style Browse fill:#fbf7ec,stroke:#2A6F77,color:#1B2A41
    style Http fill:#5B8C5A,stroke:#000000,stroke-width:1px,color:#ffffff
    style Docs fill:#D2562B,stroke:#000000,stroke-width:1px,color:#ffffff
    style Health fill:#D2562B,stroke:#000000,stroke-width:1px,color:#ffffff
    style Info fill:#D2562B,stroke:#000000,stroke-width:1px,color:#ffffff
ping (health check)
Test if API is running with a simple ping:
curl http://127.0.0.1:8080/pingExpected response:
{'ping': 'pong'}Model metadata
Get information about the model (version, feature names, etc.) from the API metadata:
curl http://127.0.0.1:8080/metadataExpected response:
{
  "user":{},
  "version":null,
  "url":null,
  "required_pkgs":["scikit-learn"],
  "python_version":[3,9,6,"final",0]
}
Prediction requests
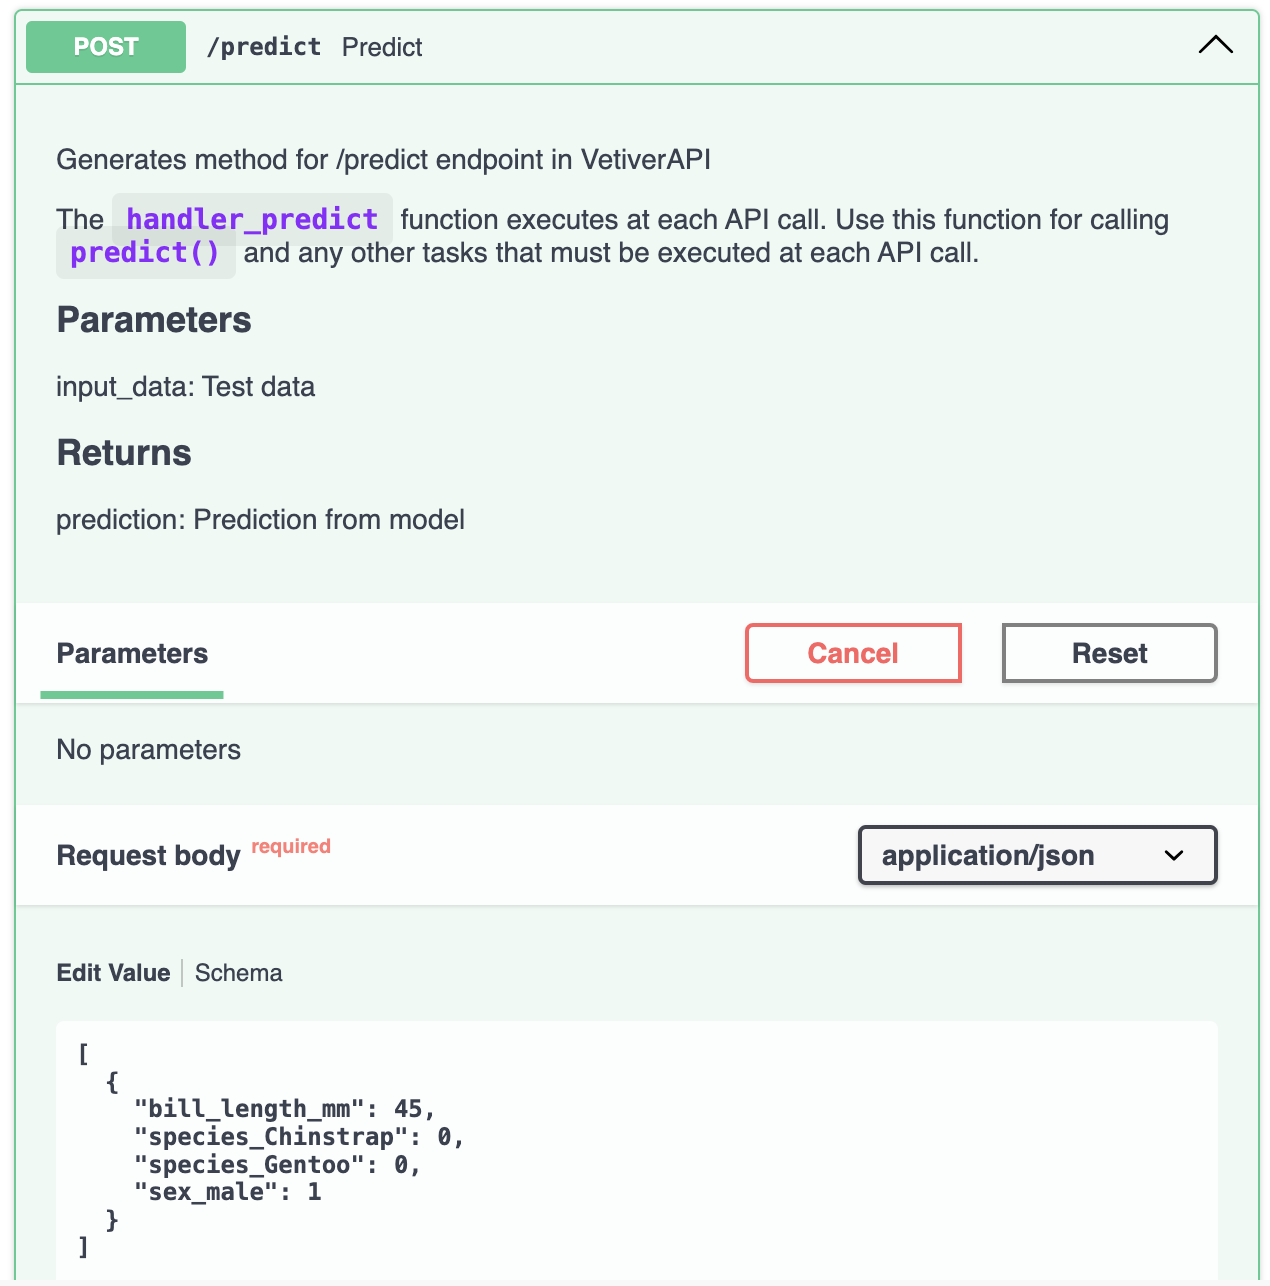
To make a prediction, we can click on the UI POST/predict section and view the Request body: Example Value
[
  {
    "bill_length_mm": 45,
    "species_Chinstrap": 0,
    "species_Gentoo": 1,
    "sex_male": 1
  }
]
Let’s make a prediction for a male Adelie penguin, with a 45mm bill:
curl -X POST "http://127.0.0.1:8080/predict" \
  -H "Content-Type: application/json" \
  -d '[{
    "bill_length_mm": 45,
    "species_Chinstrap": 0,
    "species_Gentoo": 0,
    "sex_male": 1
  }]'
Expected response:
{"predict":[4180.796549720755]}App
Now that we’ve confirmed our API is running, we can launch our Shiny (for Python) app from it’s own Terminal (or RStudio/Positron session).
%%{init: {'theme': 'base', 'themeVariables': {'fontFamily': 'monospace'}}}%%

graph TD
    subgraph T1["<strong>API Server</strong>"]
        RunApi("Run<br>mod-api.py") --"create"--> VetMod("<strong>VetiverModel</strong>")
        VetMod --"convert to"--> VetAPI("<strong>VetiverAPI</strong>")
        VetAPI --"extract"--> FastAPI("<strong>FastAPI</strong>")
    end

    subgraph T2["<strong>API Testing</strong>"]
        Curl("<strong>curl</strong><br>command") --> ManPostReq("Manual<br>POST<br>request")
        ManPostReq --> FastAPI
        FastAPI --> JSONReq("JSON<br>Response<br>Test")
        JSONReq --> VerAPI("Verify<br>API Works")
    end

    subgraph T3["<strong>Shiny App</strong>"]
       RunApp("Run<br>app-api.py") --> UI("User<br>Interface")
       UI --> HttpPostReq("HTTP<br>POST<br>Request")
       HttpPostReq --> FastAPI
       FastAPI --> JSONResp("JSON<br>Response")
       JSONResp --> DispPred("Display<br>Prediction")
    end

    subgraph Browse["<strong>Browser</strong>"]
        Http("`Got to <strong>http://</strong><strong>127.0.0.1:8080/</strong>`") --"<strong>/docs</strong>"--> Docs("API Docs")
        Http --"<strong>/ping</strong>"--> Health("Health Check")
        Http --"<strong>/metadata</strong>"--> Info("Model Info")
        Docs & Health & Info --> FastAPI
    end

    style T1 fill:#fbf7ec,stroke:#5B8C5A,color:#1B2A41
    style RunApi fill:#5B8C5A,stroke:#000000,stroke-width:1px,color:#ffffff
    style VetMod fill:#D2562B,stroke:#000000,stroke-width:1px,color:#ffffff
    style VetAPI fill:#D2562B,stroke:#000000,stroke-width:1px,color:#ffffff
    style FastAPI fill:#2A6F77,stroke:#000000,stroke-width:1px,color:#ffffff

    style T2 fill:#fbf7ec,stroke:#2A6F77,color:#1B2A41
    style Curl fill:#5B8C5A,stroke:#000000,stroke-width:1px,color:#ffffff
    style ManPostReq fill:#D2562B,stroke:#000000,stroke-width:1px,color:#ffffff
    style JSONReq fill:#485466,stroke:#000000,stroke-width:1px,color:#ffffff
    style VerAPI fill:#485466,stroke:#000000,stroke-width:1px,color:#ffffff

    style T3 fill:#fbf7ec,stroke:#2A6F77,color:#1B2A41
    style RunApp fill:#5B8C5A,stroke:#000000,stroke-width:1px,color:#ffffff
    style UI fill:#D2562B,stroke:#000000,stroke-width:1px,color:#ffffff
    style HttpPostReq fill:#D2562B,stroke:#000000,stroke-width:1px,color:#ffffff
    style JSONResp fill:#485466,stroke:#000000,stroke-width:1px,color:#ffffff
    style DispPred fill:#2A6F77,stroke:#000000,stroke-width:1px,color:#ffffff

    style Browse fill:#fbf7ec,stroke:#2A6F77,color:#1B2A41
    style Http fill:#5B8C5A,stroke:#000000,stroke-width:1px,color:#ffffff
    style Docs fill:#D2562B,stroke:#000000,stroke-width:1px,color:#ffffff
    style Health fill:#D2562B,stroke:#000000,stroke-width:1px,color:#ffffff
    style Info fill:#D2562B,stroke:#000000,stroke-width:1px,color:#ffffff
I’m going to dive a little into the syntax differences between Shiny (R) and Shiny for Python. The application in this lab uses the Shiny for Python Core syntax mode3, which looks more like Shiny for R.
At the top of the app-api.py script, we import the libraries and provide the api_url:
Code
from shiny import App, render, ui, reactive
import requests

api_url = 'http://127.0.0.1:8080/predict'| Component | Python | R |
|---|---|---|
| Assignment | = |
<- |
UI
In the UI, the syntax for layout and inputs look similar to R, but have a few key differences:
| Component | Python | R |
|---|---|---|
| Text input | ui.input_text() |
textInput() |
| Slider | ui.input_slider() |
sliderInput() |
| Select box | ui.input_select() |
selectInput() |
| Action button | ui.input_action_button() |
actionButton() |
| Text output | ui.output_text() |
textOutput() |
Python uses module prefix (ui.), while R uses function suffix (Input, Output).
show/hide UI inputs
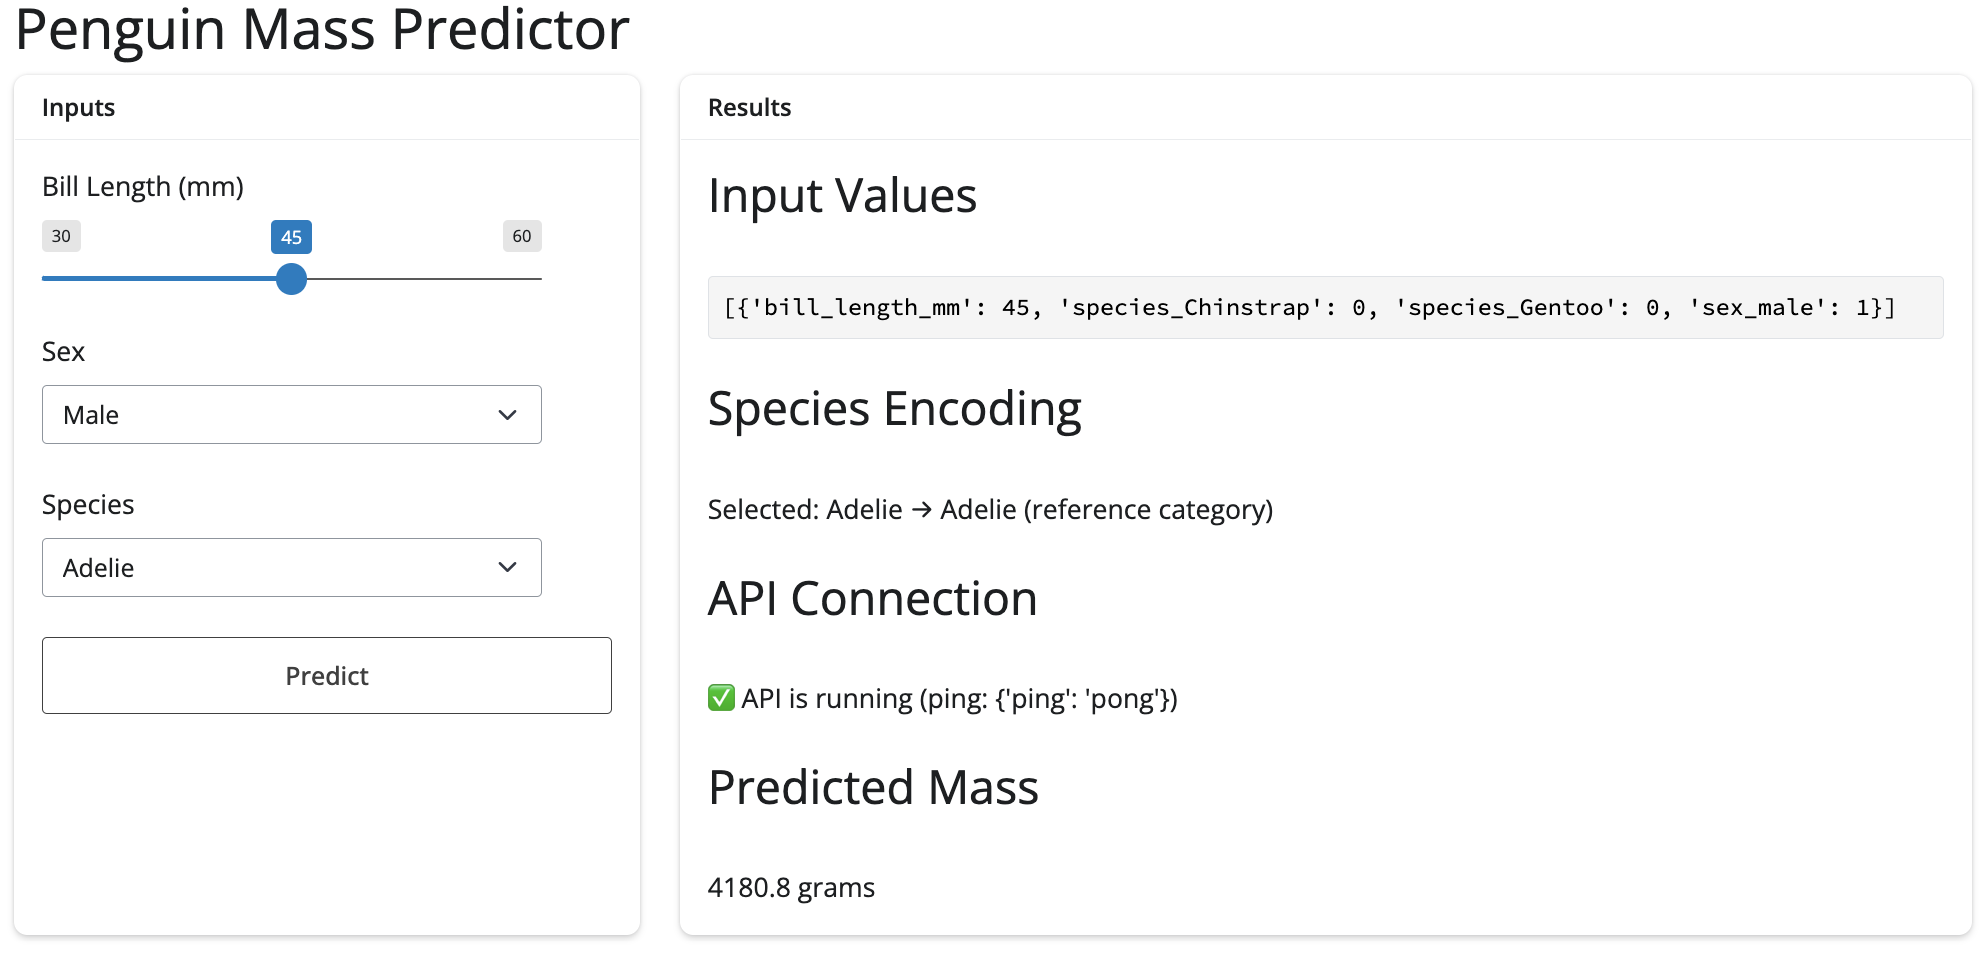
app_ui = ui.page_fluid(
    ui.h1("Penguin Mass Predictor"),
    ui.layout_columns(
        ui.card(
            ui.card_header("Inputs"),
            ui.input_slider(id="bill_length", label="Bill Length (mm)", min=30, max=60, value=45, step=0.1),
            ui.input_select(id="sex", label="Sex", choices=["Male", "Female"]),
            ui.input_select(id="species", label="Species", choices=["Adelie", "Chinstrap", "Gentoo"]),
            ui.input_action_button(id="predict", label="Predict")
        ),
        ui.card(
            ui.card_header("Results"),
            ui.h3("Input Values"),
            ui.output_text_verbatim(id="vals_out"),
            ui.h3("Species Encoding"),
            ui.output_text(id="species_debug"),
            ui.h3("API Connection"),
            ui.output_text(id="api_status"),
            ui.h3("Predicted Mass"),
            ui.output_text(id="pred_out")
        ),
        col_widths=[4, 8]
    )
)
Server
The server code looks much different than R, but the documentation provides excellent explanations for creating reactives and rendering outputs. I’ve included mermaid diagrams for the sections below because I’m still learning the Python for Shiny syntax and it’s reactive model.
Reactive values
The reactive calculations (expressions) and reactive effects (observers) are indicated with function decorators (@reactive.calc and @reactive.event). The inputs are accessed in the server with input. (not input$).
show/hide Python syntax
# UI code
ui.output_text_verbatim(id="vals_out"),
# server code
@reactive.calc
def vals():
d = [{
"bill_length_mm": int(input.bill_length()),
"species_Chinstrap": int(input.species() == "Chinstrap"),
"species_Gentoo": int(input.species() == "Gentoo"),
"sex_male": int(input.sex() == "Male")
}]
return d
@render.text
def vals_out():
data = vals()
return f"{data}"- 1
-
Equivalent to
reactive()
- 2
-
Equivalent to
vals() <-
- 3
-
Equivalent to
renderPrint()and assigning it tooutput$vals
- 4
-
Function name (
vals_out()) = output ID ("vals_out")
- 5
- f-string interpolation
Shiny for Python outputs also use decorators (i.e., @render.text), and instead of using R’s *Output(outputId) + output$outputId <- render*() syntax, Python matches the output ID (id="vals_out") with the function name (def vals_out():).
Expand the R code below to compare:
show/hide R syntax
# UI code
  verbatimTextOutput(outputId = "vals")
# server code
  vals <- reactive({
    data.frame(
      bill_length_mm = input$bill_length,
      species_Chinstrap = as.numeric(input$species == "Chinstrap"),
      species_Gentoo = as.numeric(input$species == "Gentoo"),
      sex_male = as.numeric(input$sex == "Male")
    )
  })

  output$vals <- renderPrint({
    vals()
    })
%%{init: {'theme': 'base', 'themeVariables': {'fontFamily': 'monospace'}}}%%
graph TD
subgraph "Python Decorators"
A("<strong>@reactive.calc</strong>") --> B[Function<br>definition]
C("<strong>@reactive.event</strong>") --> D("Event-driven<br>reactives")
E("<strong>@render.text</strong>") --> F("Output<br>rendering")
end
style A fill:#5B8C5A,stroke:#000000,stroke-width:1px,color:#ffffff
style B fill:#2A6F77,stroke:#000000,stroke-width:1px,color:#ffffff
style C fill:#5B8C5A,stroke:#000000,stroke-width:1px,color:#ffffff
style D fill:#2A6F77,stroke:#000000,stroke-width:1px,color:#ffffff
style E fill:#5B8C5A,stroke:#000000,stroke-width:1px,color:#ffffff
style F fill:#2A6F77,stroke:#000000,stroke-width:1px,color:#ffffff
Predictions
The predictions in the server are handled by requests.post(), which attempts to send vals() (as data_to_send) with the following error handling:
- Python stacks the decorators vertically, with each decorator adding behavior. In this case,
@reactive.event()listens to changes toinput.predict.def pred()is a standard Python function definition.
- The debugging strategy uses explicit logging at each step, with
print()and F-string formatting for readable outputs.- This manual instrumentation uses the console output for development debugging.
tryand the initialifare used to check the status code explicitly. The following logic handles different response formats.- These provide granular control over each error condition and returns a different message based on the specific error.
show/hide outputs
def server(input, output, session):
@reactive.calc
@reactive.event(input.predict)
def pred():
try:
data_to_send = vals()
print(f"\n=== PREDICTION REQUEST ===")
print(f"Sending data to API: {data_to_send}")
r = requests.post(api_url, json=data_to_send, timeout=30)
print(f"HTTP Status Code: {r.status_code}")
print(f"Raw response text: {r.text}")
if r.status_code == 200:
result = r.json()
print(f"✅ Success! Parsed response: {result}")
if '.pred' in result:
prediction = result['.pred'][0]
return prediction
elif 'predict' in result:
prediction = result['predict'][0]
return prediction
else:
return f"Unexpected response format: {result}"
else:
return f"API Error {r.status_code}: {r.text}"- 1
-
Stacked decorators
- 2
-
Function executes when
input.predictchanges
- 3
-
Explicit print statements
- 4
- Handle different possible responses
The request itself is handled by requests.post(), which takes our URL, the data, and a timeout value. To contrast this with R, the httr2 package performs the request with a series of function calls, then handles the errors with tryCatch() and pattern matching (grepl()):
show/hide httr2 function calls
pred <- reactive({
    tryCatch({
    showNotification("Predicting penguin mass...",
                     type = "default", duration = 10)

    request_data <- vals()
    response <- httr2::request(api_url) |>
      httr2::req_method("POST") |>
      httr2::req_body_json(request_data, auto_unbox = FALSE) |>
      httr2::req_perform() |>
      httr2::resp_body_json()

    showNotification("✅ Prediction successful!",
                     type = "default", duration = 10)

    response$.pred[1]

    }, error = function(e) {
      error_msg <- conditionMessage(e)

      if (grepl("Connection refused|couldn't connect", error_msg, ignore.case = TRUE)) {
        user_msg <- "API not available - is the server running on port 8080?"
      } else if (grepl("timeout|timed out", error_msg, ignore.case = TRUE)) {
        user_msg <- "Request timed out - API may be overloaded"
      } else {
        user_msg <- paste("API Error:", substr(error_msg, 1, 50))
      }

      showNotification(paste("❌", user_msg), type = "warn", duration = 10)

      paste("❌", user_msg)
      })
    }) |>
    bindEvent(input$predict, ignoreInit = TRUE)
I’ve tried to summarize Python’s general reactive philosophy in the diagram below:
%%{init: {'theme': 'base', 'themeVariables': {'fontFamily': 'monospace'}}}%%

graph TB
    subgraph Py["Python Philosophy"]
        A("<strong>Explicit over<br>Implicit</strong>") --> A1("Decorators to make<br>behavior clear")
        A --> A2("Type conversion<br>and error handing<br>are explicit")
        A --> A4("Method calls<br>with parentheses")
    end

    style Py fill:#fbf7ec,stroke:#2A6F77,color:#1B2A41
    style A fill:#5B8C5A,stroke:#000000,stroke-width:1px,color:#ffffff
    style A1 fill:#2A6F77,stroke:#000000,stroke-width:1px,color:#ffffff
    style A2 fill:#2A6F77,stroke:#000000,stroke-width:1px,color:#ffffff
    style A4 fill:#2A6F77,stroke:#000000,stroke-width:1px,color:#ffffff
Verify
Now when we launch the app, a preview of the parameters are in the list/JSON format we created them in:
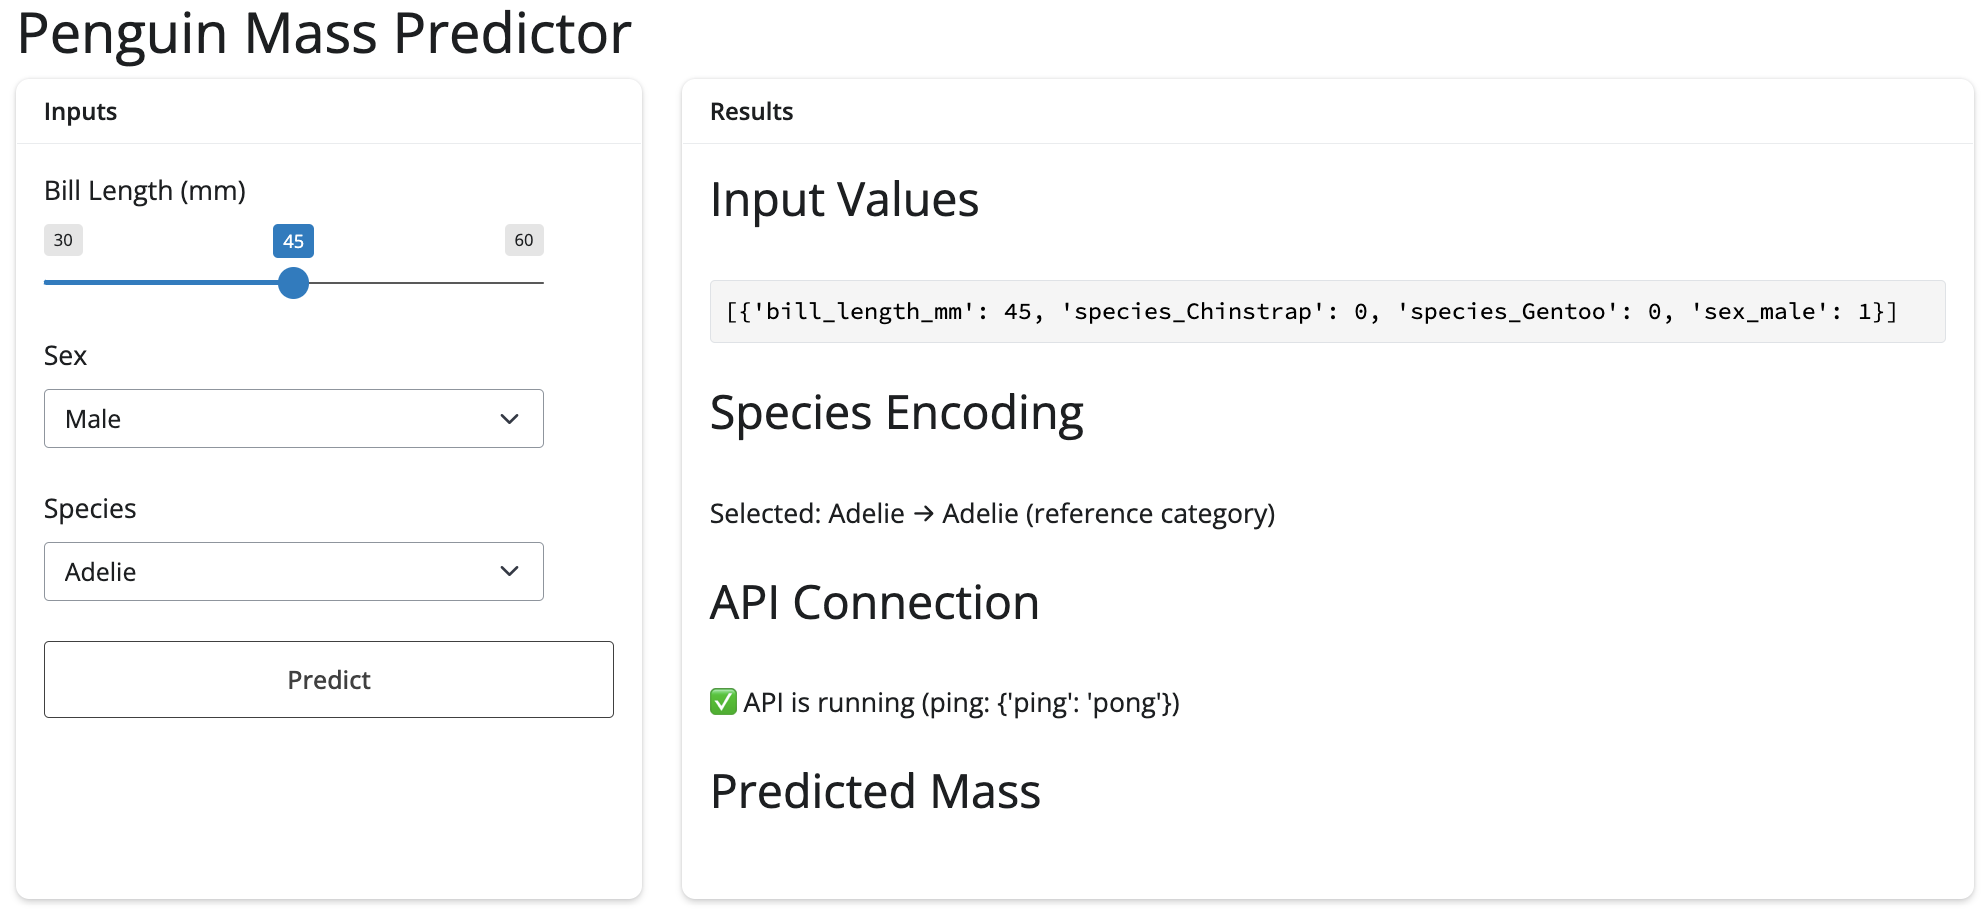
When we click Predict, we see notifications and the value is returned:
Back in the API
If we return to the FastAPI UI, we can click on POST / predict, TRY, then change the JSON values to match our parameters in the app, and click Execute:
FastAPI request bodyAnd we can compare the response to the value we saw in the app:

FastAPI responseA diagram of the user inputs (i.e., the Predict button), reactives, and the API request is below:
%%{init: {'theme': 'base', 'themeVariables': {'fontFamily': 'monospace'}}}%%

sequenceDiagram
    participant Shiny as Shiny App
    participant API as FastAPI
    participant Vetiver as Vetiver Model

    Note over Shiny: User enters:<br>Bill=45mm,<br>Species=Gentoo,<br>Sex=Male

    Shiny->>API: POST /predict<br>{"bill_length_mm": 45.0,<br>"species_Gentoo": 1,<br>"sex_male": 1}

    API->>Vetiver: Validate data

    Vetiver->>Vetiver: Run ML prediction

    Vetiver-->>API: Prediction: 4500.0 grams

    API-->>Shiny: {"pred": [4500.0]}

    Note over Shiny: Display:<br>"4500.0 grams"
Finishing touches
To keep the Python environments in each directory self-contained and reproducible, we will ‘freeze’ the dependencies in a requirements.txt in each folder.
pip freeze > requirements.txt
cat requirements.txt
Python/api/ files
├── .env
│   ├── bin
│   ├── include
│   ├── lib
│   ├── pyvenv.cfg
│   └── share
├── .gitignore
├── .Rhistory
├── api.Rproj
├── mod-api.py
├── README.md
└── requirements.txt

6 directories, 7 files
Python/app/ files
├── .env
│   ├── bin
│   ├── include
│   ├── lib
│   ├── pyvenv.cfg
│   └── share
├── .gitignore
├── .Rhistory
├── app-api.py
├── app.Rproj
├── README.md
└── requirements.txt

6 directories, 7 files
View the contents of this folder in the GitHub repo.↩︎
sklearnmodels trained withpandasDataFramesretain column names.↩︎Read more about Shiny’s two syntax modes: express vs. core.↩︎