%%{init: {‘theme’: ‘base’, ‘themeVariables’: {‘fontFamily’: ‘monospace’}}}%%

graph TD
    A(["Your<br>Laptop"]) -->|SSH| B["EC2<br>Instance"]
    B --> C("Runs<br>plumber/FastAPI")
    B --> D("Pulls model<br>from S3")
    C --> E("Serves<br>predictions")

    style A fill:#5B8C5A,stroke:#000000,stroke-width:1px,color:#ffffff
    style B fill:#E8A33D,stroke:#000000,stroke-width:1px,color:#ffffff
    style C fill:#D2562B,stroke:#000000,stroke-width:1px,color:#ffffff
    style D fill:#1B2A41,stroke:#000000,stroke-width:1px,color:#ffffff
    style E fill:#2A6F77,stroke:#000000,stroke-width:1px,color:#ffffff
Stand up an EC2 instance
This is the second part of lab 7. It assumes you’ve set up your AWS group, user, and configured the aws CLI.1
What is an EC2 instance?
EC2 is a rentable Linux (or Windows) machine in AWS’s data center. You get root/sudo access like any VM. AWS handles the physical hardware; we handle the OS, packages, and running our app (in this case, a vetiver model API).
Below we’re going to cover some basic concepts and terminology for using EC2 instances. It’s also a good idea to consult the official AWS documentation.
Core EC2 Concepts
| Concept | Plain Meaning |
|---|---|
| AMI | The OS disk image used to boot the instance (like choosing a Docker base image) |
| Instance type | The hardware size (CPU/RAM) — e.g. t3.micro is small/cheap |
| Key pair | SSH keypair AWS uses to let you log in (like your ~/.ssh keys, but AWS-managed) |
| Ingress | Incoming traffic (traffic coming into the EC2 instance) |
| Egress | Outgoing traffic (traffic leaving the instance). |
| Security group | A firewall — controls which ports/IPs can reach the instance. Security groups control both egress/ingress separately. By default:
|
| Elastic IP | A static public IP you can attach/detach from instances |
| Instance profile / IAM role | Lets the EC2 box itself have AWS permissions (e.g. to pull from S3) without storing keys on disk |
We’re going to ‘stand up’ an EC2 instance using the aws CLI (i.e., from our Terminal).
Creating a Key Pair
First, we need to create the ~/.ssh. folder:
mkdir -p ~/.sshAnd give it the proper permissions:
chmod 700 ~/.sshchmod 700 means only we can open, list, or add files in this folder. Nobody else can even look inside.
Now we can create the key pair.
# create EC2 key pair
aws ec2 create-key-pair \
--key-name vetiver-deploy-key \
--query 'KeyMaterial' \
--output text \
--profile dev-deploy > ~/.ssh/vetiver-deploy-key.pem- 1
-
Calls AWS EC2 API to generate a new SSH key pair
- 2
-
Names the key pair
vetiver-deploy-key
- 3
-
Filters the JSON response to extract only the
KeyMaterialfield, which contains the actual private key text. - 4
-
Formats the output as plain text instead of JSON
- 5
-
Use existing credentials, then redirect to SSH
.pemkey output
The .pem file also needs special permissions:
chmod 400 ~/.ssh/vetiver-deploy-key.pemchmod 400 means only we can view this file’s contents. We can’t even edit it (would need chmod 600 for that), and no one else can read, write, or execute it. This key lets you SSH in later. Treat the .pem file like a password.
Creating a Security Group
Now we’re going to create a security group for the EC2 instance. This controls how we will access the AWS server from the command line.
# create EC2 security group
aws ec2 create-security-group \
--group-name vetiver-sg \
--description "Allow SSH and API traffic" \
--profile dev-deploy- 1
-
Creates a new security group, which acts as a virtual firewall for EC2 instances
- 2
-
Names the security group
vetiver-sg
- 3
-
Adds a human-readable description explaining the group’s purpose
- 4
-
Uses the
dev-deployAWS credentials profile to run the command
This will return a JSON with the following:
{
    "GroupId": "sg-0884d49f913b38416",
    "SecurityGroupArn": "arn:aws:ec2:us-east-1:386252595109:security-group/sg-0884d49f913b38416"
}
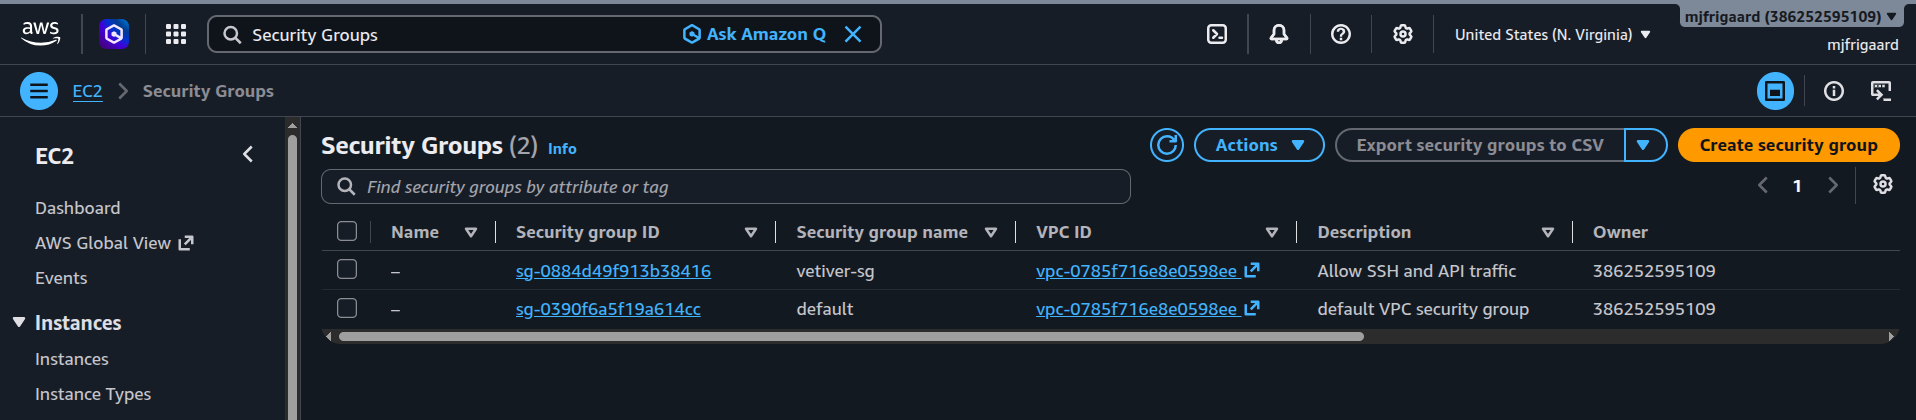
The security group was created successfully! AWS handed back its ID and ARN so we can reference it in future commands.
Response Explanation
The JSON response has two parts:
GroupIdis the unique ID AWS assigned to our new security group. We’ll use this ID (not the namevetiver-sg) in later commands, like attaching it to an EC2 instance or adding firewall rules.SecurityGroupArnis the full AWS resource identifier (ARN) for the new security group. It encodes the region (us-east-1), account number (386252595109), and the resource type/ID (security-group/sg-0884d49f913b38416), which is not something we need to memorize or protect as secret.
We can view the new security group in the AWS Console by searching for Security Groups:
Creating an IAM Role for S3 Access
An IAM role lets the EC2 instance itself authenticate to AWS (no stored credentials, no hardcoded keys). AWS issues temporary credentials automatically behind the scenes.
%%{init: {‘theme’: ‘base’, ‘themeVariables’: {‘fontFamily’: ‘monospace’}}}%%

graph LR
    EC2(["EC2 Instance"]) -->|"Assumes Role"| Role("IAM Role")
    Role -->|"Temporary Credentials"| EC2
    EC2 -->|"Authenticated Request"| S3[("S3 Bucket")]

    style EC2 fill:#5B8C5A,stroke:#000000,stroke-width:1px,color:#ffffff
    style Role fill:#E8A33D,stroke:#000000,stroke-width:1px,color:#ffffff
    style S3 fill:#D2562B,stroke:#000000,stroke-width:1px,color:#ffffff
    %% style D fill:#1B2A41,stroke:#000000,stroke-width:1px,color:#ffffff
    %% style EC2 fill:#2A6F77,stroke:#000000,stroke-width:1px,color:#ffffff
Three pieces are required:
Role: the identity itself
Policy: what that identity is allowed to do
Instance profile: the container that lets EC2 actually use the role
%%{init: {‘theme’: ‘base’, ‘themeVariables’: {‘fontFamily’: ‘monospace’}}}%%

graph LR
    Role(["<strong>IAM Role</strong>"]) --> Trust[/"<strong>Trust Policy</strong>:<br>who can assume this role"/]
    Role --> Perms[/"<strong>Permission Policy</strong>:<br>what this role can do"/]
    Role --> Prof("<strong>Instance Profile</strong>:<br>attaches role to EC2")

    style Role fill:#5B8C5A,stroke:#000000,stroke-width:1px,color:#ffffff
    %% style Trust fill:#E8A33D,stroke:#000000,stroke-width:1px,color:#ffffff
    style Prof fill:#D2562B,stroke:#000000,stroke-width:1px,color:#ffffff
    style Trust fill:#1B2A41,stroke:#000000,stroke-width:1px,color:#ffffff
    style Perms fill:#2A6F77,stroke:#000000,stroke-width:1px,color:#ffffff
Attach Permissions to Group
Recall the users inherit permissions from groups, so we’ll need to grant our group (dev-deploy-group) permissions for our user (mjfrigaard-cli) to use.
- In the AWS Console, we want to attach
IAMFullAccesstodev-deploy-group:
Log in via browser (as
rootor any admin-capable login)IAM > IAM user groups >
dev-deploy-group> Add permissions- Search
IAMFullAccess> Attach policies
- Search
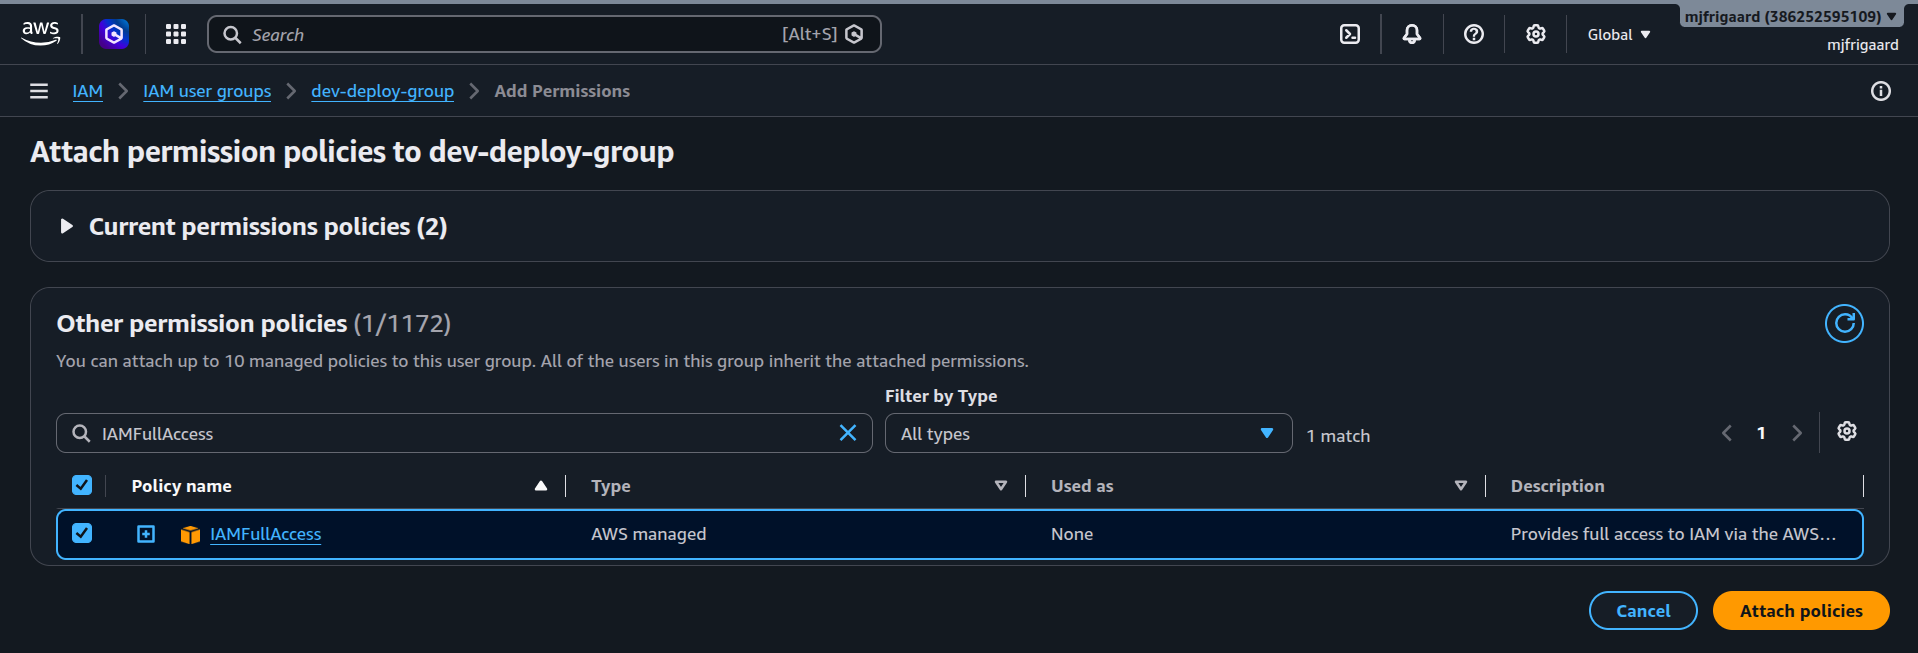
After we’ve attached this policy, the mjfrigaard-cli user can complete the steps below. IAMFullAccess is broad, and it lets us create/modify any user, role, or policy. Fine for our personal AWS account, but this might be riskier in a team/production account.
Create Trust Policy
From the lab07 root folder, use the Terminal to create the trust-policy.json file:
cat > trust-policy.json << 'EOF'
{
  "Version": "2012-10-17",
  "Statement": [{
    "Effect": "Allow",
    "Principal": {"Service": "ec2.amazonaws.com"},
    "Action": "sts:AssumeRole"
  }]
}
EOF
This file defines who is allowed to assume the role. Here, it says “only EC2 instances can use this role,” not users, not other services.
Create Role
Now we create the role itself, using the trust policy from above. At this point, the role exists but has no permissions, it’s an empty identity.
aws iam create-role \
  --role-name ec2-s3-read-role \
  --assume-role-policy-document file://trust-policy.json \
  --profile dev-deploy
The JSON returned tells us this role has been created:
{
    "Role": {
        "RoleName": "ec2-s3-read-role",
        "RoleId": "AROAVT3TS36SSEK7FFJ4E",
        "Arn": "arn:aws:iam::386252595109:role/ec2-s3-read-role",
        "CreateDate": "2026-07-08T13:25:03+00:00",
        "AssumeRolePolicyDocument": {
          < omitted >
        }
    }
}
The role now exists as an identity, with the trust policy saying “only EC2 can assume this.” Not secret, ARNs and role IDs are just identifiers.
Attach Permission Policy
Next we need to grant the role read-only access to all S3 buckets, using an AWS-managed policy (predefined by AWS, not custom-written). This is what actually lets it fetch our vetiver model files.
aws iam attach-role-policy \
  --role-name ec2-s3-read-role \
  --policy-arn arn:aws:iam::aws:policy/AmazonS3ReadOnlyAccess \
  --profile dev-deploy
attach-role-policy returns nothing on success (this is normal AWS CLI behavior, no news is good news).
%%{init: {‘theme’: ‘base’, ‘themeVariables’: {‘fontFamily’: ‘monospace’}}}%%

graph TD
    Role(["<strong>ec2-s3-read-role</strong>"]) -->|attached policy| Policy[/"<strong>AmazonS3ReadOnlyAccess</strong>"/]
    Policy --> GET("Can GET/List<br>S3 objects")
    Policy --> PUT("Cannot<br>PUT/DELETE")

    style Role fill:#5B8C5A,stroke:#000000,stroke-width:1px,font-size:14px,text-align:center,font-family:monospace,color:#ffffff
    style Policy fill:#1B2A41,stroke:#000000,stroke-width:1px,font-size:14px,text-align:center,font-family:monospace,color:#ffffff
    style PUT fill:#D2562B,stroke:#000000,stroke-width:1px,color:#ffffff
    style GET fill:#2A6F77,stroke:#000000,stroke-width:1px,color:#ffffff
The instance profile is like giving the EC2 box its own ID badge, instead of us handing it our personal keys.
Create an Instance Profile
EC2 doesn’t attach roles directly, it attaches instance profiles, which act as a wrapper around a role. This creates that empty wrapper.
aws iam create-instance-profile \
  --instance-profile-name ec2-s3-instance-profile \
  --profile dev-deploy
The JSON tells us the instance profile was created (see the InstanceProfileName, InstanceProfileId, Arn, and CreateDate), and we can see the Roles are empty.
{
    "InstanceProfile": {
        "Path": "/",
        < omitted >
        "Roles": []
    }
}
Add the Role to the Instance Profile
Finally, we link the role (permissions) to the instance profile (the thing EC2 actually uses). After this, the profile is ready to attach at launch time.
aws iam add-role-to-instance-profile \
  --instance-profile-name ec2-s3-instance-profile \
  --role-name ec2-s3-read-role \
  --profile dev-deploy
add-role-to-instance-profile returns nothing on success (this is normal AWS CLI behavior, no news is good news).
%%{init: {‘theme’: ‘base’, ‘themeVariables’: {‘fontFamily’: ‘monospace’}}}%%

graph TD
    A("ec2-s3-instance-profile") --> B("ec2-s3-read-role")
    B --> C[/"AmazonS3ReadOnlyAccess<br>Policy"/]
    D(["EC2 Instance"]) -->|attached at launch| A

    style D fill:#5B8C5A,stroke:#000000,stroke-width:1px,color:#ffffff
    style B fill:#1B2A41,stroke:#000000,stroke-width:1px,font-size:14px,text-align:center,font-family:monospace,color:#ffffff
    style C fill:#D2562B,stroke:#000000,stroke-width:1px,color:#ffffff
    style A fill:#2A6F77,stroke:#000000,stroke-width:1px,font-size:14px,text-align:center,font-family:monospace,color:#ffffff
Launch EC2
The commands below launch the EC2 instance with the role (and instance profile) already attached. As soon as it boots, it can pull from S3 without any manual credential setup:
aws ec2 run-instances \
  --image-id ami-0c02fb55956c7d316 \
  --instance-type t3.micro \
  --key-name vetiver-deploy-key \
  --security-groups vetiver-sg \
  --iam-instance-profile Name=ec2-s3-instance-profile \
  --profile dev-deploy
The JSON output from aws ec2 run-instances is long, but I’ll break down some of it’s contents:
| Field | Value | Meaning |
|---|---|---|
InstanceId |
i-0069201f3688cec43 |
Unique ID for this instance, used in future CLI commands |
PrivateIpAddress |
172.31.0.231 |
Internal IP, only reachable inside AWS’s VPC |
PublicDnsName |
"" (empty) |
No public DNS yet, still pending (see below) |
State.Name |
"pending" |
Instance is booting, not ready yet (see below) |
The PublicIpAddress wasn’t in the initial output, because the instance was still pending at launch time.
We can check again in ~30 seconds with the following:
aws ec2 describe-instances \
  --instance-ids i-0069201f3688cec43 \
  --query "Reservations[*].Instances[*].PublicIpAddress" \
  --output text \
  --profile dev-deploy
This will return the PublicIpAddress.
Summary
In the AWS Console, we can see the EC2 instance is running:

%%{init: {‘theme’: ‘base’, ‘themeVariables’: {‘fontFamily’: ‘monospace’}}}%%

graph TD
    Trust[/"trust-policy.json"/] --> Role("ec2-s3-read-role")
    Role --"attached policy"--> C[/"AmazonS3ReadOnlyAccess"/]
    Role --> Prof("ec2-s3-instance-profile")
    Prof --> E["EC2 Instance:<br><strong>i-0069201f3688cec43</strong>"]
    E --> F{{"Security Group:<br><strong>vetiver-sg</strong>"}}
    E --> G("SSH Key:<br><strong>vetiver-deploy-key</strong>")


    style Role fill:#1B2A41,stroke:#000000,stroke-width:1px,font-size:14px,text-align:center,font-family:monospace,color:#ffffff
    style Prof fill:#2A6F77,stroke:#000000,stroke-width:1px,font-size:14px,text-align:center,font-family:monospace,color:#ffffff
    style Trust fill:#5B8C5A,stroke:#000000,stroke-width:1px,font-size:14px,text-align:center,font-family:monospace,color:#ffffff
    style E fill:#E8A33D,stroke:#000000,stroke-width:1px,color:#ffffff
    style C fill:#5B8C5A,stroke:#000000,stroke-width:1px,color:#ffffff
    style F fill:#D2562B,stroke:#000000,stroke-width:1px,color:#ffffff
In this portion of the lab we’ve covered creating the following:
Key Pairs: A key pair is a set of public and private keys used to securely connect to an EC2 instance via SSH or RDP. AWS stores the public key on the instance, while we keep the private key to authenticate access.
Security groups: A security group acts as a virtual firewall controlling inbound and outbound traffic for EC2 instances. Rules define allowed protocols, ports, and source or destination IPs.
IAM roles on EC2: An IAM role grants an EC2 instance temporary permissions to access other AWS services without storing credentials on the instance. This improves security by using AWS-managed, rotating credentials.
Instance profile: An instance profile is a container that passes an IAM role to an EC2 instance at launch. It links the role’s permissions to the instance so applications running on it can assume that role automatically.
This mirrors a GitHub Actions setup: scoped permissions, no long-lived secrets sitting around, minimal blast radius if compromised.
In the next lab, we’ll cover uploading the vetiver model data in an S3 bucket.
If you haven’t completed these steps, please see Getting started with AWS.↩︎