%%{init: {'theme': 'base', 'themeVariables': {'fontFamily': 'monospace'}}}%%

graph TD
    AWS(["AWS<br>Account"]) --"create"--> Groups("IAM Groups")
    AWS --"create"--> Users("IAM Users")
    Policy[/"IAM Policies"/]

    Policy --"attach"--> Groups
    Groups --"inherit"--> Users

    style Policy fill:#5B8C5A,stroke:#000000,stroke-width:1px,color:#ffffff
    style AWS fill:#E8A33D,stroke:#000000,stroke-width:1px,color:#ffffff
    style Groups fill:#1B2A41,stroke:#000000,stroke-width:1px,color:#ffffff
    style Users fill:#2A6F77,stroke:#000000,stroke-width:1px,color:#ffffff
Getting started with AWS
This lab will cover creating AWS users, groups, attaching policies, creating access keys, and configuring the AWS command line interface (CLI).
AWS set up
First, you’ll need to log into AWS. This is separate from your regular Amazon account, and comes with different tiers. I highly recommend turning on the MFA and using something like the Microsoft Authenticator app to login.
When you first access AWS, your landing page will look something like this:
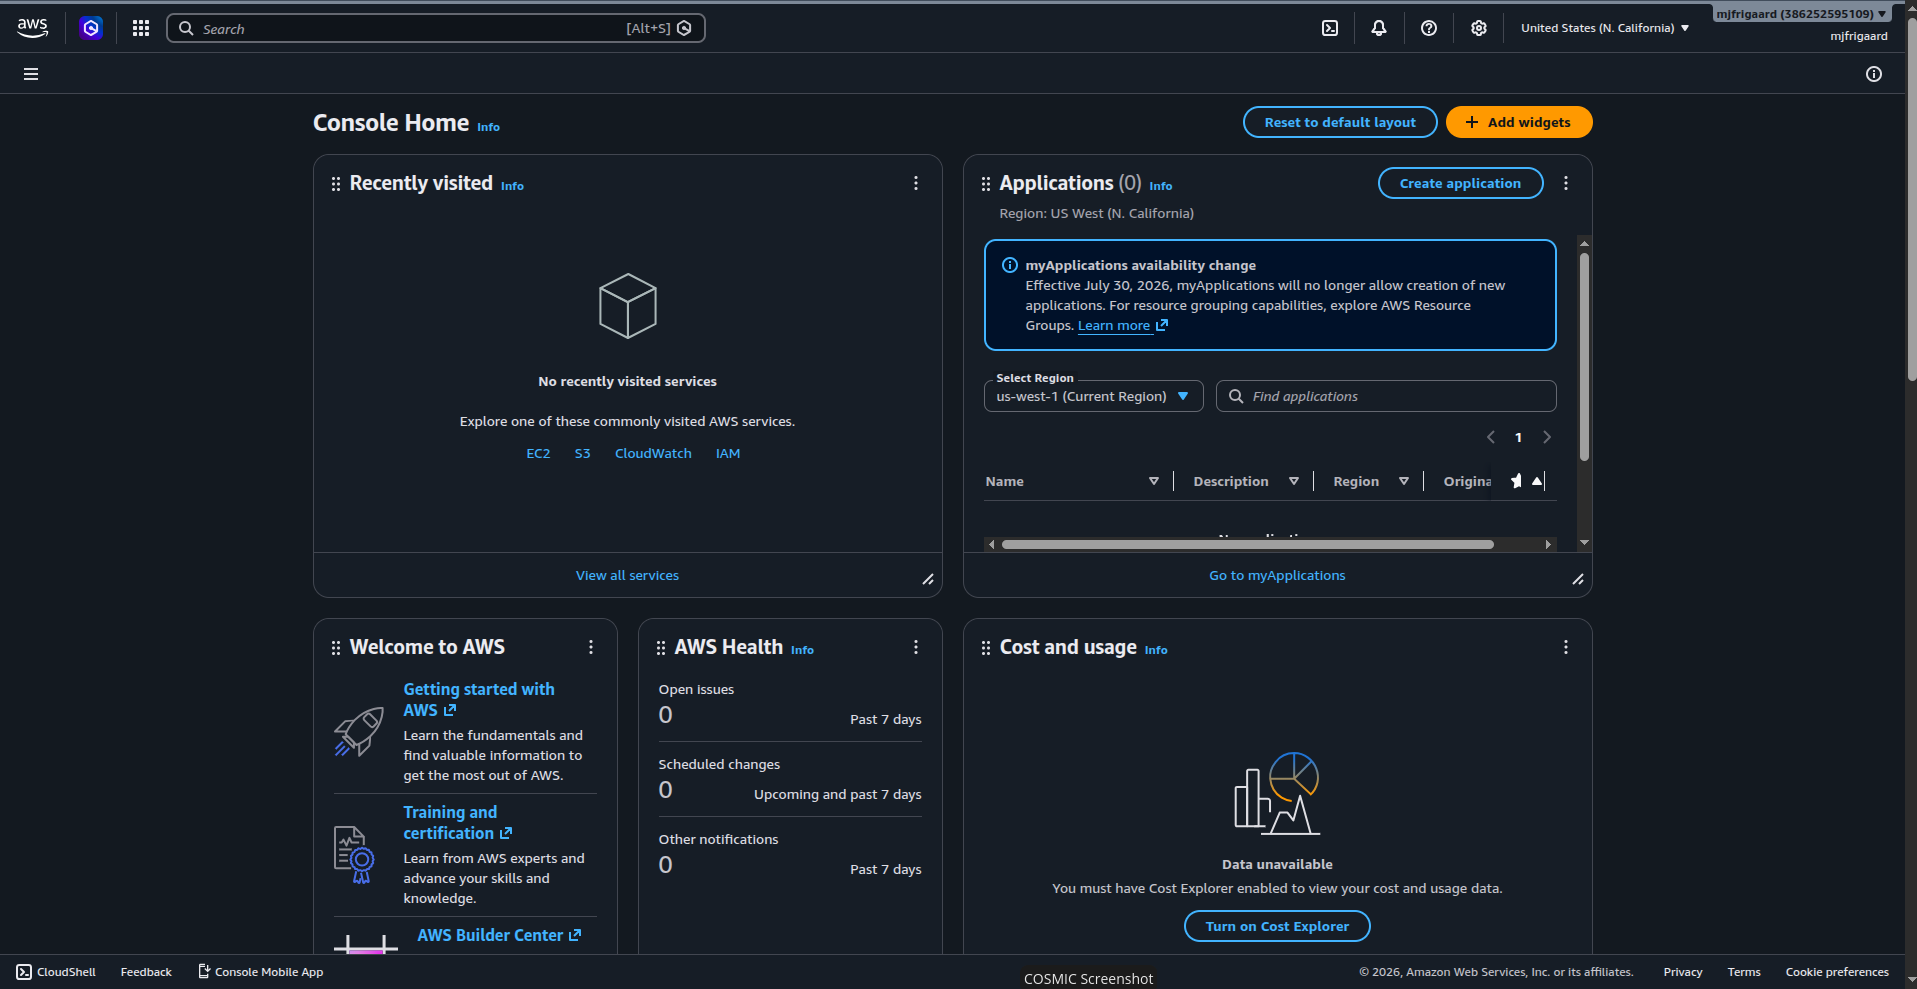
This is your AWS Console–where you’ll launch new instances, select storage devices, containers, etc. In the first part of this lab I’ll cover
Identity and Access Management (IAM)
Back in the AWS Console, we need to create a group, attach policies to this group, then create user.
Creating Groups
In the AWS Console, we’ll navigate to:
IAM > IAM User groups > Create group
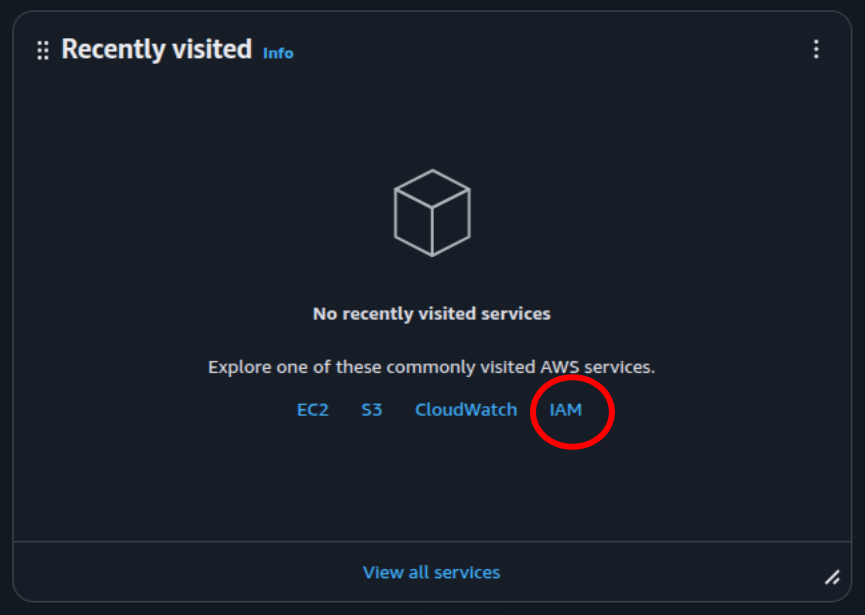
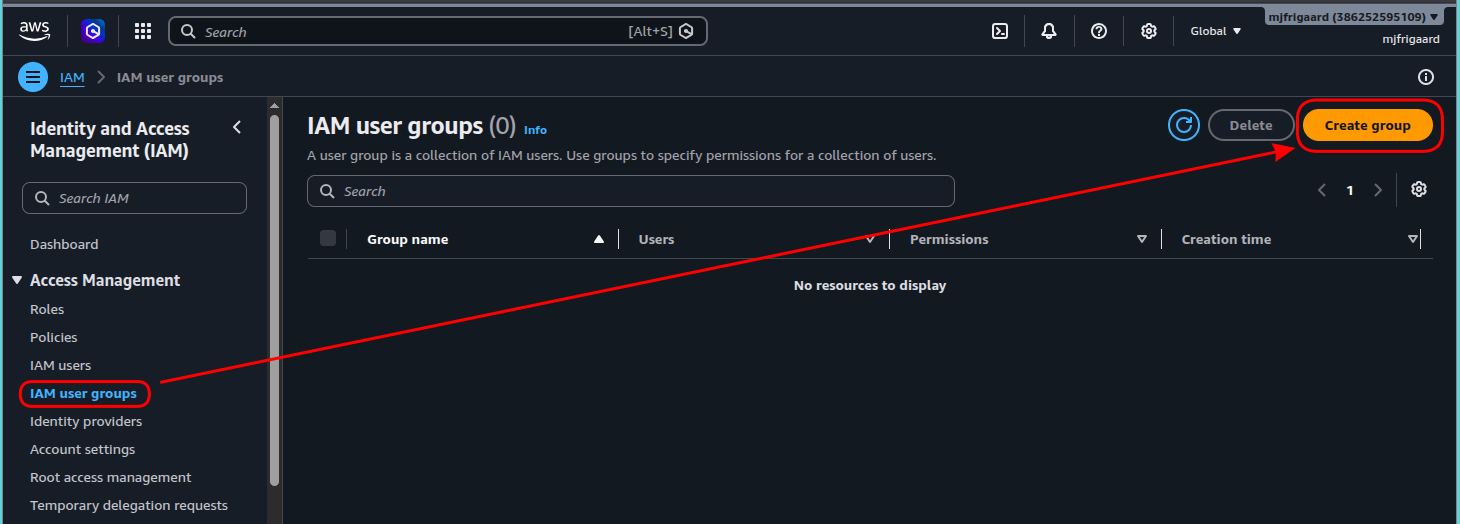
Give the group a meaningful name: dev-deploy-group
Under Attach permissions policies, search and select the following:
AmazonEC2FullAccessAmazonS3FullAccess
Down the road, we should replace these with scoped custom policies later, but for now it will get us up and running.
Click Create Group and you should see something like:
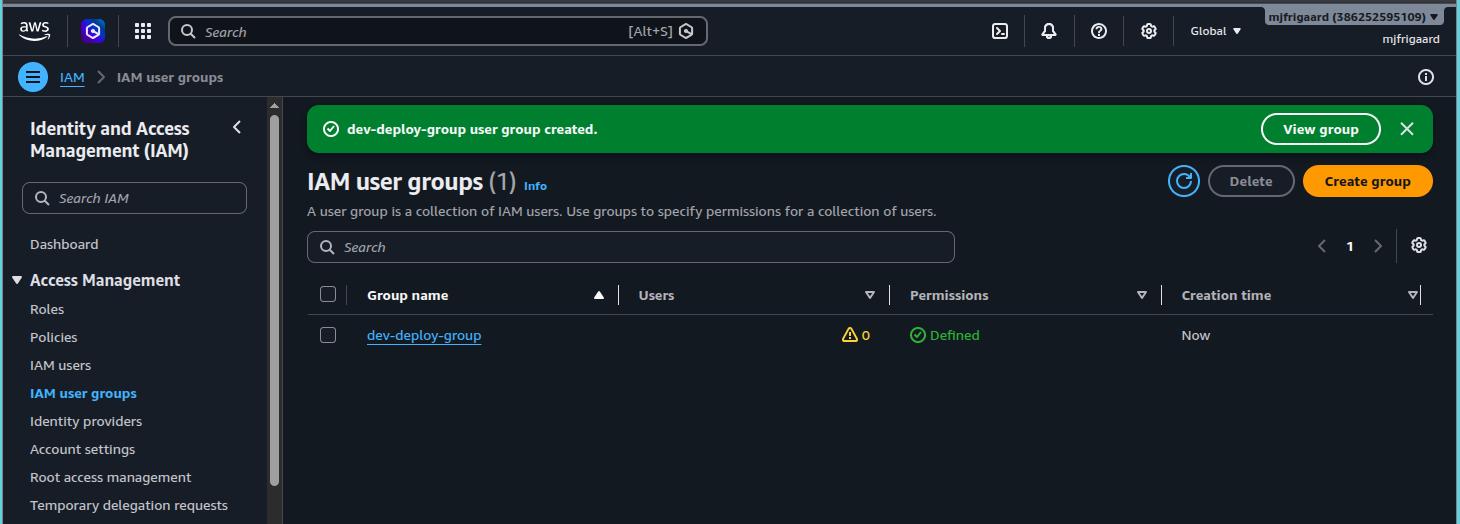
As we can see, this group doesn’t have any users, so we’ll create and add them next.
Creating Users
Back in AWS Console, we’ll to navigate to:
IAM Users > Create User
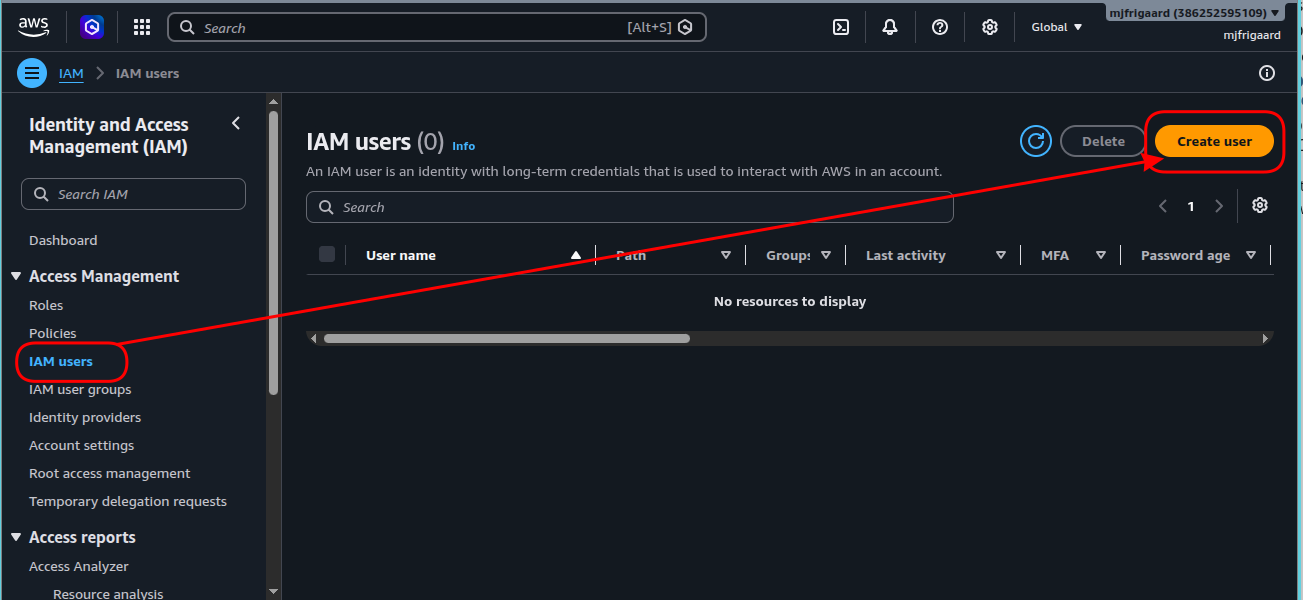
We’ll give the user a meaningful username: mjfrigaard-cli
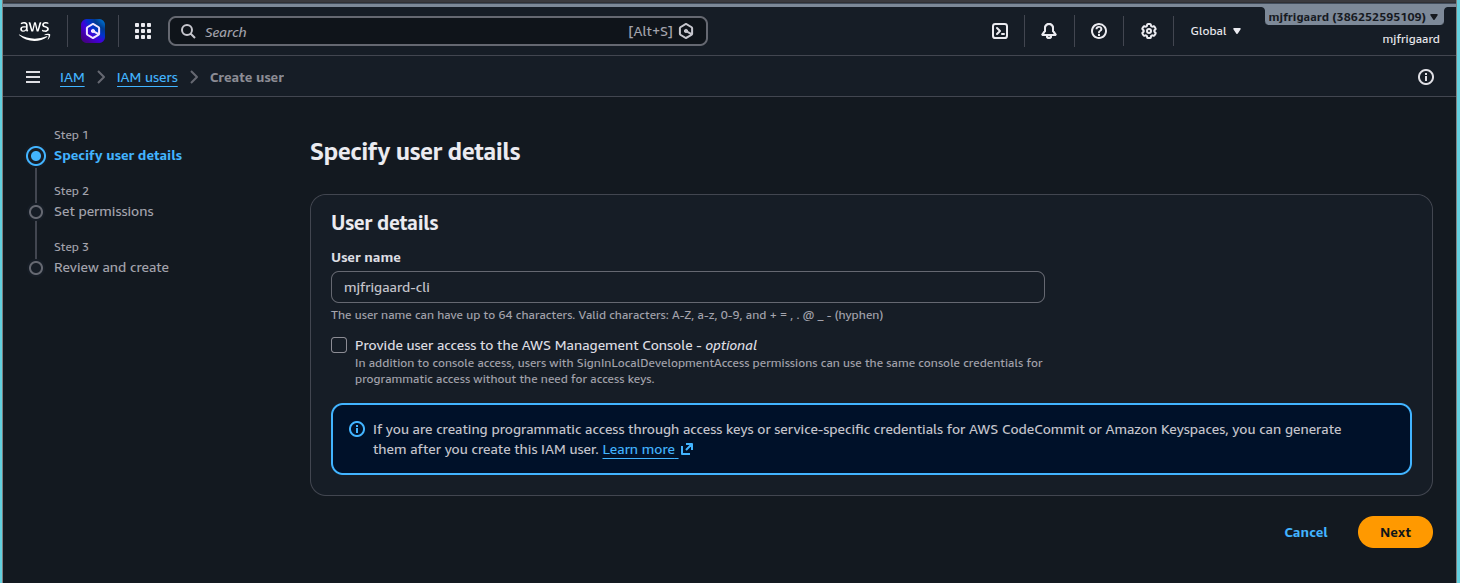
We have to option to check “Provide user access to the AWS Management Console”, but we should only do this if we need this user to log into the Console. Because mjfrigaard-cli will only access the CLI, we can skip this.
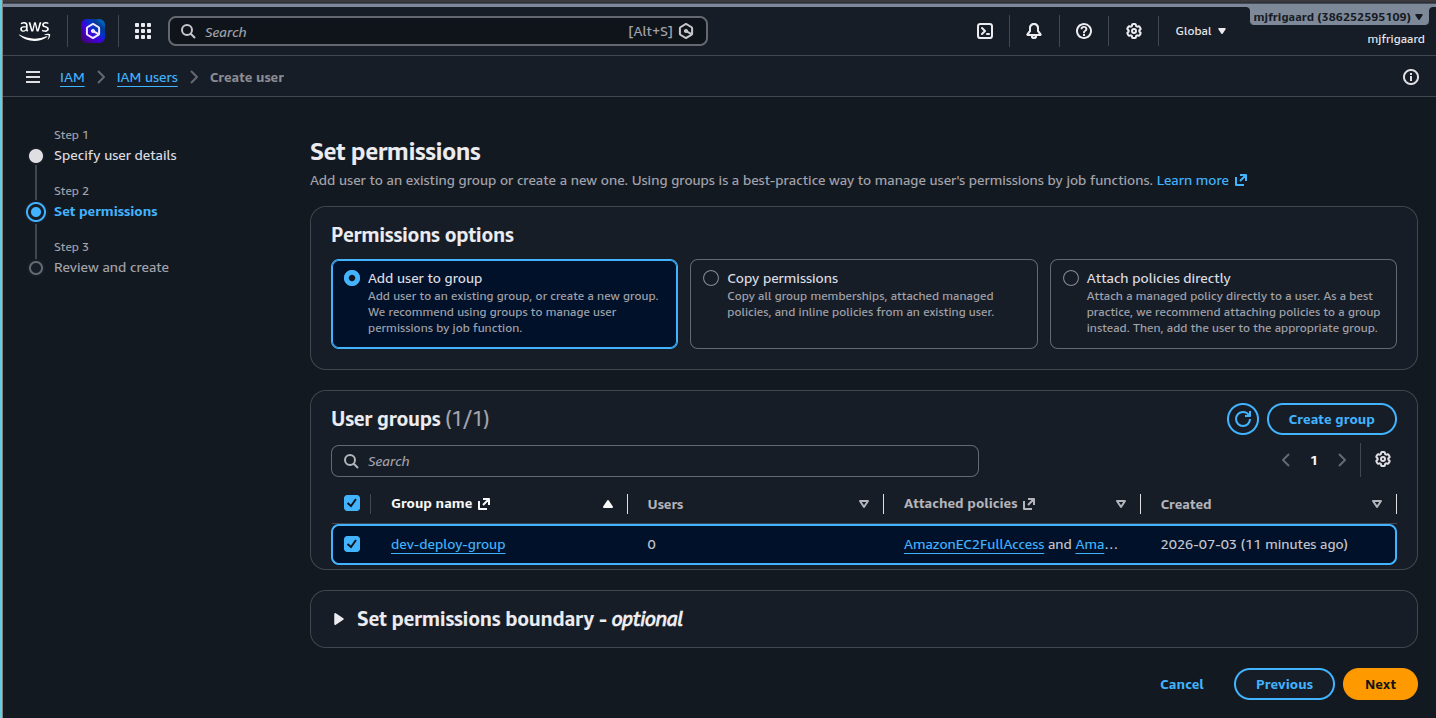
Now, under Add user to group, we select dev-deploy-group and click Next
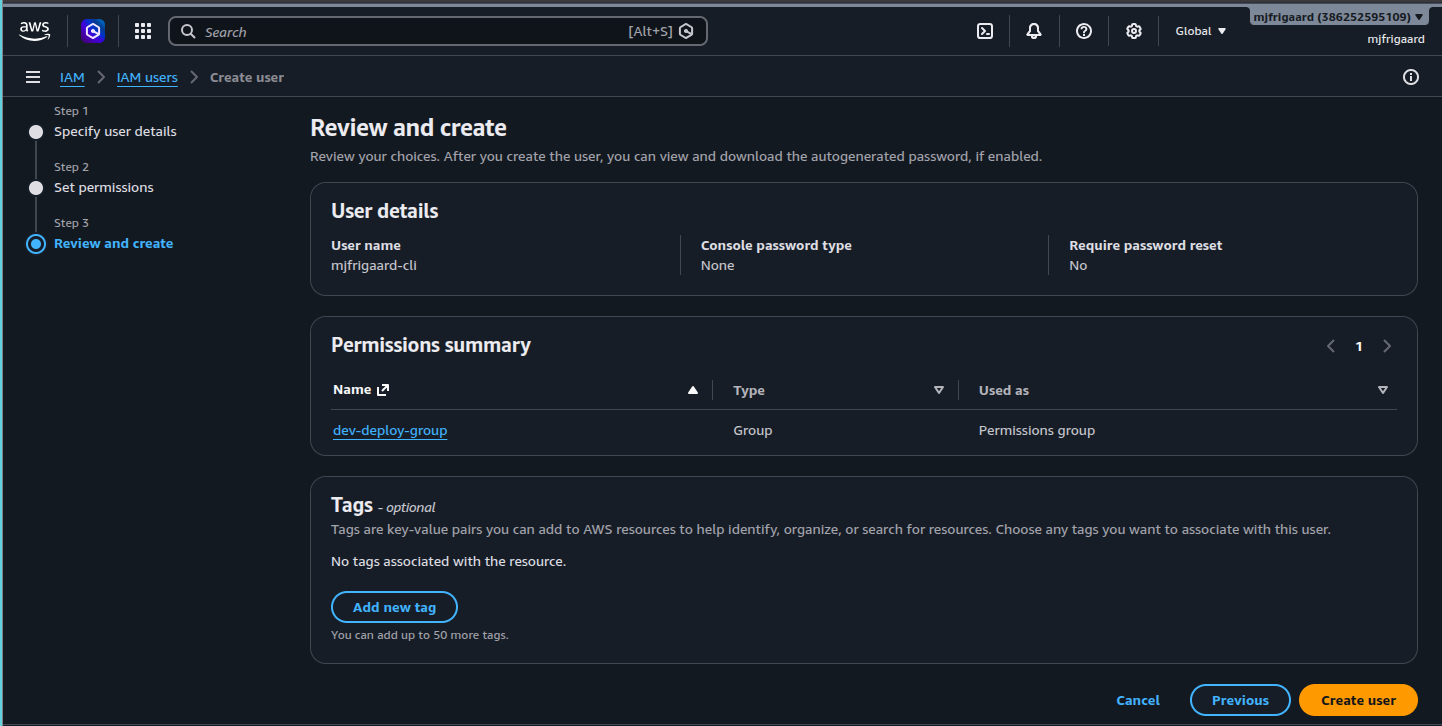
At this point, we’re given a chance to review our selections before confirming, which is also a great opportunity to quickly cover AWS IAM users and groups.
IAM: Core concepts
AWS IAM is somewhat like like Linux users and groups, but instead of file permissions, IAM uses policies to control who can do what, and where. Three core concepts to know about AWS IAM:
- A
useris an identity (a person or a service).1
- A
groupis a collection ofusersthat share permissions.2
- A
policyis a JSON document that says what actions are allowed on what resources3
Users don’t get permissions directly, they inherit permissions from the groups they belong to. If you’ve worked with Linux groups and file permissions before, the table below might be helpful for mapping the AWS IAM concepts.
| AWS IAM concept | Linux user/groups analog |
|---|---|
| IAM User | User |
| IAM Group | Group |
| IAM Policy (JSON file) | File permissions (rwx) |
| IAM Users list | /etc/passwd |
| Elevated permissions granted by attached policy | sudo |
| Access vis access key ID + secret access key | SSH keys |
So far, we’ve created/logged into our AWS account, then from the AWS Console, we 1) created an IAM group, 2) attached IAM policies to the IAM group, 3) created an IAM user, and 4) assigned that user to the IAM group.
Policies determine permissions
For example, say we have a new developer, Alice (alice). Alice wouldn’t get any permissions herself, but she’d be a member of the devs group, which has a S3ReadWrite policy attached, which allows Alice access to the my-data bucket.
%%{init: {'theme': 'base', 'themeVariables': {'fontFamily': 'monospace'}}}%%

graph LR

    Policy[/"Policy:<br><code>S3ReadWrite</code>"/]
    Groups("IAM Group:<br><code>devs</code>")
    Users("IAM User:<br><code>alice</code>")
    Resource[("S3 Bucket:<br><code>my-data"</code>)]

    Policy --> Groups --> Users --> Resource

    style Policy fill:#5B8C5A,stroke:#000000,stroke-width:1px,color:#ffffff
    style Resource fill:#D2562B,stroke:#000000,stroke-width:1px,color:#ffffff
    style Groups fill:#1B2A41,stroke:#000000,stroke-width:1px,color:#ffffff
    style Users fill:#2A6F77,stroke:#000000,stroke-width:1px,color:#ffffff
A policy is like a permissions file that specifies and effect (allow or deny), an action (what operation, like s3:PutObject), and the resource (what it applies to, i.e., a specific bucket).4
%%{init: {'theme': 'base', 'themeVariables': {'fontFamily': 'monospace'}}}%%

graph LR
    Policy[/"Policy<br>Document"/] --> Effect["<strong>Effect</strong>:<br><em>Allow</em>"]
    Policy --> Action["<strong>Action:</strong><br><em>s3:PutObject</em>"]
    Policy --> Resource[("<strong>Resource:</strong><br><em>arn:aws:s3:::my-bucket/*</em>")]

    style Policy fill:#5B8C5A,stroke:#000000,stroke-width:1px,color:#ffffff
    style Effect fill:#3E2A1E,stroke:#000000,stroke-width:1px,color:#ffffff
    style Action fill:#3E2A1E,stroke:#000000,stroke-width:1px,color:#ffffff
    style Resource fill:#D2562B,stroke:#000000,stroke-width:1px,color:#ffffff
What about multiple groups?
Like a Linux user being in multiple groups (sudo, docker, www-data), an IAM user can belong to multiple IAM groups. Consider the user alice below:
%%{init: {'theme': 'base', 'themeVariables': {'fontFamily': 'monospace'}}}%%


graph TD

    Users(["<strong>alice</strong>"]) --"In Group"--> DevGroup("<strong>devs</strong>")
    Users --"In Group"--> OpsGroup("<strong>ops</strong>")

    DevGroup --> S3Policy[/"<strong>Policy</strong>:<br><em>S3 Access</em>"/]
    OpsGroup --> EC2Policy[/"<strong>Policy</strong>:<br><em>EC2 Access</em>"/]

    S3Policy --> S3[("S3<br>Buckets")]
    EC2Policy --> EC2{{"EC2<br>Instances"}}


    style Users fill:#2A6F77,stroke:#000000,stroke-width:1px,font-size:14px,text-align:center,font-family:monospace,color:#ffffff

    style DevGroup fill:#1B2A41,stroke:#000000,stroke-width:1px,font-size:14px,text-align:center,font-family:monospace,color:#ffffff
    style OpsGroup fill:#1B2A41,stroke:#000000,stroke-width:1px,font-size:14px,text-align:center,font-family:monospace,color:#ffffff

    style S3Policy fill:#5B8C5A,stroke:#000000,stroke-width:1px,color:#ffffff
    style EC2Policy fill:#5B8C5A,stroke:#000000,stroke-width:1px,color:#ffffff

    style S3 fill:#D2562B,stroke:#000000,stroke-width:1px,color:#ffffff
    style EC2 fill:#D2562B,stroke:#000000,stroke-width:1px,color:#ffffff
Alice ends up with the combined permissions of both devs and ops groups (just like a Linux user inheriting from multiple group memberships).
Identities
In AWS, identities can be human users (i.e., people like alice logging in via console or CLI). But identities can also be service/automation users, which are things like GitHub Actions or applications that need programmatic access (like a system account or a service account key).
%%{init: {'theme': 'base', 'themeVariables': {'fontFamily': 'monospace'}}}%%

graph TD

    AWS(["AWS<br>Account"]) --"IAM User<br>(human)"--> Human("<strong>alice</strong>")
    AWS --"IAM User<br>(service)"--> Service("<strong>gha-bot</strong>")

    Human --> ConsoleAccess["Console Login +<br> CLI Keys"]
    Service --> Keys["Access Keys Only,<br>No Console"]

    style AWS fill:#E8A33D,stroke:#000000,stroke-width:1px,color:#ffffff

    style Human fill:#2A6F77,stroke:#000000,stroke-width:1px,font-size:14px,text-align:center,font-family:monospace,color:#ffffff
    style Service fill:#2A6F77,stroke:#000000,stroke-width:1px,font-size:14px,text-align:center,font-family:monospace,color:#ffffff

    style ConsoleAccess fill:#3E2A1E,stroke:#000000,stroke-width:1px,color:#ffffff
    style Keys fill:#3E2A1E,stroke:#000000,stroke-width:1px,color:#ffffff
IAM: Recap
Below is a full picture of IAM users, groups, policies and resources. We’ll be using all of these to stand up an EC2 instance, put our vetiver model/data into an S3 bucket, and give GitHub Actions the S3 credentials.
%%{init: {'theme': 'base', 'themeVariables': {'fontFamily': 'monospace'}}}%%

graph TD

    AWS(["AWS<br>Account"])

    AWS --> Users("IAM Users")
    AWS --> Groups("IAM Groups")
    AWS --> Policies[/"IAM Policies"/]
    AWS --> Roles["<em>IAM Roles<br>(optional, for cross<br>service access)</em>"]

    Users --> Groups
    Groups --> Policies
    Roles --> Policies
    Policies --> Resources{{"AWS Resources:<br>S3, EC2, etc"}}

    style AWS fill:#E8A33D,stroke:#000000,stroke-width:1px,color:#ffffff
    style Policies fill:#5B8C5A,stroke:#000000,stroke-width:1px,color:#ffffff
    style Roles fill:#3E2A1E,stroke:#000000,stroke-width:1px,color:#ffffff
    style Groups fill:#1B2A41,stroke:#000000,stroke-width:1px,color:#ffffff
    style Users fill:#2A6F77,stroke:#000000,stroke-width:1px,color:#ffffff
    style Resources fill:#D2562B,stroke:#000000,stroke-width:1px,color:#ffffff
IAM Roles (not covered in depth here) are like temporary identities services assume, e.g., an EC2 instance assuming a role to access S3 without needing stored credentials at all. This is the more secure long-term pattern, but access keys are the simpler starting point.
Creating Access Keys
In the IAM users dashboard, we can see:
- the
dev-deploy-group,
- the policies we attached to this group (
AmazonEC2FullAccessandAmazonS3FullAccess), and
- the new user we just created (
mjfrigaard-cli)
In the Summary section, there is an option to Create access key:
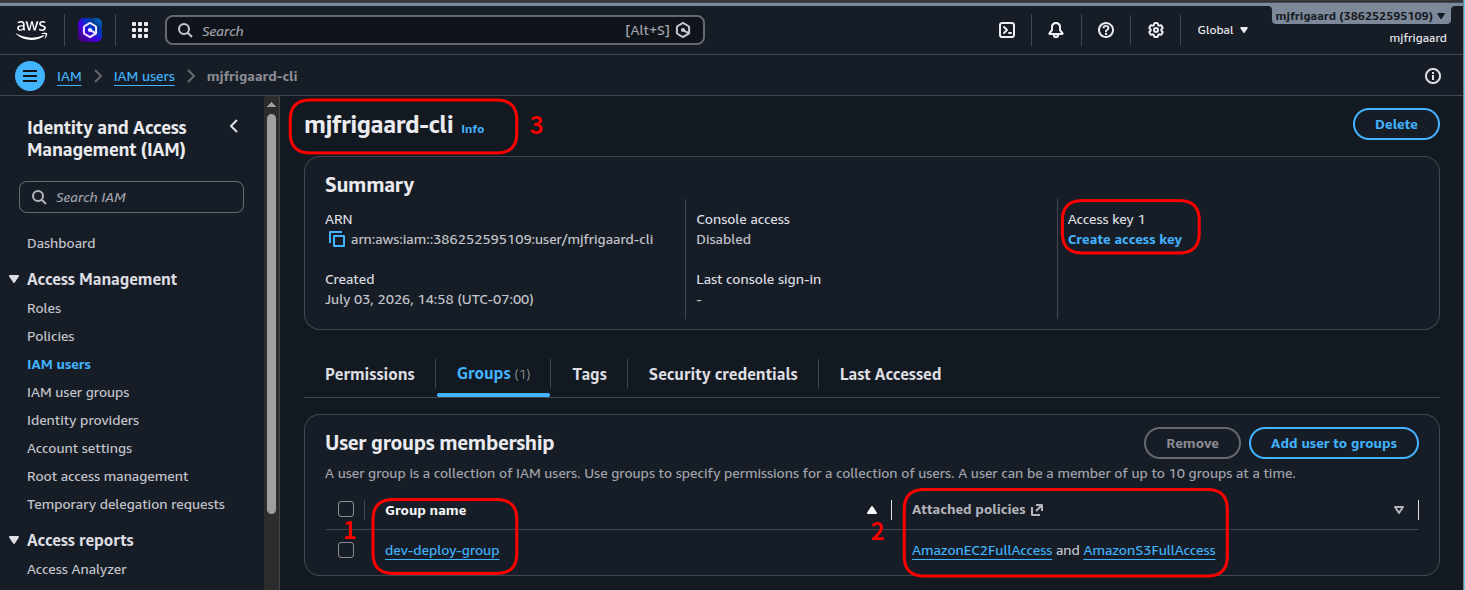
We want to click on Create access key under the Security credentials tab. The Use case we want is the Command Line Interface (CLI):
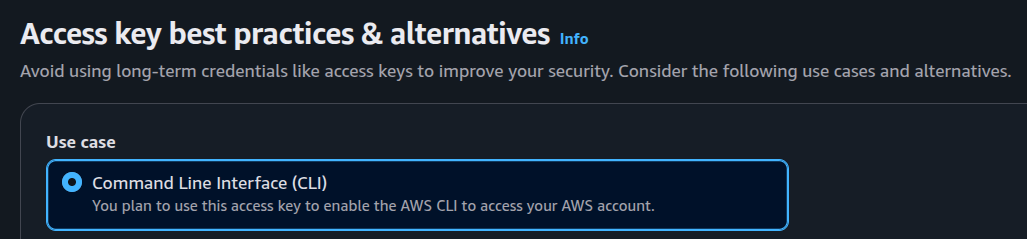
Follow the steps in the documentation (be sure to store the Access Key ID and Secret Access Key pair somewhere safe!).
Next we’ll cover installing the AWS Command Line Interface (CLI) on our local machine. This will allow us to control AWS from the command line.
Install AWS CLI
First we run the standard apt update:
sudo apt updateNext we download the latest version via the official installer:
curl "https://awscli.amazonaws.com/awscli-exe-linux-x86_64.zip" -o "awscliv2.zip"Install an unzip utility:
sudo apt install unzip -yUse unzip on the downloaded awscliv2.zip file:
unzip awscliv2.zipFinally, we install aws:
sudo ./aws/installYou should see:
# You can now run: /usr/local/bin/aws --versionVerify install
aws --version# aws-cli/2.35.15 Python/3.14.5 Linux/7.0.11-76070011-generic exe/x86_64.pop.24Logging in
Use the aws login command to log in with the Terminal:
aws loginSelect a region by clicking Enter:
No AWS region has been configured. The AWS region is the geographic location of
your AWS resources.

If you have used AWS before and already have resources in your account, specify
which region they were created in. If you have not created resources in your
account before, you can pick the region closest to you:
https://docs.aws.amazon.com/global-infrastructure/latest/regions/aws-regions.html.

You are able to change the region in the CLI at any time with the command "aws
configure set region NEW_REGION".
AWS Region [us-east-1]:
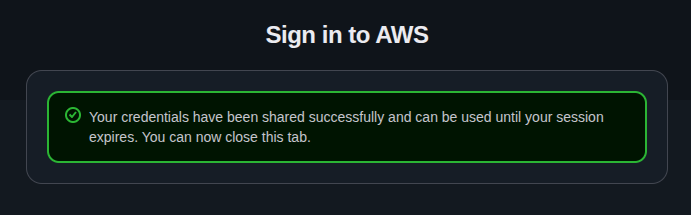
Then the browser opened and I was able to log in as the root user:
WarningAlternatives recommended
You might see the following recommendation for logging in:

I used the aws login command from the Terminal, but still needed an Access Key ID and Secret Access Key to configure the dev-deploy profile.
AWS Terminology Review
We’ve just created a new group, user, access key ID, and secret access key. Lets review these before going forward, because it got confusing for me the first time I completed this lab.
1. What is an ARN?
ARN = Amazon Resource Name. You may have noticed this under the Summary section for the mjfrigaard-cli user:
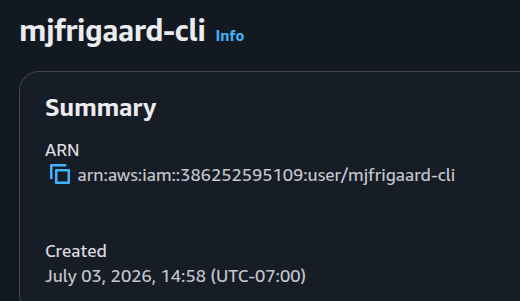
The ARN a unique identifier for a specific AWS resource (a user, bucket, instance, policy, etc).5 ARNs are similar to fully qualified file paths, but for AWS resources.
This is how it works:
arn:aws:iam::386252595109:user/mjfrigaard-cli| Part | Value | Meaning |
|---|---|---|
arn |
arn | Fixed prefix |
aws |
aws | Partition (the standard AWS, not something like GovCloud or China) |
iam |
iam | Service |
| (blank) | — | Region (IAM is global, so it doesn’t specify a region) |
386252595109 |
Account ID | Which AWS account owns this user |
user/mjfrigaard-cli |
Resource | this is an IAM user named mjfrigaard-cli |
%%{init: {'theme': 'base', 'themeVariables': {'fontFamily': 'monospace'}}}%%

graph LR
    ARN["ARN"] --"Partition"--> Partition["<strong>aws</strong>"]
    ARN --"Service"--> Service["<strong>iam<br>s3<br>ec2"]
    ARN --"Region"--> Region["<strong>us-east-1 </strong>"]
    ARN --"Account ID"--> Account["<strong>386252595109</strong>"]
    ARN --"Resource Path"--> Resource["<strong>user/mjfrigaard-cli</strong>"]

    style ARN fill:#E8A33D,stroke:#000000,stroke-width:1px,font-size:14px,text-align:left,font-family:monospace,color:#ffffff
    style Partition fill:#5B8C5A,stroke:#000000,stroke-width:1px,font-size:14px,text-align:left,font-family:monospace,color:#ffffff
    style Region fill:#3E2A1E,stroke:#000000,stroke-width:1px,font-size:14px,text-align:left,font-family:monospace,color:#ffffff
    style Service fill:#1B2A41,stroke:#000000,stroke-width:1px,font-size:14px,text-align:left,font-family:monospace,color:#ffffff
    style Account fill:#2A6F77,stroke:#000000,stroke-width:1px,font-size:14px,text-align:left,font-family:monospace,color:#ffffff
    style Resource fill:#D2562B,stroke:#000000,stroke-width:1px,font-size:14px,text-align:left,font-family:monospace,color:#ffffff
In plain English: “IAM user named mjfrigaard-cli in AWS account 386252595109.”
Should I keep my ARN a secret?
No–ARNs are not credentials. They are identifiers, similar to a username or a URL. It’s safe to share, log, or put in documentation. It does not grant access by itself (they just identify a resource).
However, you should keep the Access Key ID + Secret Access Key secret, because these are used to authenticate.
2. IAM Account IDs/Aliases
An account alias is a human-readable name you can set that will work like an Account ID. You may have seen the option to log in with an IAM account alias. By default, our AWS account is identified with a 12-digit number (called an Account ID). An Account ID is not secret like access keys (alone it can’t grant access to anything), but don’t share it unnecessarily.
To create an account alias, use the following command:
aws iam create-account-alias --account-alias my-company-nameThis changes your console log in URL from:
https://386252595109.signin.aws.amazon.com/consoleto:
https://my-company-name.signin.aws.amazon.com/consoleThis is a purely cosmetic change; it doesn’t affect permissions or ARNs.
CLI Configuration
Back in the Terminal, we’re going to configure a dev-deploy profile with the access keys for the IAM user in dev-deploy-group:
aws configure --profile dev-deployThis will prompt you for:
- Access Key ID
- Secret Access Key
- Region (
us-east-1) - Output format (
json)
The commands above only create a named credential profile stored locally at the following location (nothing was sent to AWS yet):
~/.aws/credentials   (keys)
~/.aws/config        (region/output format)
We can test our configuration with:
aws sts get-caller-identity --profile dev-deployThis asks AWS: “Using these credentials, who am I?”
It returns the following:
{
    "UserId": "AWS_ACCESS_KEY_ID",
    "Account": "NUMBER_SET",
    "Arn": "arn:aws:iam::386252595109:user/mjfrigaard-cli"
}
The sts command uses AWS’s security token service (STS) validated our keys and returned:
UserId: unique internal ID for this IAM userAccount: AWS account numberArn: confirms we are authenticated asmjfrigaard-cli
%%{init: {'theme': 'base', 'themeVariables': {'fontFamily': 'monospace'}}}%%


graph LR
    CLI(["CLI<br>(stored keys)"])
    STS("<strong>get-caller-identity<strong>")
    CLI --"Security<br>Token<br>Service"--> STS
    STS --Returns--> Response{{"<strong>UserId<br>Account<br>Arn</strong>"}}

    style CLI fill:#5B8C5A,stroke:#000000,stroke-width:1px,color:#ffffff
    style STS fill:#2A6F77,stroke:#000000,stroke-width:1px,font-size:14px,text-align:left,font-family:monospace,color:#fff
    style Response fill:#D2562B,stroke:#000000,stroke-width:1px,font-size:14px,text-align:left,font-family:monospace,color:#ffffff
This is the standard way to confirm we can CLI credentials are valid and check which identity they belong to.
In the next section, we’re going to cover launching an EC2 instance.
Read more about AWS IAM users↩︎
Read more about AWS IAM user groups↩︎
Read more about AWS IAM policies↩︎
This is conceptually similar to a Linux ACL entry, but scoped to AWS API actions instead of filesystem operations.↩︎
Read more about AWS ARN’s in the official documentation.↩︎