This chapter is being developed. Thank you for your patience.
This chapter covers using session$userData vs. reactiveValues() in an application to store values and objects. Whether to use session$userData or reactiveValues() will depend on the purpose you want them to serve (and what you want to store/access) in your application.
TipAccess the applications in this chapter
I’ve created the shinypak R package in an effort to make each section accessible and easy to follow. Install shinypak using pak (or remotes):
Calling reactiveValues() creates “an object for storing reactive values.” We’ve been storing the reactive values returned from the var_input module in the selected_vars object, then passing these values into the scatter_display module. 1
In the steps below we’ll walk through an example of using reactiveValues() to capture the selected_vars values returned from the var_input module and passed to the scatter_display module.
You should note a series of changes made to movies_server() in this branch:
reactiveValues() is used to create rVals
Instead of creating the selected_vars, the output from mod_var_input_server() is assigned to rVals as inputs
rVals is then passed as an input argument to mod_scatter_display_server()
.dev arguments have been added to both module server functions (and have been set to FALSE)
# assign inputs to rValsmovies_server <-function(input, output, session) {# create reactive values rVals <-reactiveValues()# assign inputs to rVals rVals$inputs <-mod_var_input_server("vars", .dev =FALSE)# view output in the UI output$vals <-renderPrint({ })# pass reactive values to displaymod_scatter_display_server("plot", rVals = rVals, .dev =FALSE)}
1
New reactiveValues() object
2
Returned values from mod_var_input_server() assigned to rVals$inputs
3
renderPrint() for displaying reactive values in UI
4
rVals object passed to mod_scatter_display_server()
In the steps below, we’ll view the structure and function of rVals and the reactive values in the application using methods covered in the Debug section.
33.1.1 Step 1
In movies_server(), the .dev in mod_var_input_server() is set to TRUE (the updated movies_server() function is below):
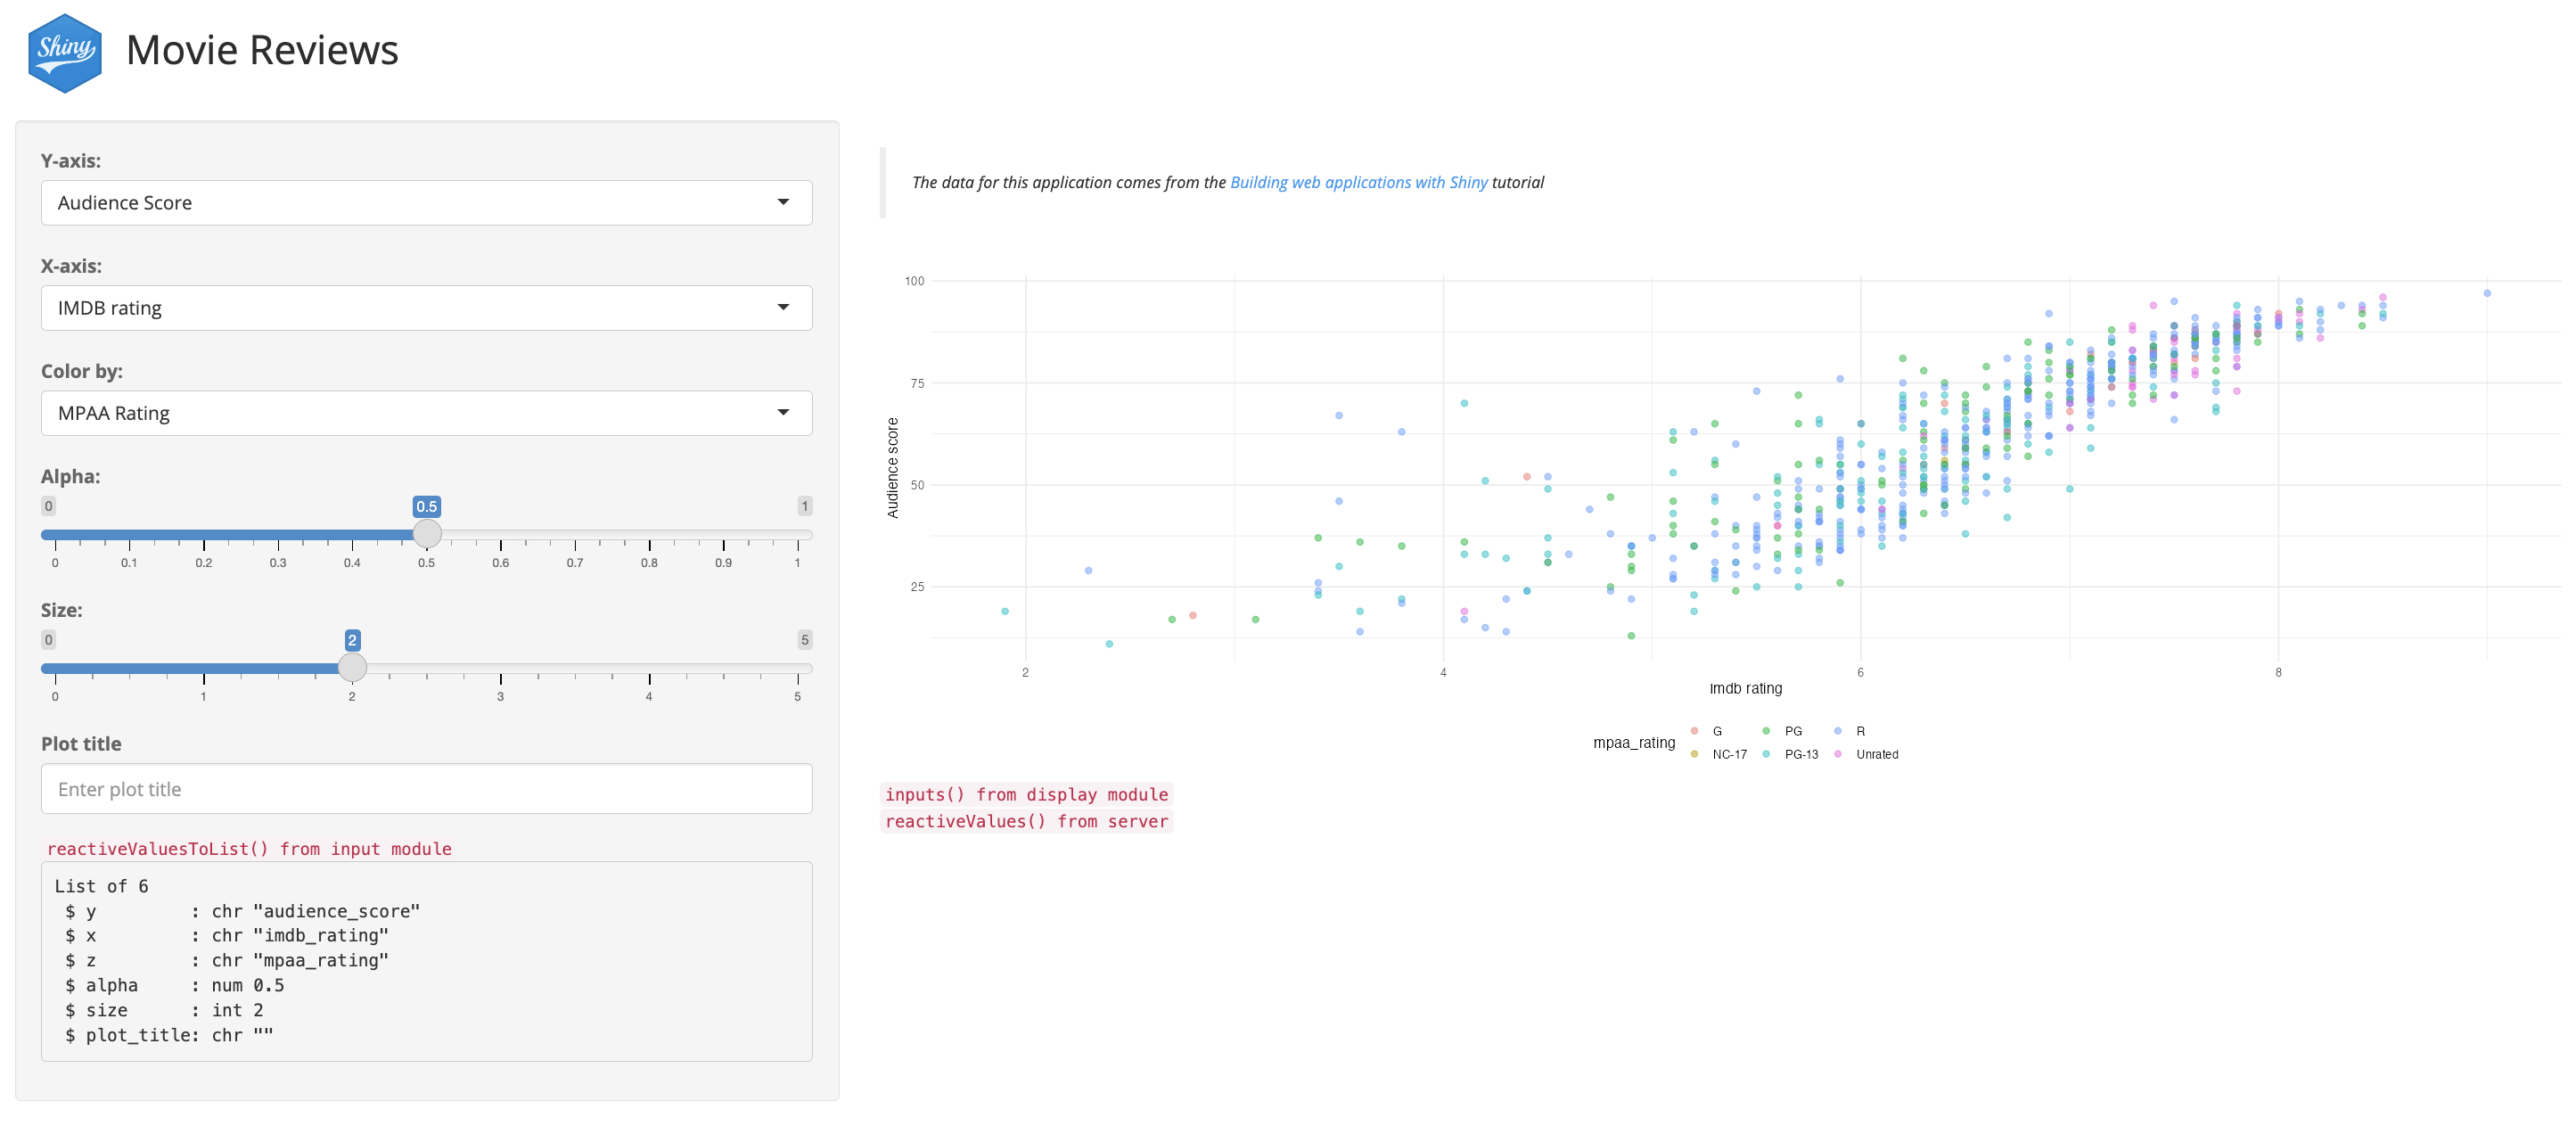
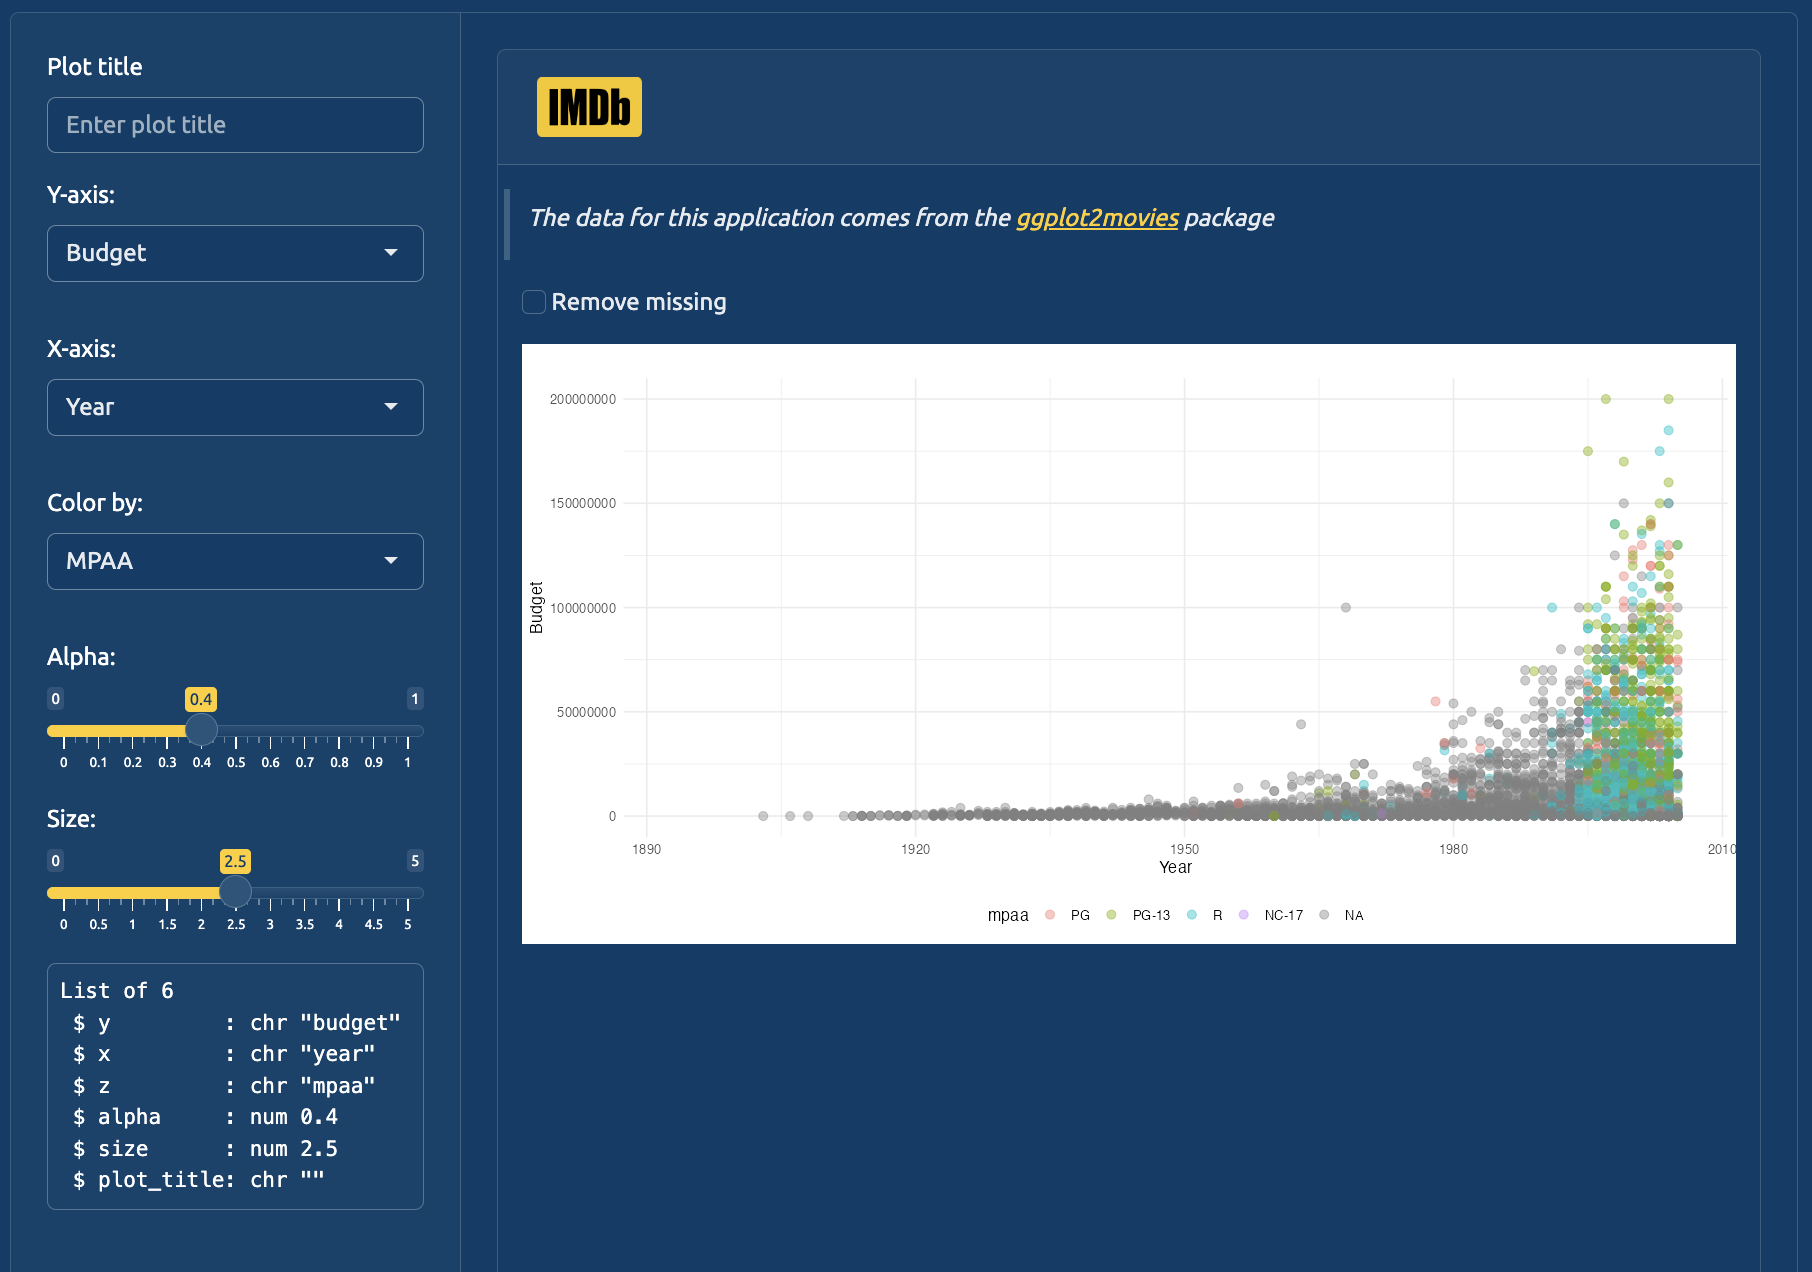
When we load the package and run the application, we see the following:2
(a) .dev = TRUE in mod_var_input_server()
Figure 33.1: reactive values from mod_var_input_server()
The output in the sidebar are the reactive values from the variable input module (mod_var_input_server()). The server function has been simplified to return the output from reactiveValuesToList(), and the output is being rendered in the sidebar when .dev is set to TRUE:
# assign inputs to rValsmovies_server <-function(input, output, session) {# create reactive values rVals <-reactiveValues()# assign inputs to rVals rVals$inputs <-mod_var_input_server("vars", .dev =TRUE)# view output in the UI output$vals <-renderPrint({str(rVals) })# pass reactive values to displaymod_scatter_display_server("plot", rVals = rVals, .dev =FALSE)}
1
Set .dev to TRUE
2
Display output from str(rVals)
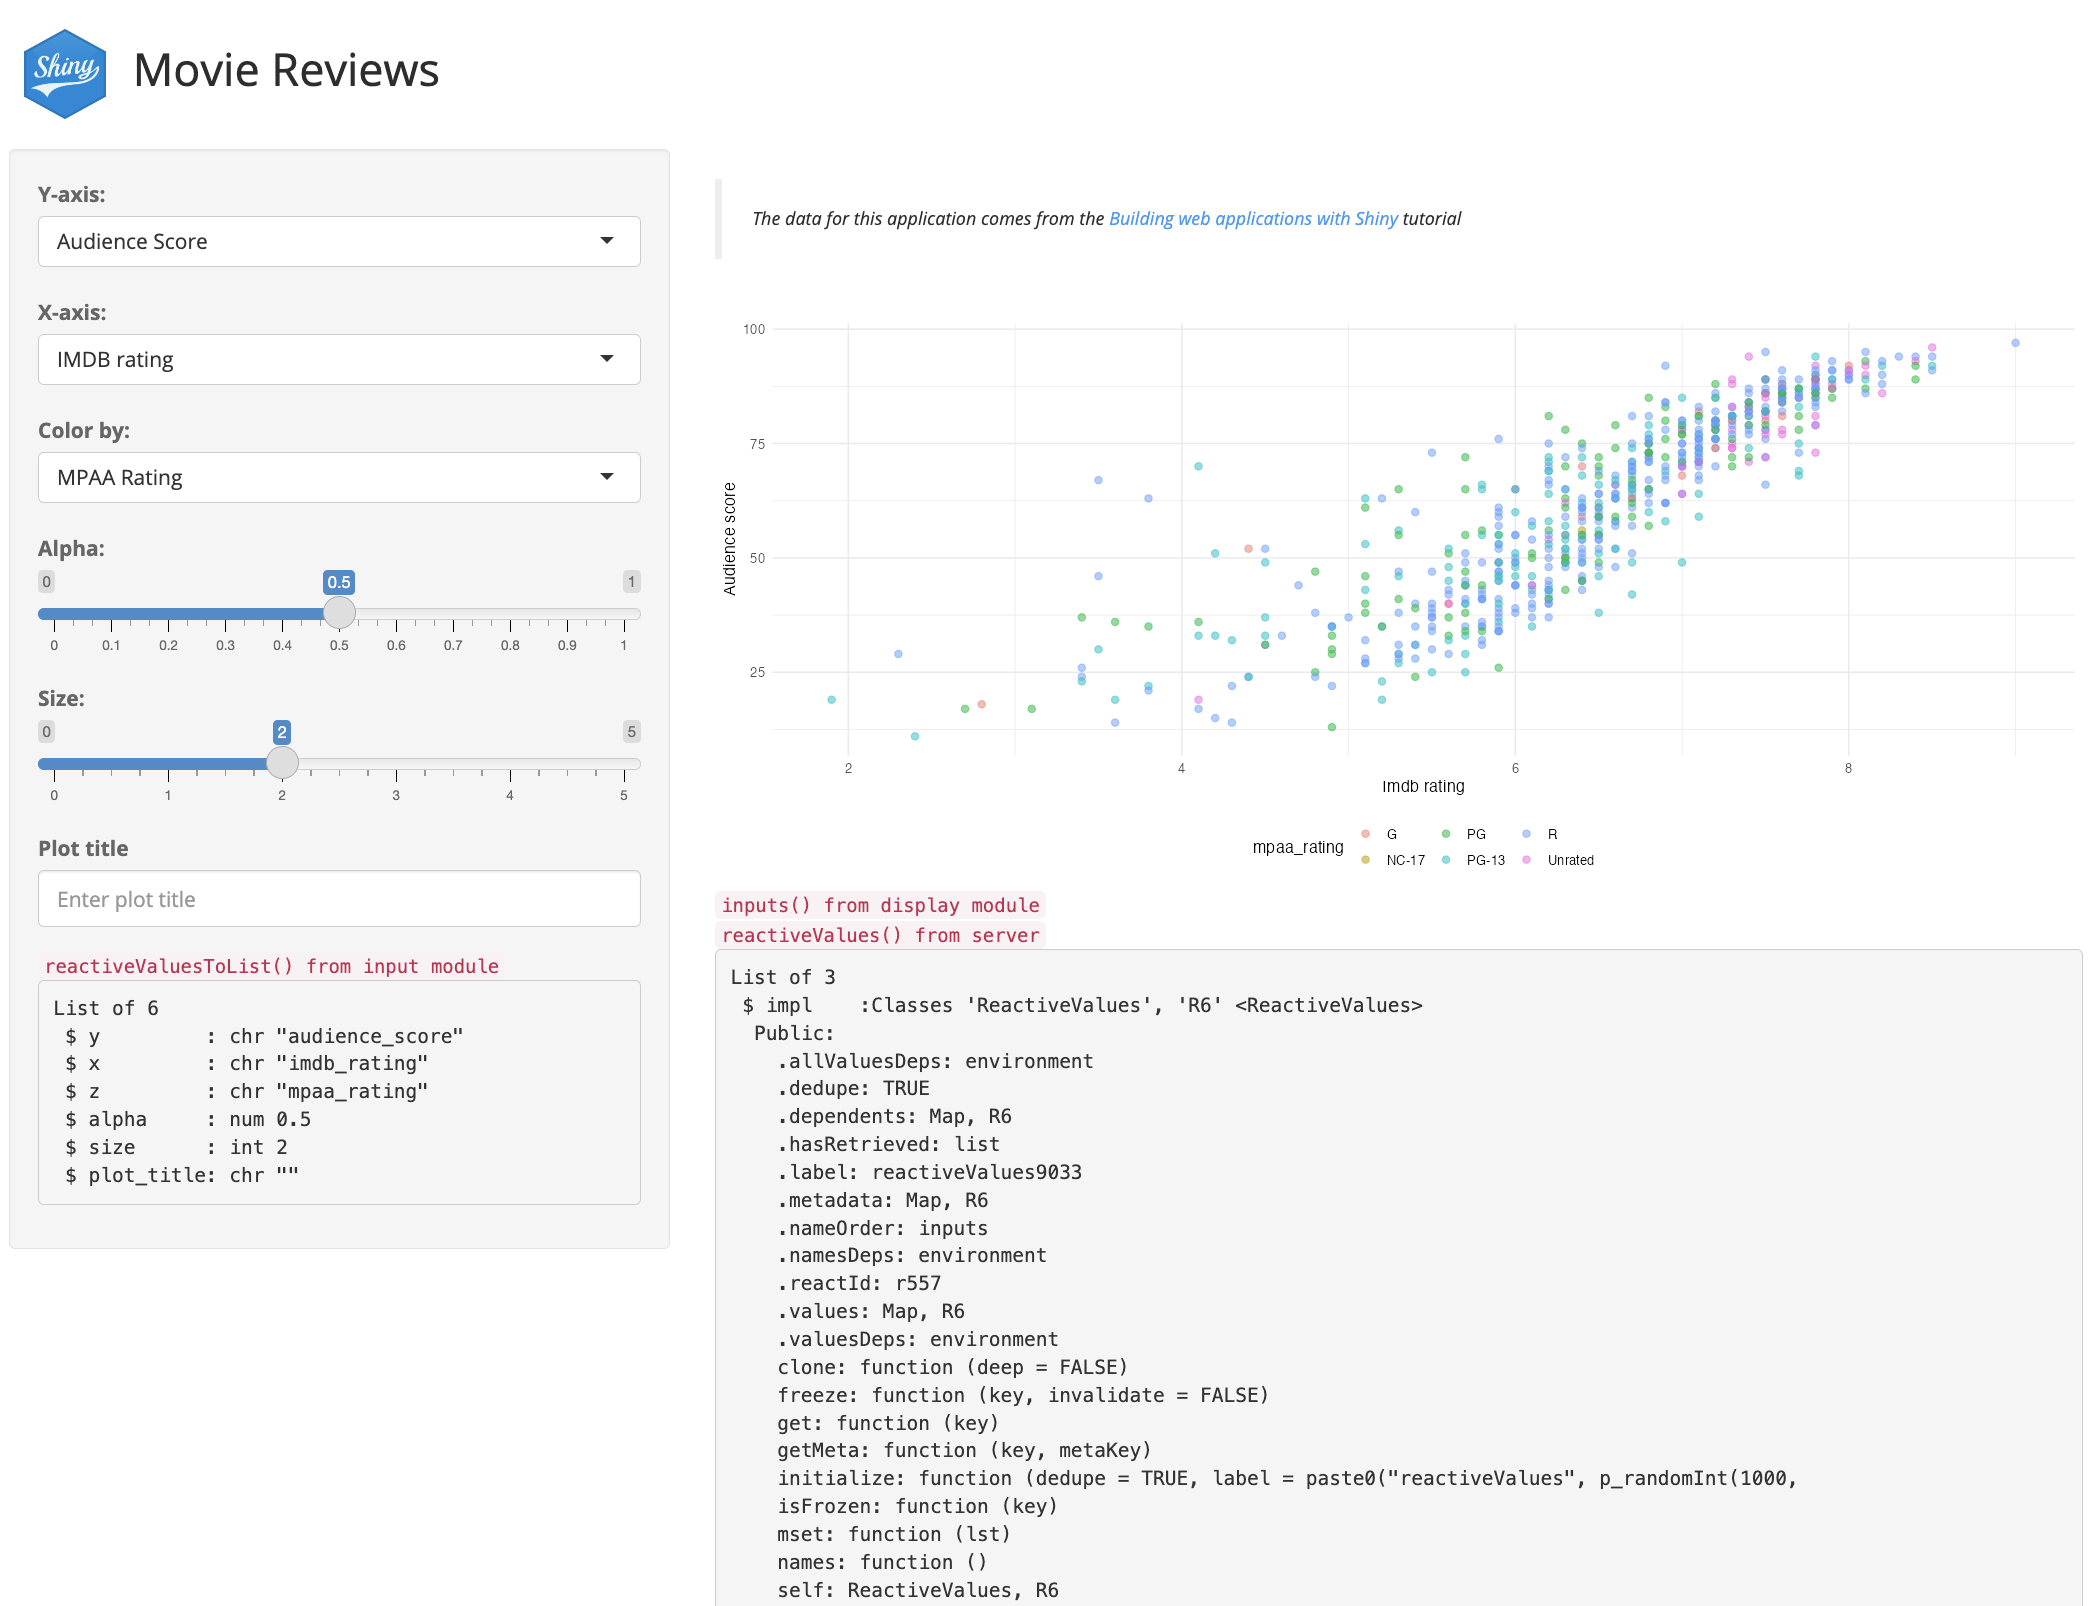
(a) str(rVals)from movies_server()
Figure 33.2: rVals$inputs() from movies_server()
33.1.2.1 What is reactiveValues()?
“When you read a value from it, the calling reactive expression takes a reactive dependency on that value, and when you write to it, it notifies any reactive functions that depend on that value. Note that values taken from the reactiveValues() object are reactive, but the reactiveValues() object itself is not.”Shiny Documentation
I’ve added emphasis to the quote above because it’s important to remember that any object assign to reactiveValue() should be treated like any reactive object (i.e., and inputId or object returned from reactive() or observe()).3
For example, if we try to access the input values as a list outside movies_server() or the module server function, we see the following error:4
# assign inputs to rValsmovies_server <-function(input, output, session) {# create reactive values rVals <-reactiveValues()# assign inputs to rVals rVals$inputs <-mod_var_input_server("vars", .dev =TRUE)# view output in the UI output$vals <-renderPrint({str(rVals$inputs()) })# pass reactive values to displaymod_scatter_display_server("plot", rVals = rVals, .dev =FALSE)}
1
Set .dev to TRUE
2
Display str(rVals$inputs())
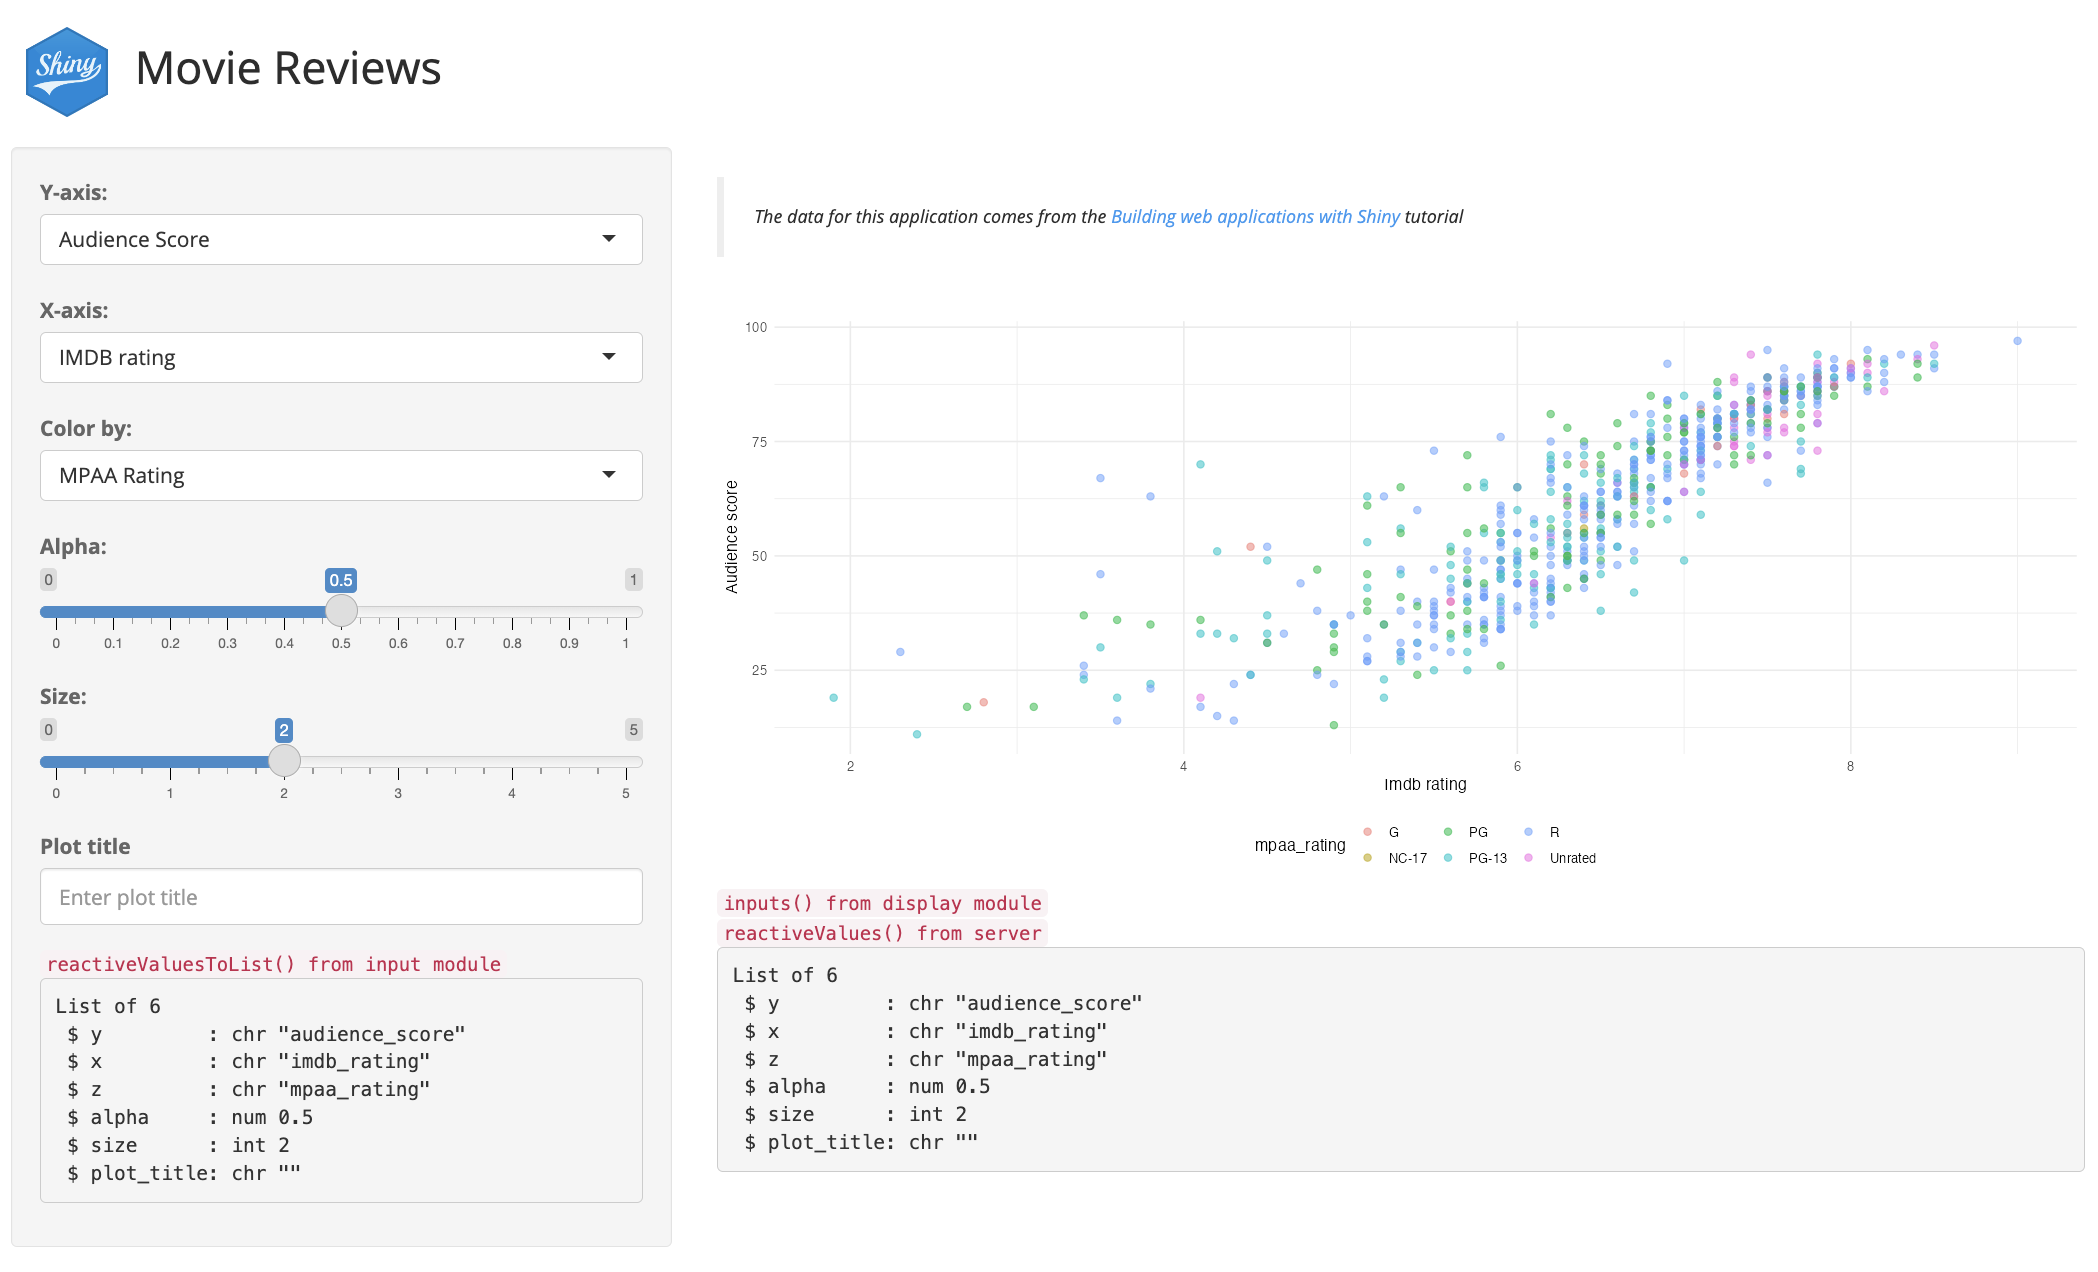
(a) str(rVals)from movies_server()
Figure 33.3: rVals$inputs() from movies_server()
The rVals$inputs() being rendered in movies_server() are the returned values from the variable input module (and they’re identical to the values in the sidebar).
When rVals is passed to mod_scatter_display_server(), the reactive inputs() object (passed inside the function) is built as rVals$inputs():
# assign inputs to rValsmovies_server <-function(input, output, session) {# create reactive values rVals <-reactiveValues()# assign inputs to rVals rVals$inputs <-mod_var_input_server("vars", .dev =TRUE)# view output in the UI output$vals <-renderPrint({ rVals$inputs() })# pass reactive values to displaymod_scatter_display_server("plot", rVals = rVals, .dev =TRUE)}
1
Set .dev to TRUE
2
Display rVals$inputs()
3
Set .dev to TRUE
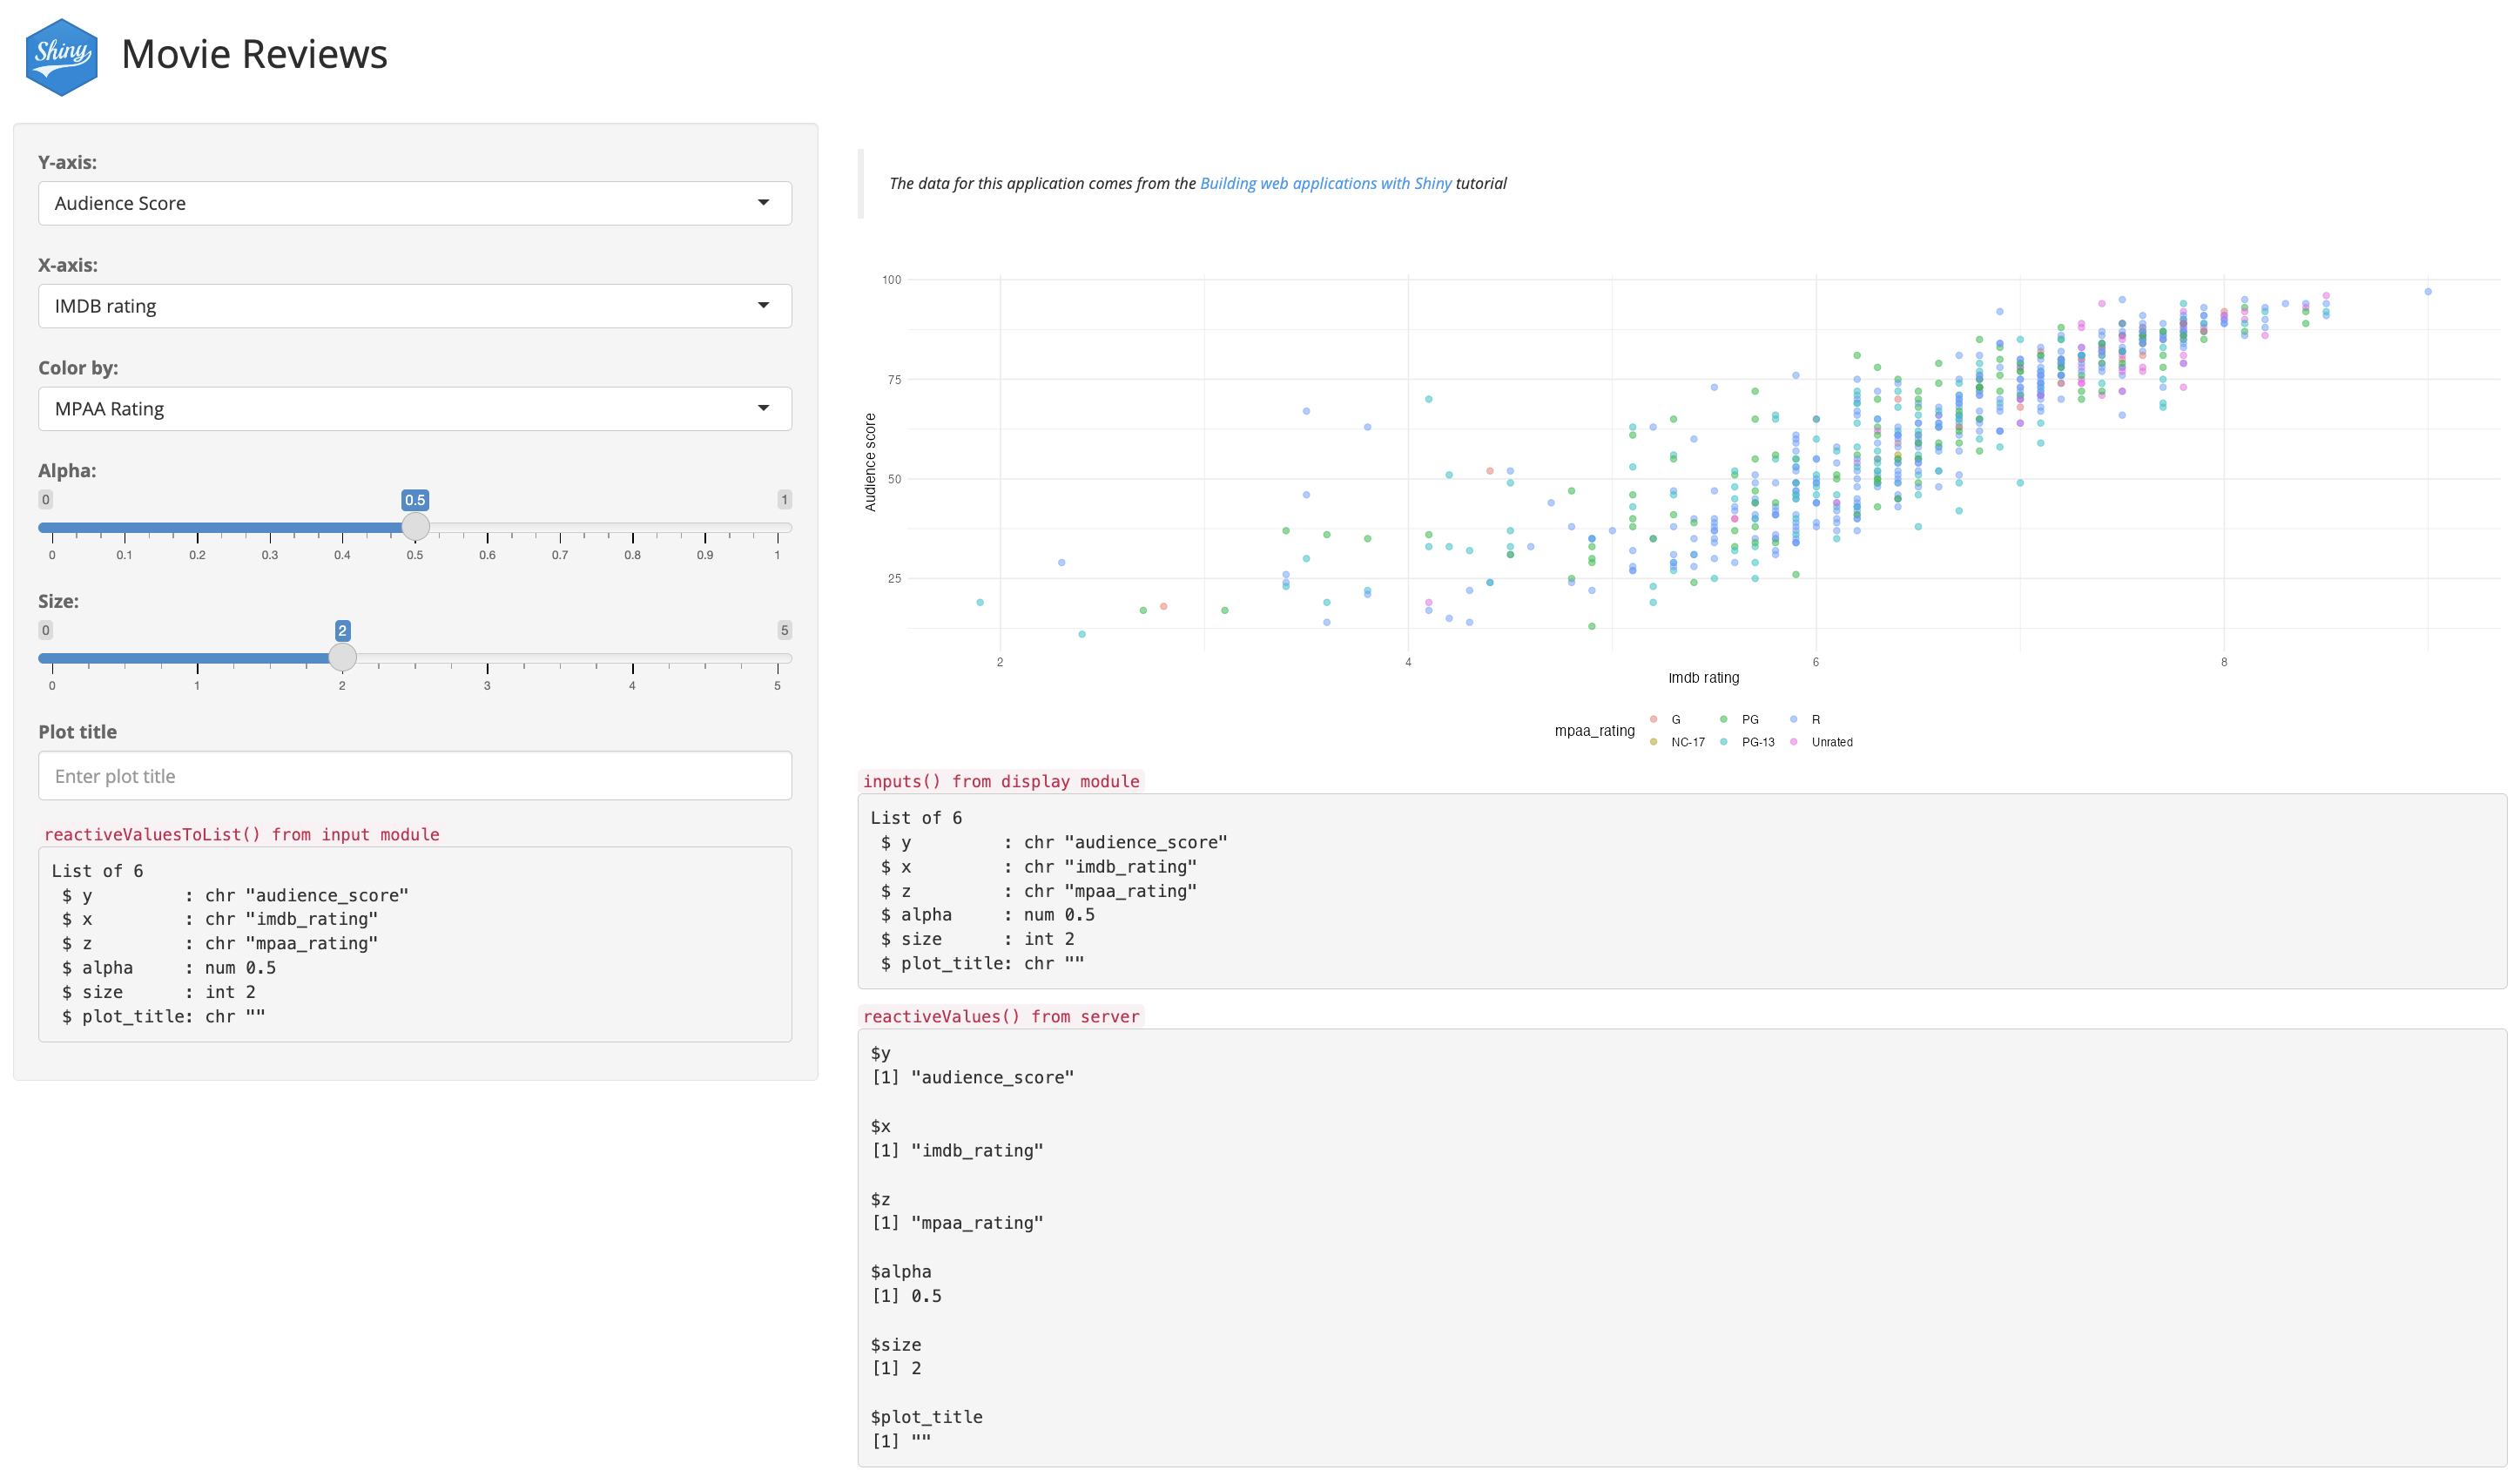
(a) .dev set to TRUE and reactive values from movies_server()
Figure 33.4: Both module .dev arguments set to TRUE and rVals$inputs() from movies_server()
The display we’re seeing directly below the graph (i.e., under inputs()fromdisplaymodule) is the structure of rVals$inputs() from mod_scatter_display_server():
if (.dev) {# view output in the UI output$display_vals <-renderPrint({str( rVals$inputs() ) })}
An important thing to note is that we can only reference rVals$inputs() in a reactive consumer (i.e., using reactive(), observe(), etc.). That’s why when we change any of the UI inputs, the values change in rVals$inputs() and in the inputs() object inside the display module.
You can also view these outputs using launch_app(run = 'b', bslib = TRUE).
33.1.5 Testing reactiveValues()
If you decide to use reactiveValues() or session$userData, you’ll need to confirm these objects in your tests. The module tests for test-mod_scatter_display.R have been redesigned to handle the reactiveValues() input.5
I’ll briefly summarize the changes below:
args = list() in testServer() now takes the output from helper functions (stored in tests/testthat/helper.R and R/testthat.R). 6
Objects stored in session$userData are not inherently reactive, which makes it ideal for storing persistent values or data that don’t require (or trigger) reactivity. Below is a demonstration of using session$userData to store a non-reactive function to be used in the inst/tidy-data/ application.
Objects we want to pass inside the server (and modules) but don’t need to update or change are perfect for session$userData. The example we’ll use below is a function (make_dev_ggp2_movies()) that prepares the ggplot2movies::movies for the application:
make_dev_ggp2_movies() is designed to take a path or URL (i.e., a connection) as an input and returns a dataset that can be used in the inst/tidy-data/ application.
In the inst/tidy-data/app.R file, the following changes have been made to devServer():
session$userData stores the contents of make_dev_ggp2_movies()
Create userData$make_dev_ggp2_movies that holds make_dev_ggp2_movies()
2
Create rVals
3
Assign output from mod_var_input_server() to rVals$inputs
4
Updated dev_mod_scatter_server() function
To view what’s happening with session$userData, we’ll run the application using the Run App button at the top of app.R
(a) Initial app in dev/inst/app.R
Figure 33.5: The reactive values from mod_var_input_server() in the sidebar
We’re using the same version of mod_var_input_server() from above that includes a .dev argument, so we know it’s displaying the contents from reactiveValuesToList() in the sidebar.
33.2.1 Step 1
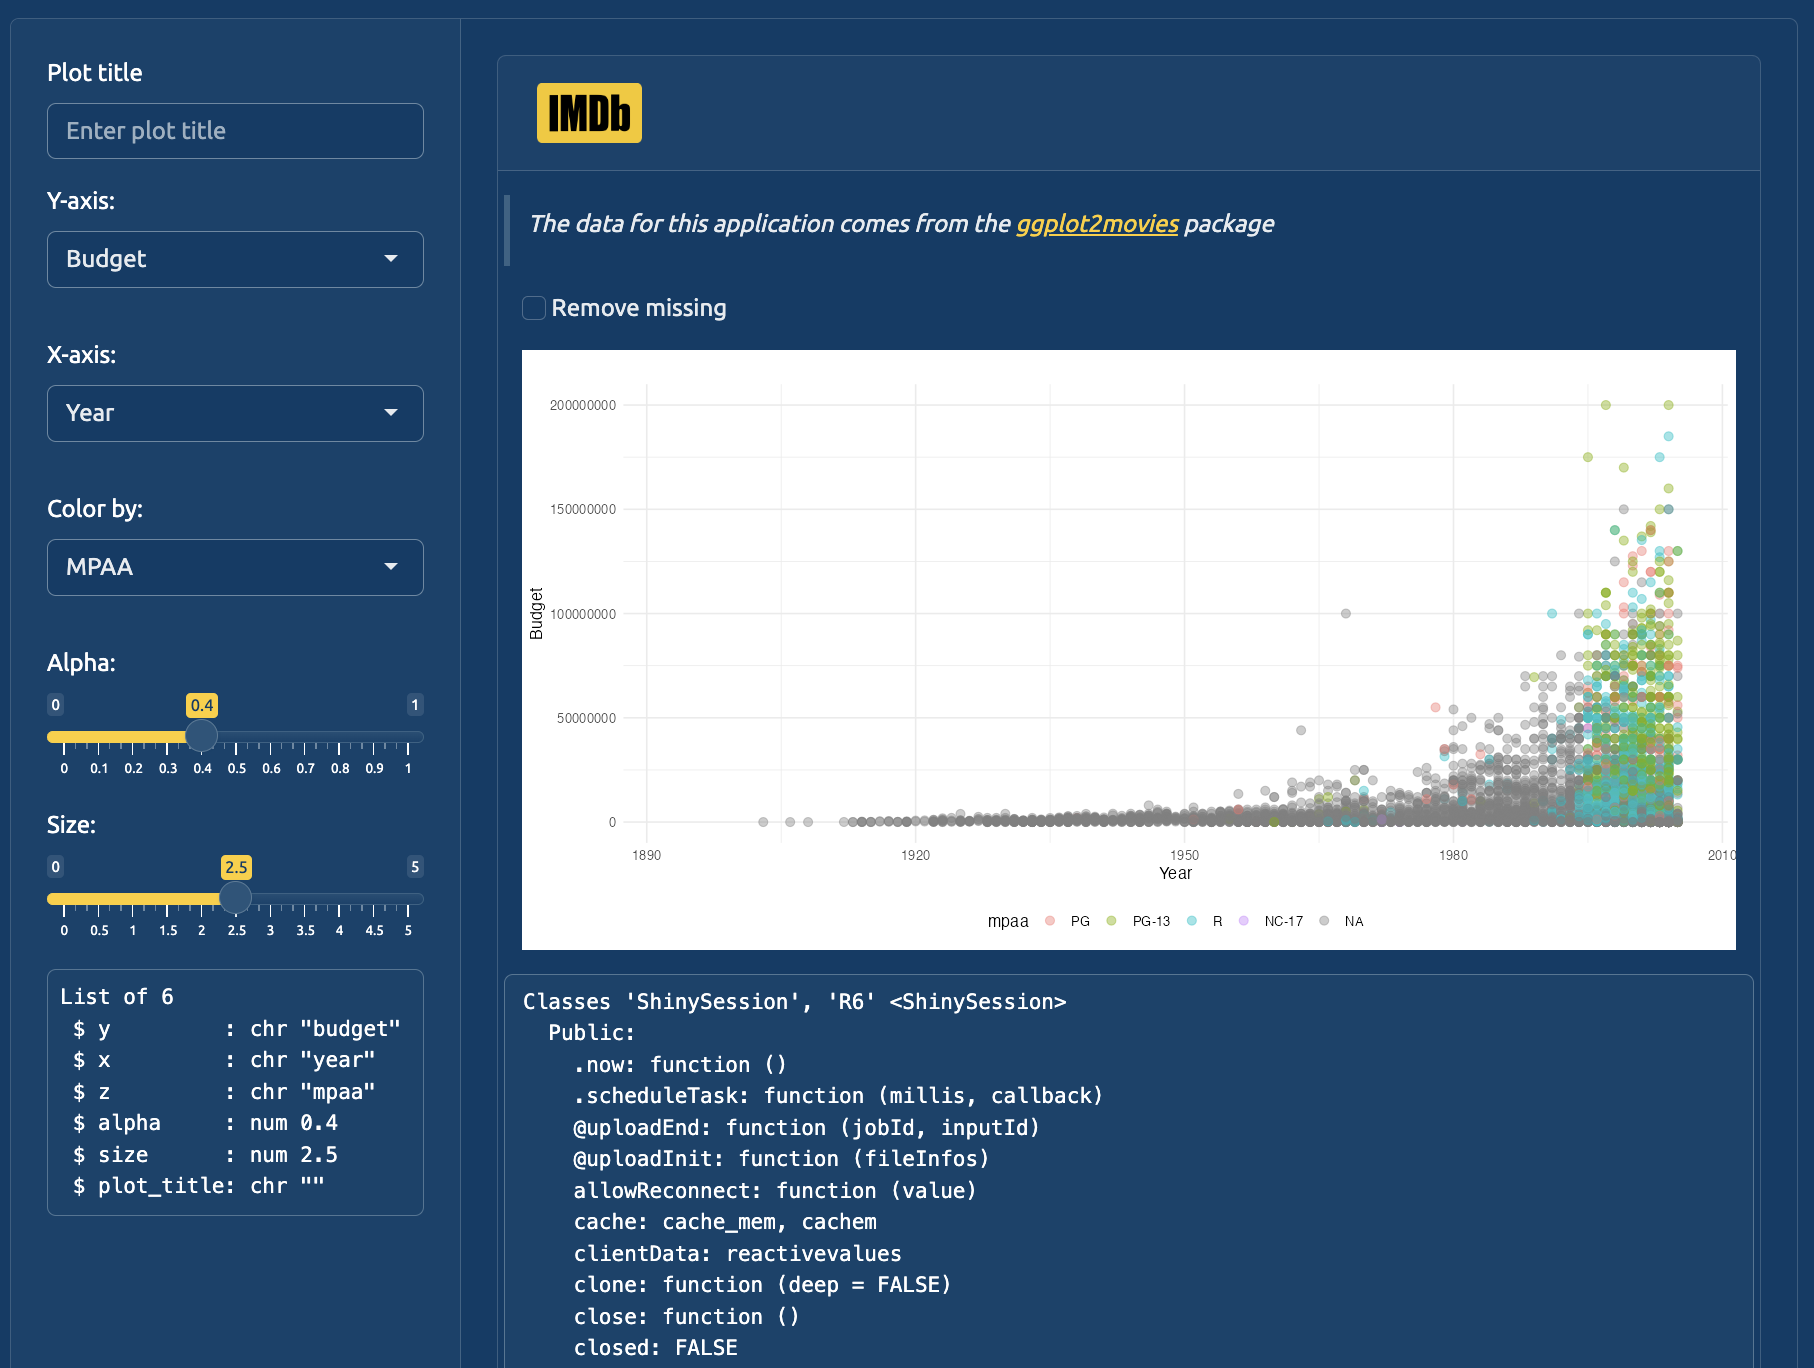
In devServer(), a renderPrint() call has been added to display the structure of session in the UI:
devServer <-function(input, output, session) {# add function to userData session$userData$make_dev_ggp2_movies <- make_dev_ggp2_movies# create reactive values rVals <-reactiveValues()# assign inputs to rVals rVals$inputs <- sap::mod_var_input_server("vars",.dev =TRUE)# view output in the UI output$vals <-renderPrint({str(session) })dev_mod_scatter_server("plot",rVals = rVals,data_fun = session$userData$make_dev_ggp2_movies, con ="https://bit.ly/3FQYR8j",.dev =FALSE )}
1
Create userData$make_dev_ggp2_movies that holds make_dev_ggp2_movies()
2
Create rVals
3
Assign output from mod_var_input_server() to rVals$inputs
4
Print the structure of session to UI
5
Updated dev_mod_scatter_server() function
(a) str(session)dev/inst/app.R
Figure 33.6: The str(session) from devServer()
33.2.1.1 What is session?
Each time the app launches, the session list is created and tied to that particular ’session.
“An environment for app authors and module/package authors to store whatever session-specific data they want.”Shiny Documentation
session$userData can store objects that should persist across different reactive contexts, but don’t need reactive updating (and won’t trigger reactivity). On the other hand, reactiveValues() creates objects stored in a reactive ‘state’, which will trigger reactive updates in the UI.’8
dev_mod_scatter_server() includes both reactiveValues() and session$userData. The arguments for rVals, data_fun, con, and .dev are described below:
rVals is the reactiveValues() object with our input values
data_fun is session$userData$make_dev_ggp2_movies
con is the path or URL to the data_fun in session$userData9
dev_mod_scatter_server("plot",rVals = rVals,data_fun = session$userData$make_dev_ggp2_movies, con ="https://bit.ly/3FQYR8j",.dev =TRUE )
1
Change to TRUE
Load (with load_all()) and the app by clicking on the Run App icon:
(a) data_fundev_mod_scatter_server()
Figure 33.7: The data_fun argument from dev_mod_scatter_server() is not reactive
We can see data_fun() is passed to dev_mod_scatter_server() from devServer() and is not a reactive (it’s a standard function we can apply to app_data).
Tests are more difficult for modules using session$userData, because these values are created when a Shiny app object is created (and exist inside the reactive context). This point is covered in more detail in this blog post.
“reusing objects passed through session violates module independence – there is code inside the module that uses external objects without stating them explicitly as server arguments.”
Recap
TipRecap: reactiveValues() & session$userData
session$userData
session$userData is best used with values or objects that persist across actions or navigation inside the app (i.e., maintaining values or data across pages of a multi-page app). session$userData can react to changes, but we’d need to explicitly create these reactive expressions or observers.
reactiveValues()
An object created with reactiveValues() is designed to be reactive, so changing values will trigger reactivity in any observers and/or reactives that depend on those values. Remember that ‘values taken from the reactiveValues() object are reactive, but the reactiveValues() object itself is not.’