# Load required libraries
library(shiny)
library(ggplot2)
library(dplyr)
library(readr)
library(bslib)
library(thematic)

# Setup thematic to automatically adjust plot theme to match app theme
thematic_shiny(font = "auto")

# Run the application
movie_visualization_app()26 Shiny Assistant
The Shiny Assistant is an AI-powered chatbot anyone can use to help them build a Shiny application.
“you can ask it questions about Shiny, or to create a Shiny application from scratch, or ask it to make changes to an existing application.” - Shiny Assistant, Winston Chang
26.1 IDE + Chat
Launch app with the shinypak package:
launch('26_llm-shiny-assist')The UI for Shiny Assistant looks like a standard chat, but if asked to “Open the editor,” an IDE opens with a script editor, console, and viewer pane:
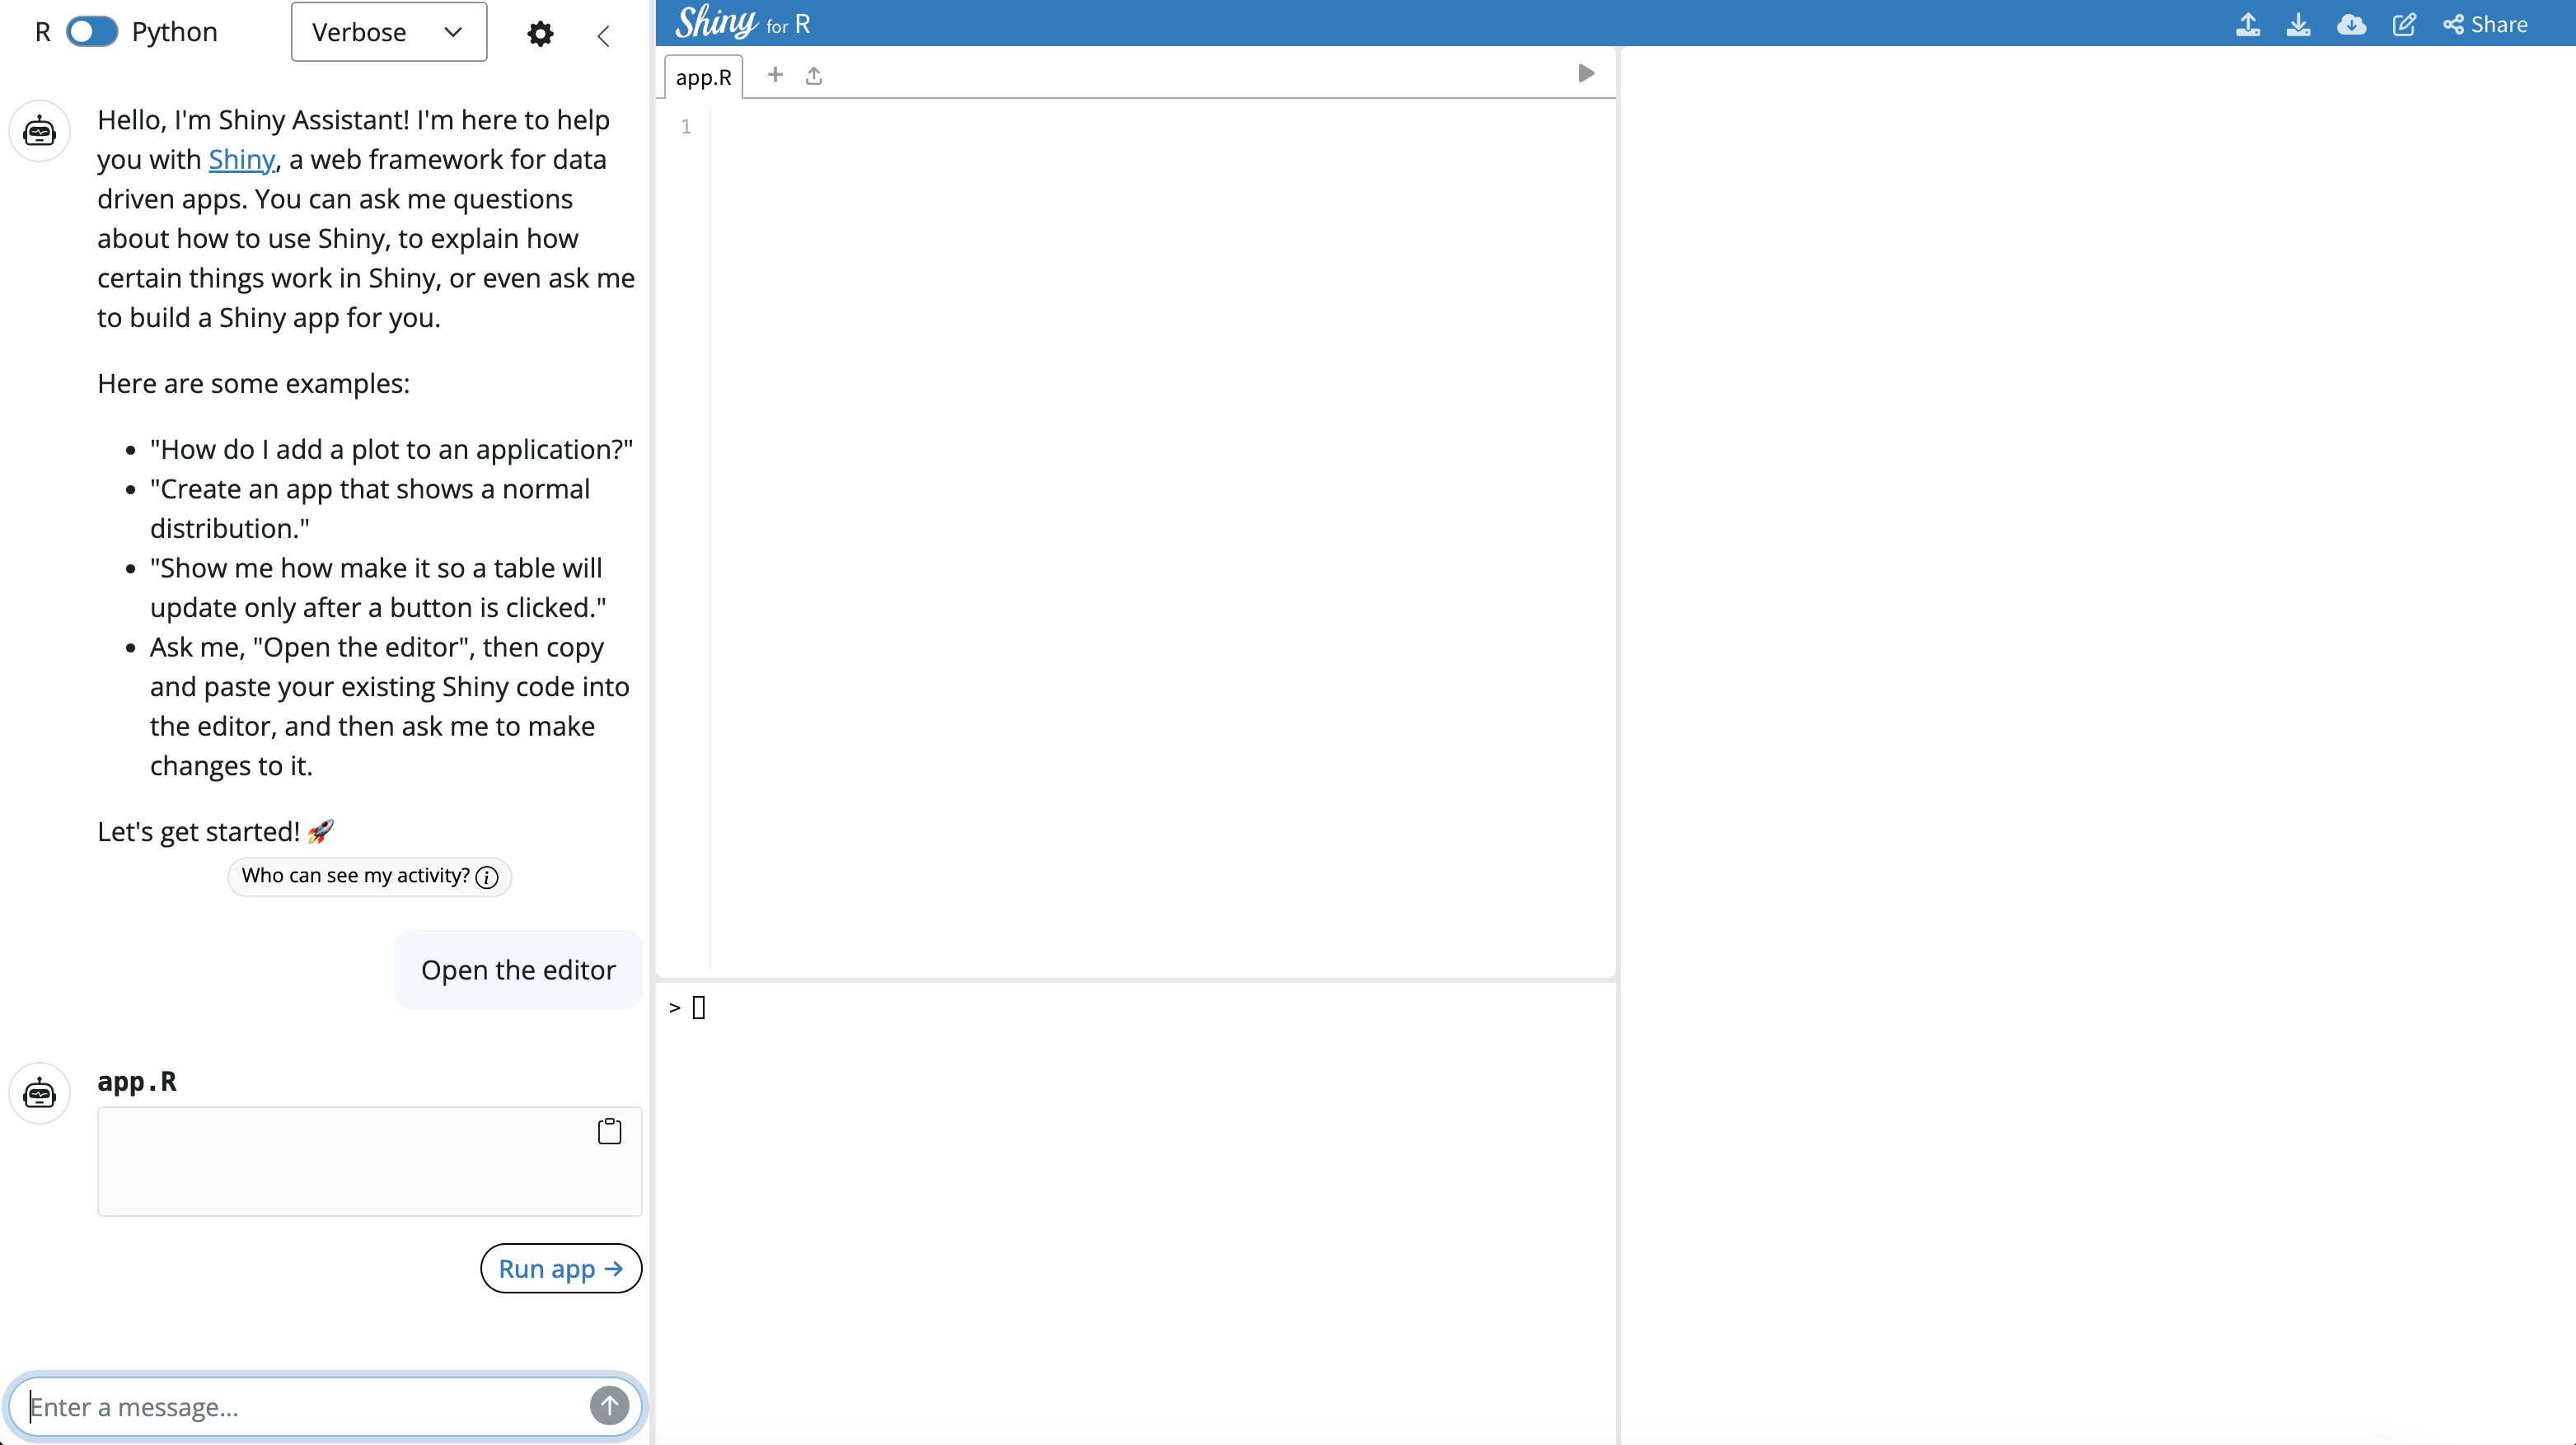
Shiny Assistant is useful for exploring different UI components, layouts, and styling (colors, themes, fonts, etc.). In this guide, we will build a simple app-package using Shiny Assistant, but we’ll limit the number of prompts to keep it short. For a more detailed example of using Shiny Assistant to create an application, check out this post on Appsilon’s blog.
The Shiny Assistant is a highly useful tool in your development toolkit, even with limited prompts. Let’s get started!
26.1.1 Prompt 1: Build an app
Let’s start by reverse-engineering the primary application in sap. It’s typical to have data before having an idea for a dashboard or app, so we’ll pass the structure of a simplified version of our movies data to the Shiny Assistant with some instructions on what we’d like to see::2
Prompt: Create a shiny application that visualizes IMDB movie data using a scatter plot. Include inputs for x, y, color, size, and transparency.
The column names are below:
``` Rows: 651 Columns: 18 $ title… $ genre … $ runtime … $ year … $ top200_box … $ director … $ mpaa_rating … $ imdb_rating … $ critics_rating … $ audience_rating … $ imdb_num_votes … $ critics_score … $ audience_score … $ best_pic_nom … $ best_pic_win … $ best_actor_win … $ best_actress_win … $ best_dir_win … ```
Use the data stored in this URL:
https://raw.githubusercontent.com/mjfrigaard/sap/refs/heads/26_llm-shiny-assist/data-raw/movies_sample.csv
Below we can see the initial app:
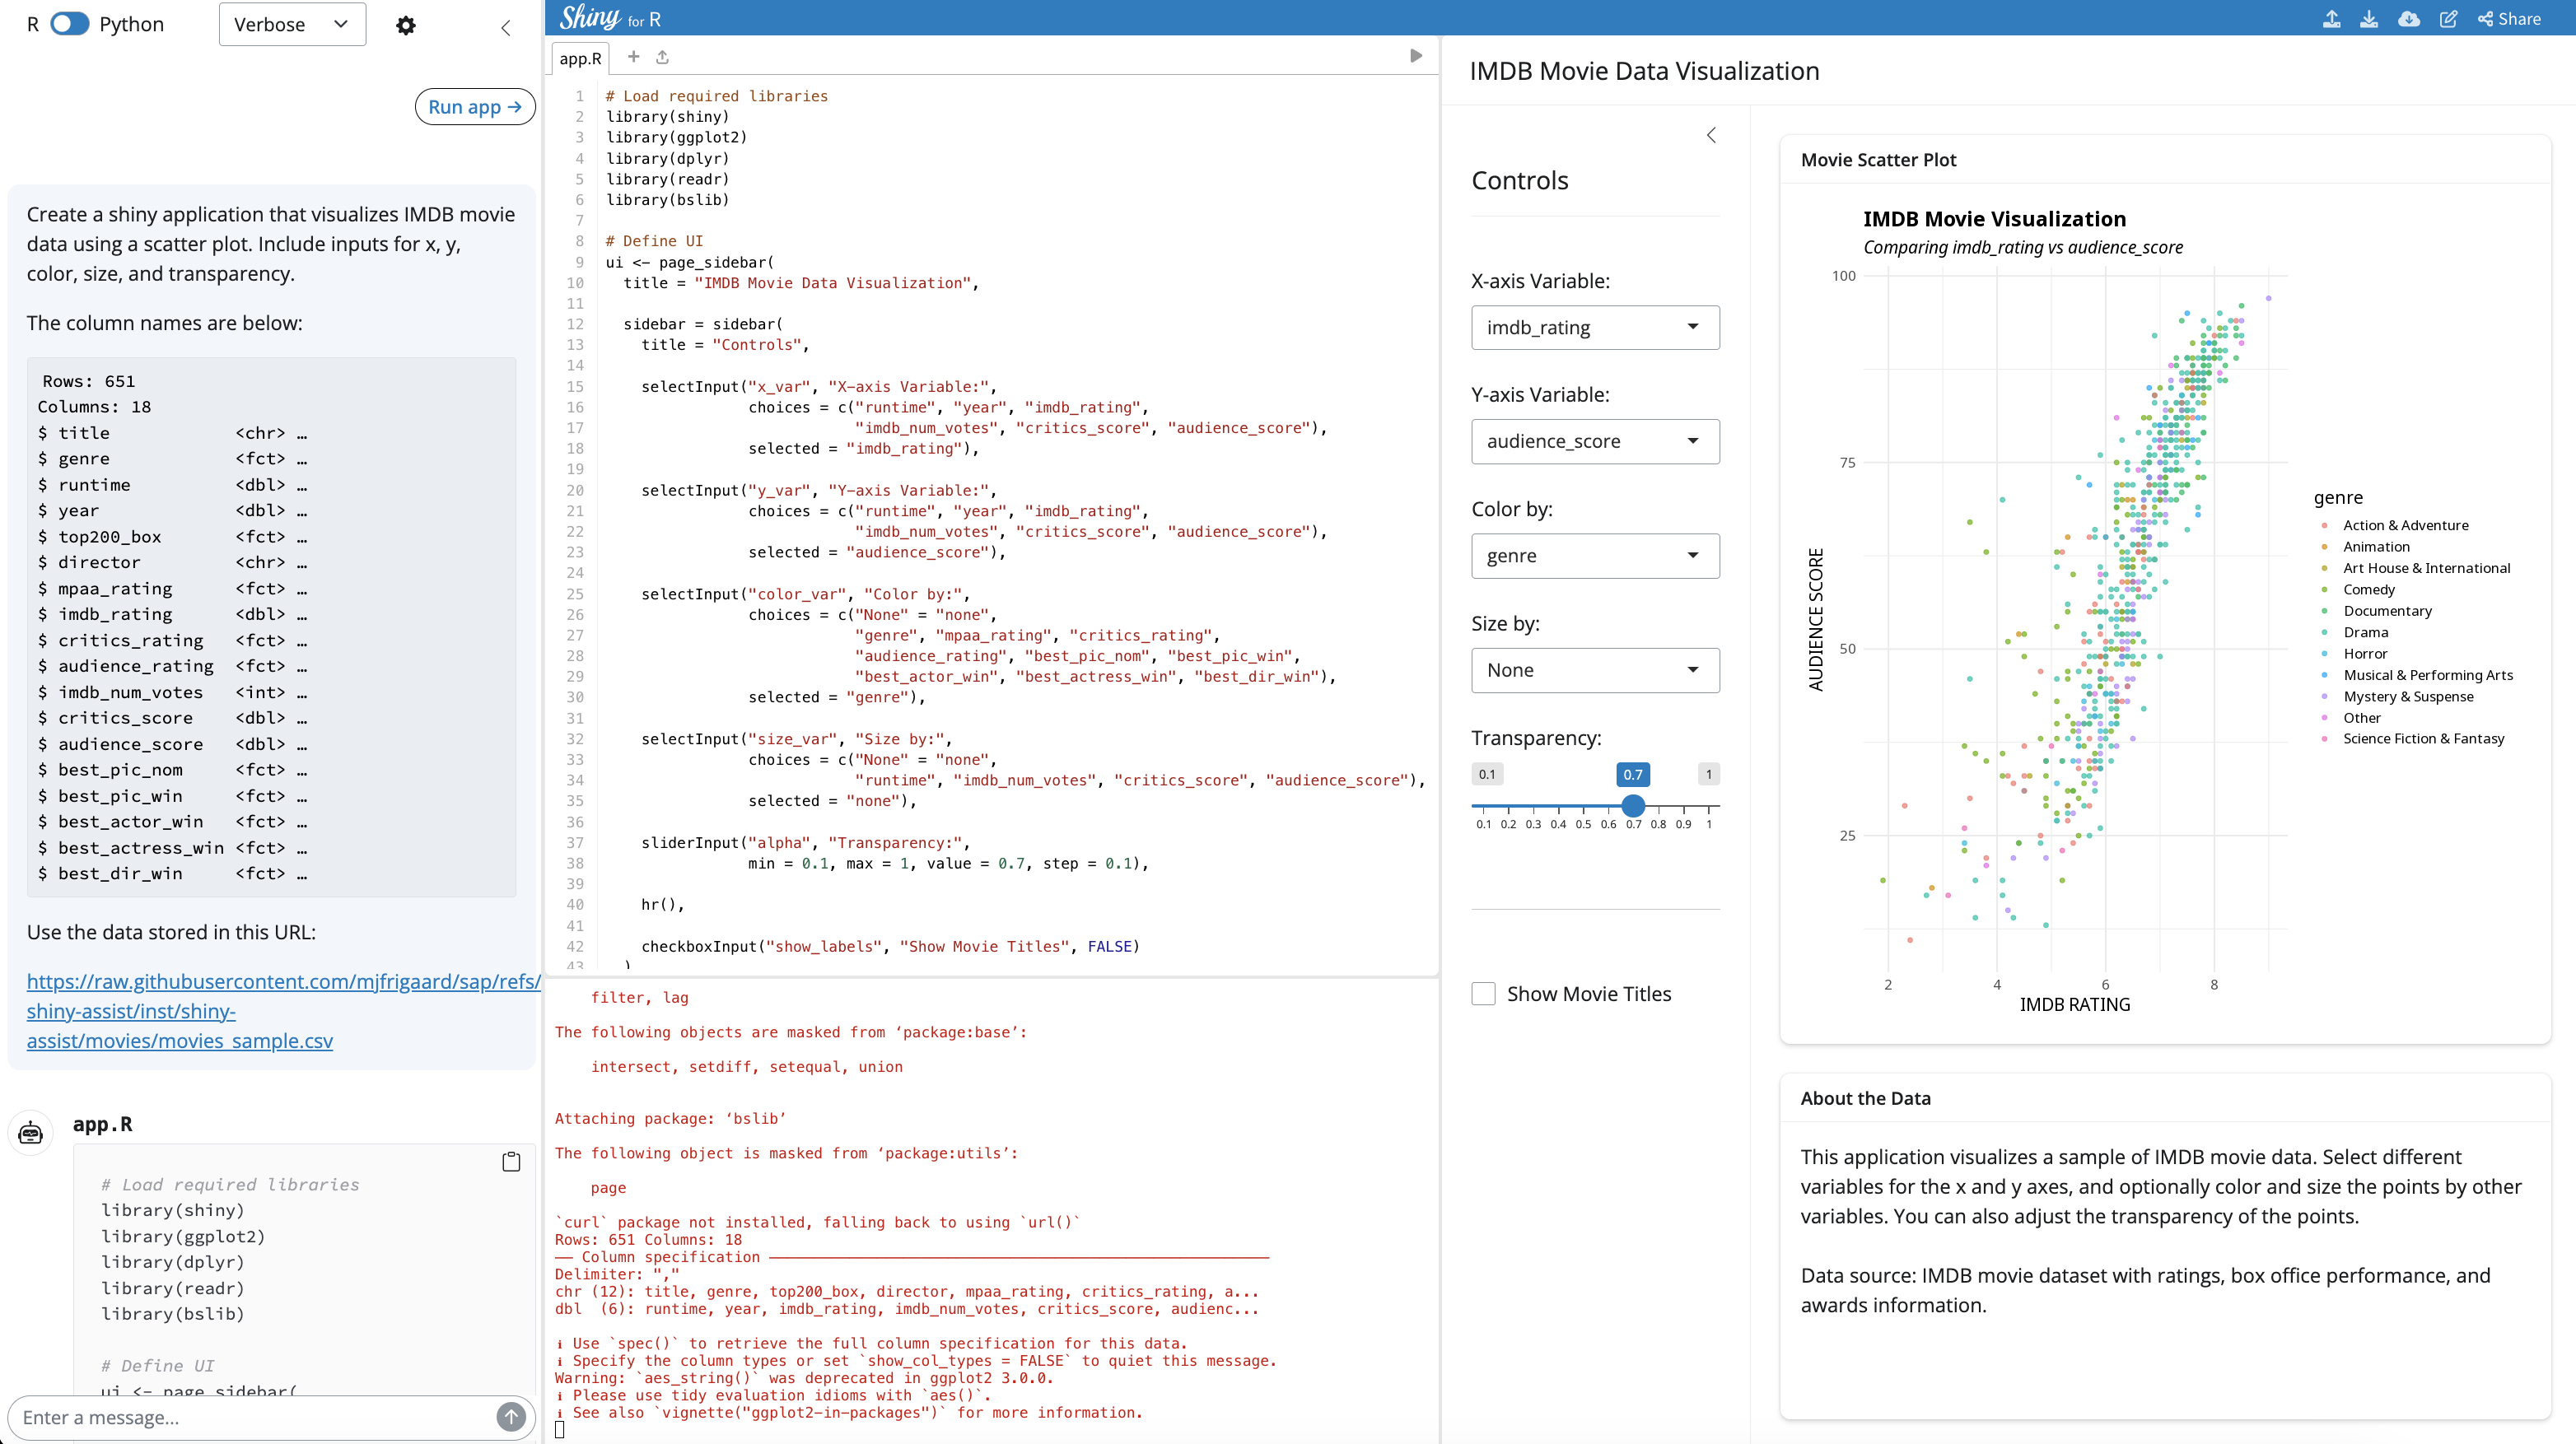
The initial application has nearly identical input, outputs, and layout. However, we can see an additional checkbox for Show Movie Titles and the Size by input has been mapped to a variable (not a numerical value).
In our next prompt, we’ll refine the app to match what we have in sap more closely.
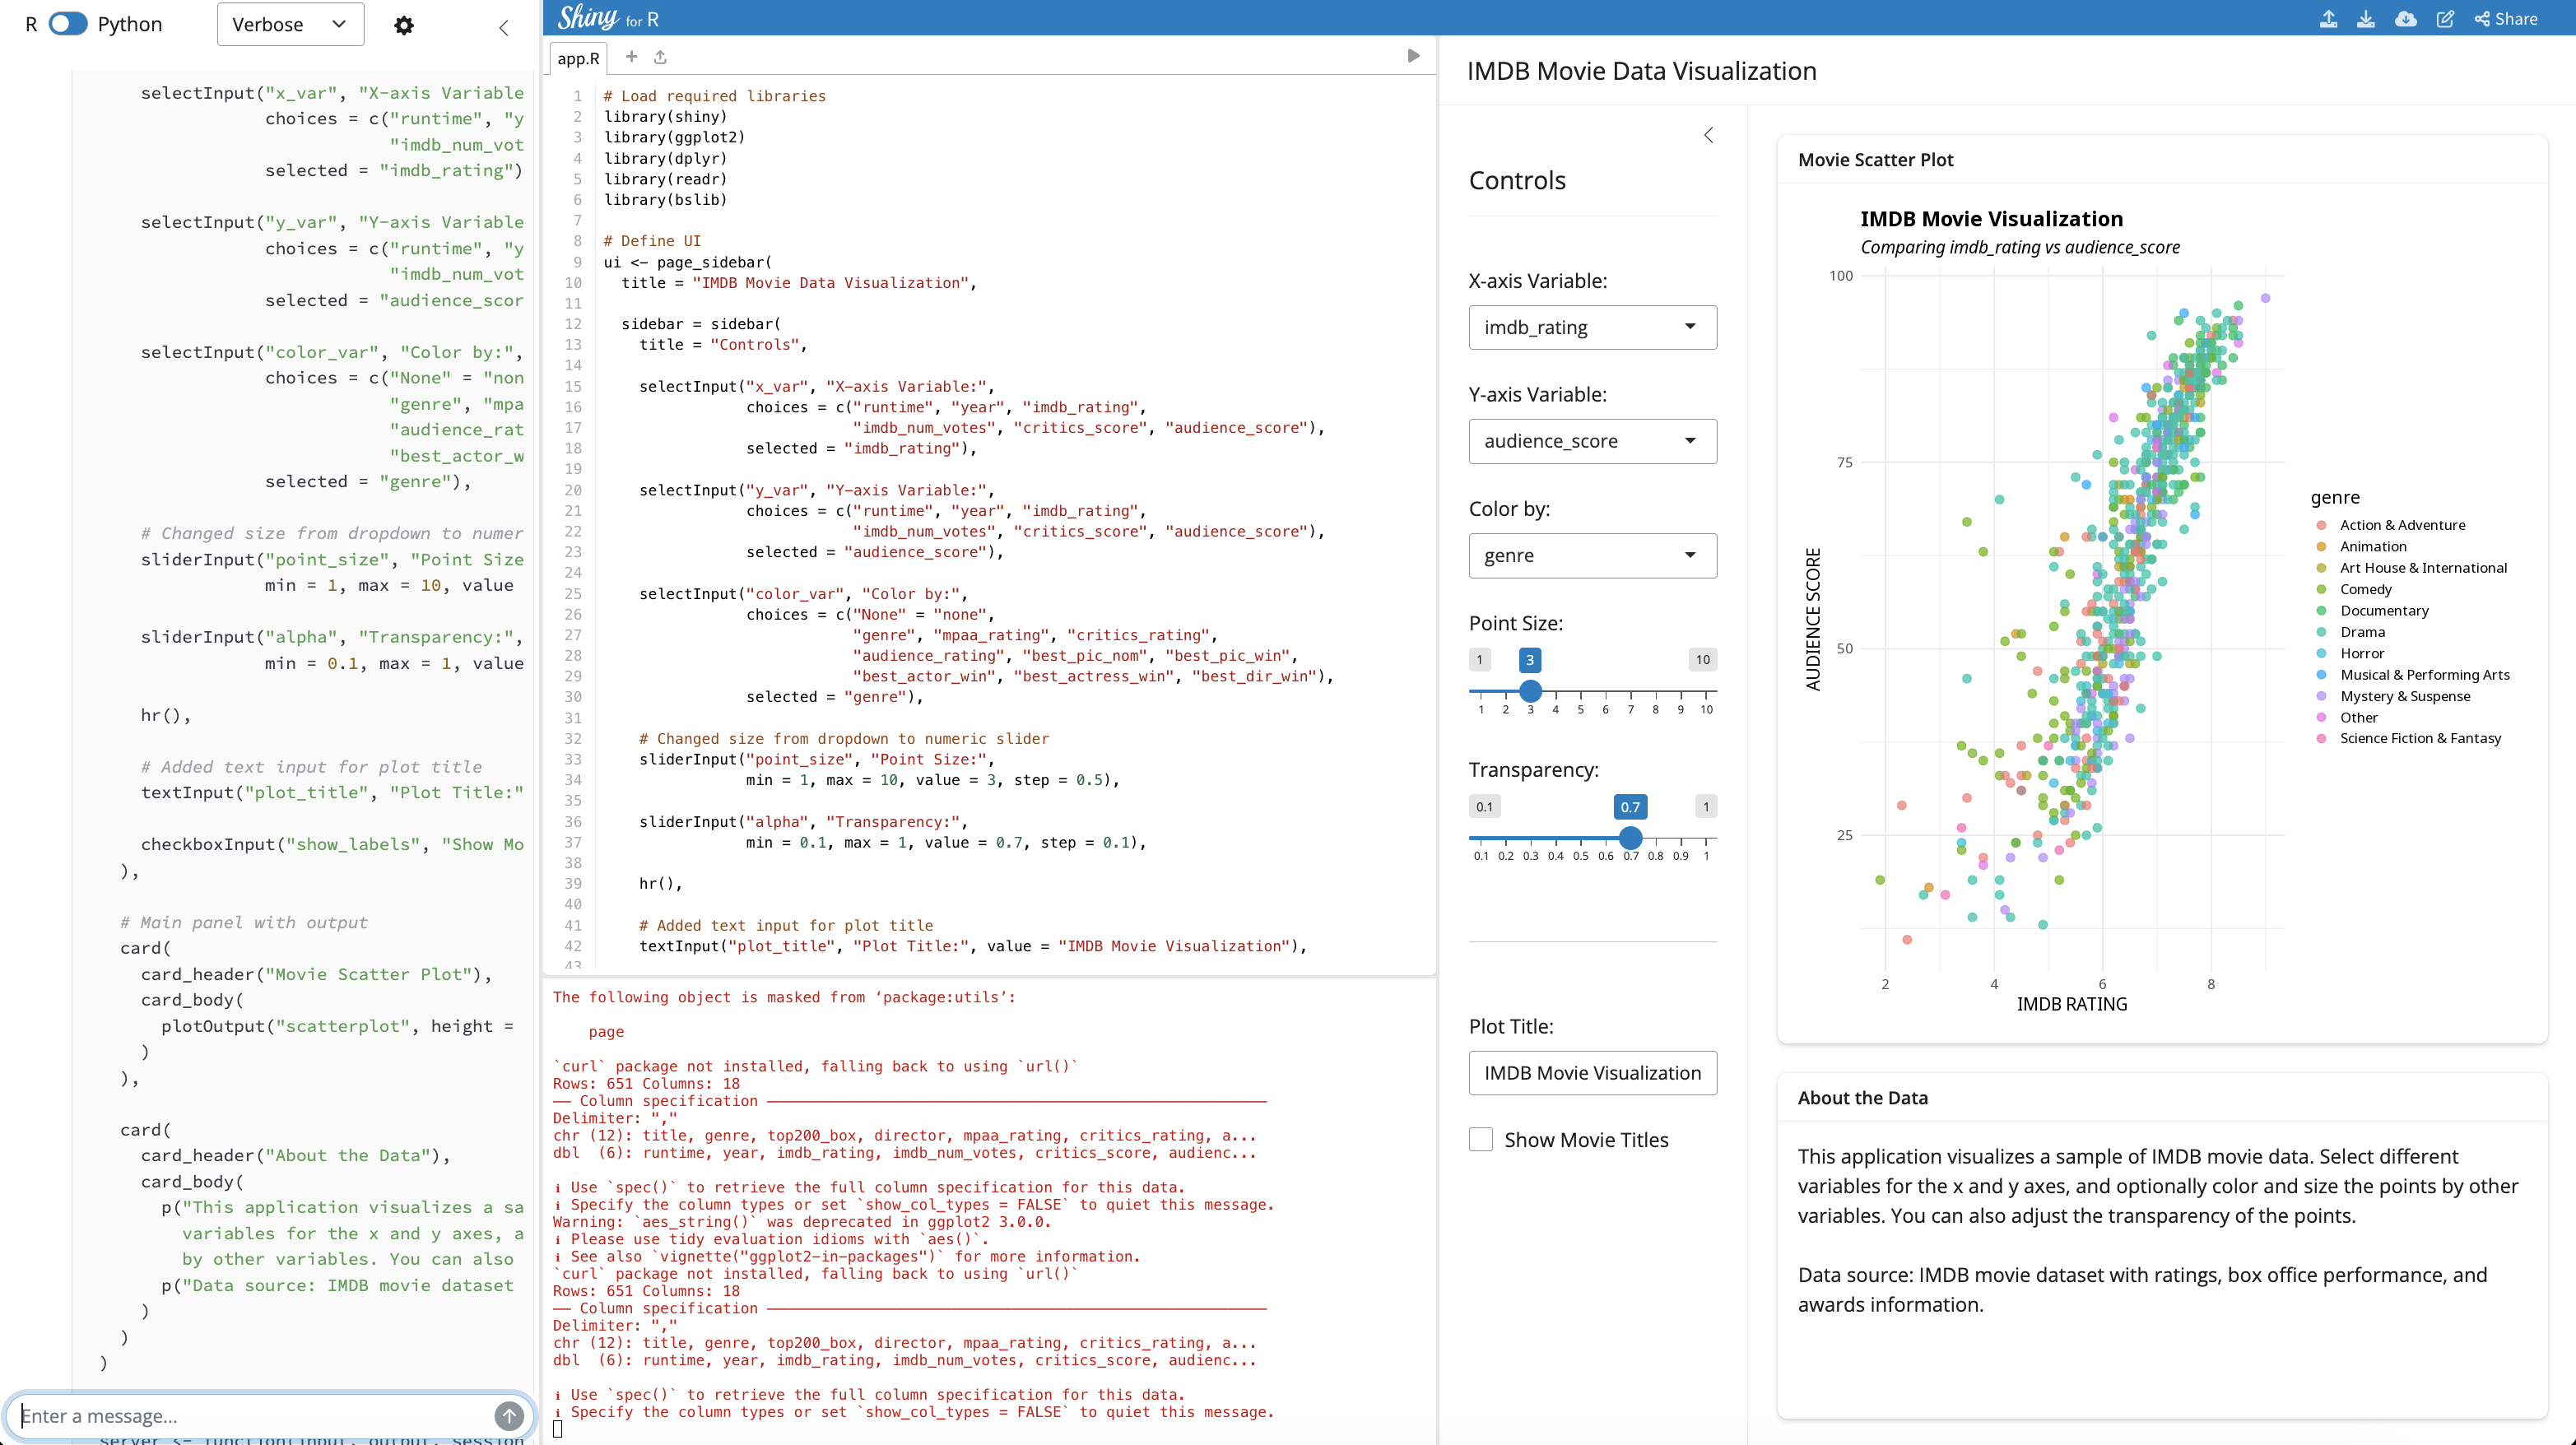
26.1.2 Prompt 2: Refine
Prompt: Change the size to a numeric slider and include a text input for a plot title.
The application is updated with the changesm and we can view the changes to app.R in the Shiny Assistant UI:
CautionWarning:
aes_string()
We can see the following warning regarding the ggplot2 graph:

We avoided this warning with the scatter_plot() utility function in previous branches, but for now, we will just note this is something we should return to and refactor after our application is in a complete state.
26.1.3 Prompt 3: Modularize
Now that we have a UI with the correct inputs and outputs, we’ll convert these into modules and separate the application into its respective components.
Prompt: Convert the inputs and outputs into modules and create a standalone app function that calls separate UI and server functions.
The response to this prompt won’t change the app, but we’re given a summary of the changes in the chat:

Response:
I’ve modified the code to use a modular structure following these changes:
Created separate modules for:
Controls (inputs) -
controlsUIandcontrolsServerPlot (output) -
plotOutputUIandplotOutputServerAbout data section -
aboutDataUI(UI only as it’s static)Created standalone UI and server functions:
ui_function()- assembles all UI components
server_function()- coordinates between modulesCreated an application function:
movie_visualization_app()- bundles everything togetherThe communication between modules:
The controls module returns all inputs as a reactive list
The plot module takes two parameters: the data and controls reactives
This modular approach makes the code more maintainable and easier to extend. Each component has a well-defined responsibility, and they communicate through clear interfaces.
I’ve left the Shiny Assistant chat setting to Verbose, but this can be changed to return less descriptive details on the code being produced:

26.1.4 Prompt 4: Structure
We’ll attempt to create individual function files and documentation in a single prompt to begin re-structuring the app as an R package.
Prompt: Store the modules, UI, server, and standalone app functions in separate files and include roxygen2 documentation.
This results in an error when the Shiny Assistant tries to run our updates:
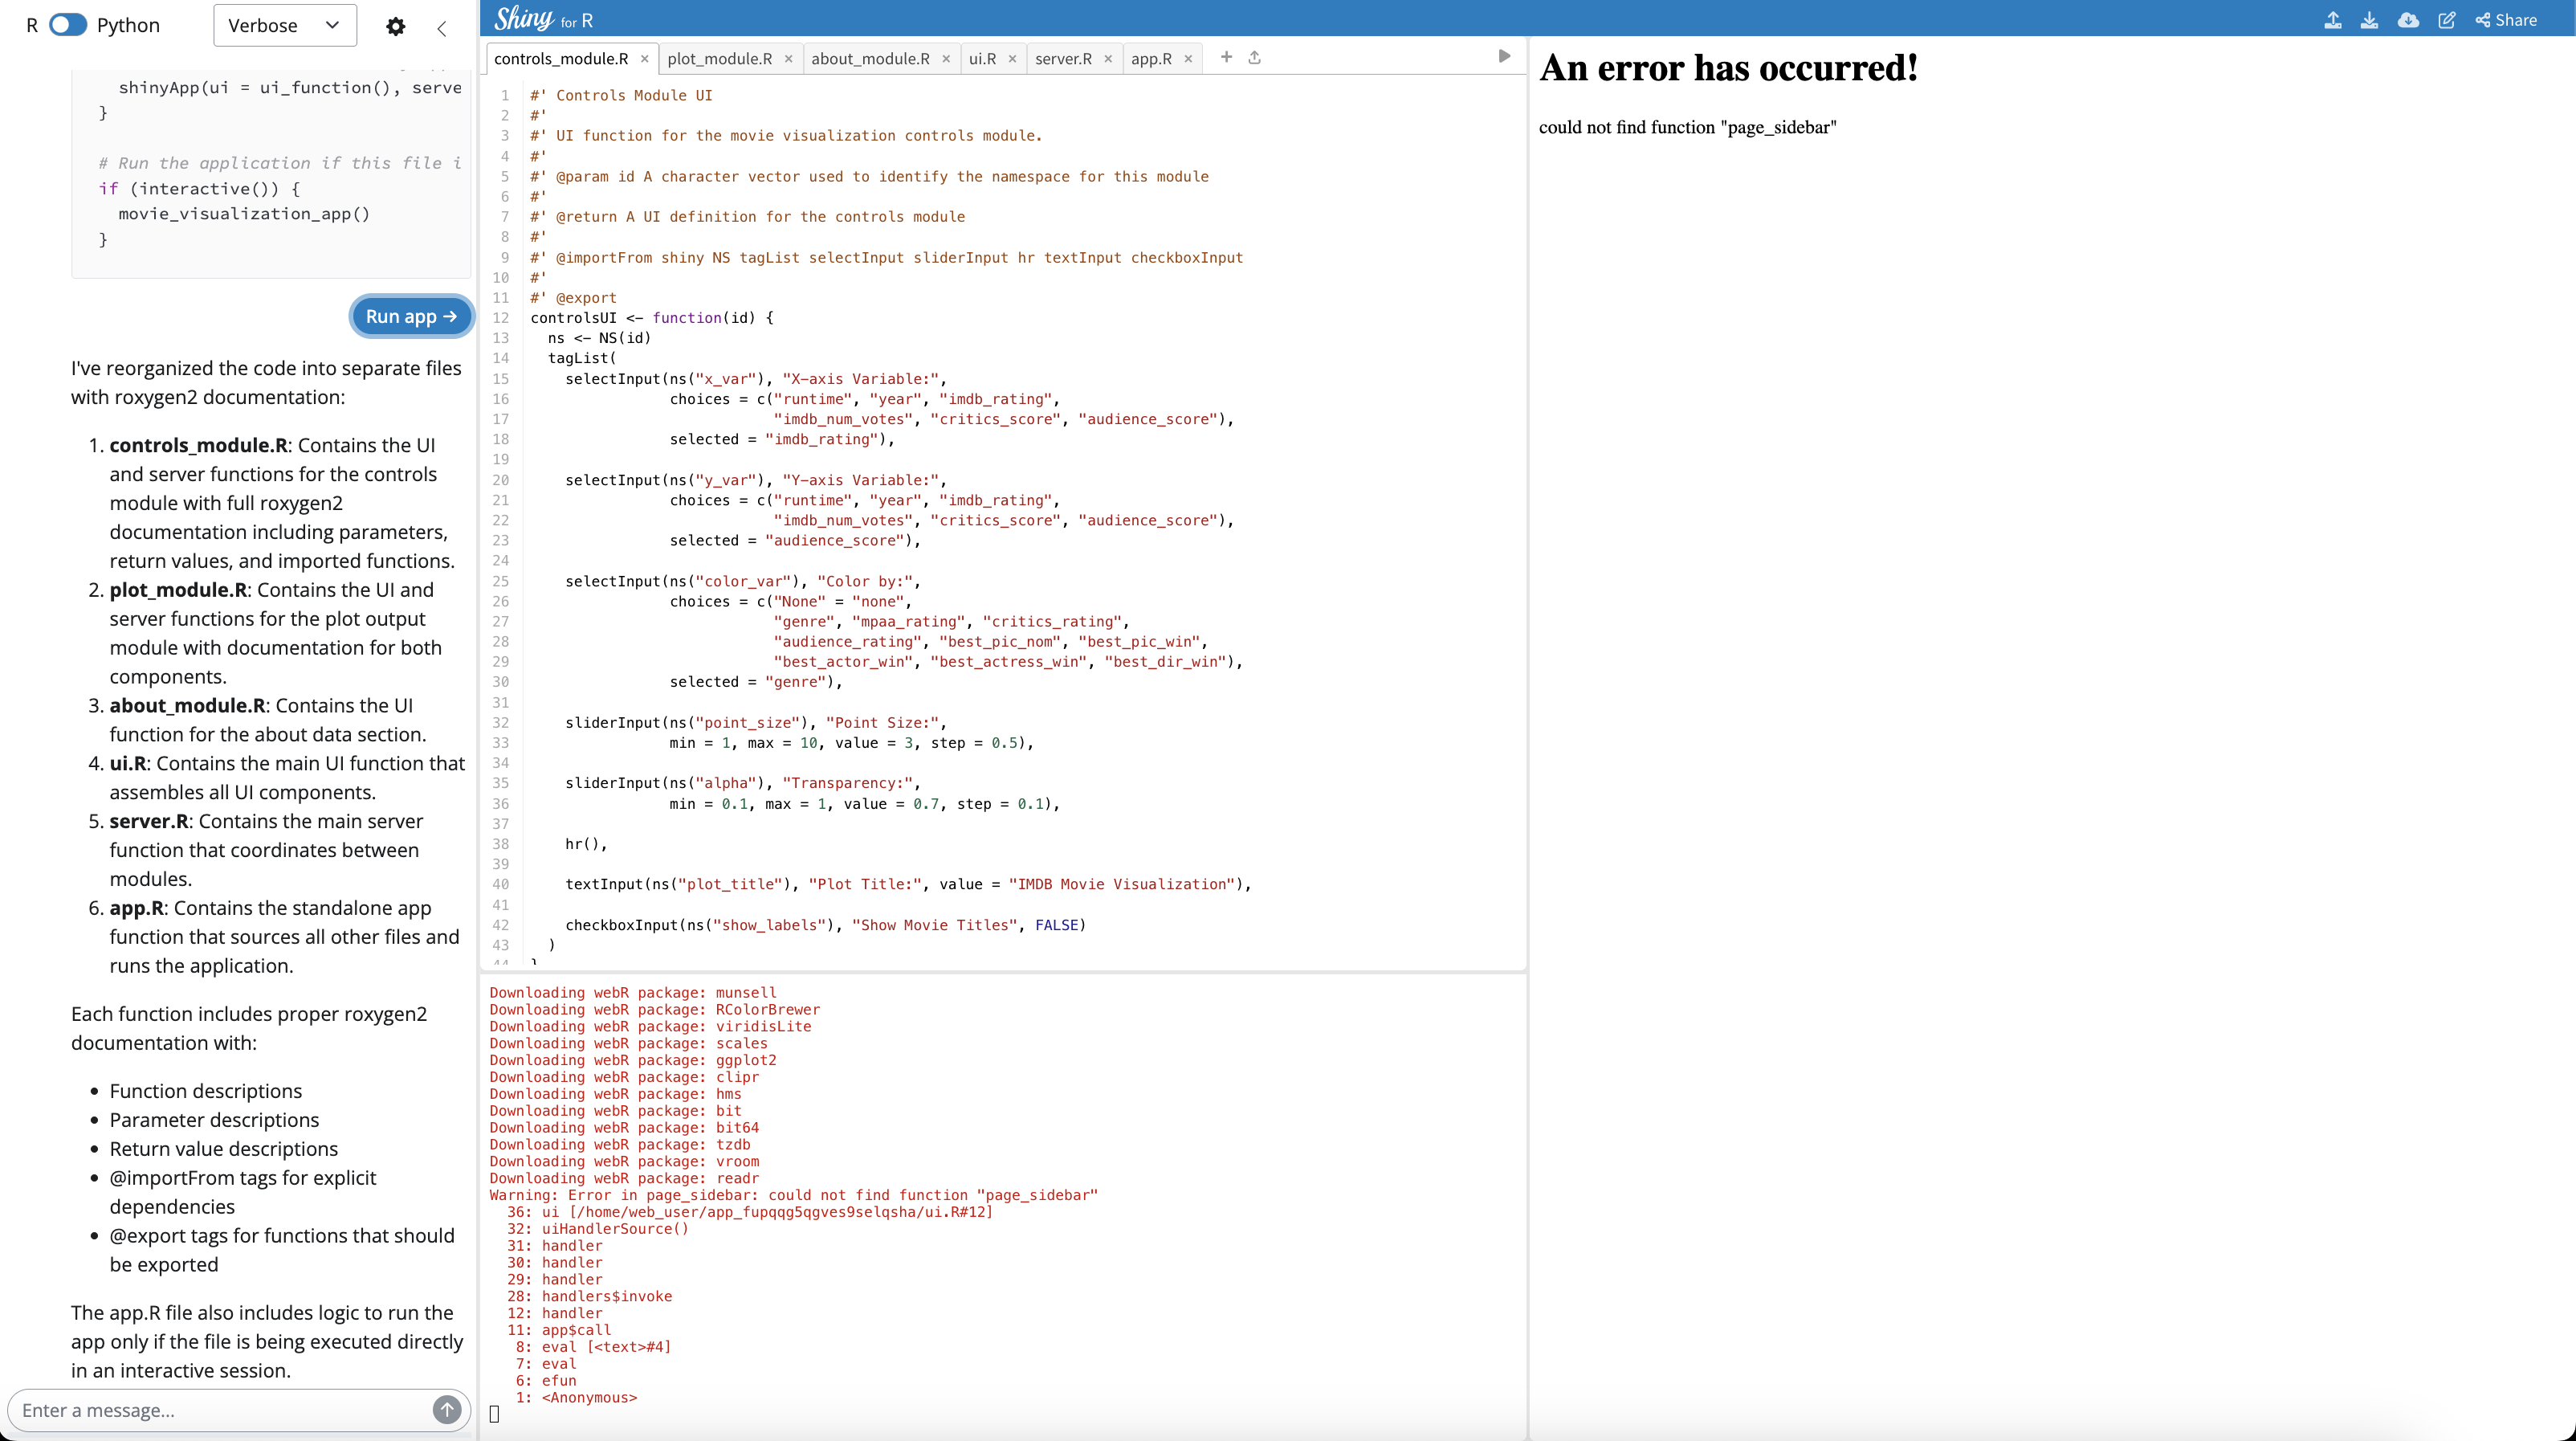
The response summary tells us what has been changed, but it doesn’t give us advice on (or even acknowledge) the error.
Response:
I’ve reorganized the code into separate files with
roxygen2documentation:
controls_module.R: Contains the UI and server functions for the controls module with full roxygen2 documentation including parameters, return values, and imported functions.
plot_module.R: Contains the UI and server functions for the plot output module with documentation for both components.
about_module.R: Contains the UI function for the about data section.**
ui.R*: Contains the main UI function that assembles all UI components.
server.R: Contains the main server function that coordinates between modules.
app.R: Contains the standalone app function that sources all other files and runs the application.Each function includes proper roxygen2 documentation with:
Function descriptions
Parameter descriptions
Return value descriptions
@importFromtags for explicit dependencies
@exporttags for functions that should be exportedThe
app.Rfile also includes logic to run the app only if the file is being executed directly in an interactive session.
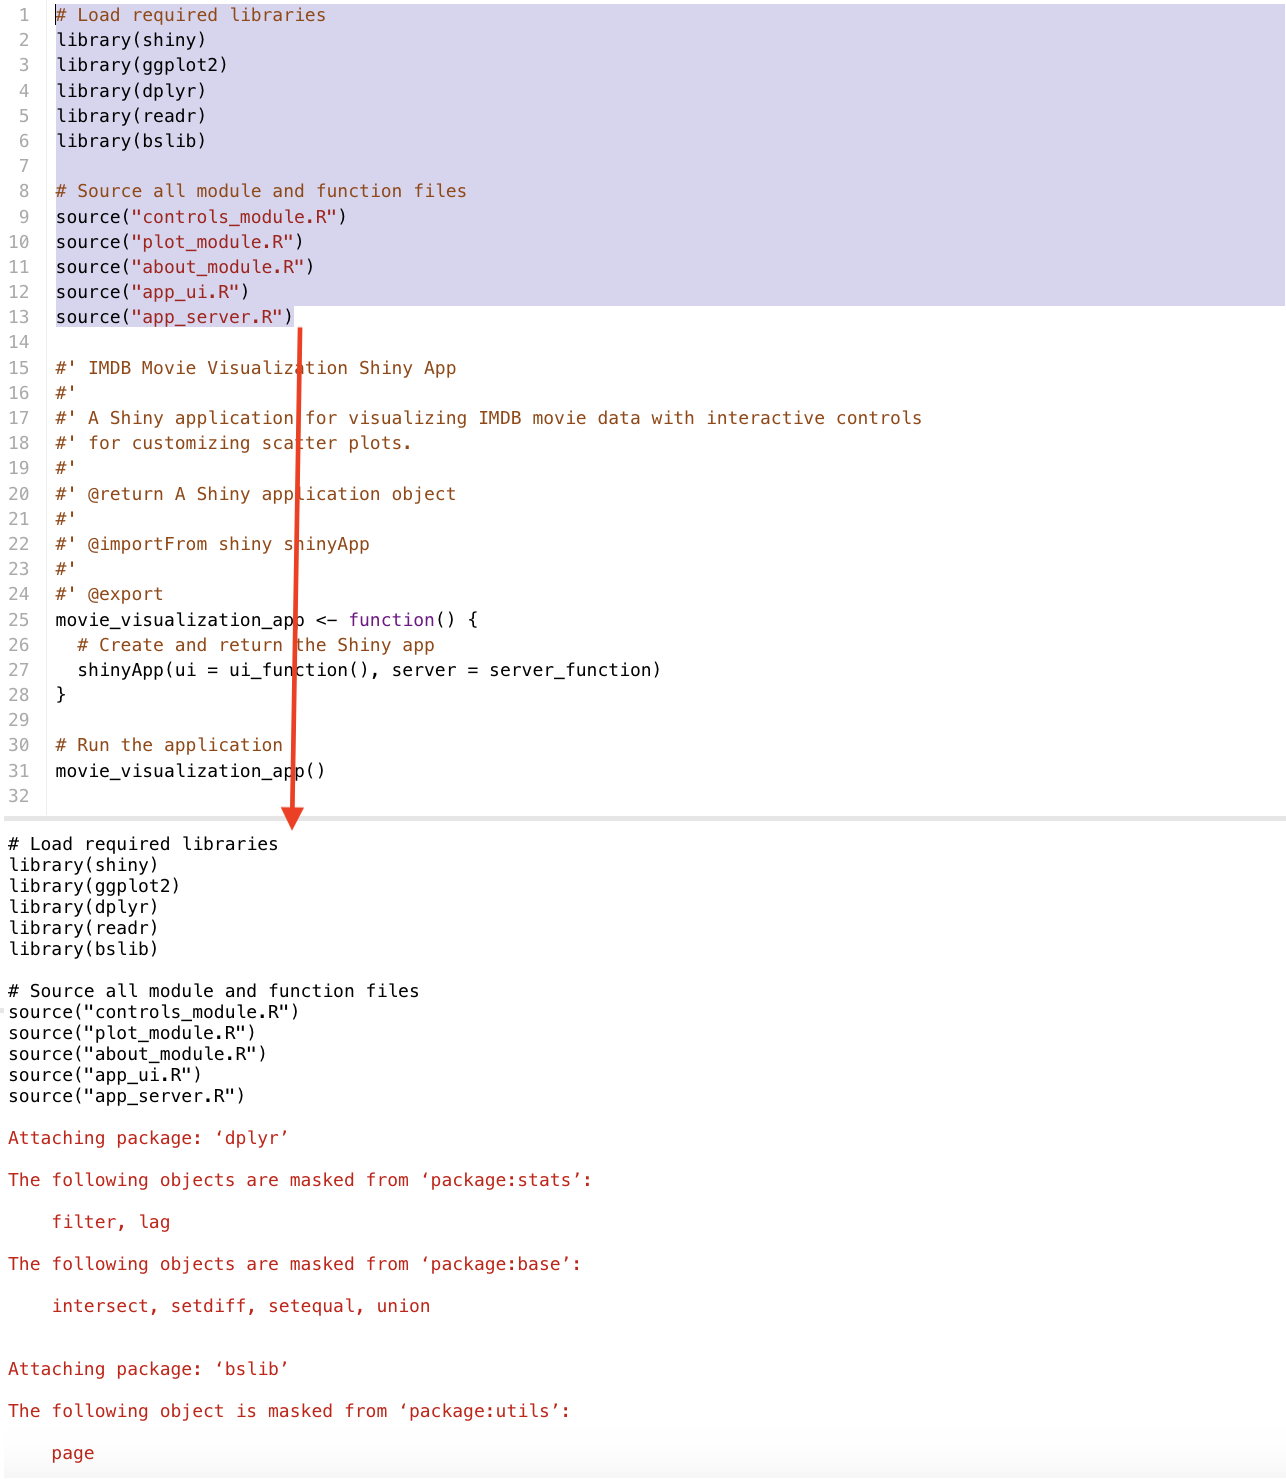
26.1.5 Prompt 5: Error
The error above tells us the bslib::page_sidebar() function isn’t being loaded before runApp() is being called, but the call to library(bslib) is in the app.R file. We’ll see if providing some direction on function/file names and where to call shinyApp() will resolve this error:
Prompt: An error occurred because the page_sidebar function could not be found. The app.R file needs to contain the library() and source() calls before the call to shinyApp(). Also, rename the ui.R and server.R to app_ui.R and app_server.R.
This results in the following changes to the app code structure:
Response:
I’ve made the following changes to fix the issues:
Renamed the files:
Changed
ui.Rtoapp_ui.RChanged
server.Rtoapp_server.RModified the
app.Rfile to:
Load all required libraries at the beginning of the file
Source all module and function files
Define the
movie_visualization_app()functionCall the function directly (removed the
if (interactive())check to ensure it runs)Maintained the same structure for all modules and functions
These changes ensure that:
All necessary files are sourced before using their functions
The application will properly find all functions when running
The organization follows a more standard Shiny module structure
The application should now run without the “page_sidebar function could not be found” error since we’re properly sourcing all the module files before they’re used in the UI and server functions.
In the app.R file, if we explicitly run the call to library(bslib) and then source("app_ui.R") (which contains the call to bslib::page_sidebar()), we see these are executed without errors in the Console:
library() and source() callsHowever, when we try to source and call our standalone app function, we see the following error:
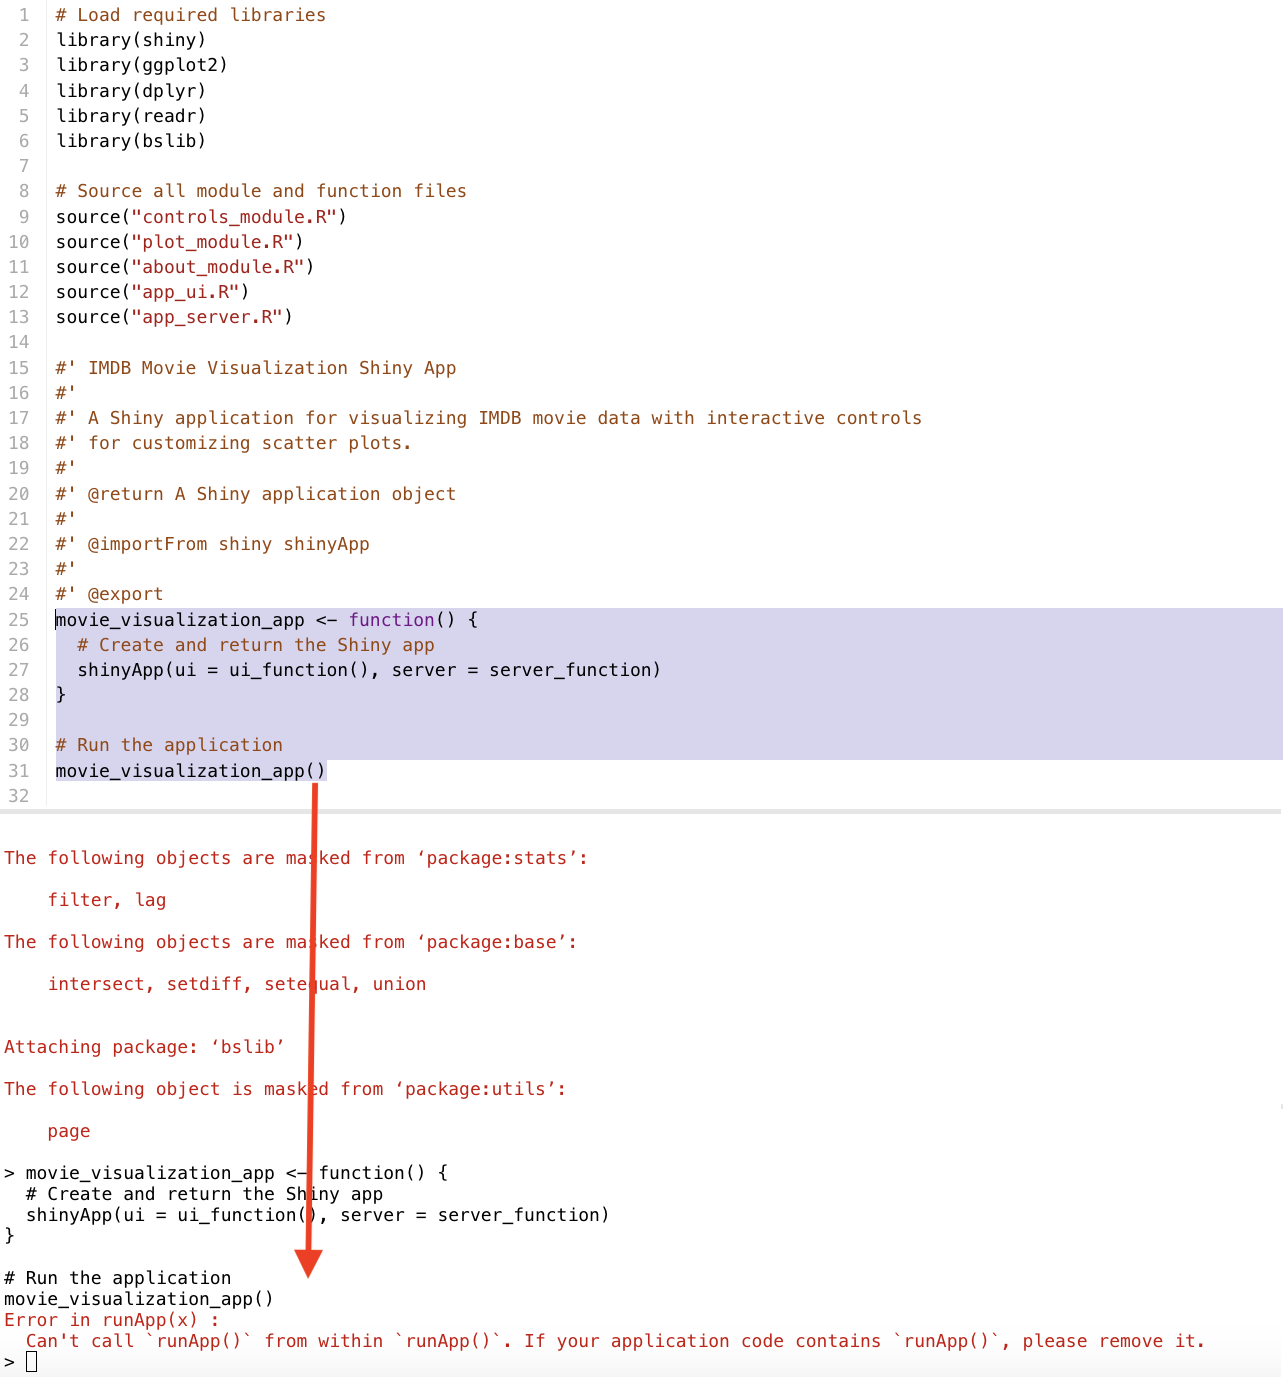
runApp() errorError in runApp(x) :
Can't call `runApp()` from within `runApp()`. If your application code
contains`runApp()`, please remove it.The error is a little tricky, because the standalone app function calls shinyApp(), not runApp(). But Shiny Assistant launches applications by calling runApp() when we click on the icon in the upper right-hand corner of the source editor:
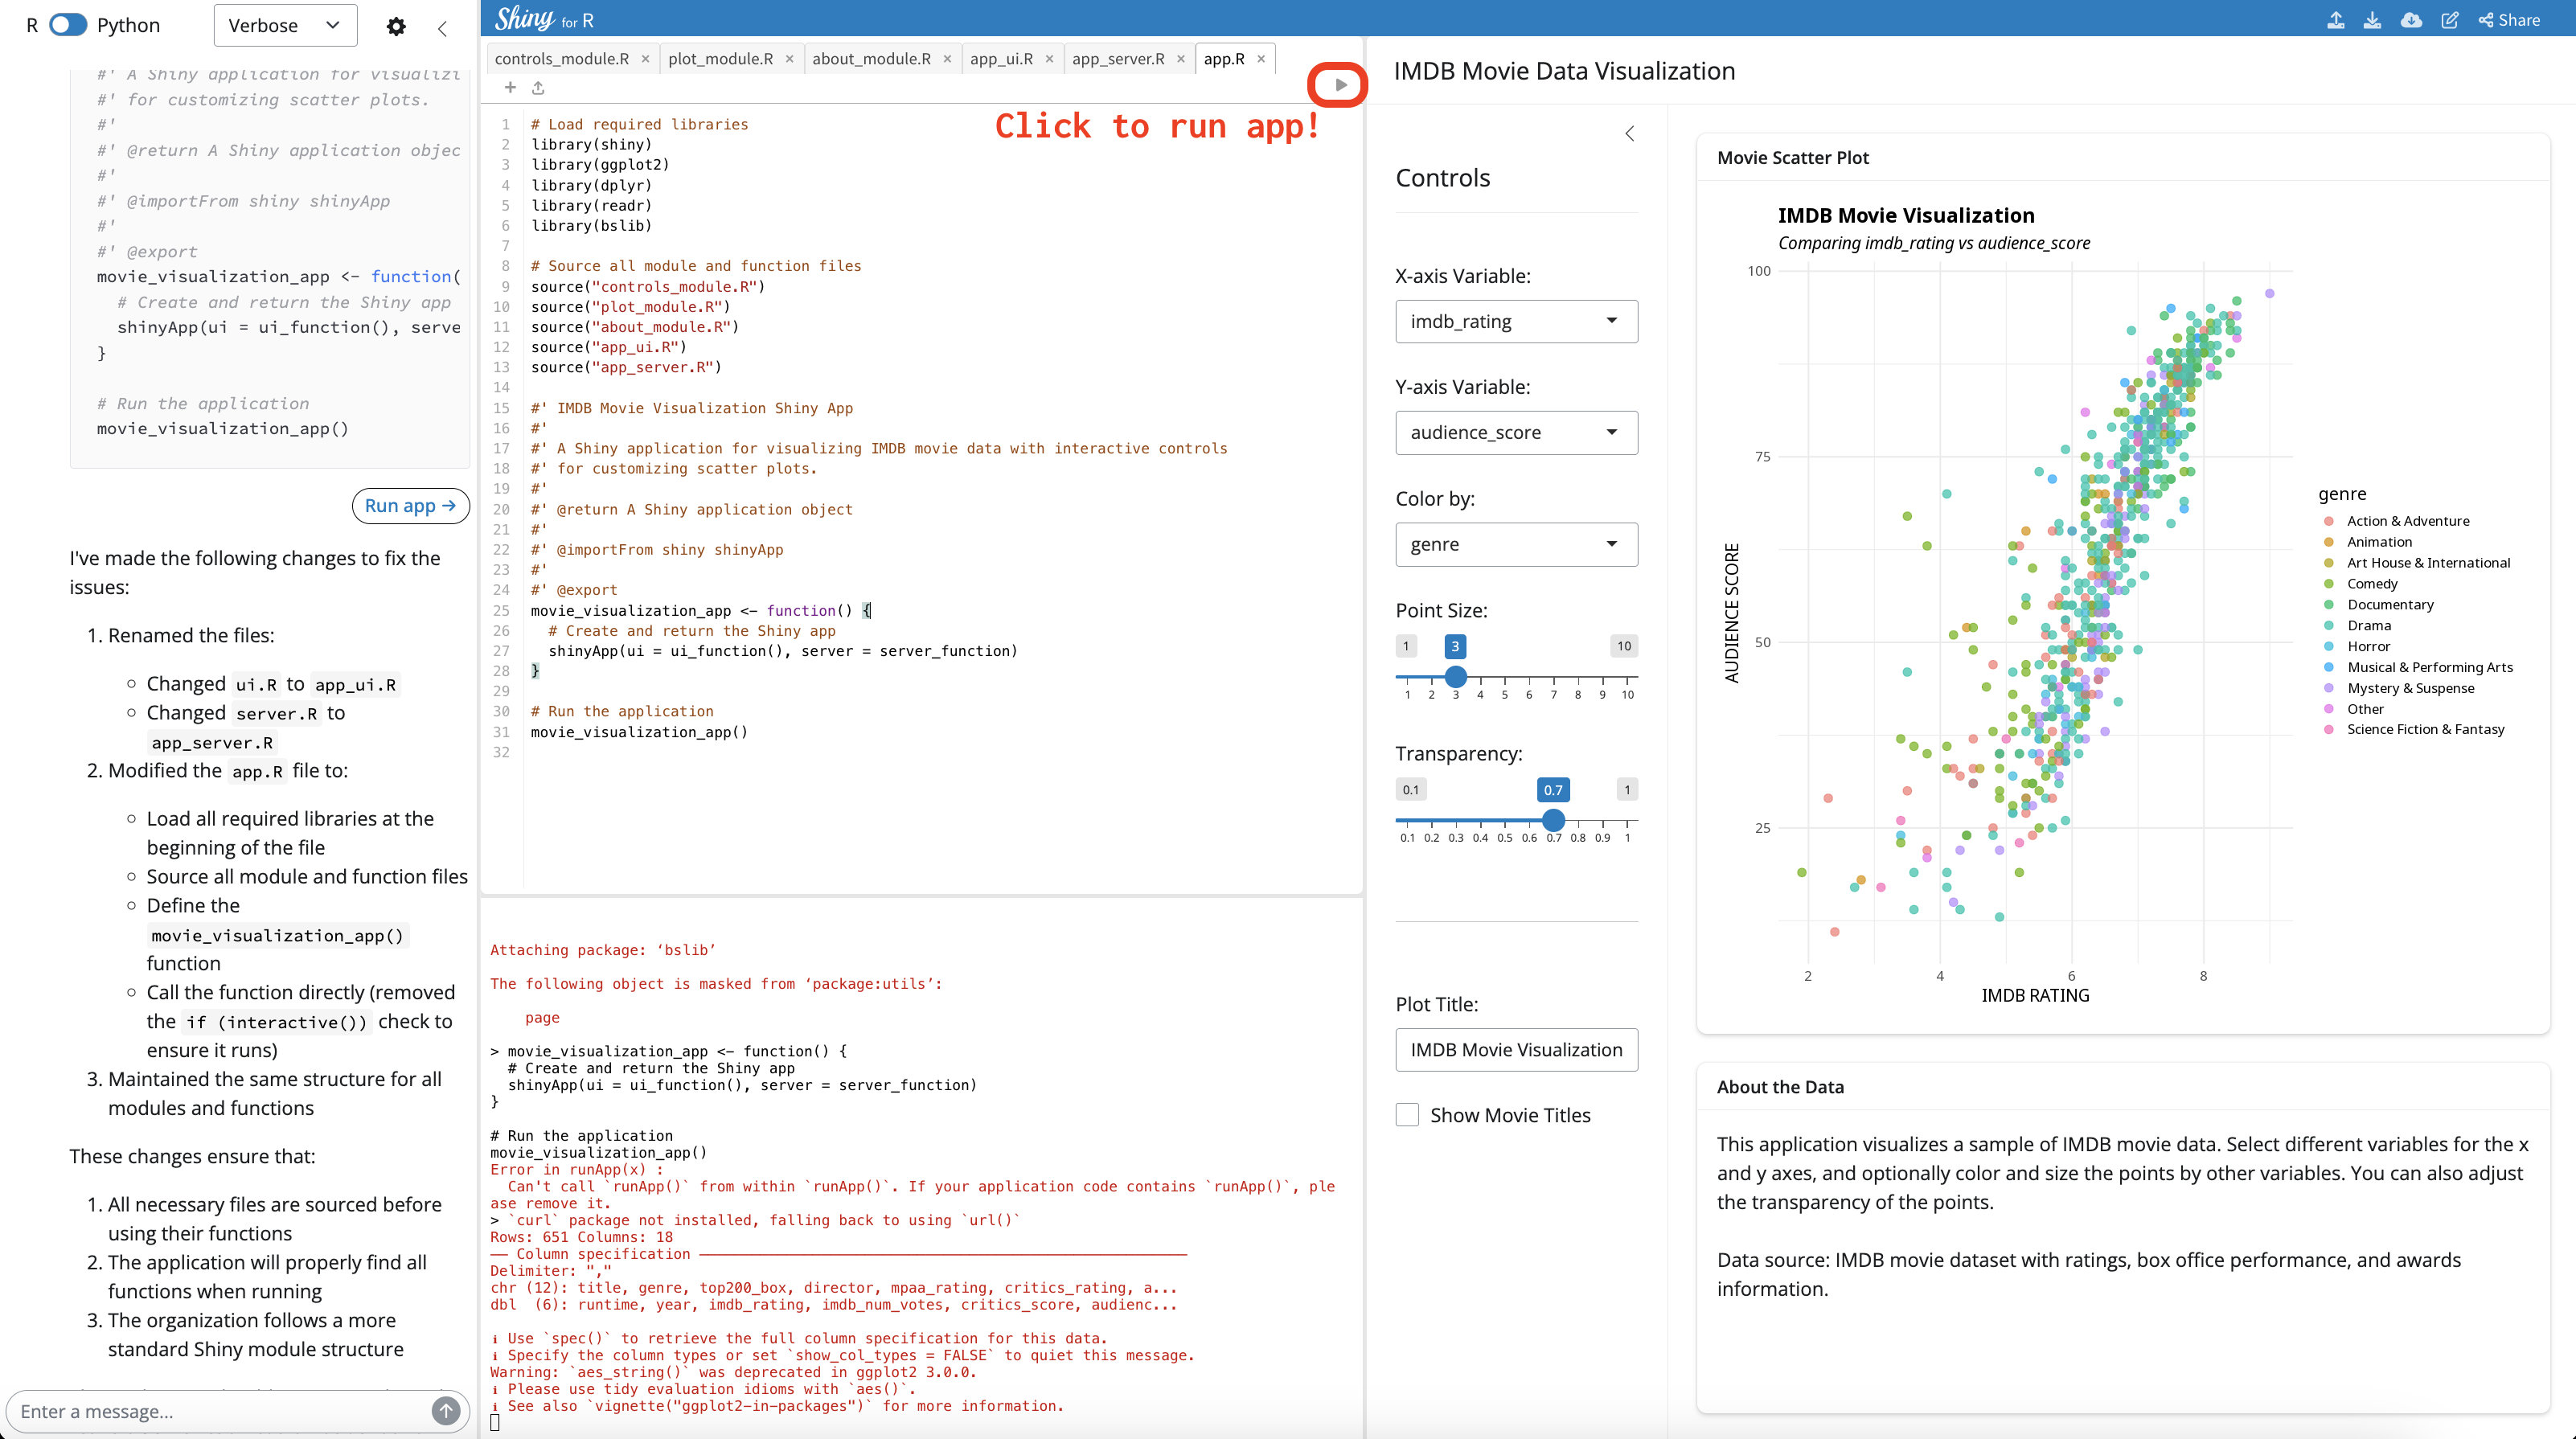
Clicking on the icon will launch the application (we don’t need to call the standalone app function).
26.1.6 Bonus: Theme
We have modules, UI and server functions, roxygen2 documentation, and an app.R file. We’ll finish by adding a dark thematic theme:
Prompt: Add a dark theme using the thematic package: https://rstudio.github.io/thematic/
The updated app includes a dark theme:
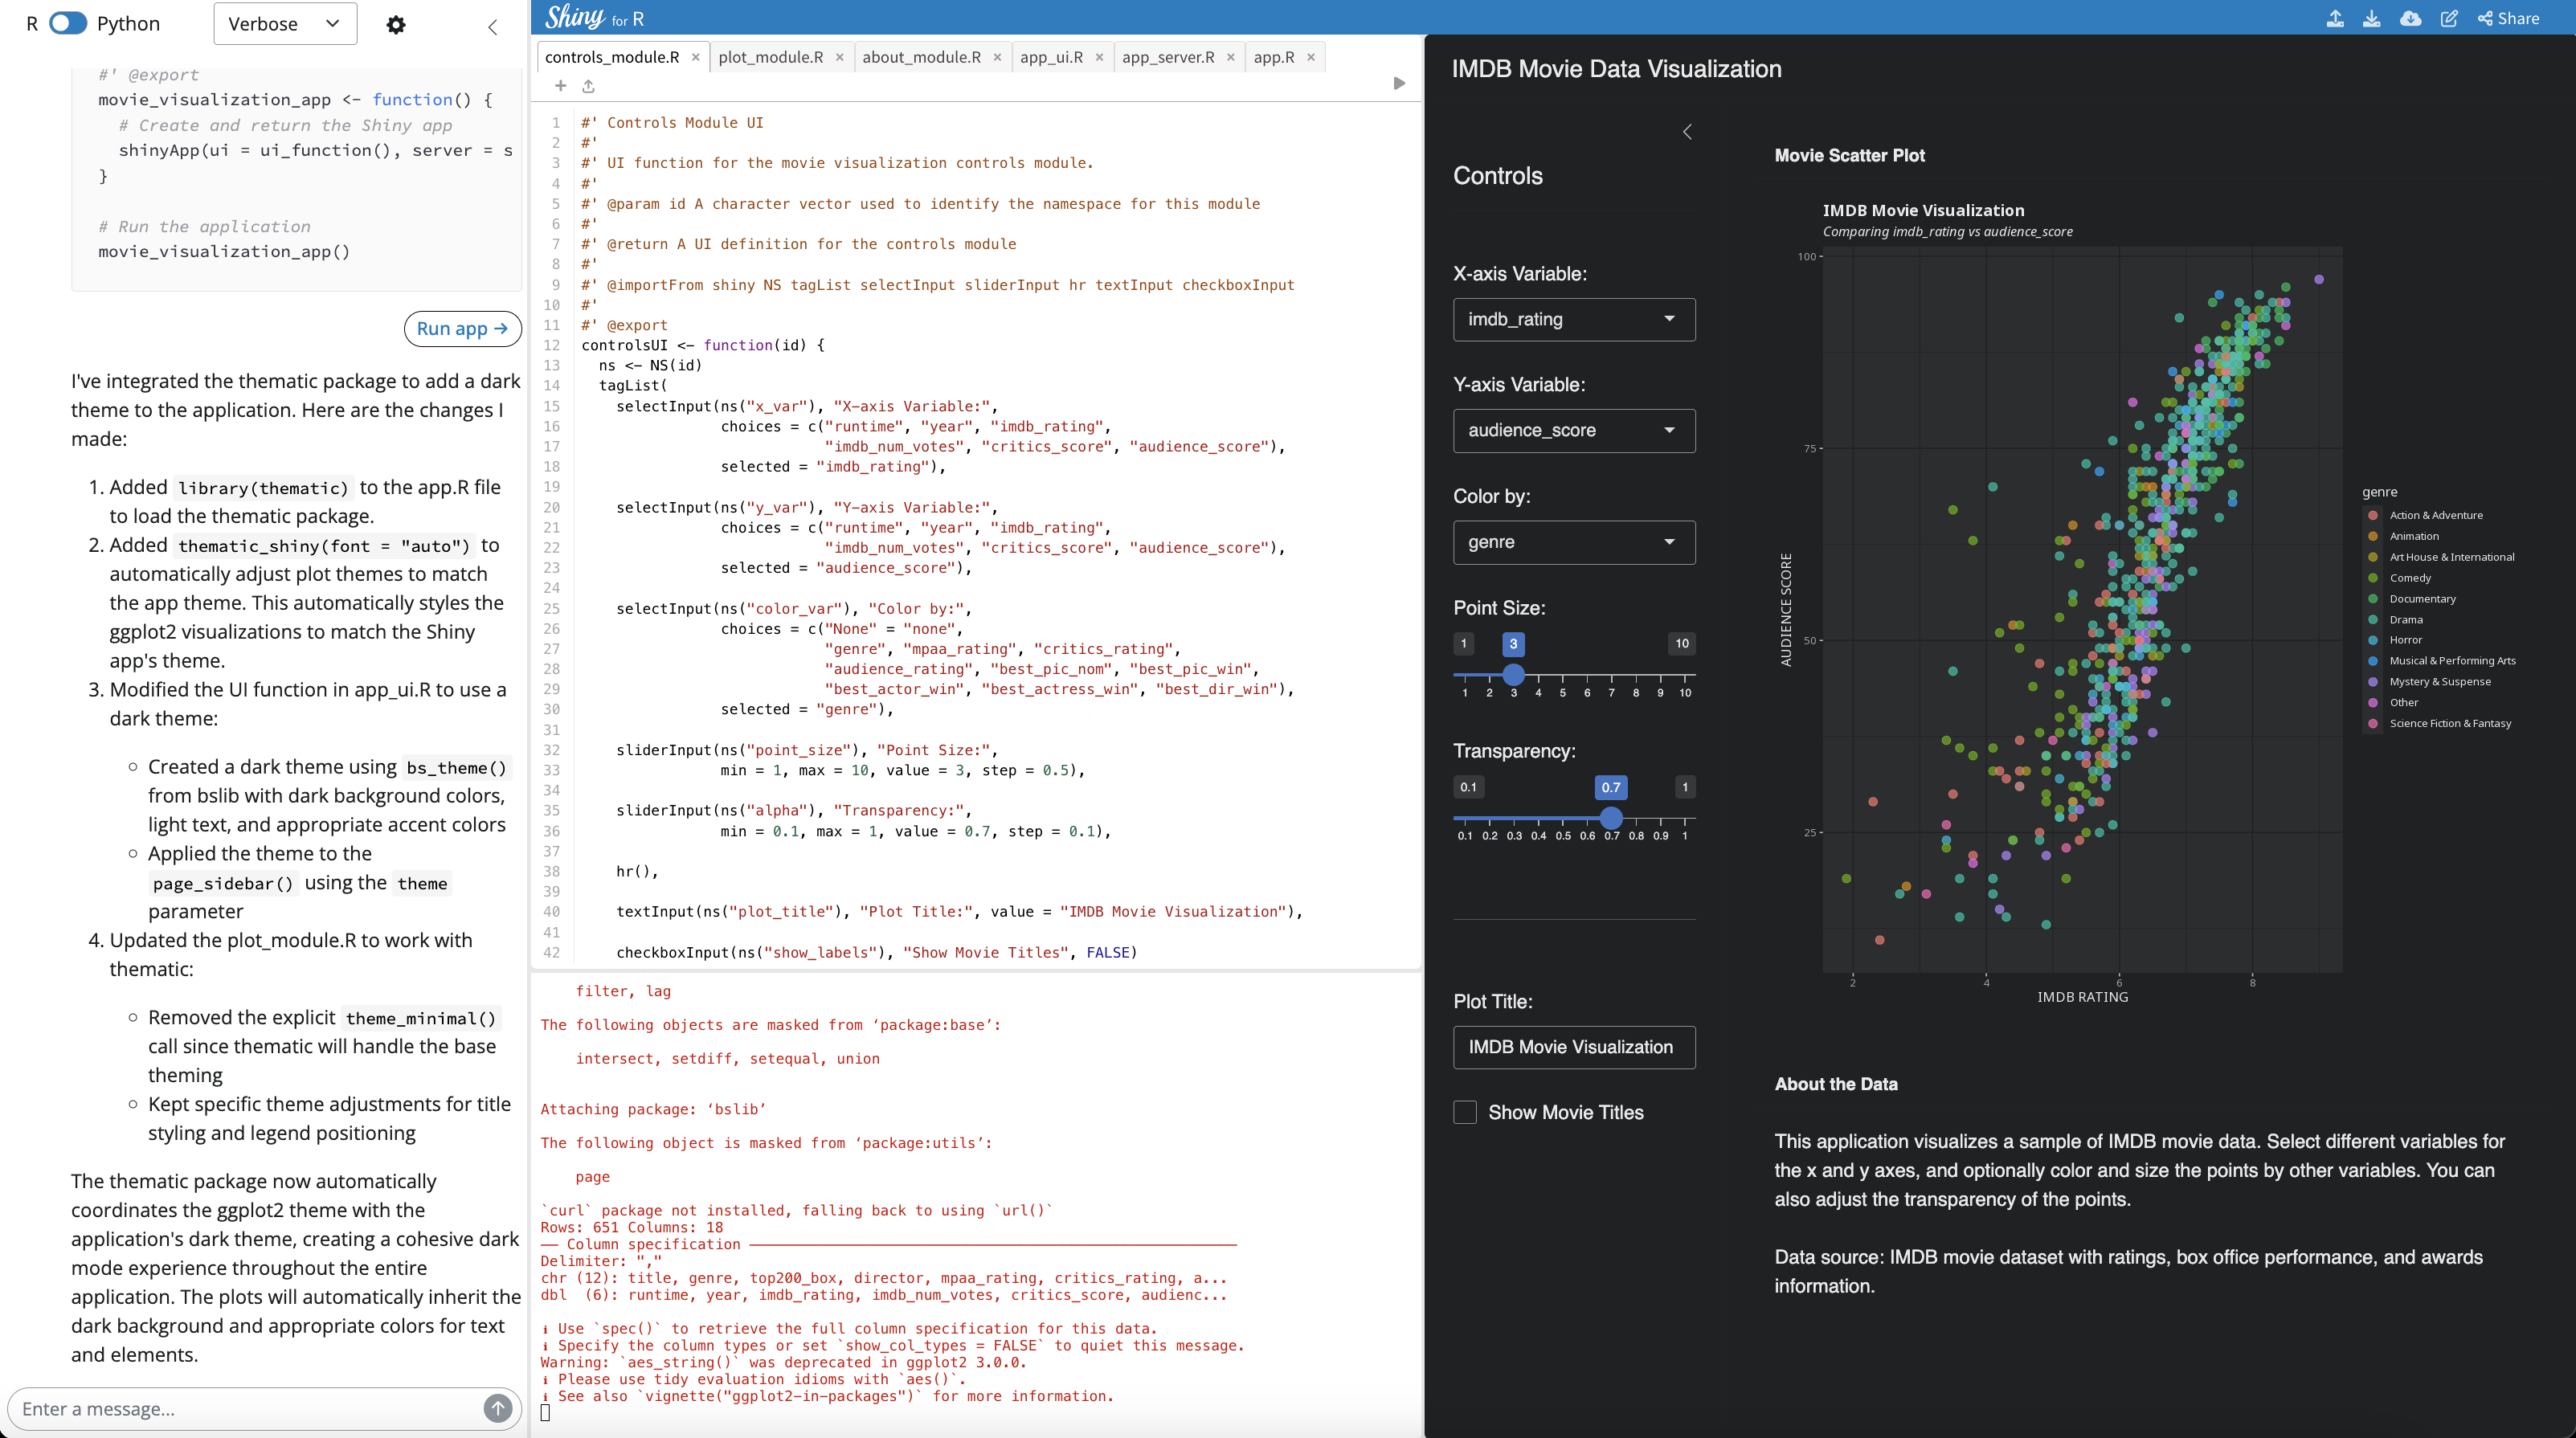
thematic themeAnd the summary of changes is below:
Response:
I’ve integrated the thematic package to add a dark theme to the application. Here are the changes I made:
Added
library(thematic)to the app.R file to load the thematic package.Added
thematic_shiny(font = "auto")to automatically adjust plot themes to match the app theme. This automatically styles the ggplot2 visualizations to match the Shiny app’s theme.Modified the UI function in app_ui.R to use a dark theme:
Created a dark theme using
bs_theme()from bslib with dark background colors, light text, and appropriate accent colorsApplied the theme to the
page_sidebar()using thethemeparameterUpdated the plot_module.R to work with thematic:
Removed the explicit
theme_minimal()call since thematic will handle the base themingKept specific theme adjustments for title styling and legend positioning
The thematic package now automatically coordinates the ggplot2 theme with the application’s dark theme, creating a cohesive dark mode experience throughout the entire application. The plots will automatically inherit the dark background and appropriate colors for text and elements.
26.2 Download files
After confirming the new theme works, we’ll download the app files by clicking on the cloud icon in the upper right-hand corner of the Viewer:

This assumes we’ve already created a local app-package directory using the methods described in Section 3.1.1 or with a Shiny framework.
26.3 Finishing touches
I’ve placed the downloaded files in the inst/shiny-assist/movies directory in sap. The modules and UI/server functions are moved into an internal R/ folder, and place the standalone app function in it’s own file:
inst/shiny-assist/
└── movies
├── R
│ ├── about_module.R
│ ├── app_server.R
│ ├── app_ui.R
│ ├── controls_module.R
│ ├── movie_visualization_app.R
│ └── plot_module.R
└── app.R
3 directories, 7 files- 1
-
R/folder for modules and functions - 2
- Standalone app function
The app-package structure starting to take shape!
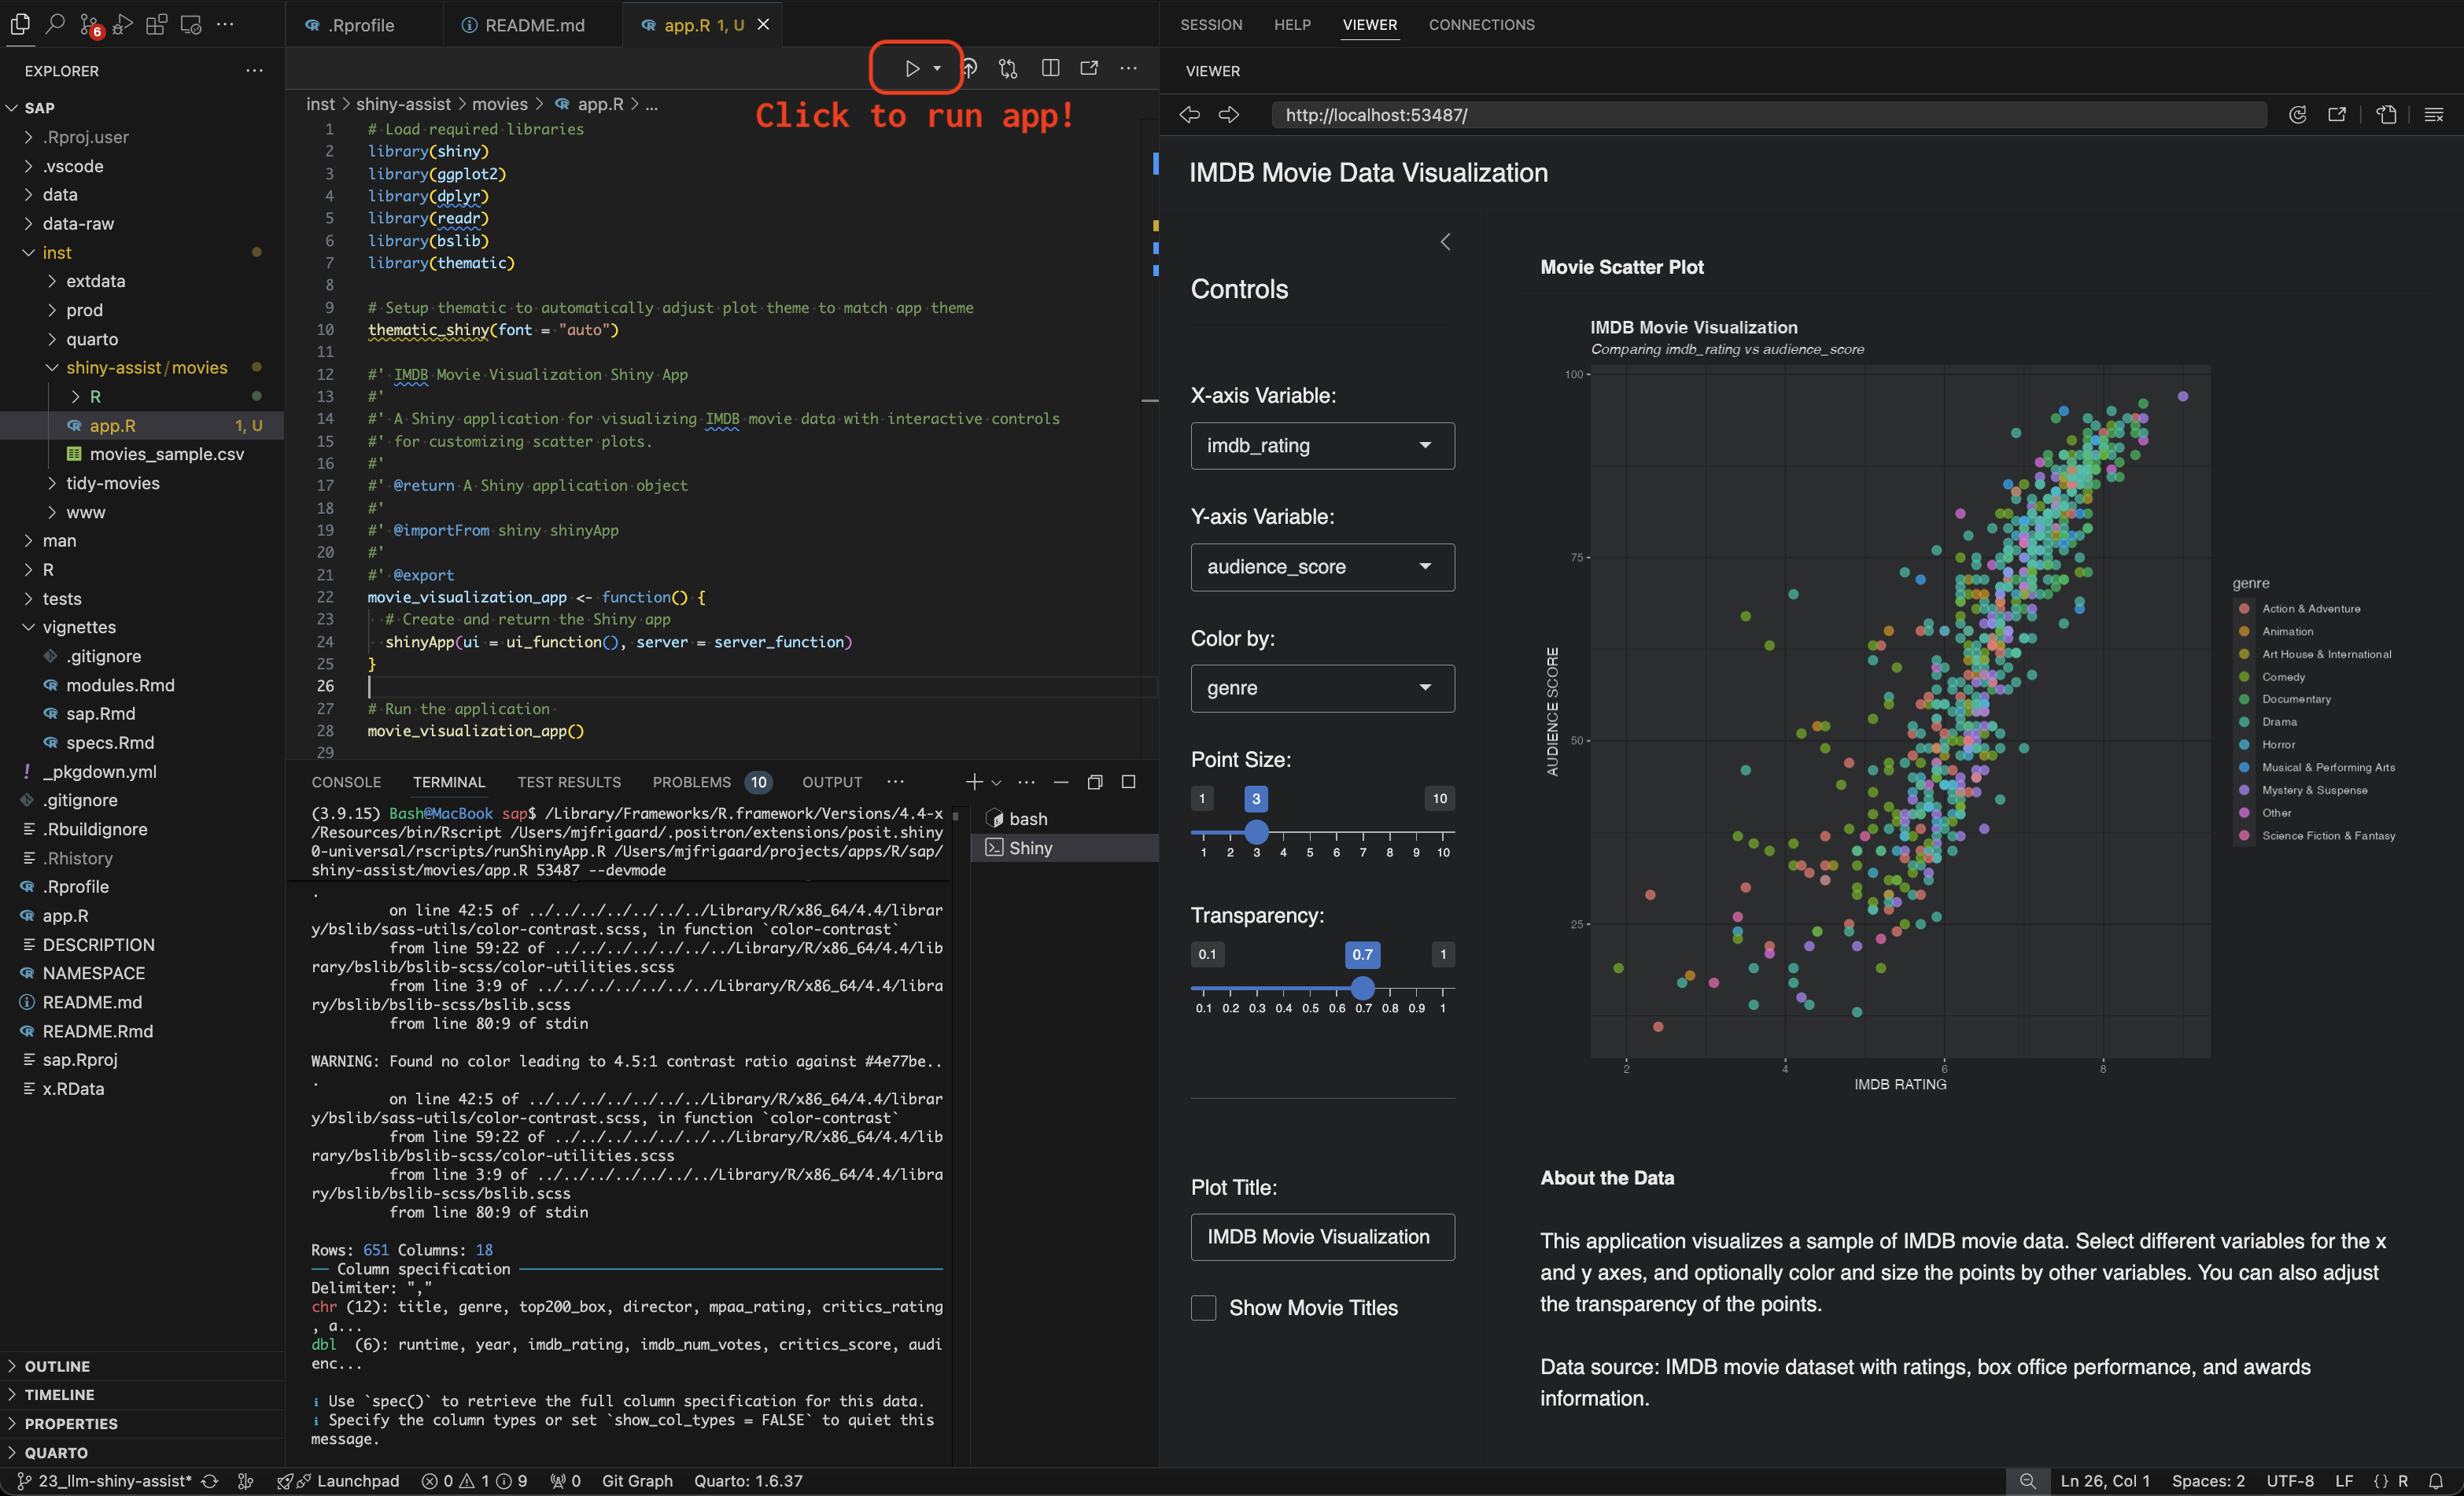
26.3.1 The app.R file
The app.R file no longer needs to source() the modules and app functions if they are placed in an R/ folder.3
Now app.R only loads the packages, sets the theme, and launches the app.
In Positron, we can see the Run App icon is present at the top of app.R, and it’s fully functional:
26.3.2 ggplot2 warnings
We’ve have a persistent warning printed to the console about the use of aes_string() in our plot_module.R.
ggplot2::aes_string() warningThe solution is to convert the aes_string() to use rlang::sym() and !!.
aes_string()
# Create base plot
p <- ggplot2::ggplot(data(),
        ggplot2::aes_string(
        x = ctrl$x_var,
        y = ctrl$y_var)
      )
rlang::sym() & !!
# convert to symbols
x_var <- rlang::sym(ctrl$x_var)
y_var <- rlang::sym(ctrl$y_var)

# Create base plot
p <- ggplot2::ggplot(
          data(),
        ggplot2::aes(
          # use double bang!!
            x = !!x_var,
            y = !!y_var
            )
          )
aes_string()
# Add color if selected
if (ctrl$color_var != "none") {

  p <- p + aes_string(
              color = ctrl$color_var
              )

}
rlang::sym() & !!
# Add color if selected
if (ctrl$color_var != "none") {

  # convert to symbols
  color_var <- rlang::sym(ctrl$color_var)

  p <- p + ggplot2::aes(
              # use double bang!!
              color = !!color_var
              )
}
The final step is to add this app to our launch_app() function:
show/hide updated launch_app() function
launch_app <- function(app = NULL, options = list(), run = "p", ...) {
if (interactive()) {
display_type(run = run)
}
if (is.null(app)) {
app <- "movies"
}
logr_msg(glue::glue("Launching app: {app}"),
level = "INFO"
)
tryCatch({
if (app == "bslib") {
shinyApp(
ui = movies_ui(bslib = TRUE),
server = movies_server,
options = options
)
} else if (app == "ggp2") {
shinyAppDir(
appDir = system.file("tidy-movies", package = "sap"),
options = options
)
} else if (app == "quarto") {
quarto::quarto_preview(
system.file("quarto", "index.qmd", package = "sap"),
render = "all"
)
} else if (app == "assist") {
shinyAppDir(
appDir = system.file("shiny-assist", package = "sap"),
options = options
)
} else {
shinyApp(
ui = movies_ui(...),
server = movies_server,
options = options
)
}
}, error = function(e) {
logr_msg(glue::glue("FATAL: Application failed to launch. Reason: {e$message}"),
level = "FATAL"
)
stop("Application launch failed. Check logs for details.")
}
)
}- 1
- New Shiny Assistant application
Recap
This chapter covered building a Shiny app ‘fit for a package’ using the Shiny Assistant. As you can see, in just a few prompts, we can have a Shiny application that ~80% ready to be loaded, installed, and launched. The callout box below includes a few items to watch out for when using Shiny Assistant to build apps:
Read more in the Shiny Assistant post on the Shiny blog.↩︎
I’ve included a .csv version of these data in the
data-raw/folder of this branch.↩︎loadSupport()was covered back in Section 2.3.↩︎