test_that("scatter_plot creates a ggplot object", {

  p <- scatter_plot(mtcars, "mpg", "hp", "cyl", 0.7, 3)

  expect_s3_class(p, "gg")
  expect_equal(ggplot2::ggplot_build(p)$layout$panel_ranges[[1]]$x.range,
    range(mtcars$mpg))
  expect_equal(ggplot2::ggplot_build(p)$layout$panel_ranges[[1]]$y.range,
    range(mtcars$hp))
})

test_that("scatter_plot handles different alpha and size values", {

  p1 <- scatter_plot(mtcars, "mpg", "hp", "cyl", 0.5, 2)
  p2 <- scatter_plot(mtcars, "mpg", "hp", "cyl", 1, 4)

  expect_true(p1$layers[[1]]$aes_params$alpha < p2$layers[[1]]$aes_params$alpha)
  expect_true(p1$layers[[1]]$aes_params$size < p2$layers[[1]]$aes_params$size)
})16 Test tools
This chapter introduces some tools to help write clean and efficient tests. We’ll cover using the ensure package to help write tests, where to store test data, snapshots, and more. Most of topics and methods covered in R Packages, 2ed and the testthat documentation, but within the context of a standard R package .1
16.1 Unit tests & LLMs
I recommend using the ensure package to help write tests in your app-package. If you’re already using LLMs to help write code, ensure is a nice addition to your toolbox because of it’s focus on testing (we’ll cover these tools more in the Shiny Tools section).
Launch app with the shinypak package:
launch('16.1_test-help')“The ensurer is familiar with
testthat3e as well as tidy style, and incorporates context from the rest of your R package to write concise and relevant tests.” -ensuredocumentation
Follow the setup instructions to activate the addin (and I highly recommend creating a keyboard shortcut).
16.1.1 Help, not automation
The ensure package does a great job when writing basic unit tests, but as you’ll see, it doesn’t have a solid understanding of the specification or functional requirements of your application (only you know these). The test code created by ensure often needs some editing.
For example, the following test code was created for R/scatter_plot.R function:
Based on the descriptions, these would test two important functional requirements of our application. However, two of these tests fail:
[ FAIL 2 | WARN 0 | SKIP 0 | PASS 3 ]

── Failure (test-scatter_plot.R:6:3): scatter_plot creates a ggplot object ─────
ggplot2::ggplot_build(p)$layout$panel_ranges[[1]]$x.range (`actual`) not equal to range(mtcars$mpg) (`expected`).

`actual` is NULL
`expected` is a double vector (10.4, 33.9)

── Failure (test-scatter_plot.R:8:3): scatter_plot creates a ggplot object ─────
ggplot2::ggplot_build(p)$layout$panel_ranges[[1]]$y.range (`actual`) not equal to range(mtcars$hp) (`expected`).

`actual` is NULL
`expected` is a double vector (52, 335)
[ FAIL 2 | WARN 0 | SKIP 0 | PASS 3 ]
This might lead us to believe our utility function is not behaving as expected. But when we dig into the method and values these tests are using, we discover it’s an issue with the test:
# build plot
p <- scatter_plot(mtcars, "mpg", "hp", "cyl", 0.7, 3)
# check x
ggplot2::ggplot_build(p)$layout$panel_ranges[[1]]$x.rangeNULL# check y
ggplot2::ggplot_build(p)$layout$panel_ranges[[1]]$y.rangeNULLThe correct code for these tests would be the panel_params (not panel_ranges), but these aren’t going to work either, because ggplot2 automatically adjusts the axis limits based on the data and potential aesthetic mappings (which we can confirm with waldo::compare()):2
waldo::compare(
  x = ggplot2::ggplot_build(p)$layout$panel_params[[1]]$x.range,
  y = range(mtcars$mpg))
`old`: 9.2 35.1
`new`: 10.4 33.9waldo::compare(
x = ggplot2::ggplot_build(p)$layout$panel_params[[1]]$y.range,
y = range(mtcars$hp))`old`: 37.9 349.1
`new`: 52.0 335.0We can continue trying to find something produced by ggplot2::ggplot_build(), but this test confirms the “scatter_plot creates a ggplot object”, so why not just use ggplot2::is_ggplot():
test_that("scatter_plot creates a ggplot object", {
  p <- scatter_plot(mtcars, "mpg", "hp", "cyl", 0.7, 3)
  expect_true(ggplot2::is_ggplot(p))
})
test_that("scatter_plot handles different alpha and size values", {
  p1 <- scatter_plot(mtcars, "mpg", "hp", "cyl", 0.5, 2)
  p2 <- scatter_plot(mtcars, "mpg", "hp", "cyl", 1, 4)
  expect_true(p1$layers[[1]]$aes_params$alpha < p2$layers[[1]]$aes_params$alpha)
  expect_true(p1$layers[[1]]$aes_params$size < p2$layers[[1]]$aes_params$size)
})
[ FAIL 0 | WARN 0 | SKIP 0 | PASS 3 ]I’ve provided this example because it illustrates some important limitations when using ensure (or any LLMs) to help write code: Don’t confuse volume with precision. LLMs are great at generating copius amounts of code, but have no way of checking if the code is functional or accurate. In this case, it arguably would’ve taken less time to do the research and write the correct test (instead of debugging the one created by ensure).
It’s also worth pointing out that if the original test code did pass, the test_that() description wouldn’t the expectation (these belong in a “scatter_plot x and y limits match true range of values” test).
16.1.2 Test scope
One of the recent updates to the testthat package (version 3.2.0) emphasizes limiting code that exists outside of our tests.3
“Eliminating (or at least minimizing) top-level code outside of
test_that()will have the beneficial effect of making your tests more hermetic. This is basically the testing analogue of the general programming advice that it’s wise to avoid unstructured sharing of state.” - Self-sufficient tests, R Packages, 2ed
Strategies for reducing or removing the code outside of test_that() tests include:4
Move file-scope logic to either narrower scope (just this test) or a broader scope (all files).
It’s ok to copy and paste: test code doesn’t have to be super DRY. Obvious >>> DRY
Code outside of test_that() usually serves a specific purpose (load or manipulate data, set options, create folders or files, etc). The section below describes methods for including these behaviors in tests without placing code outside the test scope.
16.1.3 Test fixtures
Test fixtures can be anything used to create repeatable test conditions (data, file paths, functions, etc.). Good test fixtures provide a consistent, well-defined test environment, and then are removed/destroyed when the test is executed. This ensures any changes made during the test don’t persist or interfere with future tests.5
In R packages, test fixtures are stored in the tests/testthat/fixtures/ folder:6
tests/
├── testthat/
│   └── fixtures/
└── testthat.R
16.2 Test data
Large static data files are an example of a test fixture.7 Any code used to create test data should be stored with the output file (using a clear naming convention).
Launch app with the shinypak package:
launch('16.2_test-data')For example, I’ve stored the code used to create a ‘tidy’ version of the ggplot2movies::movies data along with the output dataset in tests/testthat/fixtures/:
tests
├── testthat
│ ├── fixtures
│ │ ├── make-tidy_ggp2_movies
│ │ └── tidy_ggp2_movies.rds
│ └── test-scatter_plot.R
└── testthat.R
3 directories, 4 files- 1
-
The code used to create the test data (
make-make_tidy_ggp2_movies.R) - 2
-
The test data file (i.e.,
tidy_ggp2_movies.rds):
Data files stored in tests/testthat/fixtures/ can be accessed with testthat::test_path() inside each test.
Below is a test for the scatter_plot() utility function that answers the question, ‘does the plot generate without producing an error?’ using the tidy_ggp2_movies.rds test fixture:
describe(
"Feature: Scatter plot data visualization
As a film data analyst
I want to explore IMDB.com movie review data
So that I can examine relationships between movie reivew metrics
Background:
Given I have IMDB movie reviews data
And the data contains continuous variables like 'rating'
And the data contains categorical variables like 'mpaa'",
code = {
it(
"Scenario: Scatter plot initial x, y, color values
When I launch the Scatter Plot Data Visualization
And I have a IMDB dataset of movie reviews
Then the plot should show 'Rating' on the x-axis
And the plot should show 'Length' on the y-axis
And the points on the plot should be colored by 'MPAA' rating",
code = {
ggp2_scatter_inputs <- list(
x = "rating",
y = "length",
z = "mpaa",
alpha = 0.75,
size = 3,
plot_title = "Enter plot title"
)
tidy_ggp2_movies <- readRDS(test_path("fixtures",
"tidy_ggp2_movies.rds"))
app_graph <- scatter_plot(tidy_ggp2_movies,
x_var = ggp2_scatter_inputs$x,
y_var = ggp2_scatter_inputs$y,
col_var = ggp2_scatter_inputs$z,
alpha_var = ggp2_scatter_inputs$alpha,
size_var = ggp2_scatter_inputs$size
)
expect_true(ggplot2::is_ggplot(app_graph))
})
})- 1
-
Feature
- 2
-
Scenario
- 3
-
Test inputs
- 4
-
Test fixture
- 5
-
Create observed object
- 6
- Expectation
This type of test is appropriate because we want to confirm the tidy movies data will generate a plot object when passed to our graphing utility function, not necessarily to verify the specific contents of the graph.8
If the tidy_ggp2_movies.rds file in the tests/testthat/fixtures/ folder are going to be used repeatedly, it might make sense to store the data in inst/extdata/ or data-raw/. Test fixtures are described in-depth in R Packages, 2ed and in the testthat documentation.
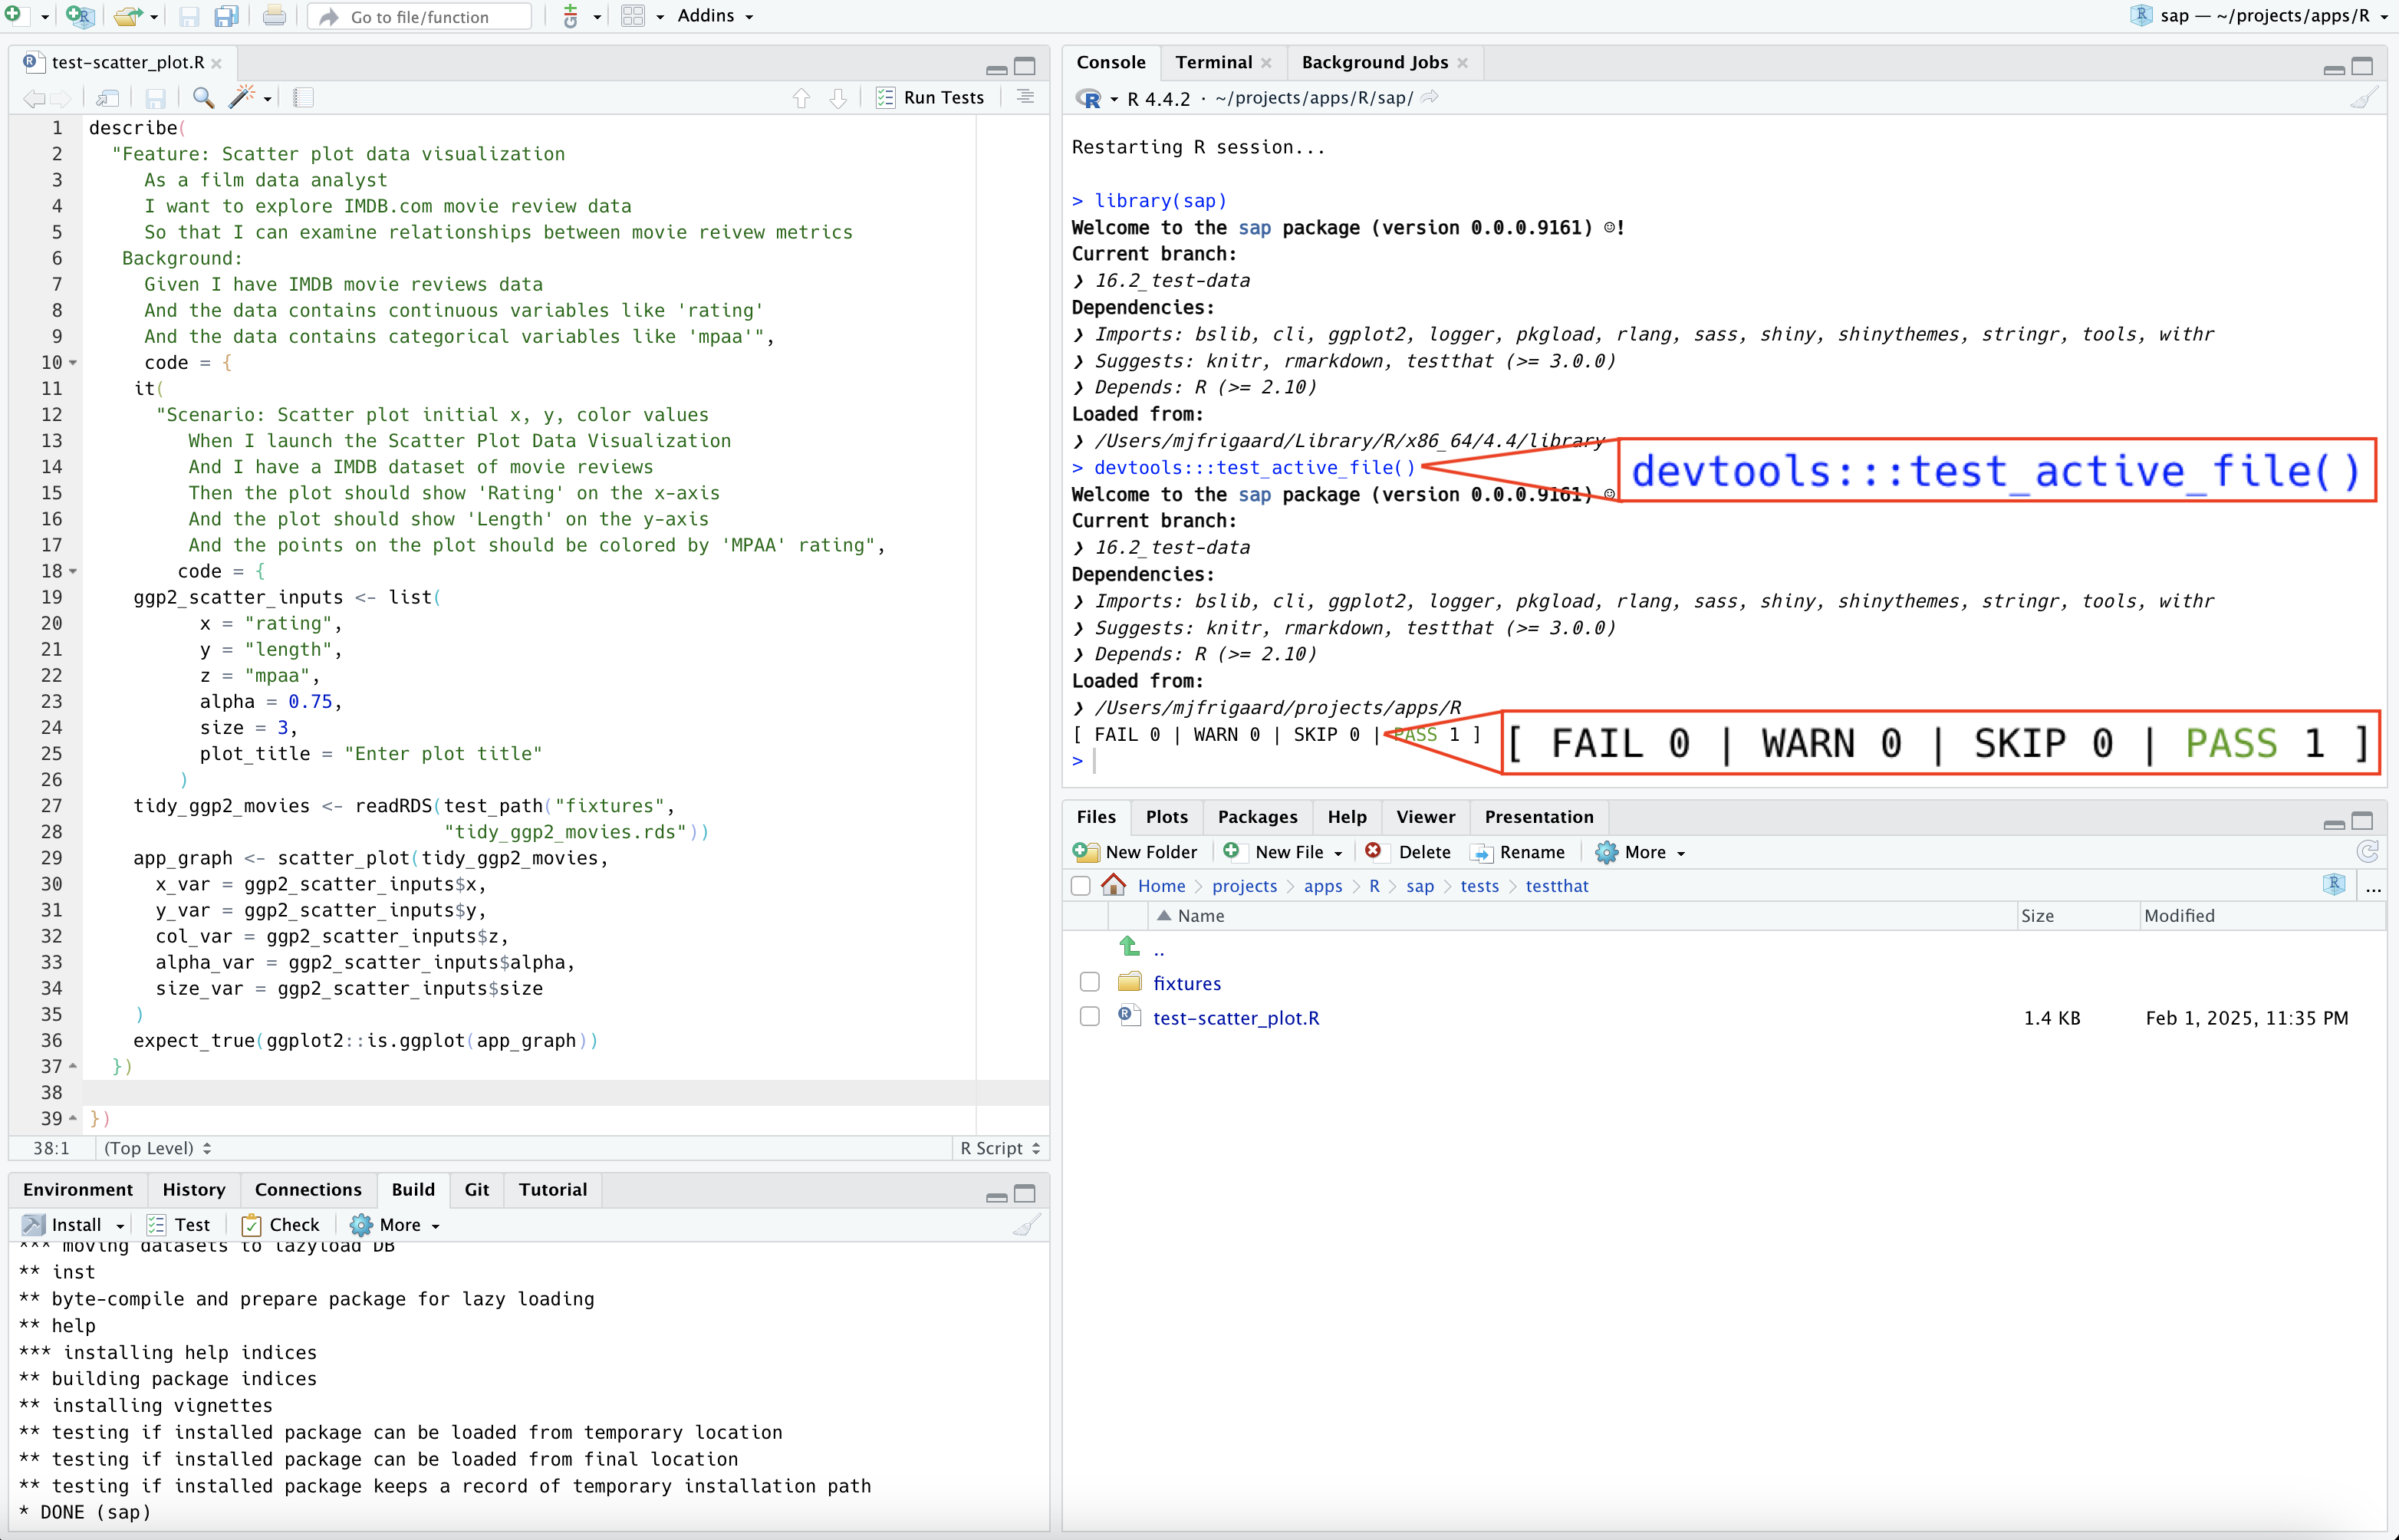
If we’ve created the keyboard shortcut for devtools::test_active_file() in RStudio, we’ll see the following in the Console.
Ctrl/Cmd + T
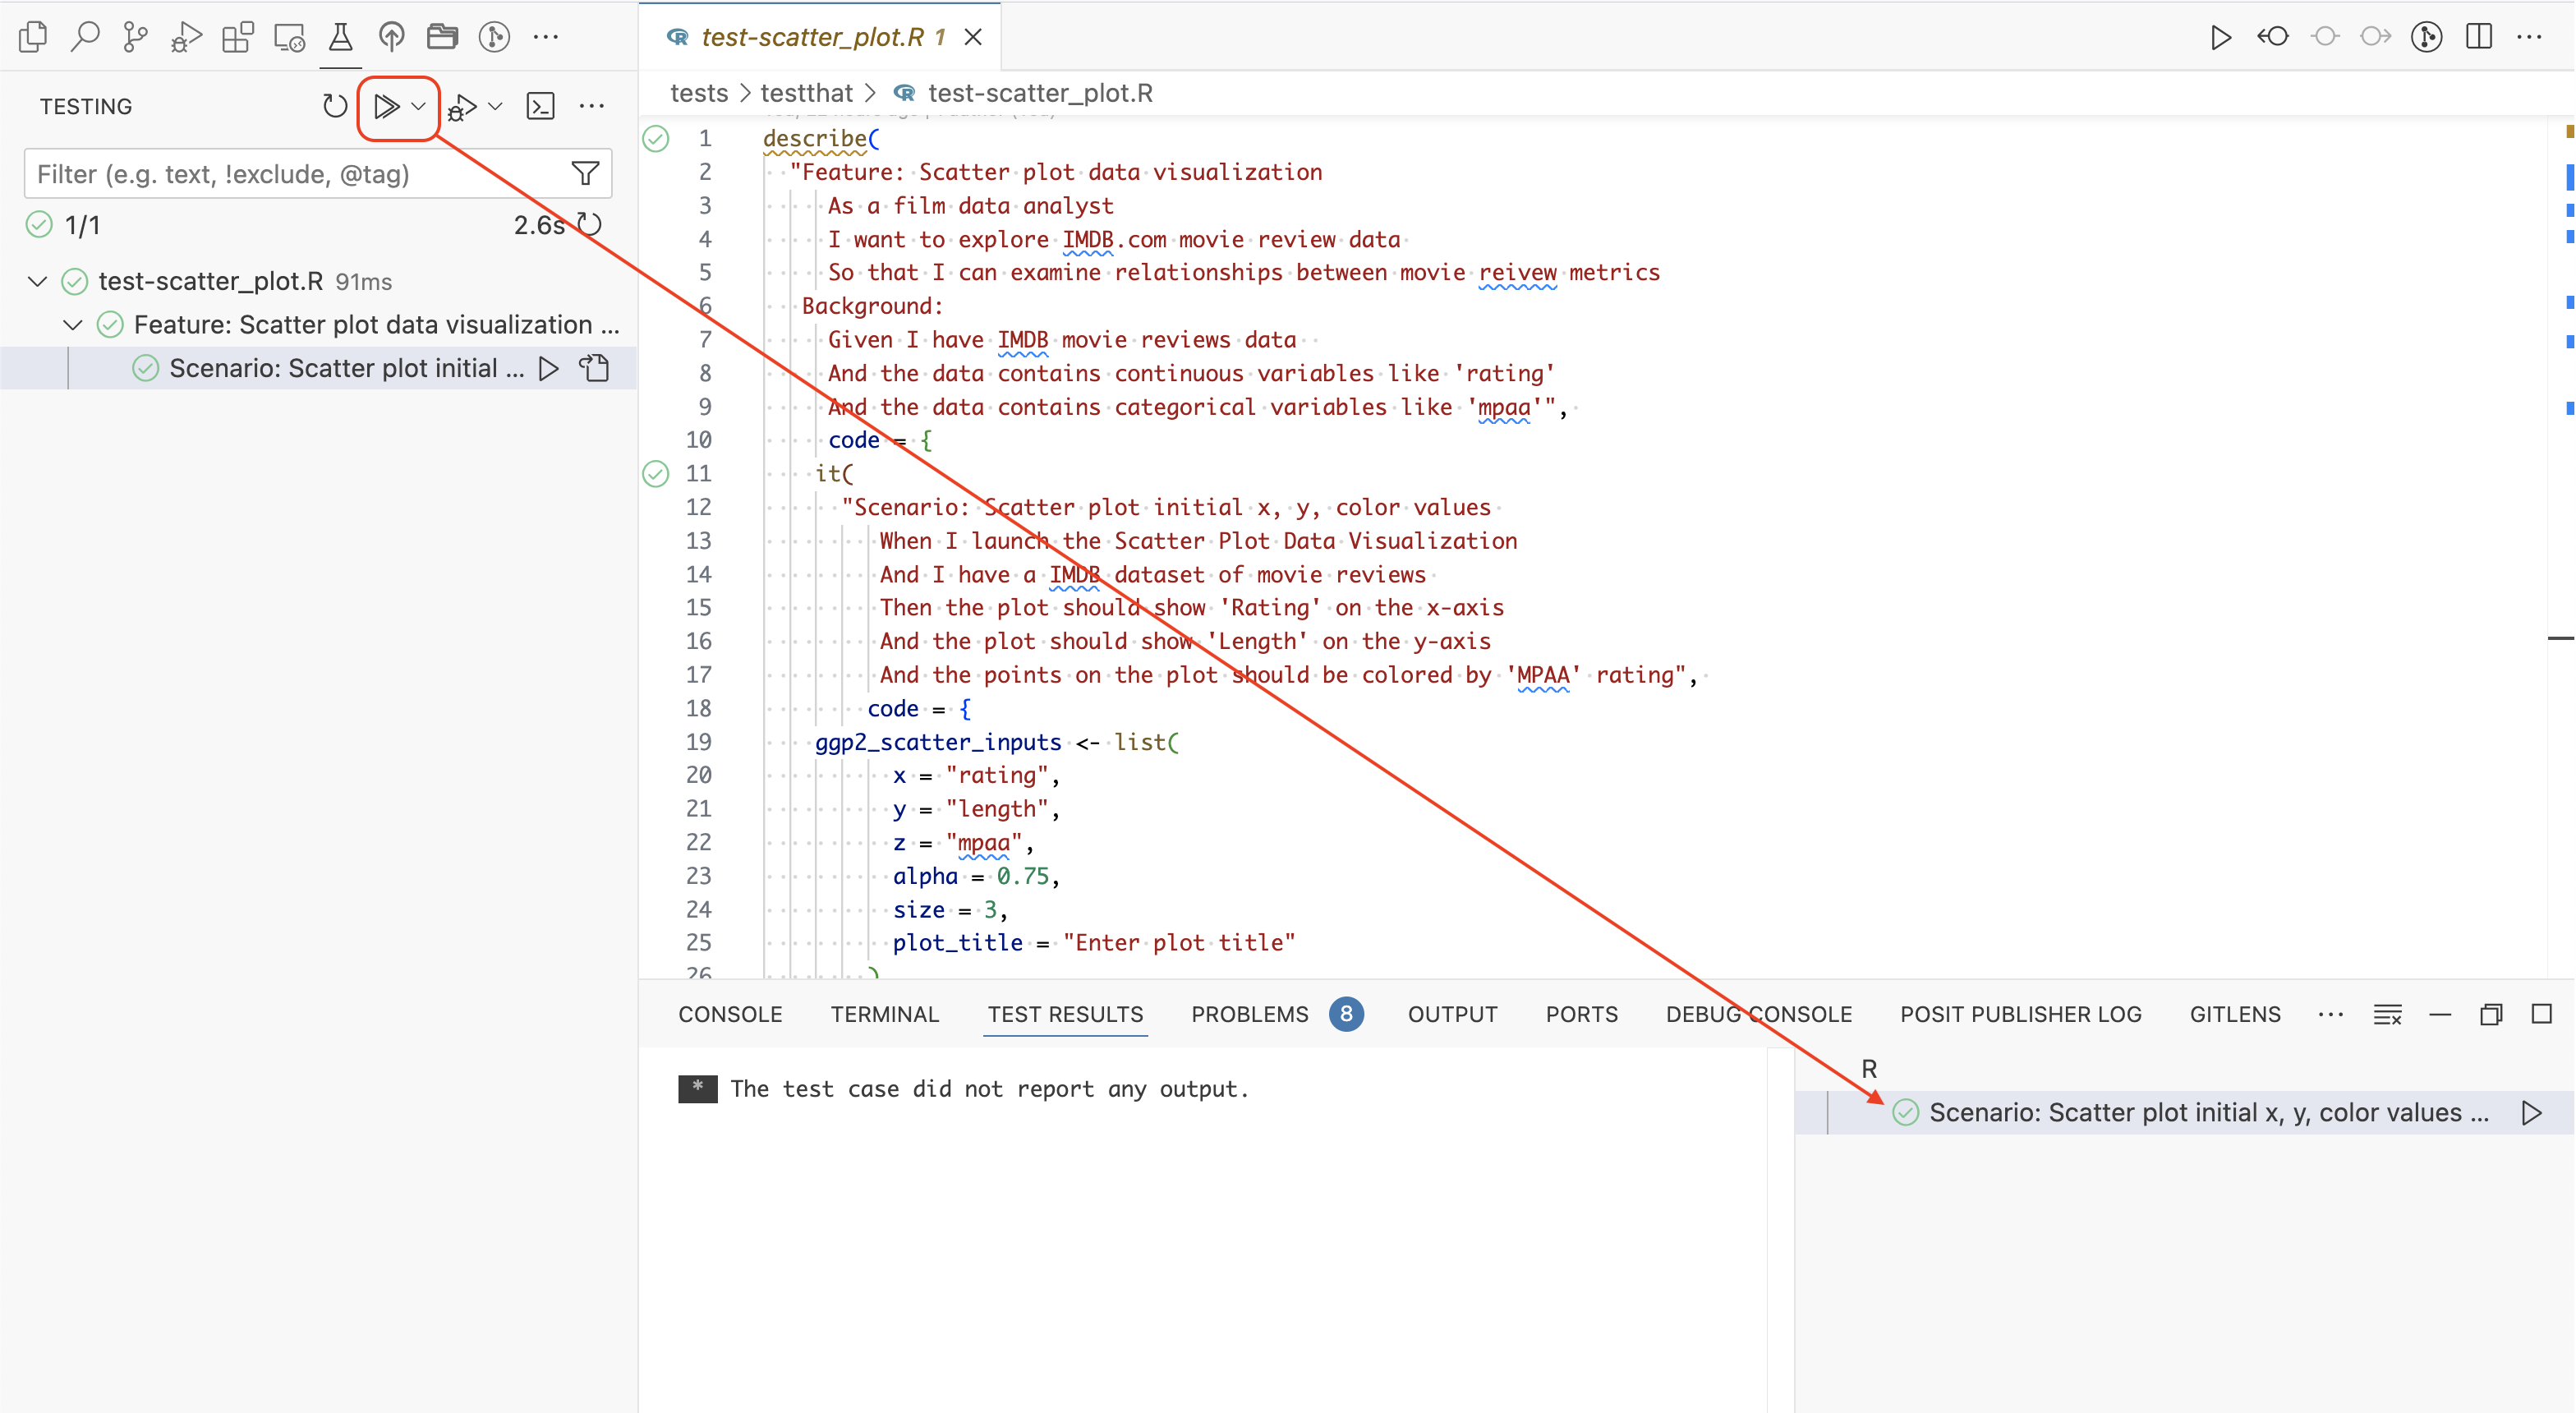
In Positron, the Testing menu gives us a hierarchical breakdown of the describe() and it() testing functions. When we click on the Run Tests icon, we’ll see the following in the Test Results.
16.3 Test logging
As we covered in the previous section (Chapter 13), we can create a test_logger() helper function to monitor our tests and provide additional context:
#' Log test messages (helper)
#'
#' `test_logger()` logs informational messages using the `cli` package. It
#' allows optional `start` and `end` tags to indicate the beginning and end of
#' a process.
#'
#' @param start A character string indicating the start tag. Default is `NULL`.
#' @param end A character string indicating the end tag. Default is `NULL`.
#' @param msg A character string containing the log message.
#'
#' @details
#' - If both `start` and `end` are `NULL`, logs only the message.
#' - If `start` is provided and `end` is `NULL`, logs a message prefixed with
#' `START <start> = <msg>`.
#' - If `start` is `NULL` and `end` is provided, logs a message prefixed with
#' `END <end> = <msg>`.
#' - If both `start` and `end` are provided, logs both `START` and `END`
#'  messages.
#'
#' @return Logs messages and returns `NULL` (used for side effects).
#'
#' @examples
#' test_logger(msg = "Processing started")
#' test_logger(start = "Step1", msg = "Loading data")
#' test_logger(end = "Step1", msg = "Data loaded successfully")
#' test_logger(start = "Step2", end = "Step2", msg = "Performing computation")
#'
#' @keywords internal
#'
#' @export
test_logger <- function(start = NULL, end = NULL, msg) {
  if (is.null(start) & is.null(end)) {
    cat("\n")
    cli::cli_inform("TEST:[{format(Sys.time(), '%Y-%m-%d %H:%M:%S')}] = {msg}")
  } else if (!is.null(start) & is.null(end)) {
    cat("\n")
    cli::cli_inform("\nTEST: START [{format(Sys.time(), '%Y-%m-%d %H:%M:%S')}] {start} = {msg}")
  } else if (is.null(start) & !is.null(end)) {
    cat("\n")
    cli::cli_inform("\nTEST: END [{format(Sys.time(), '%Y-%m-%d %H:%M:%S')}] {end} = {msg}")
  } else {
    cat("\n")
    cli::cli_inform("\nTEST: START [{format(Sys.time(), '%Y-%m-%d %H:%M:%S')}]{start} = {msg}")
    cat("\n")
    cli::cli_inform("\nTEST: END [{format(Sys.time(), '%Y-%m-%d %H:%M:%S')}] {end} = {msg}")
  }
}
Launch app with the shinypak package:
launch('16.3_test-logger')test_logger() can be used to log the start and end of each test, and it includes a message argument (msg) we can use to reference the test description in each test_that() or it() call.9
An example of using test_logger() with the movies data is below:
describe(
"Feature: Scatter plot data visualization
As a film data analyst
I want to explore movie review data
So that I can examine relationships between movie reivew metrics
Background:
Given I have movie reviews data
And the data contains continuous variables like 'IMDB rating'
And the data contains categorical variables like 'mpaa'",
code = {
test_that(
"Scenario: Scatter plot initial x, y, color values
When I launch the Scatter Plot Data Visualization
And I have a IMDB dataset of movie reviews
Then the plot should show 'IMDB rating' on the x-axis
And the plot should show 'Audience score' on the y-axis
And the points on the plot should be colored by 'MPAA' rating",
code = {
ggp2_scatter_inputs <- list(y = 'audience_score',
x = 'imdb_rating',
z = 'mpaa_rating',
alpha = 0.5,
size = 2,
plot_title = 'Enter plot title')
test_logger(start = "Step1", msg = "loading movies data")
movies <- sap::movies
test_logger(end = "Step1", msg = "movies data loaded successfully")
test_logger(start = "Step2", msg = "creating graph")
app_graph <- scatter_plot(movies,
x_var = ggp2_scatter_inputs$x,
y_var = ggp2_scatter_inputs$y,
col_var = ggp2_scatter_inputs$z,
alpha_var = ggp2_scatter_inputs$alpha,
size_var = ggp2_scatter_inputs$size
)
test_logger(end = "Step2", msg = "graph created")
expect_true(ggplot2::is_ggplot(app_graph))
})
})- 1
-
Log the data loading
- 2
-
Log the
scatter_plot()function execution
- 3
- Run the test
When the test is run, the following output is printed to the Console:
[ FAIL 0 | WARN 0 | SKIP 0 | PASS 0 ]
TEST: START [2025-02-06 07:50:53] Step1 = loading movies data

TEST: END [2025-02-06 07:50:53] Step1 = movies data loaded successfully

TEST: START [2025-02-06 07:50:53] Step2 = creating graph

TEST: END [2025-02-06 07:50:53] Step2 = graph created
[ FAIL 0 | WARN 0 | SKIP 0 | PASS 1 ]
There’s nothing prohibiting placing test_logger() in a testing utility file (R/testthat.R) below the R/ folder. Including testing functions in the R/ folder also ensures they’re documented (and any dependencies become part of your app-package).10
16.3.1 Test helpers
“Helper files are a mighty weapon in the battle to eliminate code floating around at the top-level of test files.” Testthat helper files, R Packages, 2ed
Test helpers reduce repeated/duplicated test code. In general, objects or values that aren’t large enough to justify storing as static test fixtures can be created with helper functions. Helper functions are stored in tests/testthat/helper.R, which is automatically loaded with devtools::load_all():
tests/
├── testthat/
│ ├── fixtures/
│ │ ├── make-tidy_ggp2_movies.R
│ │ └── tidy_ggp2_movies.rds
│ ├── helper.R
│ └── test-scatter_plot.R
└── testthat.R- 1
-
Test fixture scripts and
.rdsfiles
- 2
-
Helper functions
- 3
- Test file
Test helpers should only be created if they make testing easier when the tests fail. The article, ‘Why Good Developers Write Bad Unit Tests’, provides great advice on complexity vs. clarity when writing unit tests,
‘think about what will make the problem obvious when a test fails. Refactoring may reduce duplication, but it also increases complexity and potentially obscures information when things break.’
R programmers resist copy + paste programming, and in most cases this makes sense. After all, R is a functional programming language, so it’s tempting to bundle any repeated code into a function and store it in the tests/testthat/helper.R file.
However, when we’re writing tests, it’s more important that tests are easy to read and understand when they fail.
For example, consider the ggp2_scatter_inputs inputs passed to the scatter_plot() function in the previous test:
ggp2_scatter_inputs <- list(
        x = "rating",
        y = "length",
        z = "mpaa",
        alpha = 0.75,
        size = 3,
        plot_title = "Enter plot title"
)
We could write a var_inputs() function that stores these values in a list. In our tests, this would allow us to use var_inputs() with the same ‘reactive syntax’ we use with scatter_plot() in the module server function:
var_inputs <- function() {
   list(x = "rating",
        y = "length",
        z = "mpaa",
        alpha = 0.75,
        size = 3,
        plot_title = "Enter plot title")
}
var_inputs()
## $x
## [1] "rating"
##
## $y
## [1] "length"
##
## $z
## [1] "mpaa"
##
## $alpha
## [1] 0.75
##
## $size
## [1] 3
##
## $plot_title
## [1] "Enter plot title"
While this removes duplicated code, it also makes it less clear for the reader what var_inputs() contains and where it was created (without opening the helper.R file).
tidy_ggp2_movies <- readRDS(test_path("fixtures",
"tidy_ggp2_movies.rds"))
app_graph <- scatter_plot(
tidy_ggp2_movies,
x_var = var_inputs()$x,
y_var = var_inputs()$y,
col_var = var_inputs()$z,
alpha_var = var_inputs()$alpha,
size_var = var_inputs()$size)
testthat::expect_true(ggplot2::is_ggplot(app_graph))- 1
-
Load test fixture
- 2
-
Identical to the code in
mod_scatter_display_server()
In contrast, the make_ggp2_inputs() function below creates inputs for the scatter_plot() utility function:
make_ggp2_inputs <- function() {
  glue::glue_collapse("list(x = 'rating',
     y = 'length',
     z = 'mpaa',
     alpha = 0.75,
     size = 3,
     plot_title = 'Enter plot title'
     )"
  )
}
I can call make_ggp2_inputs() in the Console and it will return the list of values to paste into each test:
make_ggp2_inputs()
## list(x = 'rating',
##      y = 'length',
##      z = 'mpaa',
##      alpha = 0.75,
##      size = 3,
##      plot_title = 'Enter plot title'
##      )
While copying and pasting this list into the test doesn’t reduce the number of keystrokes per test, it also doesn’t obscure the source of the values in the test (like with var_inputs()).
glue::glue_collapse() is your friend when you want to quickly reproduce code for your tests. make_var_inputs() creates the list of inputs for testing the original movies data:
make_var_inputs <- function() {
  glue::glue_collapse("list(y = 'audience_score',
     x = 'imdb_rating',
     z = 'mpaa_rating',
     alpha = 0.5,
     size = 2,
     plot_title = 'Enter plot title'
    )")
}16.3.2 Test development
While developing, using keyboard shortcuts makes it easier to iterate between building fixtures, writing and running tests, and checking code coverage.
Ctrl/Cmd + Shift + R
devtools:::test_coverage_active_file()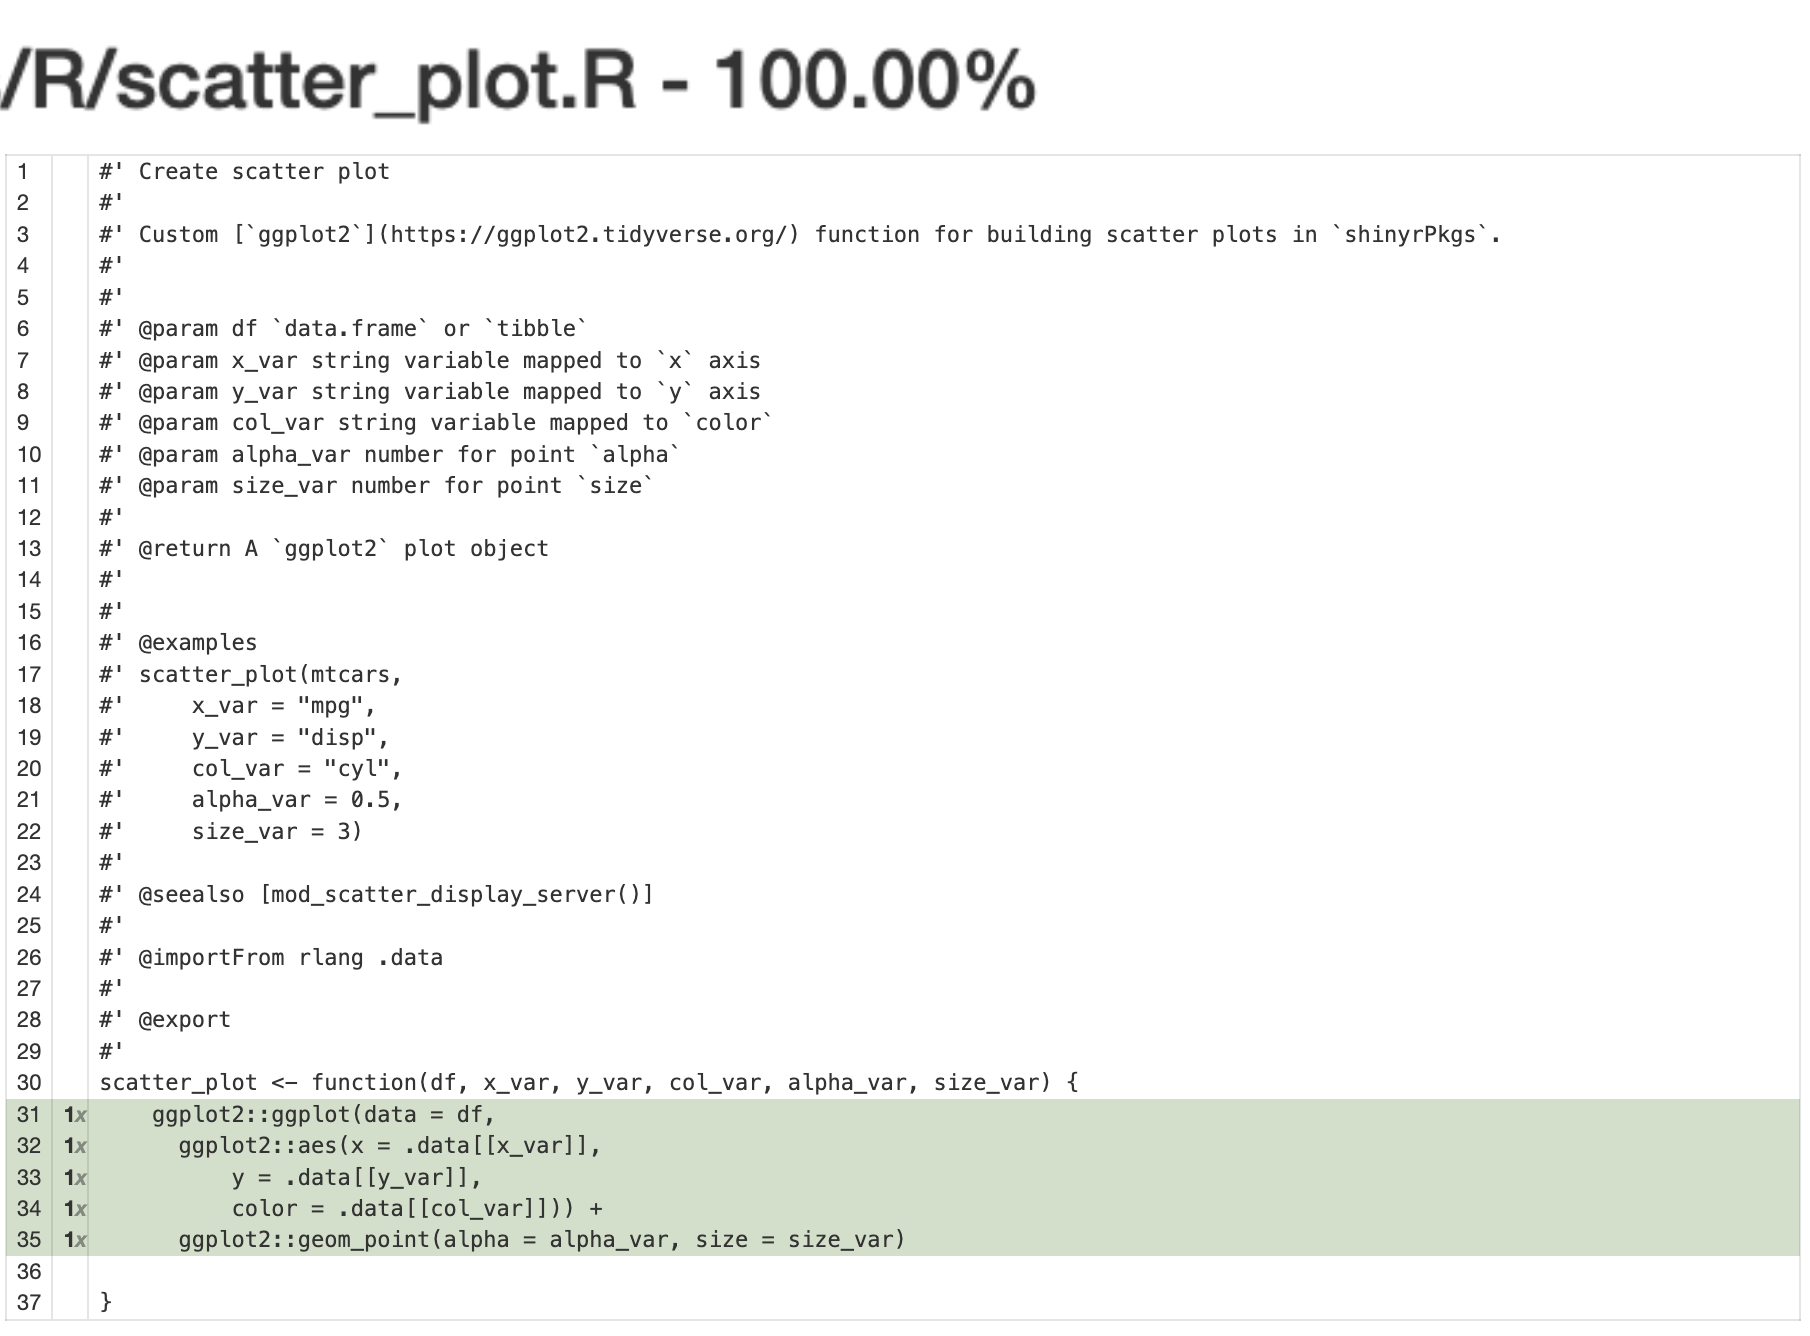
We can see the test coverage on the scatter_plot() function is 100%, but this only covers a small percentage of the code in our app-package.
devtools:::test_coverage()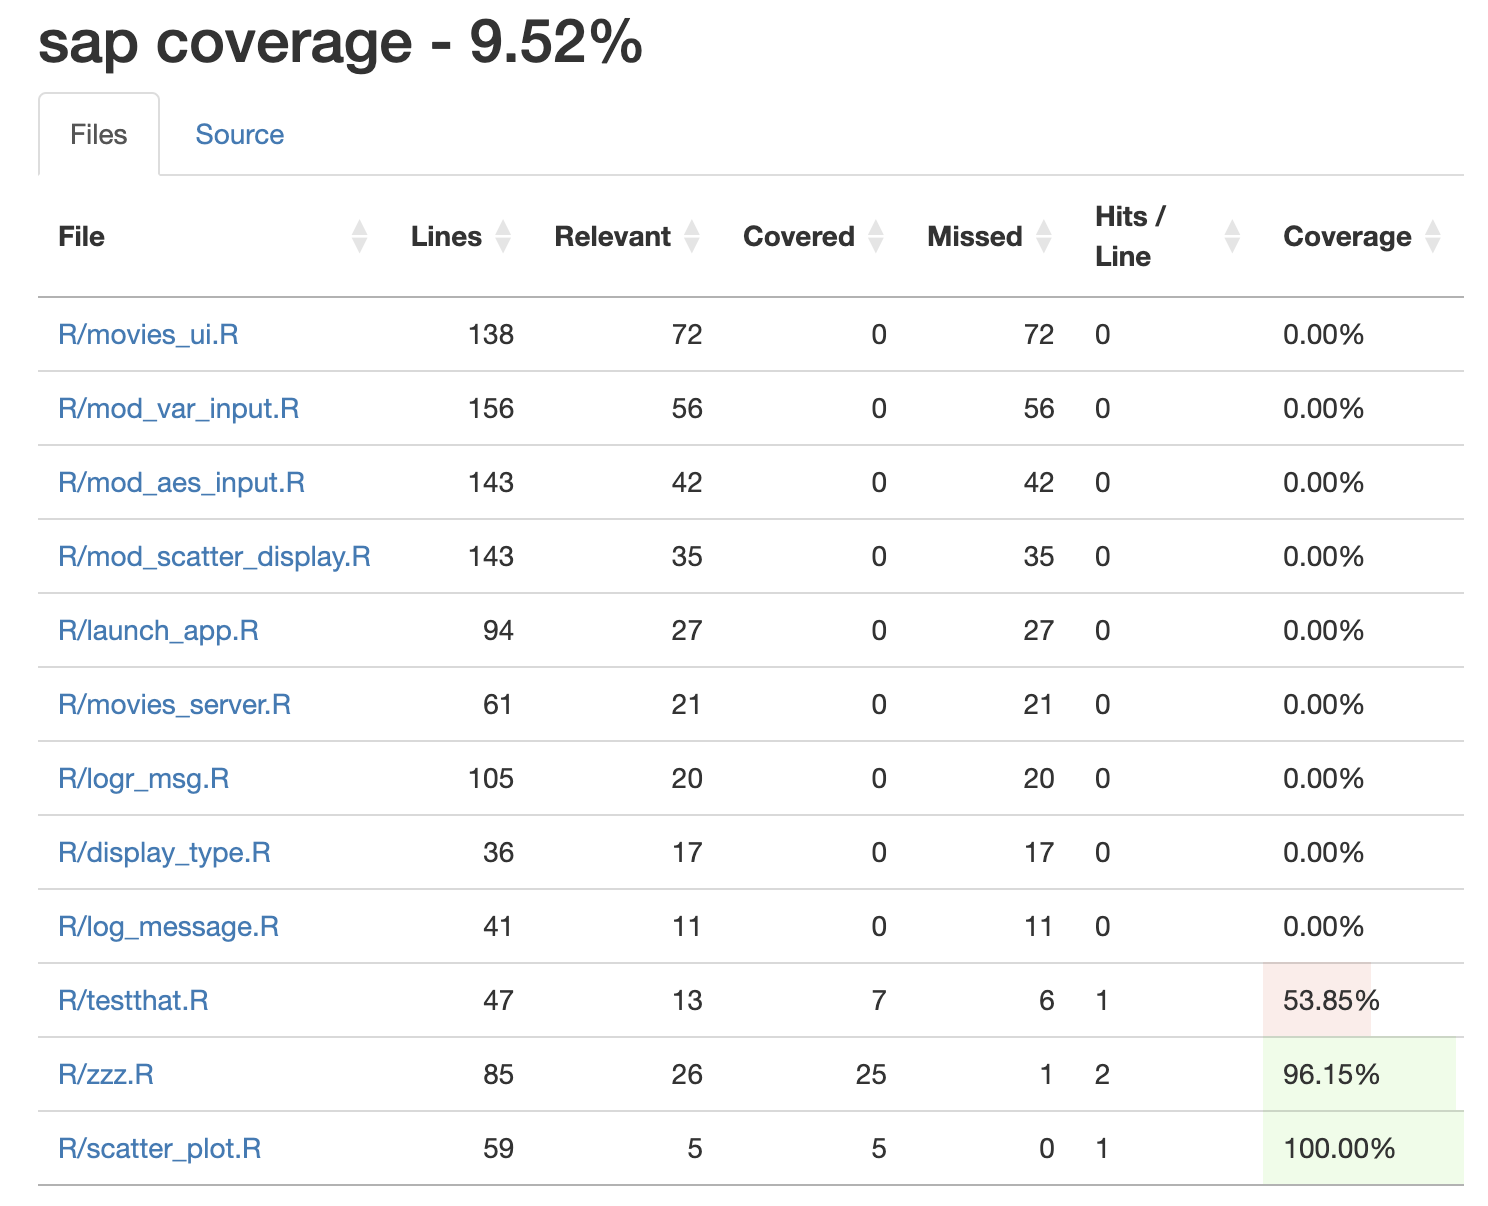
sap package16.4 Test snapshots
Launch app with the shinypak package:
launch('16.4_test-snapshots')If the expected output we’re interesting in testing is cumbersome to describe programmatically, we can consider using a snapshot tests.
Examples of this include UI elements (which are mostly HTML created by Shiny’s UI layout and input/output functions) and data visualizations. Writing tests for these outputs can be difficult because their “correctness” is somewhat subjective and requires human judgment. 11
I’ve included a small UI function (text_logo()) in the R/ folder of sap:
show/hide text_logo()
#' Create a Text-based Logo in HTML
#'
#' `text_logo()` generates a text-based logo enclosed within HTML tags, allowing
#' for the specification of the heading size (h1 through h6). The logo features
#' a stylized representation of a face within arrows, using ASCII characters.
#'
#' @param size A character string specifying the heading size for the logo.
#' Valid options include "h1", "h2", "h3", "h4", "h5", and "h6".
#' Defaults to "h3".
#'
#' @return An HTML object containing the logo. This object can be directly used
#' in R Markdown documents or Shiny applications to render the logo in a web page.
#'
#' @examples
#' # Generate a logo with default size h3
#' text_logo()
#'
#' # Generate a logo with size h1
#' text_logo(size = "h1")
#'
#'
#' @export
text_logo <- function(size = 'h3') {
  if (any(size %in% c("h1", "h2", "h3", "h4", "h5", "h6"))) {
  htmltools::HTML(
    paste0(
    "<span>\n",
      paste0("  <", size, ">", collapse = ""), "\n",
      "    <code>√\\/--‹(•_•)›--√\\/</code>\n",
      paste0("  <", size, "/>", collapse = ""), "\n",
    "</span>\n"
      )
    )
  } else {
    rlang::abort(paste(size, "isnt supported", sep = " "))
  }
}
This function generates the HTML so we can include a small logo in the UI.12
The output in the UI:
text_logo()The pre-rendered HTML:
<span>
  <h3>
    <code>√\/--‹(•_•)›--√\/</code>
  </h3>
</span>
Reviewing the entire HTML contents of movies_ui() to see if text_logo() is working isn’t practical, but we can store it’s results in a snapshot file using expect_snapshot(). In tests/testthat/test-text_logo.R, I’ll write the following tests:13
Confirm the default
sizeargument:describe( "Scenario: Generating a logo with default size Given the user did not specify a [size] in text_logo() When text_logo() is invoked without a [size] argument Then the correct HTML for a ['h3'] text logo is returned", code = { test_that("text_logo()", code = { test_logger(start = "snap", msg = "text_logo()") expect_snapshot(text_logo()) test_logger(end = "snap", msg = "text_logo()") }) })Confirm a new
sizeargument:describe( "Scenario: Generating a logo of a specified size Given the user wants a ['h1'] sized text logo When text_logo(size = 'h1') is invoked Then the correct HTML for a ['h1'] text logo is returned", code = { test_that("text_logo('h1')", code = { test_logger(start = "snap", msg = "text_logo('h1')") expect_snapshot(text_logo("h1")) test_logger(end = "snap", msg = "text_logo('h1')") }) })Confirm an invalid
sizeargument:describe( "Scenario: Attempting to generate a logo with an invalid size Given the user specifies an invalid [size] for the text logo When text_logo() is invoked with an invalid [size] argument Then an error is returned stating the [size] is not recognized", code = { test_that("text_logo('invalid')", code = { test_logger(start = "snap", msg = "text_logo('invalid')") expect_error(text_logo("massive"), NULL) test_logger(end = "snap", msg = "text_logo('invalid')") }) })
When we test this file, we see the following warnings about the creating of the snapshot files:
devtools:::test_active_file()![]()
16.4.1 Reviewing _snaps/
Snapshots are stored in the tests/testthat/_snaps/ folder. The output from expect_snapshot_file() is a markdown file with contents similar to what we saw above in the warning message. Should the markdown file contents change in future test runs, the tests will fail and we’ll be prompted to review the changes. 14
For example, if the <span> changed to a <div> in text_logo() and caused a test failure, I could review the changes in tests/testthat/_snaps/text_logo.md with testthat::snapshot_review('text_logo'):
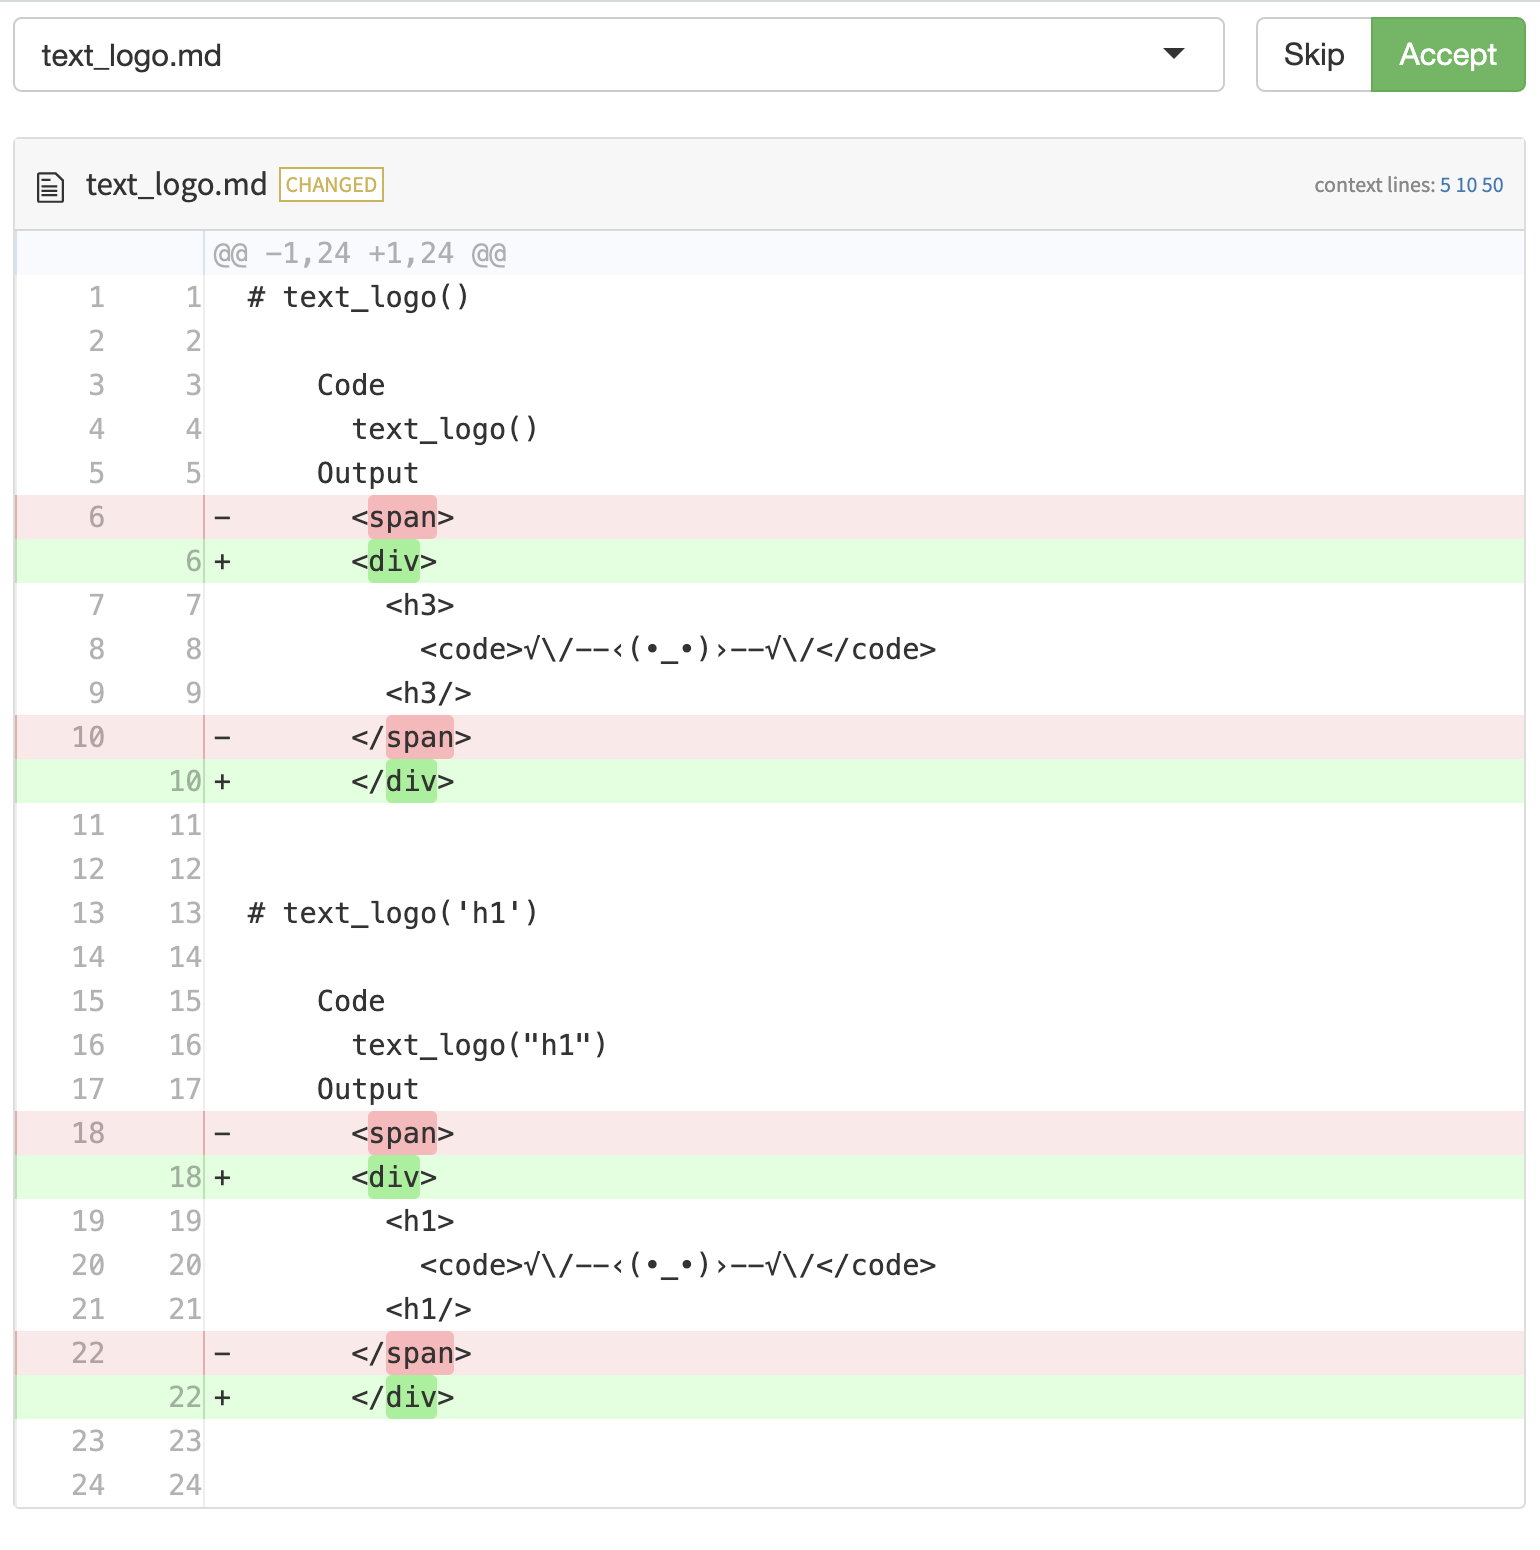
testthat::snapshot_review('text_logo')
Accepting snapshot: 'tests/testthat/_snaps/text_logo.md'
For examples of snapshot tests for graphical outputs, review the examples in Appendix F.
Recap
The three chapters in R Packages, 2ed, dedicated to testing are Testing basics, Designing your test suite, and Advanced testing techniques↩︎
Read more about numeric position scales in the Position scales and axes chapter of ggplot2, 3e↩︎
Read a summary of the changes to the
testthatpackage on the tidyverse blog↩︎these tips (and more!) were covered in the Package Development Masterclass delivered at posit::conf(2023)↩︎
For a concrete example, see this article on self-cleaning tests.↩︎
The name ‘
fixtures’ isn’t required (you can name this folder anything).↩︎Creating a tidied version of
ggplot2movies::movieswould be costly to re-create with every test, so it’s advised to store it as an static test fixture.↩︎Snapshot tests would be more appropriate for answering the question, ‘is the plot visually correct?’.↩︎
Check out the
loggerpackage for more information on logging your app-package.↩︎Placing common files for testing below
R/is covered in R Packages, 2ed↩︎Graph snapshots are covered in Appendix E.↩︎
This is a simple example, but I chose it because it needs some tricky escape characters to work.↩︎
Mastering Shiny covers creatng a snapshot file to test UI elements, but also notes this is probably not the best approach.↩︎
We’ll encounter this folder again in the Chapter 18 on system tests with
shinytest2.↩︎