%%{init: {'theme': 'neutral', 'themeVariables': { 'fontFamily': 'monospace', "fontSize":"16px"}}}%%

flowchart TD
  workflow(["Workflow"]) -->|"<em>Triggered by<em>"| event("<strong>Event</strong>: push, pull request, etc.")
21 GitHub Actions
NoteTLDR 
GitHub Actions automate testing and deployment for R packages.
Workflows are defined in YAML files under
.github/workflows/.Common tasks include styling/linting, running tests, and deploying apps.
Continuous Integration (CI) and Continuous Deployment (CD) help automate software development tasks, especially testing and deployment. In the context of a Shiny app-package, CI/CD usually refers to GitHub Actions or Travis CI.
This chapter will only cover CI/CD with GitHub Actions. Travis-CI has been around longer than GitHub Actions, and if you’d like to compare the two, I recommend this article.
GitHub Actions
GitHub Actions (or Actions, for short) is a feature provided by GitHub that enables automation of various development workflows. These workflows are defined in YAML files and can automate some of the repetitive tasks in the development lifecycle, right within a GitHub repository.
We can use Actions to create custom workflows for building, testing, and deploying our app-package.
Workflows
A workflow is a YAML file placed in a repository to automate processes and executes jobs. Workflows can be triggered manually or set to run on a schedule based on repository events.
on
on defines the event(s) that trigger the workflow.
on:
  push:
    branches: [ main ]
  pull_request:
    branches: [ main ]
An event is any activity that triggers a workflow, such as a pull request, a new issue or pushed commits.1
name
name is an optional field to identify a workflow in the Actions tab of the GitHub repository.
name: shinyIf name is not provided, GitHub will use the file path.
jobs
A job consists of a sequence of steps defined in the workflow file.
%%{init: {'theme': 'neutral', 'themeVariables': { 'fontFamily': 'monospace', "fontSize":"16px"}}}%%
flowchart
  workflow(["Workflow"]) -->|"<em>Triggered by<em>"| event("<strong>Event</strong>: push, pull request, etc.")

  event --> |"<em>Executes</em>"| Jobs{"<strong>Jobs</strong>"}
jobs:
  check:
    runs-on: ubuntu-latest
The identifier (check in this case) is used to reference the runner, in this example it’s ubuntu-latest.
A runner is a server (running Ubuntu Linux, Microsoft Windows, or macOS) that operates within a freshly provisioned virtual machine to execute the triggered workflow.
%%{init: {'theme': 'neutral', 'themeVariables': { 'fontFamily': 'monospace', "fontSize":"16px"}}}%%

flowchart
  workflow(["Workflow"]) -->|"<em>Triggered by<em>"| event("<strong>Event</strong>: push, pull request, etc.")

  subgraph VM["Virtual Machine"]
    subgraph runner02["<strong>Runner</strong> 2"]
    end
    subgraph runner01["<strong>Runner</strong> 1"]
    end
  end

  event --> |"<em>Executes</em>"| Jobs{"<strong>Jobs</strong>"}
  Jobs --> |"<em>Launches</em>"|runner01 & runner02
Each runner can run a single job at a time.
jobs:
  check:
    runs-on: ${{ matrix.config.os }}
matrix runs jobs across different operating systems, programming language versions, etc.
name: ${{ matrix.config.os }} (${{ matrix.config.r }})
    strategy:
      fail-fast: false
      matrix:
        config:
          - {os: macos-latest,   r: 'release'}
          - {os: windows-latest, r: 'release'}
          - {os: ubuntu-latest,   r: 'release'}
fail-fast: false means the workflow will continue running even if one of the matrix jobs fails.
steps
Each step can be a shell script or an action, and they are executed in the order they are written. For example, checking out code from a repository, setting up R, installing a package, and launching an app.
%%{init: {'theme': 'neutral', 'themeVariables': { 'fontFamily': 'monospace', "fontSize":"16px"}}}%%

flowchart
  workflow(["Workflow"]) -->|"<em>Triggered by<em>"| event("<strong>Event</strong>: push, pull request, etc.")

  subgraph VM["Virtual Machine"]
    subgraph runner02["<strong>Runner</strong> 2"]
        action02a("<strong>Action</strong>: checkout code")
        action02b("<strong>Action</strong>: set up R")
        step02a("<strong>Script</strong>: launch app")
    end
    subgraph runner01["<strong>Runner</strong> 1"]
        action01a("<strong>Action</strong>: checkout code")
        action01b("<strong>Action</strong>: set up R")
        step01a("<strong>Script</strong>: install package")
    end
  end

  event --> |"<em>Executes</em>"| Jobs{"<strong>Jobs</strong>"}
  Jobs --> |"<em>Launches</em>"|runner01 & runner02
steps:
    - uses: actions/checkout@v2

    - name: Set up R
      uses: r-lib/actions/setup-r@v2

    - name: Install package
      run: |
        install.packages('remotes')
        remotes::install_local('.')
      shell: Rscript {0}
steps define a series of tasks or actions that the job will execute. These steps check out the code, set up the R environment, and install a local R package.
Finally, lines beginning with # will not be executed. It’s common to provide 1) a reference to the workflow source (r-lib/actions in this case) and 2) a link for help with debugging build failures.
# Workflow derived from https://github.com/r-lib/actions/tree/v2/examples
# Need help debugging build failures? Start at https://github.com/r-lib/actions#where-to-find-help
Permissions
In order for workflows to run, we’ll need to make sure Actions have read and write permissions. We can do this by clicking on the repository’s Settings tab, then expand the Actions menu and select General:
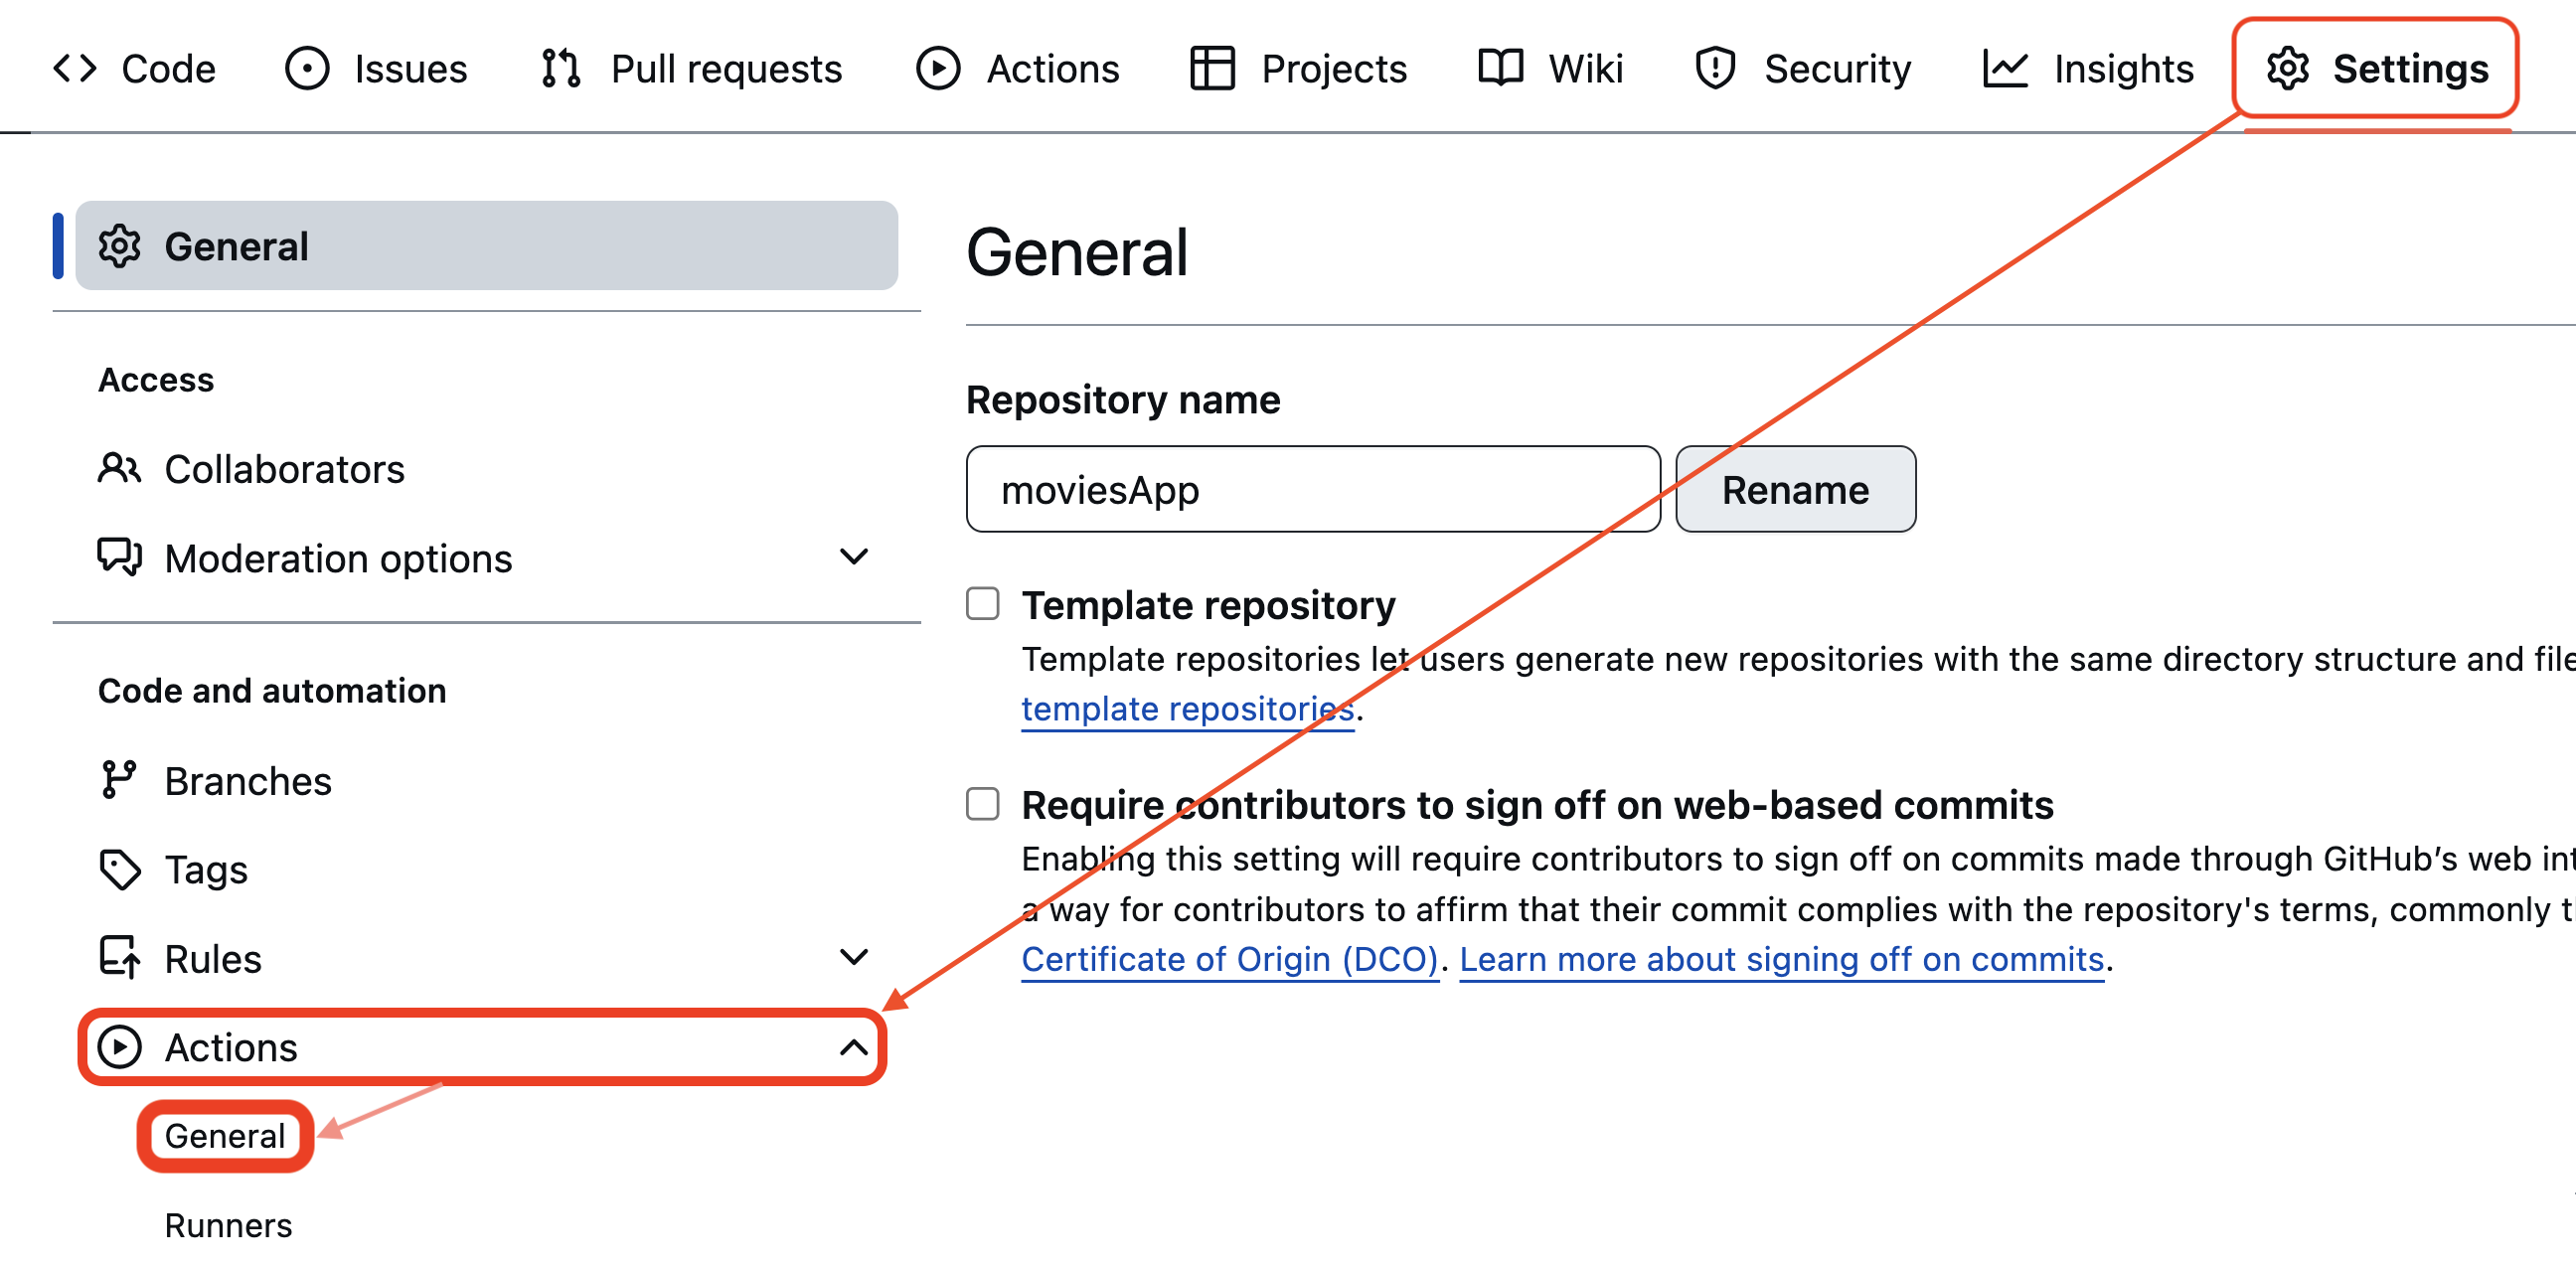
In the General settings, we want to confirm the workflow has Read and write permissions permissions (if this needs to be been changed, be sure to click Save).

Now our workflows can commit and push changes to the repository.
21.1 Code styling and linting
In R packages, we can set up the GitHub Action infrastructure with usethis::use_github_action(). The name can be any of the workflow files available at r-lib/actions. The first workflow we’ll be demonstrating can be used to automate the code style in an app-package.
Launch app with the shinypak package:
launch('21.1_gha-style')usethis::use_github_action("style")✔ Setting active project to '/projects/apps/sap'
✔ Creating '.github/'
✔ Adding '*.html' to '.github/.gitignore'
✔ Creating '.github/workflows/'
✔ Saving 'r-lib/actions/examples/style.yaml@v2' to '.github/workflows/style.yaml'The output tells us a local .github/workflows/style.yaml file has been copied from the r-lib/actions/examples/style.yaml@v2 into the .github/workflows folder:
.github/
  └── workflows
    └── style.yaml

2 directories, 1 file
The documentation for the style.yaml@v2 file tells us this workflow,
“styles the R code in a package, then commits and pushes the changes to the same branch.”
The code styling in this workflow is handled by the styler package, which “formats your code according to the tidyverse style guide.”
We’ll make one small change to style.yaml before pushing it to GitHub. Instead of having the workflow automatically commit and push the styled code changes to the same branch, we’ll limit the code styling to the 21.1_gha-style branch:
on:
  push:
    branches: [21.1_gha-style]
    paths: ["**.[rR]", "**.[qrR]md", "**.[rR]markdown", "**.[rR]nw", "**.[rR]profile"]
This change ensures our style workflow will be triggered only for pushes to the specified branches (and when changes are made to files with the specified extensions in path).
After saving these changes to .github/workflows/style.yaml, we’ll add, commit, and push the changes to GitHub,
git add .
git commit -m "updates to style workflow"
[21.1_gha-style 899bd38] updates to style workflow
4 files changed, 43 insertions(+), 45 deletions(-)git pushEnumerating objects: 17, done.
Counting objects: 100% (17/17), done.
Delta compression using up to 12 threads
Compressing objects: 100% (8/8), done.
Writing objects: 100% (9/9), 950 bytes | 25.00 KiB/s, done.
Total 9 (delta 6), reused 0 (delta 0), pack-reused 0
remote: Resolving deltas: 100% (6/6), completed with 6 local objects.
To https://github.com/mjfrigaard/sap.git
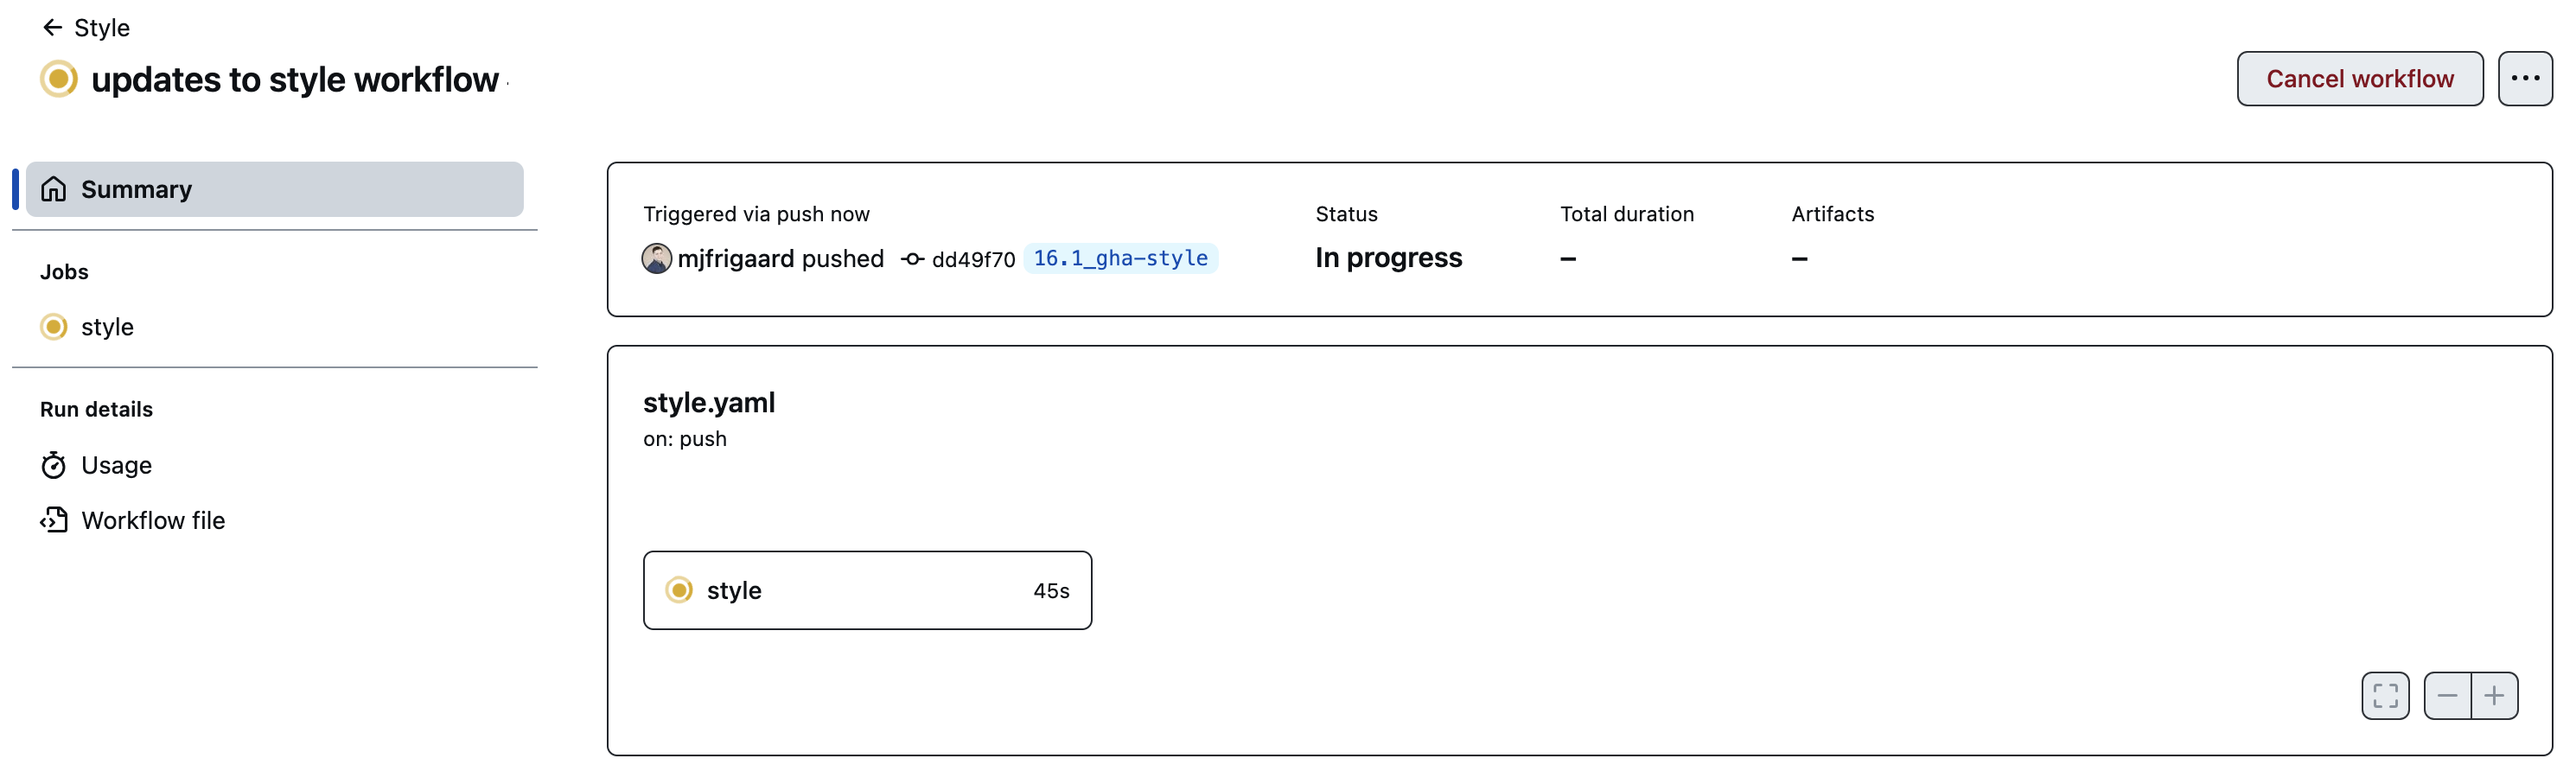
d366e0f..899bd38 21.1_gha-style -> 21.1_gha-styleIf we view the Actions tab, we’ll see the workflow listed with the name of our commit message:

Clicking on the workflow reveals the following:
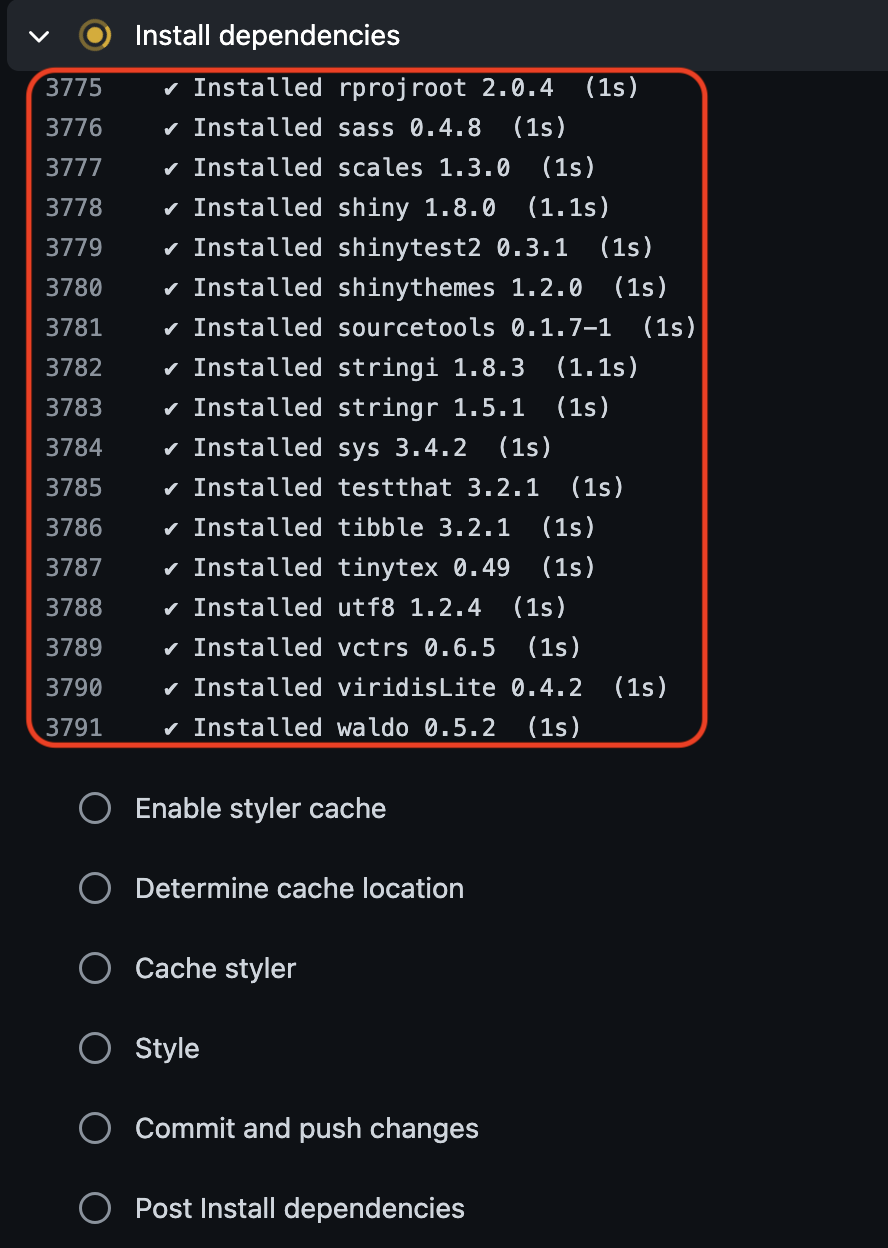
The style widget contains each step in the workflow file. If we click on it we can see each step executed in real-time. Below we can see the dependencies installed from the pak lockfile:
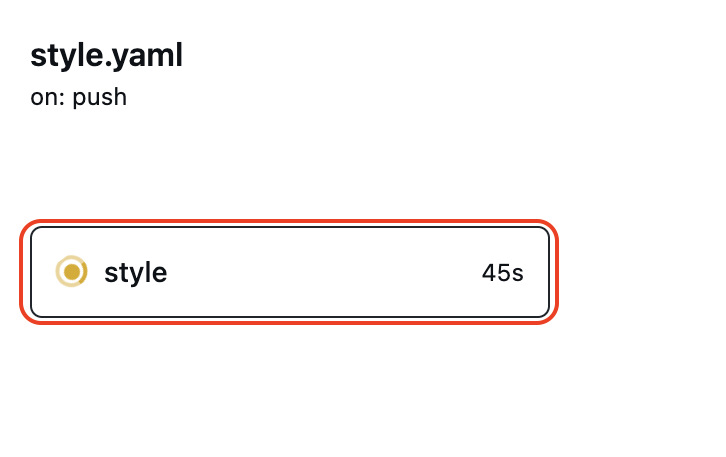
The actual styling comes is in the Style step:
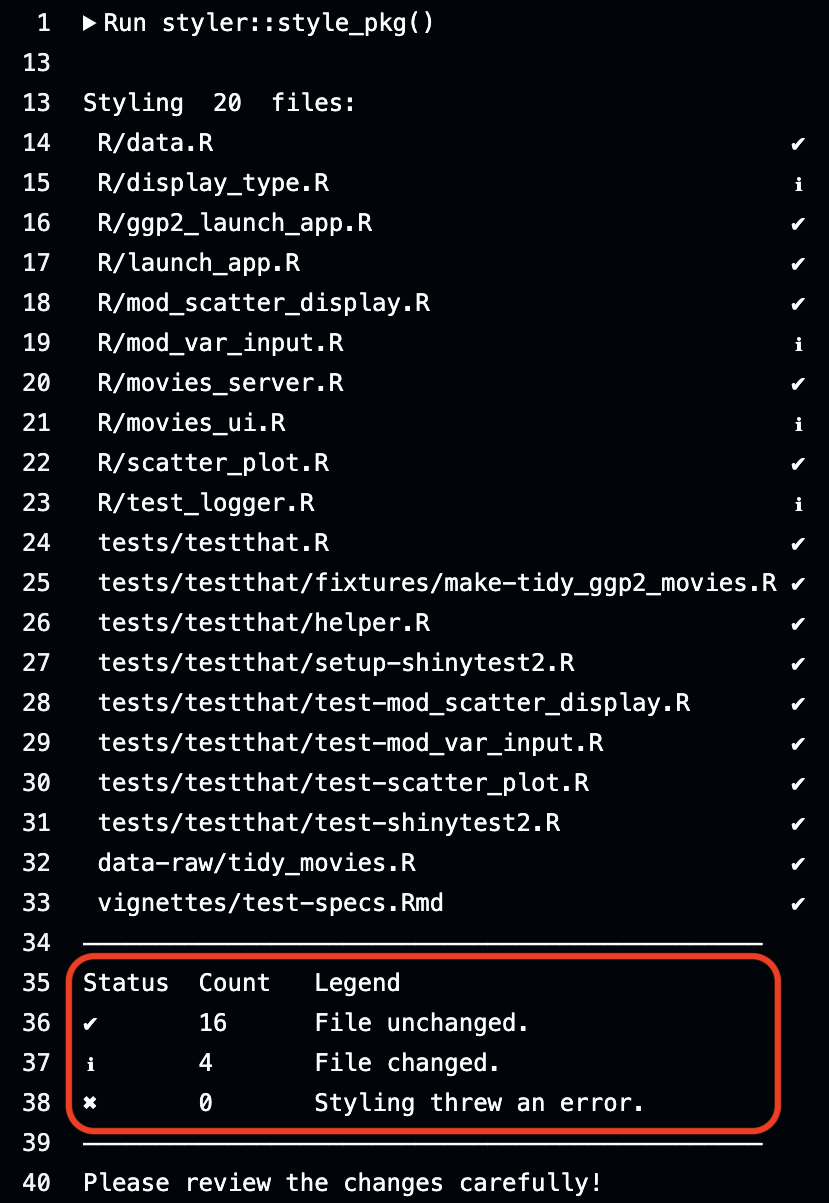
When the workflow has finished, we can pull the style changes to our local branch and view the styled files:2
git pullremote: Enumerating objects: 67, done.
remote: Counting objects: 100% (67/67), done.
remote: Compressing objects: 100% (7/7), done.
remote: Total 34 (delta 28), reused 33 (delta 27), pack-reused 0 (from 0)
Unpacking objects: 100% (34/34), 5.60 KiB | 86.00 KiB/s, done.
From https://github.com/mjfrigaard/sap
5ccdc21..6296140 21.1_gha-style -> origin/21.1_gha-style
Updating 5ccdc21..6296140
Fast-forward
R/data.R | 10 +++++-----
R/display_type.R | 16 ++++++++-------
R/launch_app.R | 88 +++++++++++++++++++++++++++++++++++++++++------------------------------------------
R/log_message.R | 10 +++++-----
R/logr_msg.R | 28 +++++++++++++--------------
R/mod_aes_input.R | 54 ++++++++++++++++++++++++++++-----------------------
R/mod_scatter_display.R | 121 ++++++++++++++++++++++++++++++++++++++++++++++++++++++++++++------------------------------------------------------
R/mod_var_input.R | 67 ++++++++++++++++++++++++++++++++++-----------------------------
R/movies_server.R | 69 ++++++++++++++++++++++++++++++++++++-----------------------------
R/movies_ui.R | 108 ++++++++++++++++++++++++++++++++++++++++++++++++++++-------------------------------------------------
R/scatter_plot.R | 34 +++++++++++++++++---------------
R/testthat.R | 16 +++++++--------
R/text_logo.R | 23 +++++++++++-----------
R/zzz.R | 58 +++++++++++++++++++++++++++----------------------------
inst/quarto/index.qmd | 32 ++++++++++++++++--------------
tests/testthat/fixtures/make-tidy_ggp2_movies.R | 6 ++++--
tests/testthat/helper.R | 7 +++----
tests/testthat/test-mod_scatter_display_server.R | 88 +++++++++++++++++++++++++++++++++++++++++++++--------------------------------------
tests/testthat/test-mod_var_input_server.R | 25 ++++++++++++------------
tests/testthat/test-scatter_plot.R | 62 +++++++++++++++++++++++++++++-----------------------------
tests/testthat/test-shinytest2-export.R | 31 ++++++++++++++---------------
tests/testthat/test-shinytest2-prod.R | 43 ++++++++++++++++++++++-------------------
tests/testthat/test-shinytest2.R | 45 +++++++++++++++++++++++--------------------
tests/testthat/test-text_logo.R | 45 ++++++++++++++++++++++---------------------
vignettes/specs.Rmd | 2 +-
25 files changed, 570 insertions(+), 518 deletions(-)21.2 Shiny app deployment
In this section we’ll be adapting the GitHub Action workflow file provided for deploying a Shiny applications. Before we get to the workflow file, we need to address a few settings and configurations that need to take place outside of the workflow file.
Launch app with the shinypak package:
launch('21.2_gha-shiny-deploy')21.2.1 Creating repository secrets
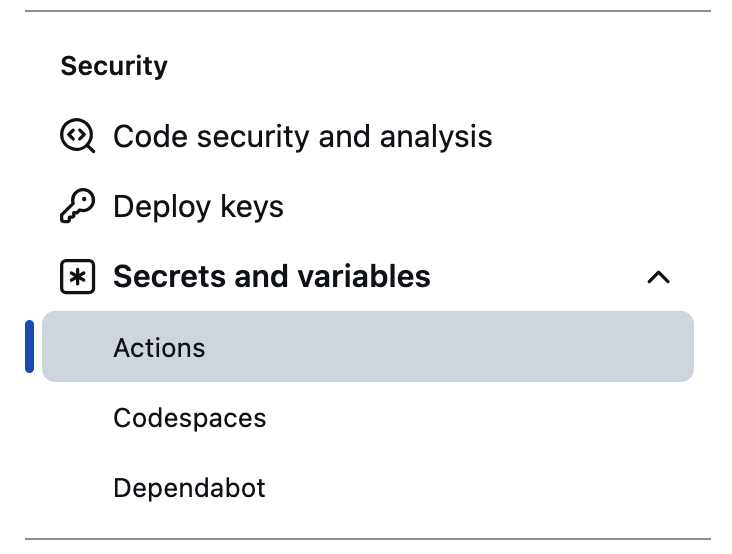
We need to make sure our rsconnect secrets are stored with the GitHub repository (so we can access them from within the workflow file). To do this, we’re going to return to the Settings tab on the sap repository, expand Secrets and variables under Security, and select Actions:3
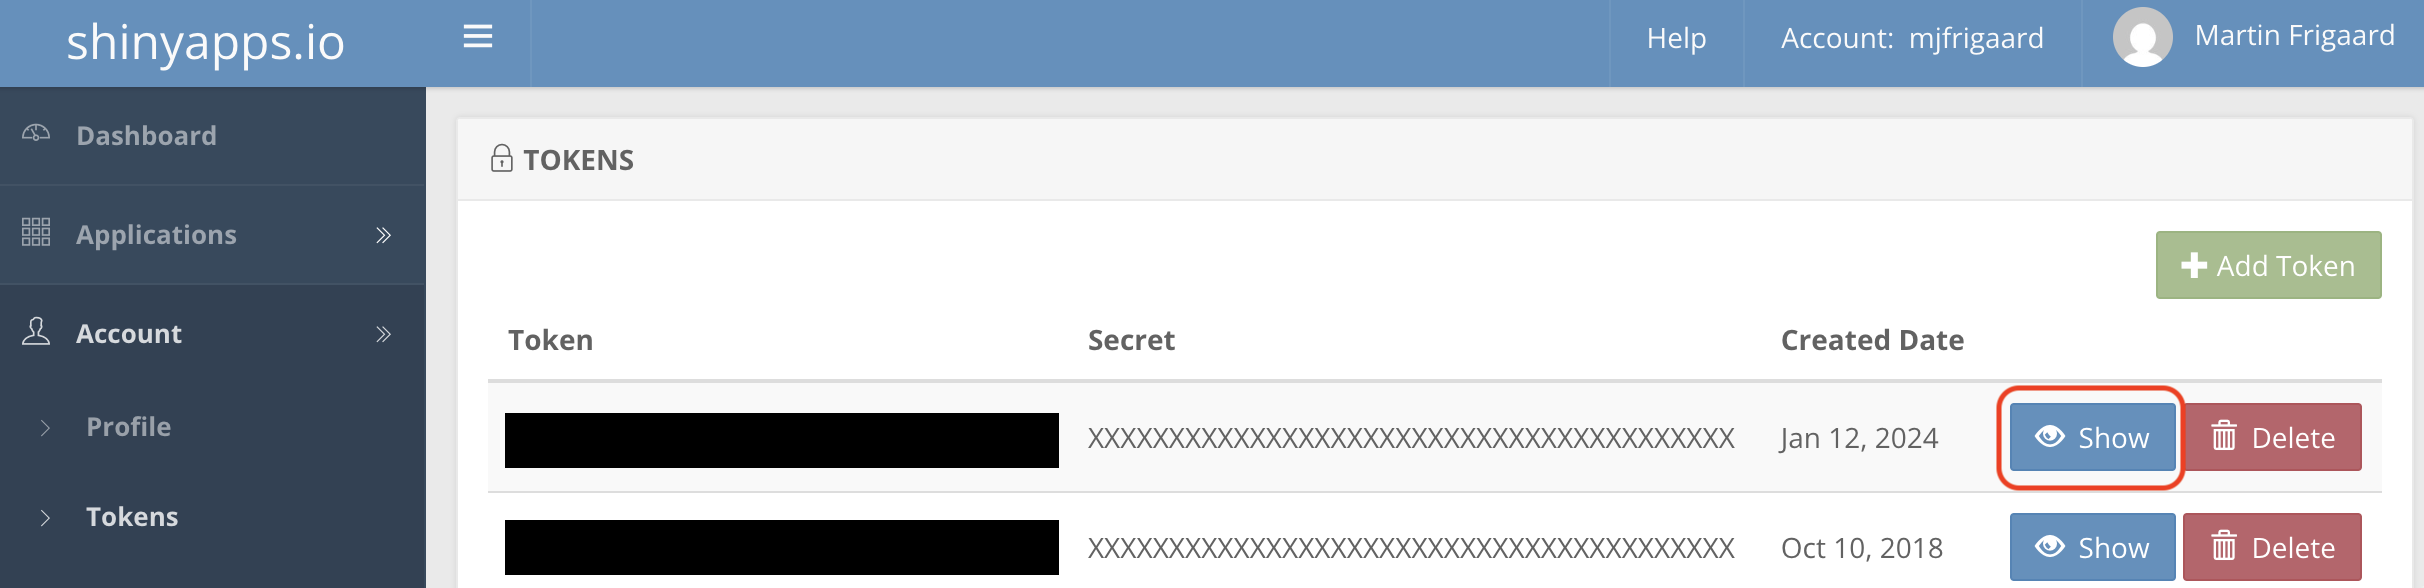
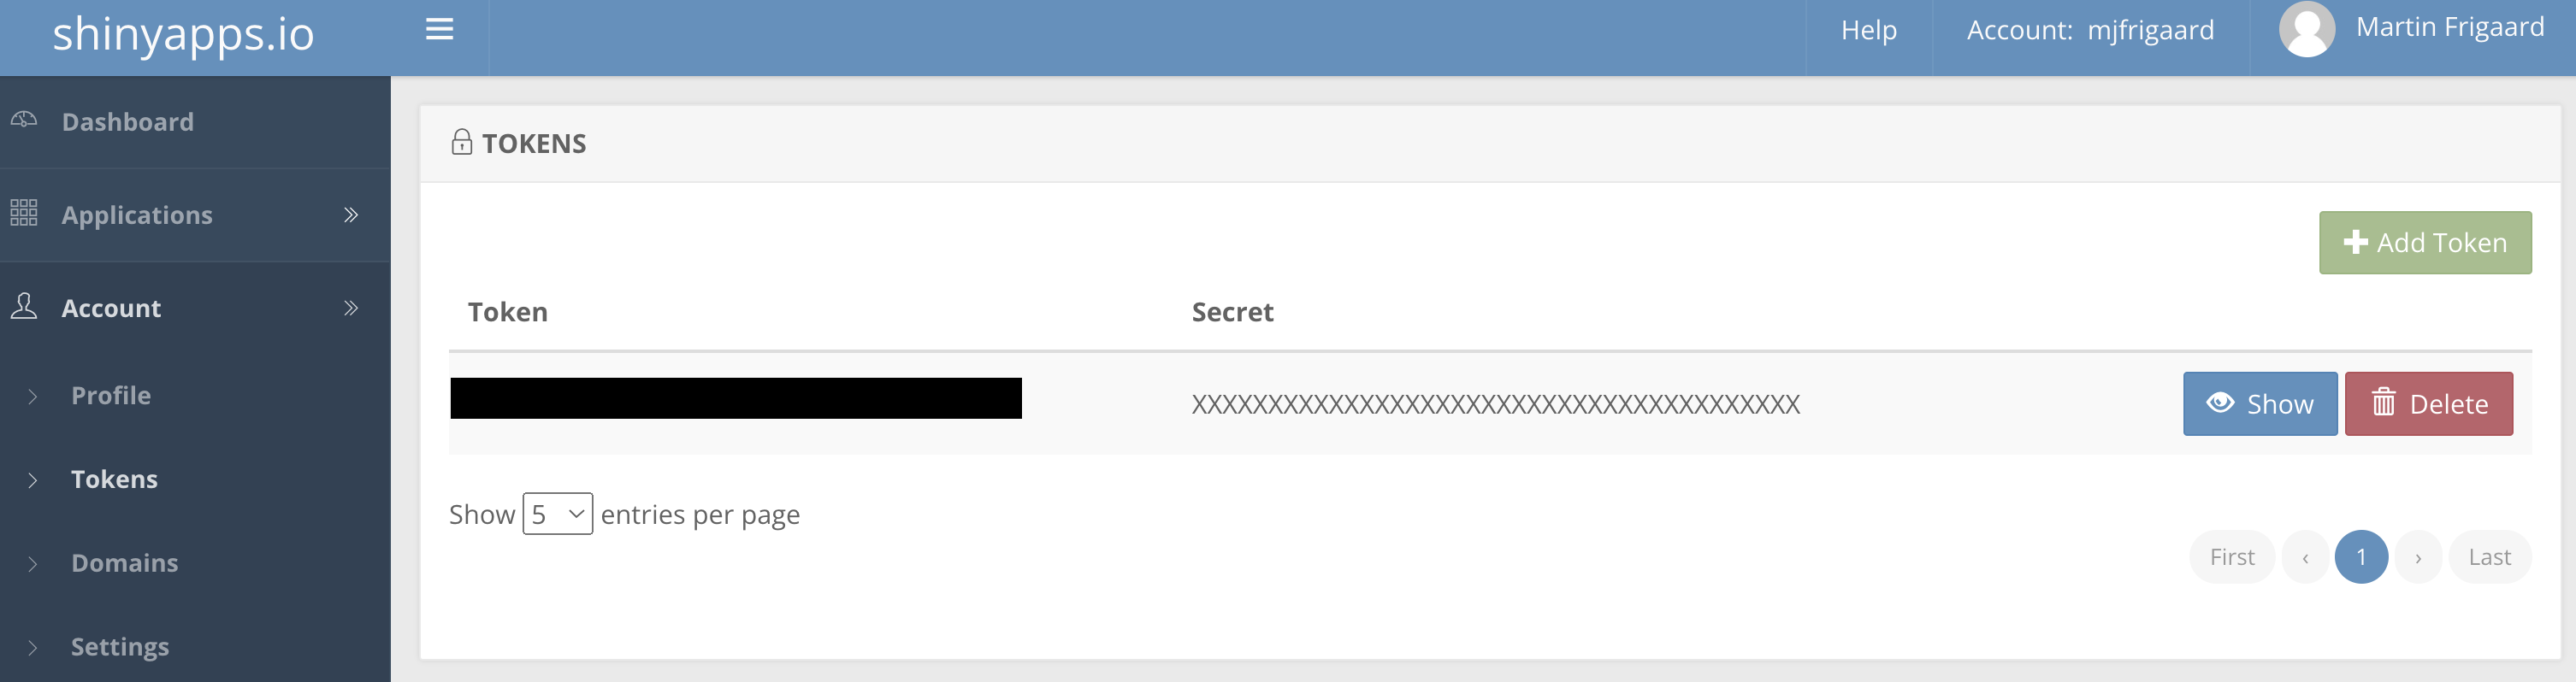
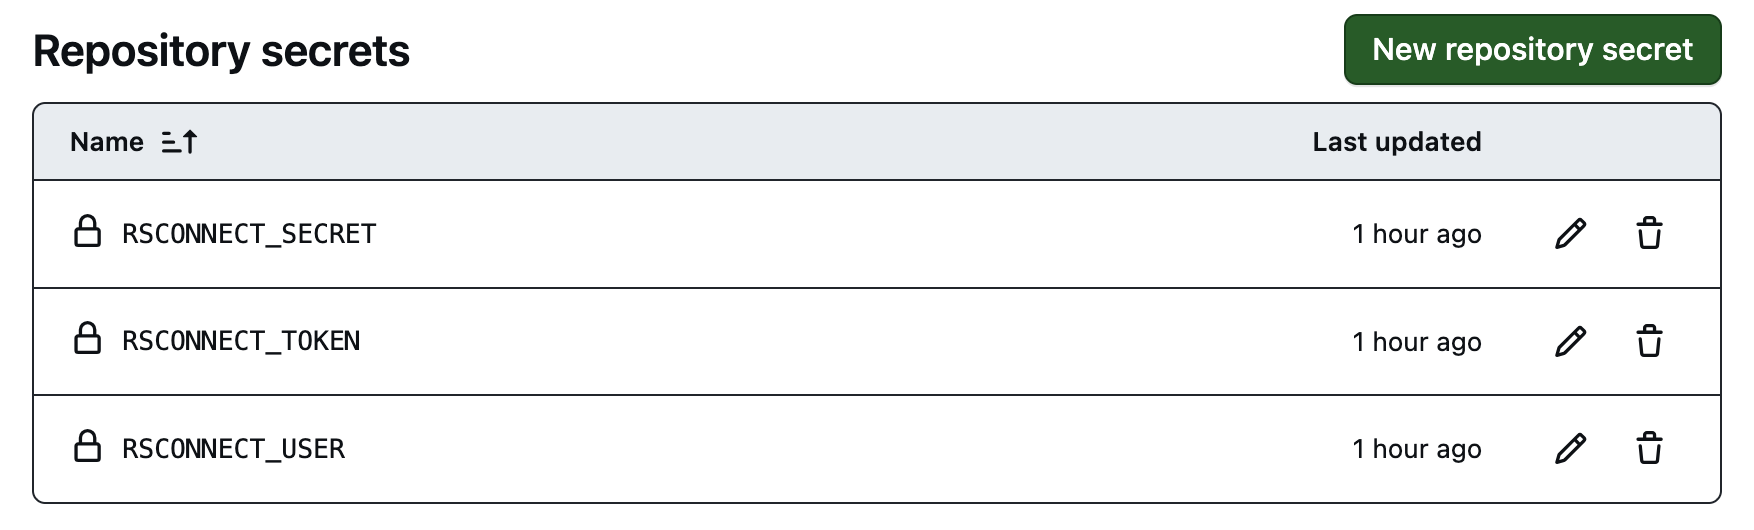
sap repositoryUse New repository secret to create three new secrets: RSCONNECT_USER, RSCONNECT_TOKEN, and RSCONNECT_SECRET. You can access these in your shinyapps.io account by clicking on the Tokens tab, then Show and Show secret:
When you’re finished, should see the following three Repository secrets:
sap21.2.2 Enable private repositories
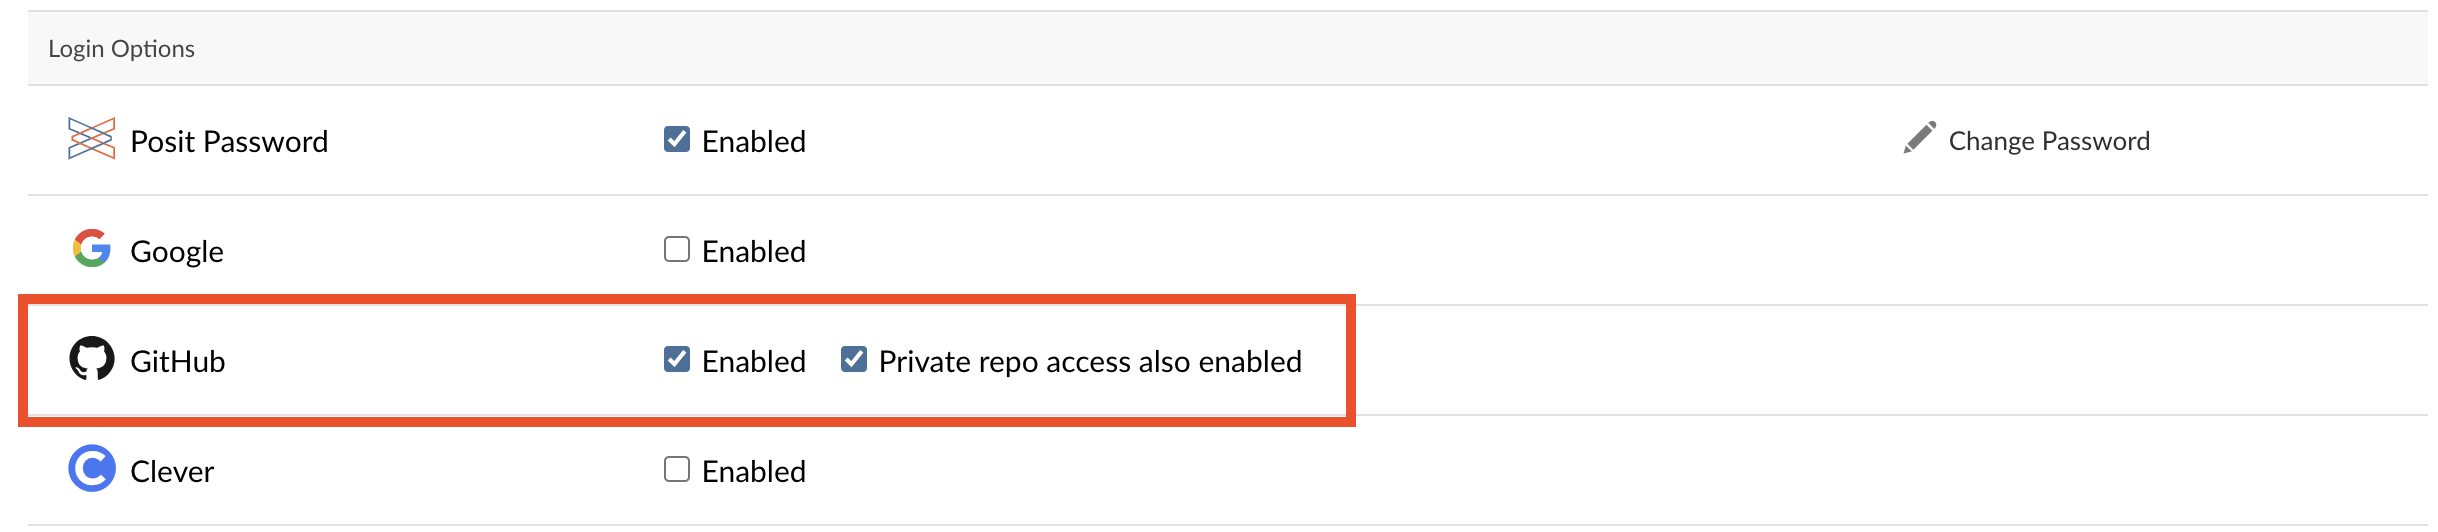
We also need to make sure our shinyapps.io account allows us to install from private GitHub repositories during a workflow deployment. We can do this in the Profile menu item in our dashboard:
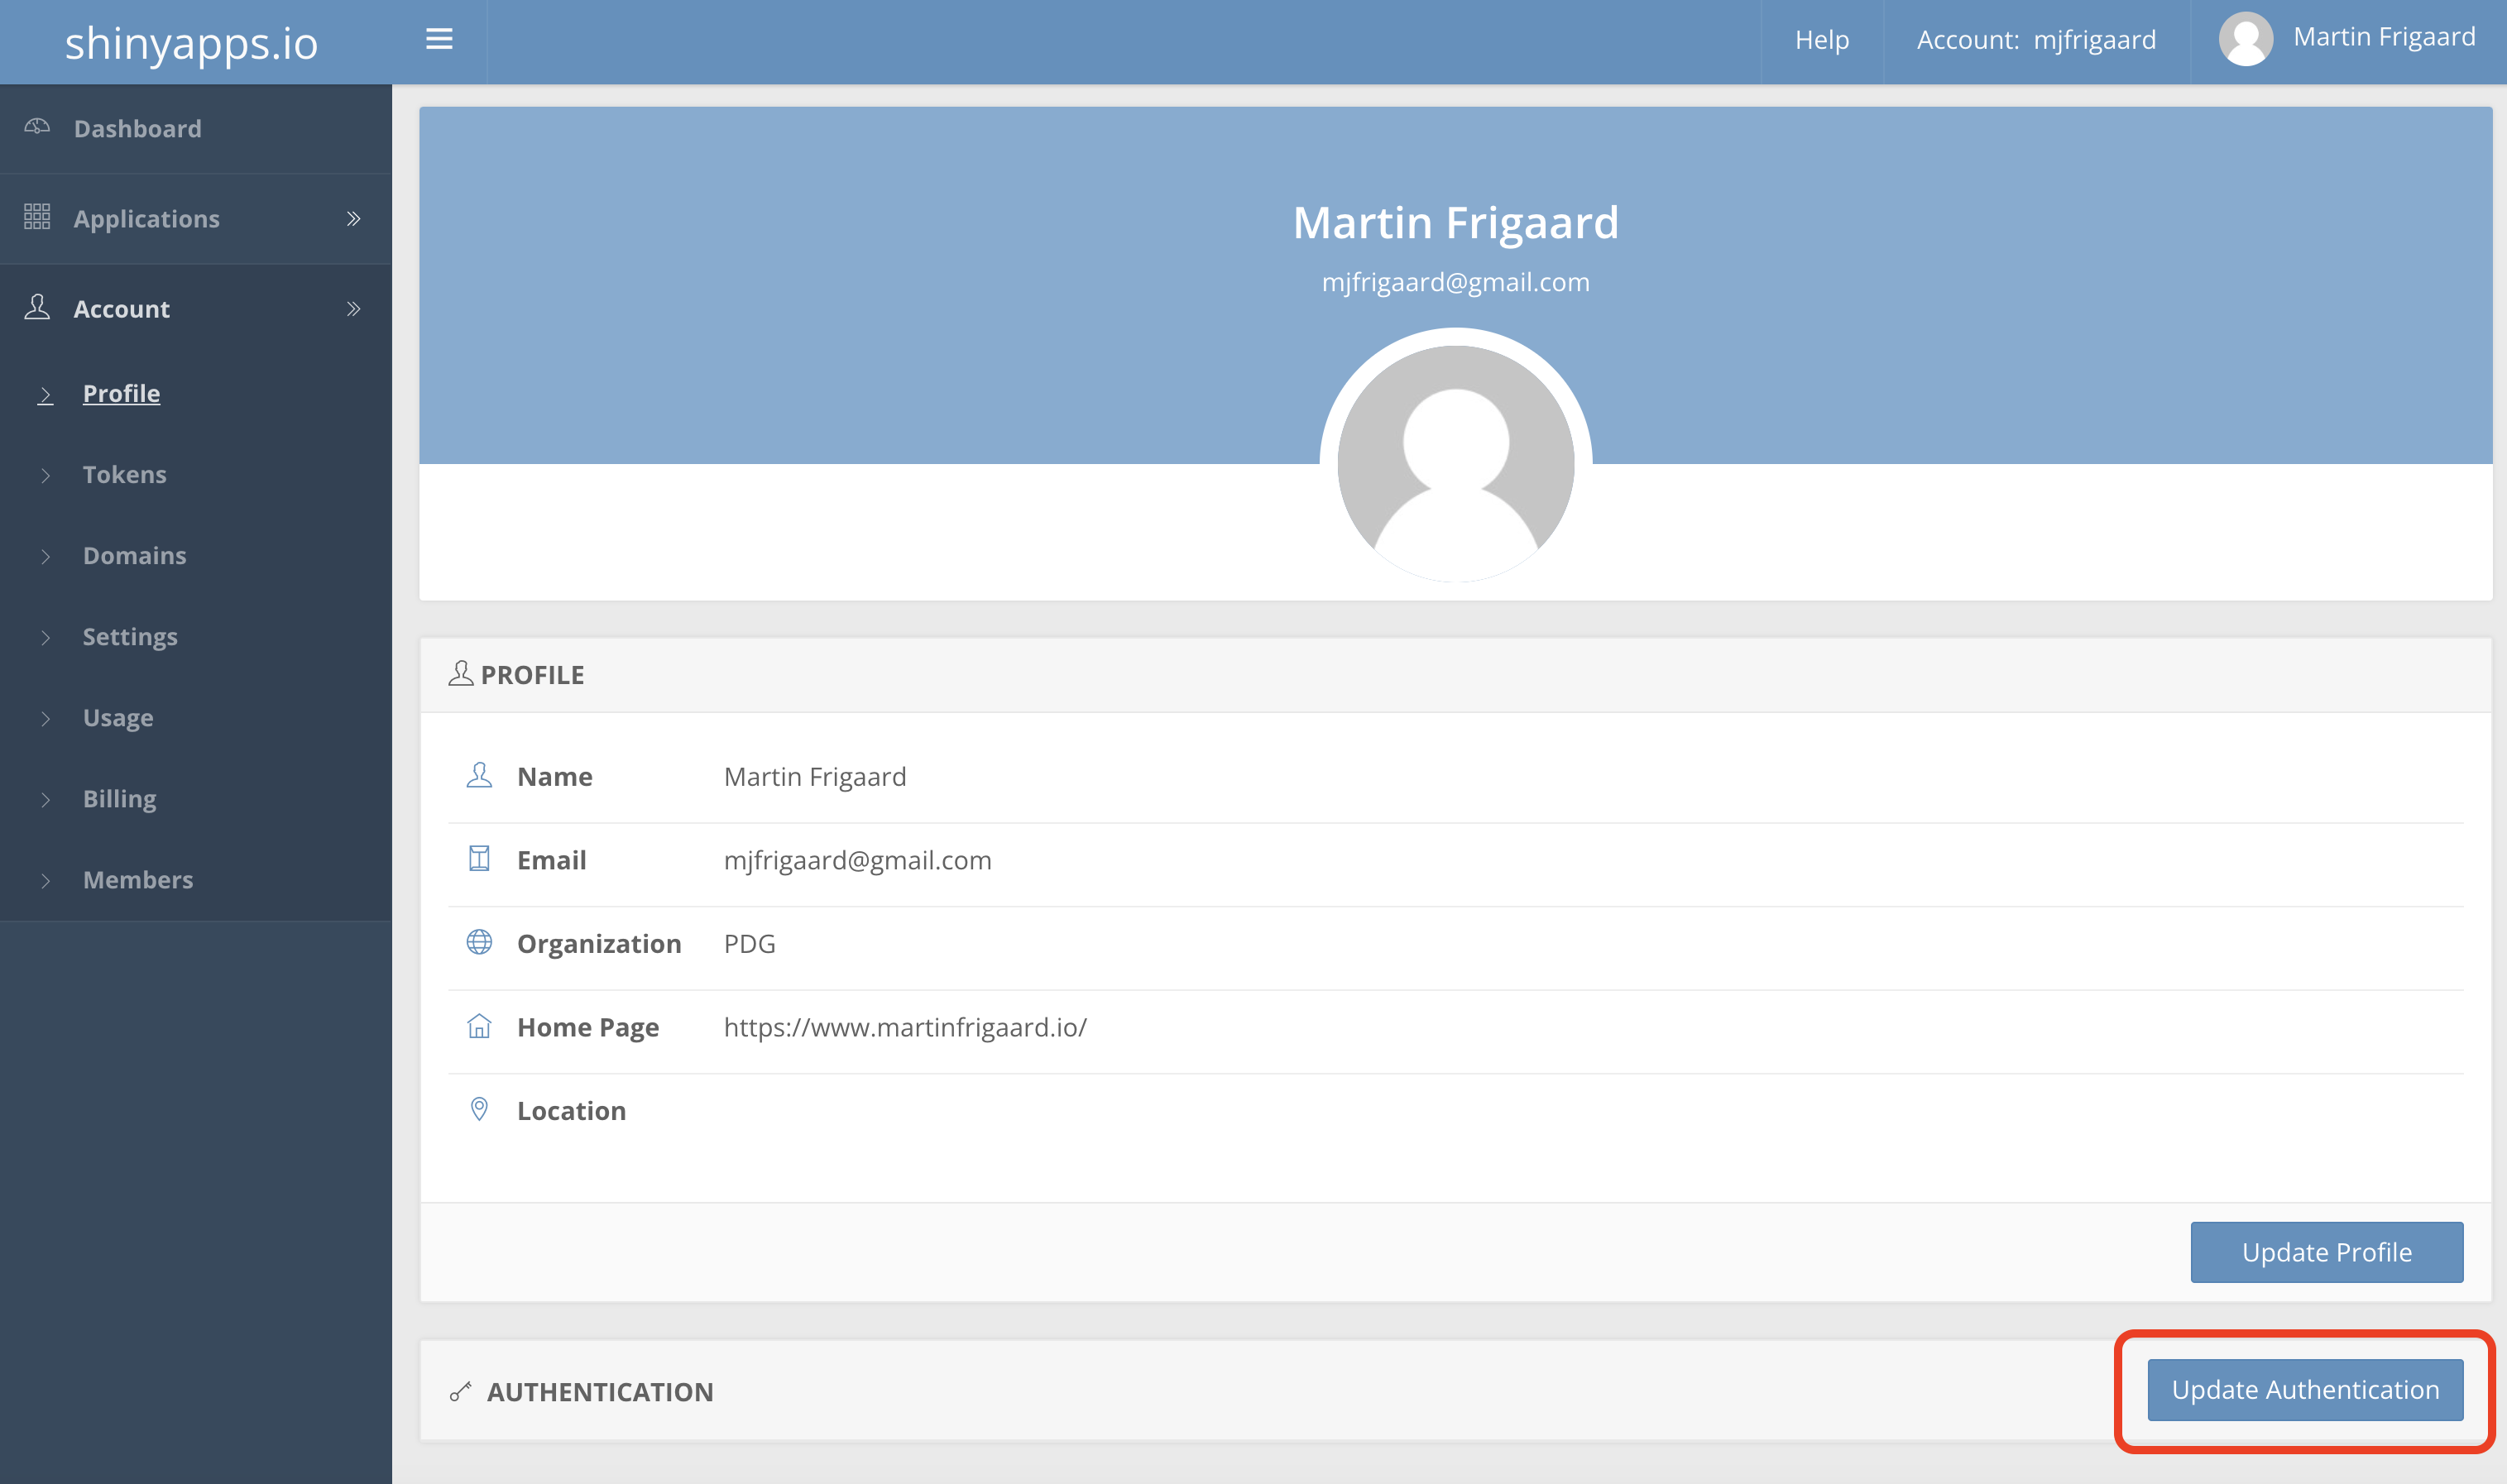
Clicking Update Authentication will open your Posit profile settings, where you can enable private repositories.
21.2.3 Capture dependencies
The documentation for ‘Shiny App Deployment’ indicates we need to create a renv lockfile in the 21.2_gha-shiny-deploy branch.4
We can create the lockfile with the code below:
install.packages('renv')
renv::init(force = TRUE)
This project contains a DESCRIPTION file.
Which files should renv use for dependency discovery in this project?
1: Use only the DESCRIPTION file. (explicit mode)
2: Use all files in this project. (implicit mode)We’re going to use the explicit mode, because the dependencies in the DESCRIPTION should be all that’s needed to run and deploy the application.
Selection: 1This will update the renv.lock file with the packages, their dependencies, and the R version:
- Linking packages into the project library ... Done!The following package(s) will be updated in the lockfile:The version of R recorded in the lockfile will be updated:- Lockfile written to "~/projects/apps/R/sap/renv.lock".
- renv activated -- please restart the R session.We will restart the session to finish creating the new project library.
After renv has discovered and installed the dependencies, the R session will restart and we’ll see the following new folder/files:
├── .Rprofile
├── renv/
│ ├── activate.R
│ └── settings.json
└── renv.lock- 1
-
.Rprofilecontains a call tosource("renv/activate.R"), which manages the project-level dependencies
- 2
-
renvsettings
- 3
-
renvlockfile
When using renv in package development, we want to be sure to run renv::install() and renv::update():
renv::install()- There are no packages to install.renv::update()- Checking for updated packages ... Done!
- All packages appear to be up-to-date.Now that we’ve handled our secrets and tokens and have all of our dependencies captured, we can write our workflow file.
21.2.4 shiny-deploy.yaml
We can include the ‘Shiny App Deployment’ workflow file in sap with usethis::use_github_action("shiny-deploy"):5
usethis::use_github_action("shiny-deploy")✔ Creating .github/.
✔ Adding "*.html" to .github/.gitignore.
✔ Creating .github/workflows/.
✔ Saving "r-lib/actions/examples/shiny-deploy.yaml@v2" to .github/workflows/shiny-deploy.yaml.
☐ Learn more at <https://github.com/r-lib/actions/blob/v2/examples/README.md>.This example workflow file is designed to deploy a Shiny application to a server. We’re going to make a few changes to shiny-deploy.yaml so it will deploy our application to shinyapps.io when we push to the 21.2_gha-shiny-deploy branch.
21.2.4.1 Test run
The example shiny workflow includes calls to rsconnect::setAccountInfo() and rsconnect::deployApp(). We’ll perform a test run with these functions to confirm we can deploy the application using the information we’ve collected:
- Start by entering your rsconnect info:
install.packages('rsconnect')
rsconnect::setAccountInfo(
  name = "mjfrigaard",
  token = "YOUR TOKEN",
secret = "YOUR SECRET")- Then try to deploy the application using
rsconnect::deployApp():
library(sap)
rsconnect::deployApp(
appName = "shinyAppPkgsCICD",
account = "mjfrigaard",
server = "shinyapps.io",
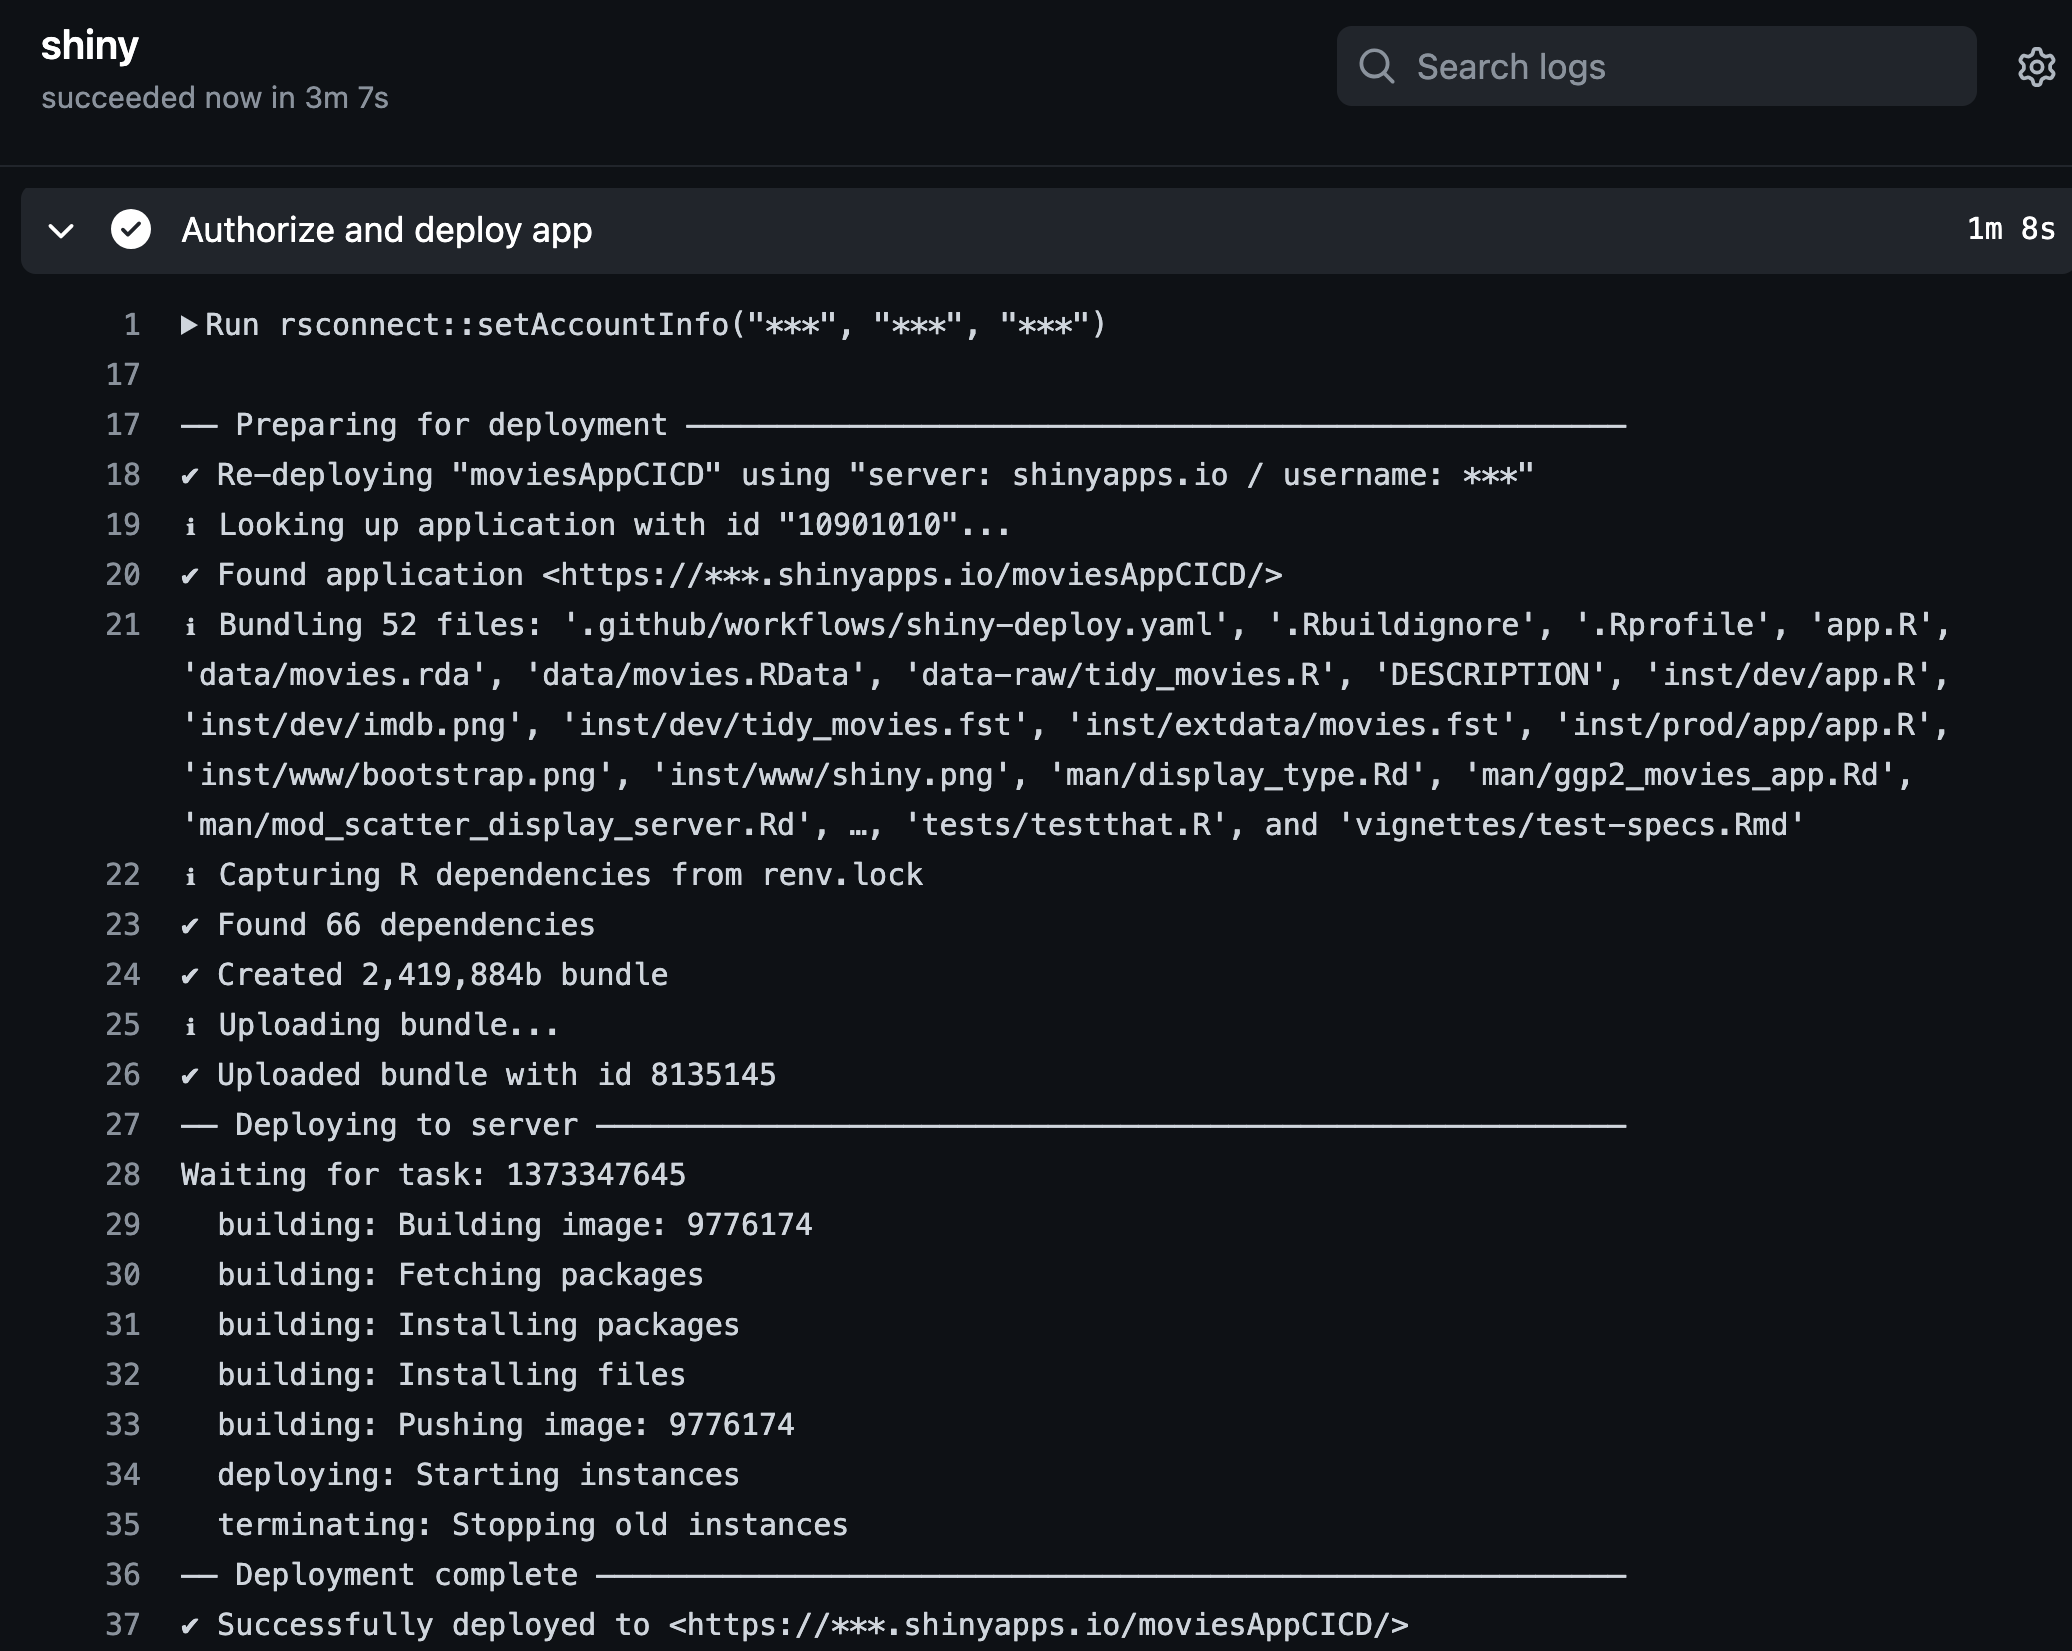
forceUpdate = TRUE)Reading the deployment log will tells us if the secret, token, configuration, and lockfile are all working:
── Preparing for deployment ──────────────────────────────────────────────────
✔ Deploying "shinyAppPkgsCICD" using "server: shinyapps.io / username: mjfrigaard"
ℹ Bundling 50 files: .github/workflows/shiny-deploy.yaml, .Rbuildignore, ...,
tests/testthat.R, and vignettes/test-specs.Rmd
ℹ Capturing R dependencies with renv
✔ Found 99 dependencies
✔ Created 2,431,325b bundle
ℹ Uploading bundle...
✔ Uploaded bundle with id 8130675
── Deploying to server ─────────────────────────────────────────────────────────
Waiting for task: 1372980209
  building: Processing bundle: 8130675
  building: Building image: 9770352
  building: Fetching packages
  building: Installing packages
  building: Installing files
  building: Pushing image: 9770352
  deploying: Starting instances
  unstaging: Stopping old instances
── Deployment complete ─────────────────────────────────────────────────────────
✔ Successfully deployed to <https://mjfrigaard.shinyapps.io/shinyAppPkgsCICD/>
Making sure an application will deploy locally with the code we plan on putting into the workflow file builds confidence it run when it’s triggered. Now we’re ready to adapt the .github/workflows/shiny-deploy.yaml file.
21.2.4.2 Event
The event we want to trigger this deployment is a push the 21.2_gha-shiny-deploy branch. We’ll also change of the name of this workflow to shiny.
on:
  push:
    branches: [21.2_gha-shiny-deploy]

name: shiny
Triggered event
onapushto the21.2_gha-shiny-deploybranchChange
nametoshiny
%%{init: {'theme': 'neutral', 'themeVariables': { 'fontFamily': 'monospace', "fontSize":"16px"}}}%%
flowchart TD
  Push(["Push to branch"])
  Push -->|"<em>Triggers</em>"| Shiny{"<strong>Job</strong>: <code>shiny</code>"}
21.2.4.3 Jobs
The job will set up the runner and pass our stored GITHUB_TOKEN. runs-on launches a runner with the latest Ubuntu operating system and env maps the GITHUB_TOKEN environment variable (we can access those secrets with secrets.<SECRET_NAME>).
jobs:
  shiny:
    runs-on: ubuntu-latest
    env:
      GITHUB_PAT: ${{ secrets.GITHUB_TOKEN }}
jobs remains unchanged, but the identifier should match the name.
%%{init: {'theme': 'neutral', 'themeVariables': { 'fontFamily': 'monospace', "fontSize":"16px"}}}%%
flowchart TD
  Push(["Push to branch"])
  Push -->|"<em>Triggers</em>"| Shiny{"<strong>Job</strong>: <code>shiny</code>"}
    subgraph ubuntu["<strong>Runner</strong>"]
      Env("<strong>Env</strong>: <code>GITHUB</code>")
    end
  Shiny -->|"<em>Runs on: Ubuntu Latest</em>"| ubuntu
21.2.4.4 Steps
The first four steps are actions that clone our repo and set up the environment for performing the tasks in the workflow. The path to the action is passed to uses:, so actions/checkout@v4 uses the YAML file from the actions/checkout repo.
    steps:
      - uses: actions/checkout@v4

      - uses: r-lib/actions/setup-pandoc@v2

      - uses: r-lib/actions/setup-r@v2
        with:
          use-public-rspm: true
          r-version: renv

      - uses: r-lib/actions/setup-renv@v2
Check out the repository code
Set up Pandoc (document conversions)
Set up R environment.6
Set up
renvto manage the project-specific dependencies captured inrenv.lock
%%{init: {'theme': 'neutral', 'themeVariables': { 'fontFamily': 'monospace', "fontSize":"16px"}}}%%
flowchart TD
  Push(["Push to branch"])
  Push -->|"<em>Triggers</em>"| Shiny{"<strong>Job</strong>: <code>shiny</code>"}
    subgraph ubuntu["<strong>Runner</strong>"]
        PAT("<strong>Env</strong>: <code>GITHUB</code>")
        Checkout("<strong>Action</strong>: Checkout")
        SetupPandoc("<strong>Action</strong>: Pandoc")
        SetupR("<strong>Action</strong>: R env")
        SetupRenv("<strong>Action</strong>: <code>renv</code>")
    end
  Shiny -->|"<em>Runs on: Ubuntu Latest</em>"| ubuntu
  PAT --> Checkout --> SetupPandoc --> SetupR
  SetupR --> SetupRenv
The following step is a script (i.e., run:) and it installs the rsconnect package:
      - name: Install rsconnect
        run: install.packages("rsconnect")
        shell: Rscript {0}
Install rsconnect uses R to install the rsconnect
Next we use env again to map our account username (mjfrigaard) and app name (shinyDeployApp):
    - name: Authorize and deploy app
      env:
        APPNAME: shinyDeployApp
        ACCOUNT: mjfrigaard
        SERVER: shinyapps.io
Sets up the environment variables APPNAME, ACCOUNT, and SERVER for authorization
The final run step sets the account information using rsconnect::setAccountInfo() and deploys the app to the specified server using rsconnect::deployApp() (we’ll add forceUpdate = TRUE):
    run: |
      rsconnect::setAccountInfo("${{ secrets.RSCONNECT_USER }}", "${{ secrets.RSCONNECT_TOKEN }}", "${{ secrets.RSCONNECT_SECRET }}")
      rsconnect::deployApp(appName = "${{ env.APPNAME }}", account = "${{ env.ACCOUNT }}", server = "${{ env.SERVER }}", forceUpdate = TRUE)
    shell: Rscript {0}
This will deploy an application at https://<ACCOUNT>.shinyapps.io/<APPNAME>/.
%%{init: {'theme': 'neutral', 'themeVariables': { 'fontFamily': 'monospace', "fontSize":"16px"}}}%%
flowchart TD
  Push(["Push to branch"])
  Push -->|"<em>Triggers</em>"| Shiny{"<strong>Job</strong>: <code>shiny</code>"}
    subgraph ubuntu["<strong>Runner</strong>"]
        PAT("<strong>Env</strong>: <code>GITHUB</code>")
        Checkout("<strong>Action</strong>: Checkout")
        SetupPandoc("<strong>Action</strong>: Pandoc")
        SetupR("<strong>Action</strong>: R env")
        SetupRenv("<strong>Action</strong>: <code>renv</code>")
        InstallRsconnect("<strong>Script</strong>: <code>rsconnect</code>")
        Auth("<strong>Env</strong>: <code>RSCONNECT</code>")
        Deploy("<strong>Script</strong>: Deploy")
    end
  Shiny -->|"<em>Runs on: Ubuntu Latest</em>"| ubuntu
  PAT --> Checkout --> SetupPandoc --> SetupR
  SetupR --> SetupRenv --> InstallRsconnect
  InstallRsconnect --> Auth --> Deploy
When we add, commit, and push the changes to the repo, we see the following deployment log:
git add .
git commit -m "shiny deploy workflow"
git push
[21.2_gha-shiny 7953a5c] shiny deploy workflow
10 files changed, 2130 insertions(+)
create mode 100644 .Rprofile
create mode 100644 .github/.gitignore
create mode 100644 .github/workflows/shiny-deploy.yaml
create mode 100644 renv.lock
create mode 100644 renv/.gitignore
create mode 100644 renv/activate.R
create mode 100644 renv/settings.json
create mode 100644 rsconnect/shinyapps.io/mjfrigaard/shinyDeployApp.dcfOn GitHub, we can see the workflow running on the Actions tab of the sap repository:

When it’s finished, we can see the deployment log from the workflow looks similar to the log we saw locally:
You can view the deployed application here: https://mjfrigaard.shinyapps.io/shinyDeployApp/
21.3 Actions, Shiny & Docker
We covered Docker in the previous chapter, which builds and application in an image and containerizes it’s deployment. In this section we’ll combine Docker and GitHub Actions to automate deployment of our app. Automating app deployments will minimize the risk of environmental discrepancies (avoiding the “it works on my machine” problem) and manual deployment processes. Plus, if something goes wrong after a workflow run, rolling back to a previous version in Git is straightforward.
Launch app with the shinypak package:
launch('21.3_gha-shiny-docker')21.3.1 Secrets and tokens
Most of the steps below are covered in the excellent blog post by Nicola Rennie7 I’ve updated the contents to work with a Shiny app-package.
To make sure our Connect username, token, and secret travels with our Dockerfile, we will need to store them as environmental variables.
Environmental variables can be set/unset with Sys.setenv()/Sys.unsetenv():
Sys.setenv(RSCONNECT_USER = '<username>',
  RSCONNECT_TOKEN = '<token>',
  RSCONNECT_SECRET = '<secret>')
These environmental variables are be passed to rsconnect::setAccountInfo() with a deploy.R file.
21.3.2 deploy.R
deploy.R contains the calls to rsconnect::setAccountInfo() and rsconnect::deployApp() we had in our previous workflow file. Sys.getenv() will retrieve the username, token, and secret stored with Sys.setenv():
rsconnect::setAccountInfo(name = Sys.getenv("RSCONNECT_USER"),
               token = Sys.getenv("RSCONNECT_TOKEN"),
               secret = Sys.getenv("RSCONNECT_SECRET"))
rsconnect::deployApp(appDir = ".",
  appName = "shinyAppPkgsDockerCiCd",
  account = "mjfrigaard",
    server = "shinyapps.io",
    forceUpdate = TRUE)
The deploy.R script should be placed in the root folder of sap. By default, this will deploy the application launched with app.R. We’ll change this to the application launched with launch_app('ggp2') by changing the contents of app.R to the following:
show/hide updated app.R
withr::with_options(new = list(shiny.autoload.r = FALSE), code = {
  if (!interactive()) {
    sink(stderr(), type = "output")
    tryCatch(
      expr = {
        library(sap)
      },
      error = function(e) {
        pkgload::load_all()
      }
    )
    shinyAppDir(appDir = system.file("prod/app", package = "sap"))
  } else {
    pkgload::load_all()
  }
  launch_app(app = 'ggp2', options = list(test.mode = FALSE))
})
21.3.3 Dockerfile
The Dockerfile will look similar to the example in the Docker chapter, but with a few important changes:
When we make the path
/home/shinyAppPkgsDockerCiCdwithmkdir, this is not only the image location we’ll be launching the application from, but it’s also the URL for the deployed app:https://username.shinyapps.io/shinyAppPkgsDockerCiCd/
We’ll include the packages in the
DESCRIPTIONin our list of dependencies to install, and theremotesandrsconnectpackages.The final
Rscriptcommand will run the application using ourdeploy.Rfile.
FROM rocker/shiny
RUN mkdir /home/shinyAppPkgsDockerCiCd
ADD . /home/shinyAppPkgsDockerCiCd
WORKDIR /home/shinyAppPkgsDockerCiCd
RUN R -e 'install.packages(c("bslib", "cli", "fst", "ggplot2", "ggplot2movies", "logger", "pkgload", "quarto", "ragg", "remotes", "rlang", "rsconnect", "sass", "shiny", "shinytest2", "shinythemes", "stringr", "thematic", "tidyr", "testthat", "tools", "waldo", "withr"))'
RUN R -e 'remotes::install_local(upgrade="never")'
EXPOSE 8180
CMD Rscript deploy.R
21.3.4 shiny-docker.yml
In the .github/workflows folder, we’ll create a shiny-docker.yml file with the following contents:
name: docker-shiny, sap

on:
  push:
    branches: [ 21.3_gha-shiny-docker ]

jobs:
  docker:
    runs-on: ubuntu-latest

    steps:
      - uses: actions/checkout@v4

      - name: Build image
        run: docker build -t sap .
Add a
namefor the Docker/Shiny workflowSpecify the triggering event the workflow will run
onThe
jobwill run onubuntu-latest(withdockerid)Checkout the code
Build the docker image with
docker build
The final execute step is docker run and it passes our environment variables to the secrets we have stored in GitHub (i.e., with secrets.<SECRET_NAME>):
      - name: execute
        run: >
          docker run -e RSCONNECT_USER=${{ secrets.RSCONNECT_USER }} -e RSCONNECT_TOKEN=${{ secrets.RSCONNECT_TOKEN }}  -e RSCONNECT_SECRET=${{ secrets.RSCONNECT_SECRET }} sap
21.3.5 App dependencies
rsconnect has a handy appDependencies() function that returns a data.frame of packages, versions, and repositories for your application:
head(rsconnect:::appDependencies(appDir = "."))# Package Version Source Repository
# 1 MASS 7.3-65 CRAN https://cran.rstudio.com
# 2 Matrix 1.7-2 CRAN https://cran.rstudio.com
# 3 R6 2.6.1 CRAN https://cran.rstudio.com
# 4 RColorBrewer 1.1-3 CRAN https://cran.rstudio.com
# 5 Rcpp 1.0.14 CRAN https://cran.rstudio.com
# 6 base64enc 0.1-3 CRAN https://cran.rstudio.comPassing appDependencies() in your app-package’s root directory will tell you if any packages have missing Source or Repository values (this can cause the deployment to fail).
I also recommend running attachment::att_amend_desc() to capture all the dependencies in the DESCRIPTION. For example, att_amend_desc() added the following packages to the Suggests field in the DESCRIPTION:8
[+] 2 package(s) added: shinytest2, testthat.21.3.6 Docker build
In the docker workflow log, we can see the commands from our Dockerfile executed to install the necessary packages:
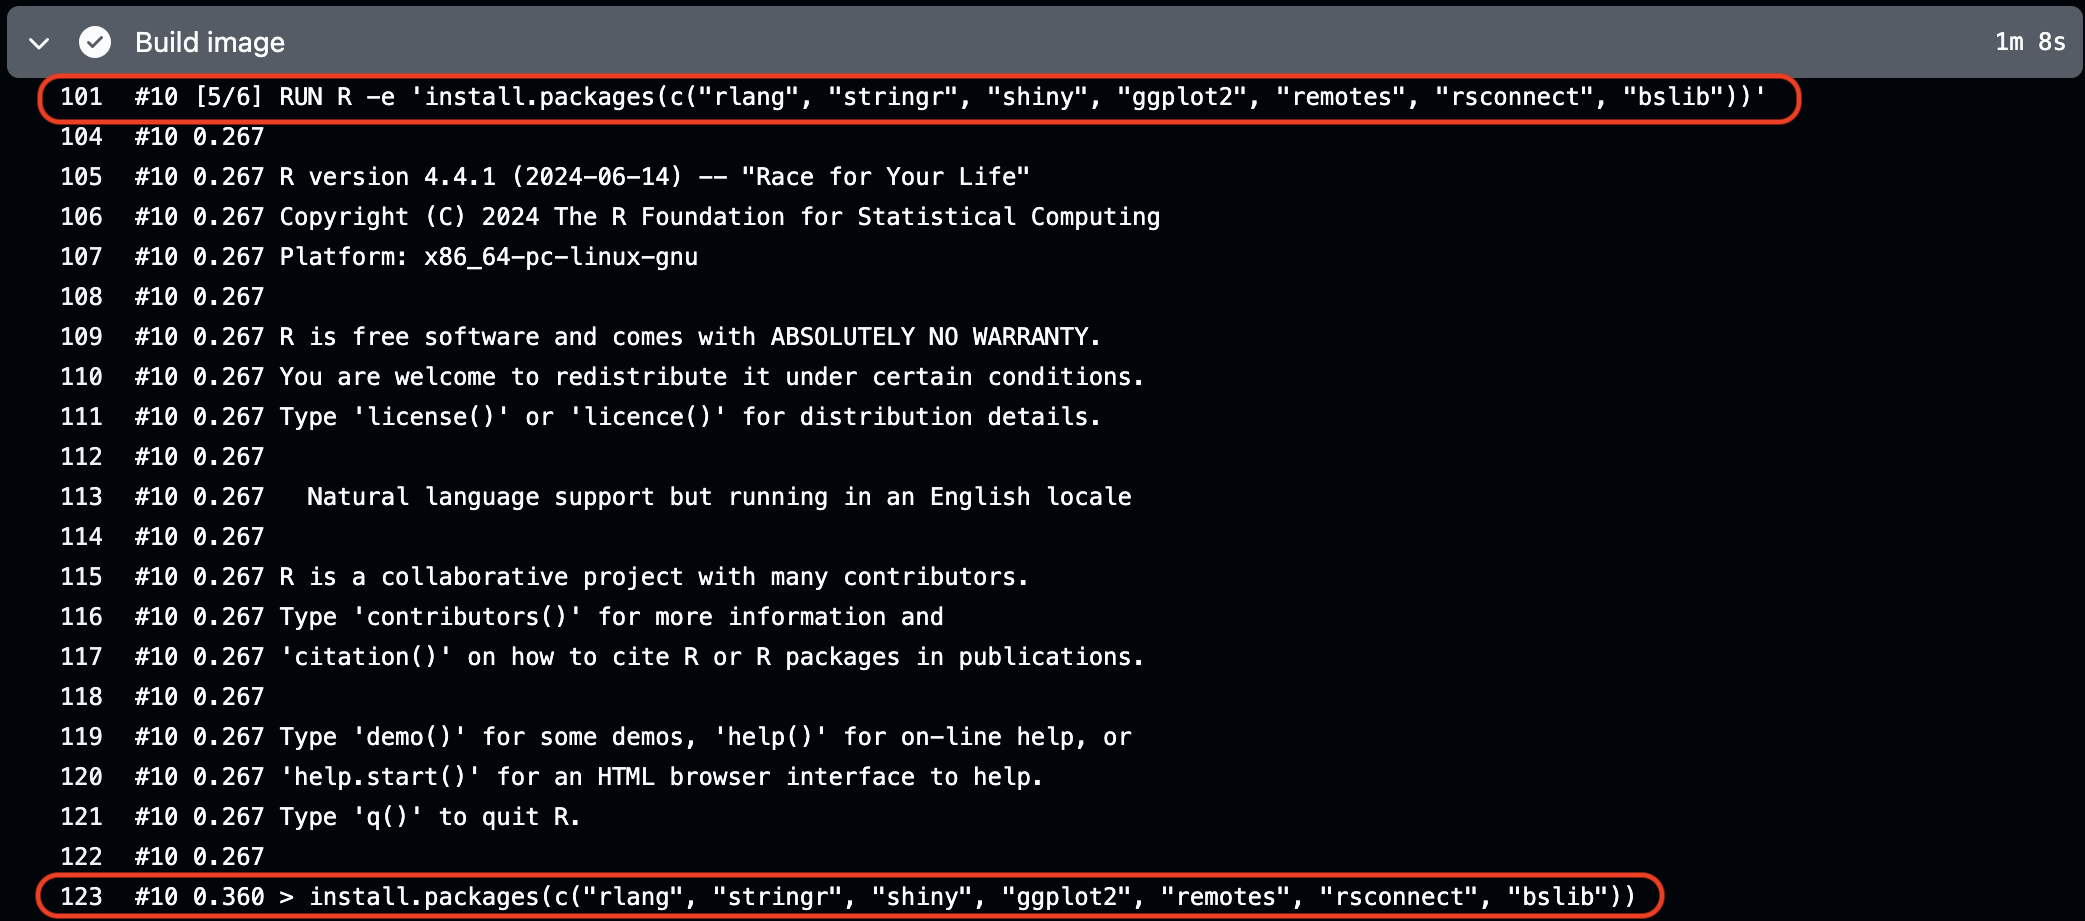
DockerfileAfter installing the dependencies, the sap.tar.gz is installed from *source*:
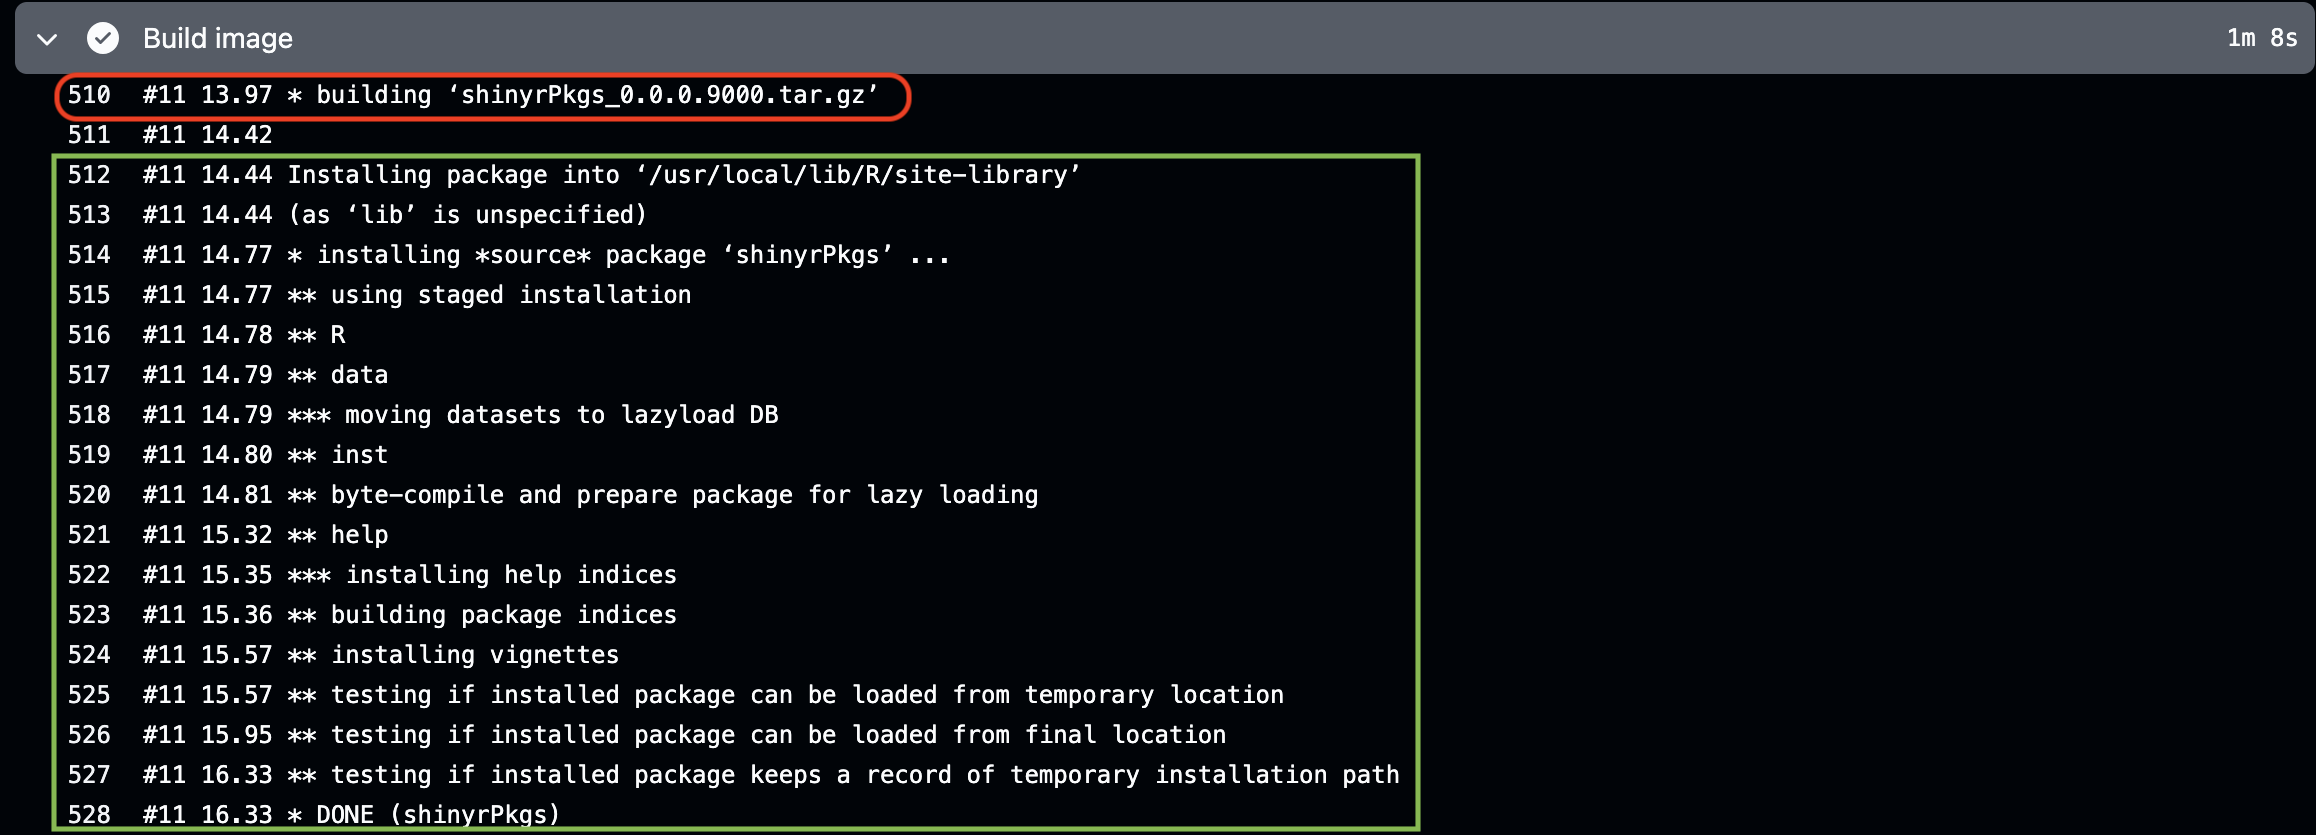
*source*The output above should look familiar–it’s very similar to what we see when we run devtools::load_all().
After installing the dependencies, we can see the Shiny deployment log execute in the workflow:
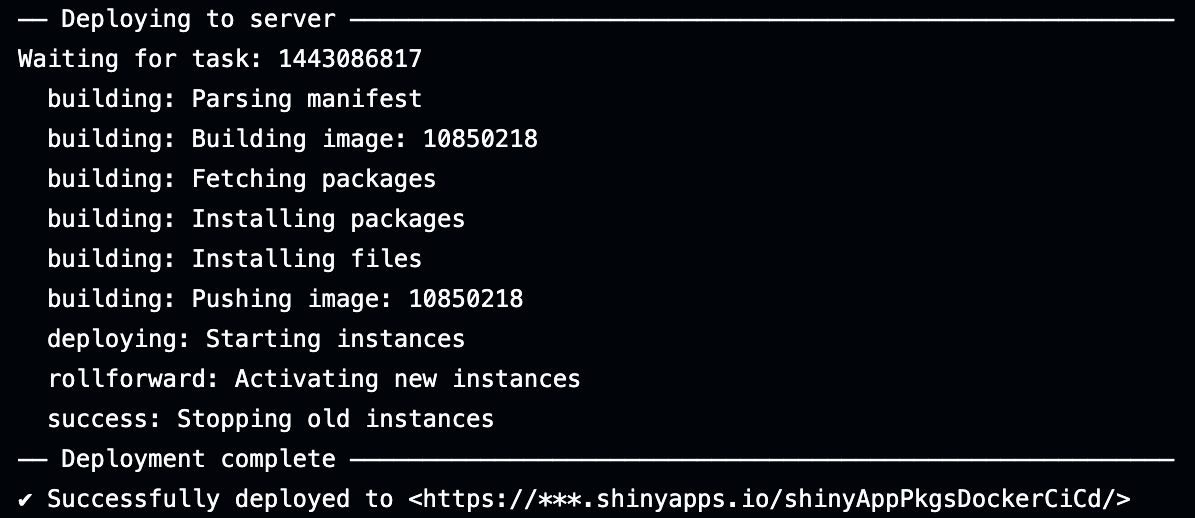
View the deployed application here.
ImportantCapturing and recording dependencies with
renv
In the Shiny workflow example above, we captured the application dependencies with renv. However, in this Docker and Shiny workflow, we didn’t create a renv.lock file or a renv/ folder.
We get away with this because when the workflow runs, renv is used to capture the dependencies (line 9-12 in the output below). We see a message about the packages listed in the Suggests field or our DESCRIPTION:
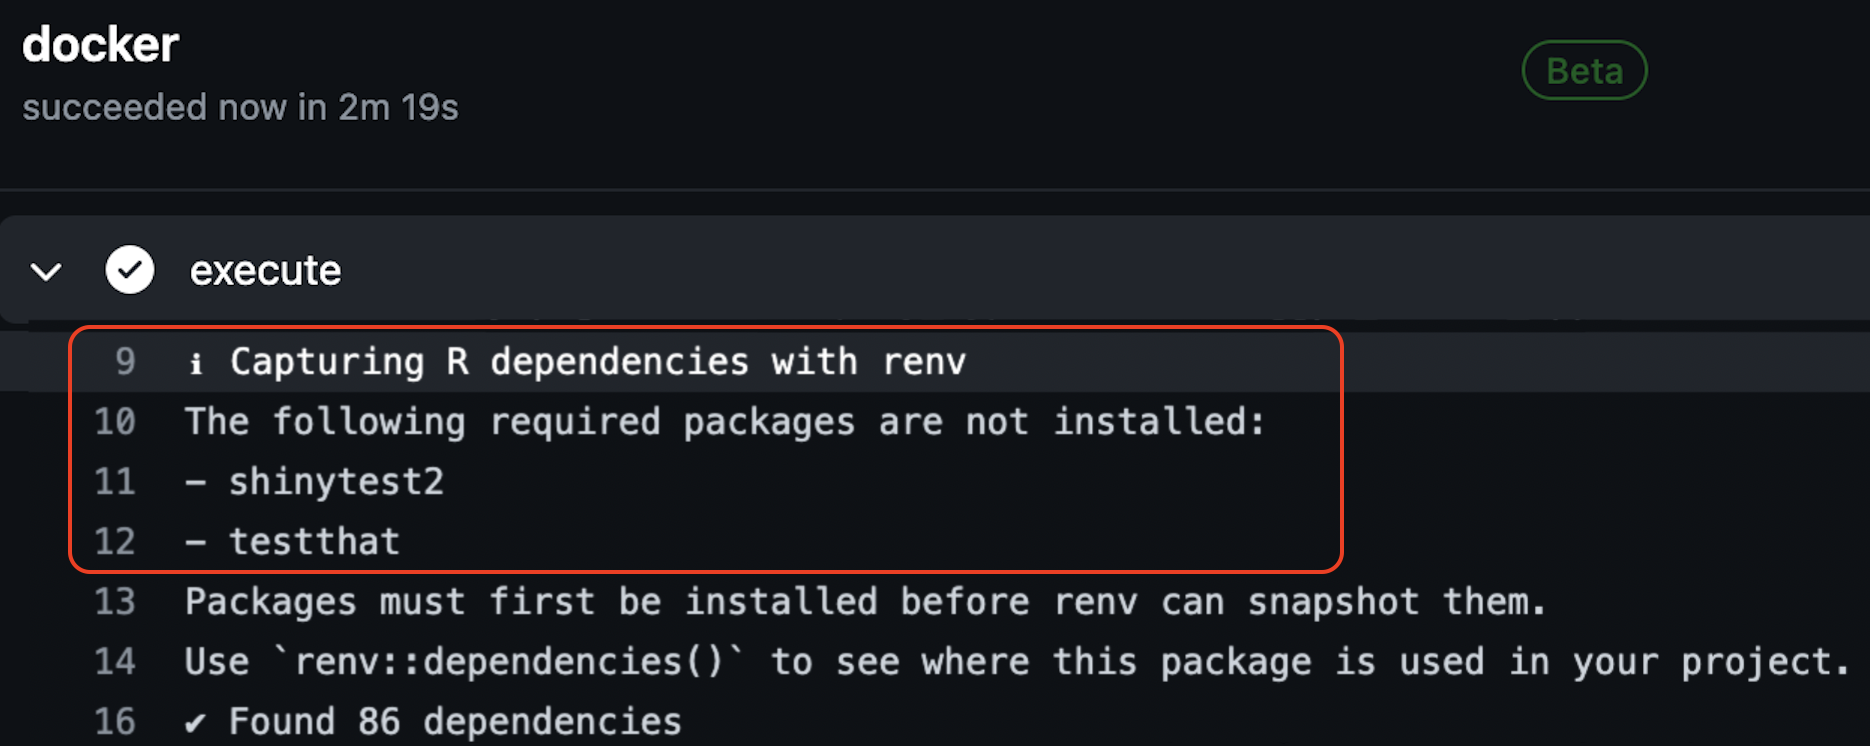
Not having shinytest2 and testthat packages installed won’t interfere with our application deploying because these packages are listed in the Suggests field in the DESCRIPTION file and are used intests/.
Recap
GitHub Actions can be used to set up the necessary R environment and dependencies required to deploy the application from your app-package, while allowing secure account credentials stored in GitHub secrets.
Triggers can also be configured to run at scheduled times.↩︎
You can find more examples of common GitHub Actions for R packages in r-lib/actions/examples.↩︎
GitHub secrets should be specified by the user following the instructions in the Creating secrets for a repository article.↩︎
“This action assumes you have an
renvlockfile in your repository that describes the R packages and versions required for your Shiny application.” - Shiny App Deployment↩︎Instructions for the GitHub Action Shiny deployment can be found here↩︎
use-public-rspmis the public RStudio package manager andr-version: renvindicates the R version is captured withrenv.↩︎Automatically deploying a Shiny app for browsing #RStats tweets with GitHub Actions. Nicola Rennie. October 3, 2022.↩︎
att_amend_desc()adds adevfolder with a YAML config file, but you can remove this before building/deploying.↩︎