Make sure each function has documentation for the @title, @description, @param(s), @return, and @examples (if applicable)
Use Markdown for code, emphasis, hyperlinks, etc.
Regularly load and document to preview the help files:
Ctrl/Cmd + Shift + L / D
Link modules with @seealso and group functions with @family
Include any additional information in a new @section
Use @inheritParams to avoid repeating shared parameter docs across module functions; filter with an explicit list or -param to exclude server-only arguments
Start tag values on the same line as the tag – roxygen2 8.0.0 warns when the value begins on the next line
Run roxygen2::needs_roxygenize('.') to check whether .Rd files are out of date before committing
This chapter covers documenting Shiny app functions with roxygen2. I’ll start by introducing the fundamentals of the roxygen2 syntax, but also touch on a few helpful tips specific to Shiny modules and standalone app functions.
TipAccess the applications in this chapter
I’ve created the shinypak R package in an effort to make each section accessible and easy to follow. Install shinypak using pak (or remotes):
(the rsconnect/ folder from deploying sap has been removed)
When we use devtools::install(), the following message regarding documentation is returned:
No man pages found in package ‘sap’
Documenting the functions in the R/ folder will address this message, and I strongly encourage checking out the roxygen2 vignettes and the chapter in R Packages, 2ed for more information on documenting your app-package.
roxygen2 connects the package code (i.e., the .R files in the R/ folder) to its documentation files (i.e., the .Rd files in the man/ folder). Two pieces of roxygen2 syntax to know are comment blocks and tags:
Comment blocks are any lines beginning with #'
#'
#'
#'
Tags begin with @
#' #' @tag#'
The roxygen2 tags and comment blocks are placed above functions and used with devtools::document() to create help documentation:
#' #' @tag#' my_fun <-function() {}
In the following sections, we’ll cover some roxygen2 basics using the scatter_plot() function in the R/utils.R file.
5.1.1 File name alignment
Shiny apps (and most R projects) often contain utility functions in helper.R or utils.R files. Placing non-Shiny code in these files isn’t a bad practice–it’s is even encouraged in Mastering Shiny:
“You might want to collect smaller, simpler, functions into one place. I often use R/utils.R for this…”
However, because we’ll want to develop tests for scatter_plot(), we should follow the advice in R Packages,2 and rename R/utils.R to R/scatter_plot.R as we transition to an app-package.3
NoteR/utils.R
From now on, I’ve renamed R/utils.R to R/scatter_plot.R, so it aligns with the naming conventions in other R packages.
When we created our app-package with create_package(), support for markdown formatting in our package help files was automatically included by adding Config/roxygen2/markdown: TRUE to the DESCRIPTION file:
Package: sapVersion: 0.0.0.9500Type: PackageTitle: Shiny App-PackagesDescription: An R package with a collection of Shiny applications.Author: John Smith [aut, cre]Maintainer: John Smith <John.Smith@email.io>License: GPL-3Encoding: UTF-8Config/roxygen2/markdown: TRUE
1
Updated package version
2
Markdown support (Config/roxygen2/ replaces the older Roxygen: list(markdown = TRUE) field)
If you have an existing package with the legacy Roxygen: and RoxygenNote: fields, running devtools::document() will migrate them to the Config/roxygen2/ format automatically. If the field is missing entirely, follow the instructions in the roxygen2 documentation for enabling markdown.
5.1.3 Title & description
TipInserting roxygen2 skeletons
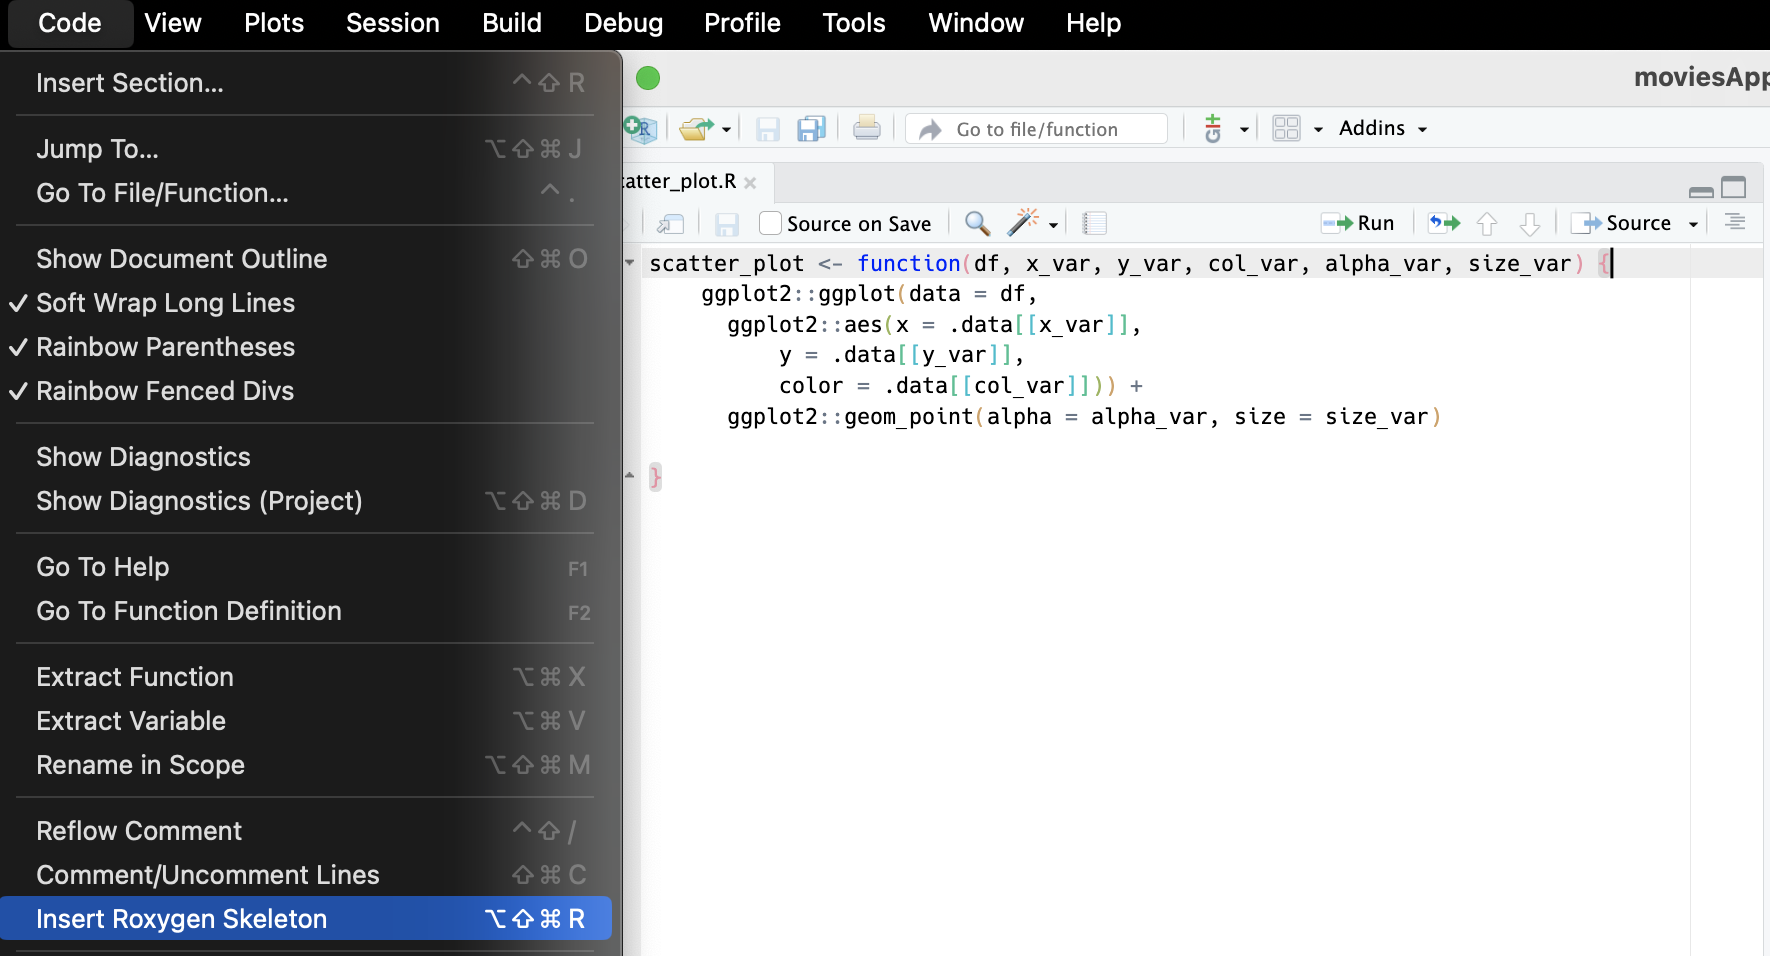
In RStudio , you can insert an roxygen2 skeleton into your function using Code > Insert Roxygen Skeleton
Standard roxygen2 skeleton
The first two sections of roxygen2 documentation are the title and description. These sections don’t require tags–roxygen2 will detect each section as long as there is at least one #' line separating them (and their contents don’t extend past the length indicated in parentheses below):
#' function title (one line)#'#' A short description... (one paragraph)#'
The @title and @description for the scatter_plot() function stored in R/utils.R might look like this:
#' Create scatter plot #'#' Custom [`ggplot2`](https://ggplot2.tidyverse.org/) function for building scatter plots in `sap`.#'
TipFunction @description and @details
If the contents in the @description for a function requires more complicated formatting than a single paragraph (i.e., multiple paragraphs, lists, etc.), you can use the @details tag:
#' Create scatter plot #' #' @description#' Custom [`ggplot2`](https://ggplot2.tidyverse.org/) function for building scatter plots in `sap`.#' #' @details#' `scatter_plot()` is a custom `ggplot2` function written to handle string arguments from reactive inputs (i.e., `input$x` or `input$y`)
5.1.4 Parameters & return objects
Document function arguments and outputs with @param and @return:
@param should include the name and description of each function input (i.e., their type and what they do)4
#' @param name description of its action
@return describes the type (or class) and structure of the function output5
#' @return type/structure of the output
Below are examples for @param and @return in the scatter_plot() function stored in R/utils.R:
#'#' @param df `data.frame` or `tibble`#' @param x_var string variable mapped to `x` axis#' @param y_var string variable mapped to `y` axis#' @param col_var string variable mapped to `color`#' @param alpha_var number for point `alpha`#' @param size_var number for point `size`#'#' @return A `ggplot2` plot object
ImportantMulti-line tag values (roxygen2 8.0.0)
Starting a tag value on the line below the tag now triggers a warning:
#' @return#' A ggplot2 plot object # <-- warning: value starts on next line
Put the value on the same line as the tag:
#' @return A ggplot2 plot object
Continuation lines (indented text that wraps a long description) are still fine and do not trigger a warning.
5.1.5 Inheriting parameters
When multiple functions share parameters, @inheritParams pulls the documentation from a source function so you only have to write it once:
#' @inheritParams source_function
In sap, every module UI and server function accepts an id parameter. Rather than copying the same @param id line into each function, document it once on mod_var_input_ui() and inherit it everywhere else:
#' @inheritParams mod_var_input_ui
Filtering inherited parameters is new in roxygen2 8.0.0. If you only need a subset of the source function’s parameters, list them explicitly:
#' @inheritParams mod_var_input_ui id
To inherit everything except specific parameters, prefix them with -:
#' @inheritParams mod_var_input_ui -var_inputs
This filtering is especially useful in Shiny modules, where the server function shares id with the UI function but not the reactive arguments (like var_inputs) that are server-side only.
To view how the roxygen2 syntax will appear in the .Rd file, we’ll need to document sap:
To reduce the amount of repetitive code, I’ll just be showing the keyboard shortcuts for each devtools function from this point forward
Ctrl/Cmd + Shift + D
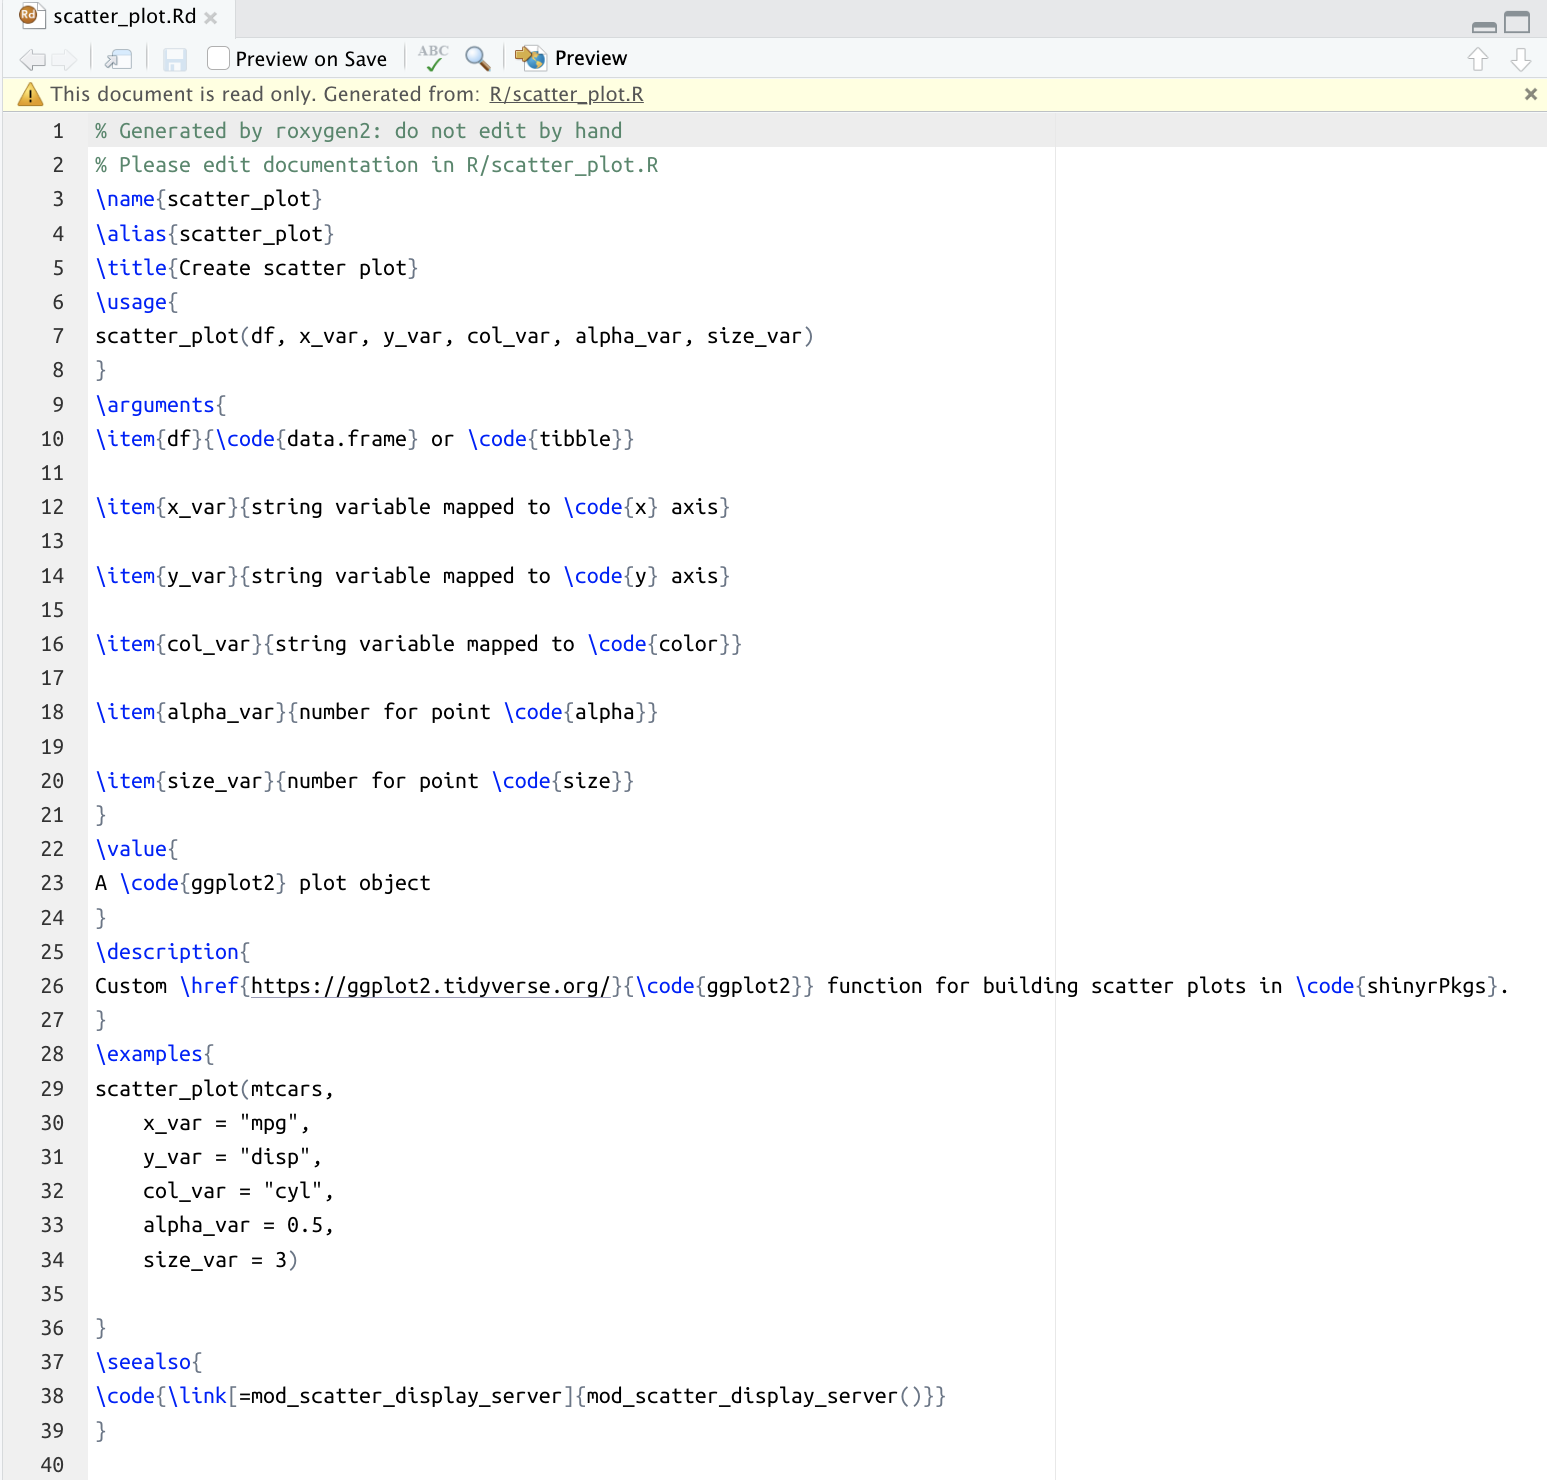
I can see the scatter_plot.Rd file is written to the man/ folder:
ℹ Updating sap documentationℹ Loading sapWriting scatter_plot.RdDocumentation completed
An overview of what devtools::document() does is illustrated below:
roxygen2 creates the NAMESPACE and help files in the man/ folder
5.1.6 .Rd files
When we open man/scatter_plot.Rd, we see it contains the following:
The scatter_plot.Rd documentation file
R documentation (.Rd) files have a formatting style similar to (La)TeX, but roxygen2 saves us from having to learn this syntax by automatically generating the .Rd files.
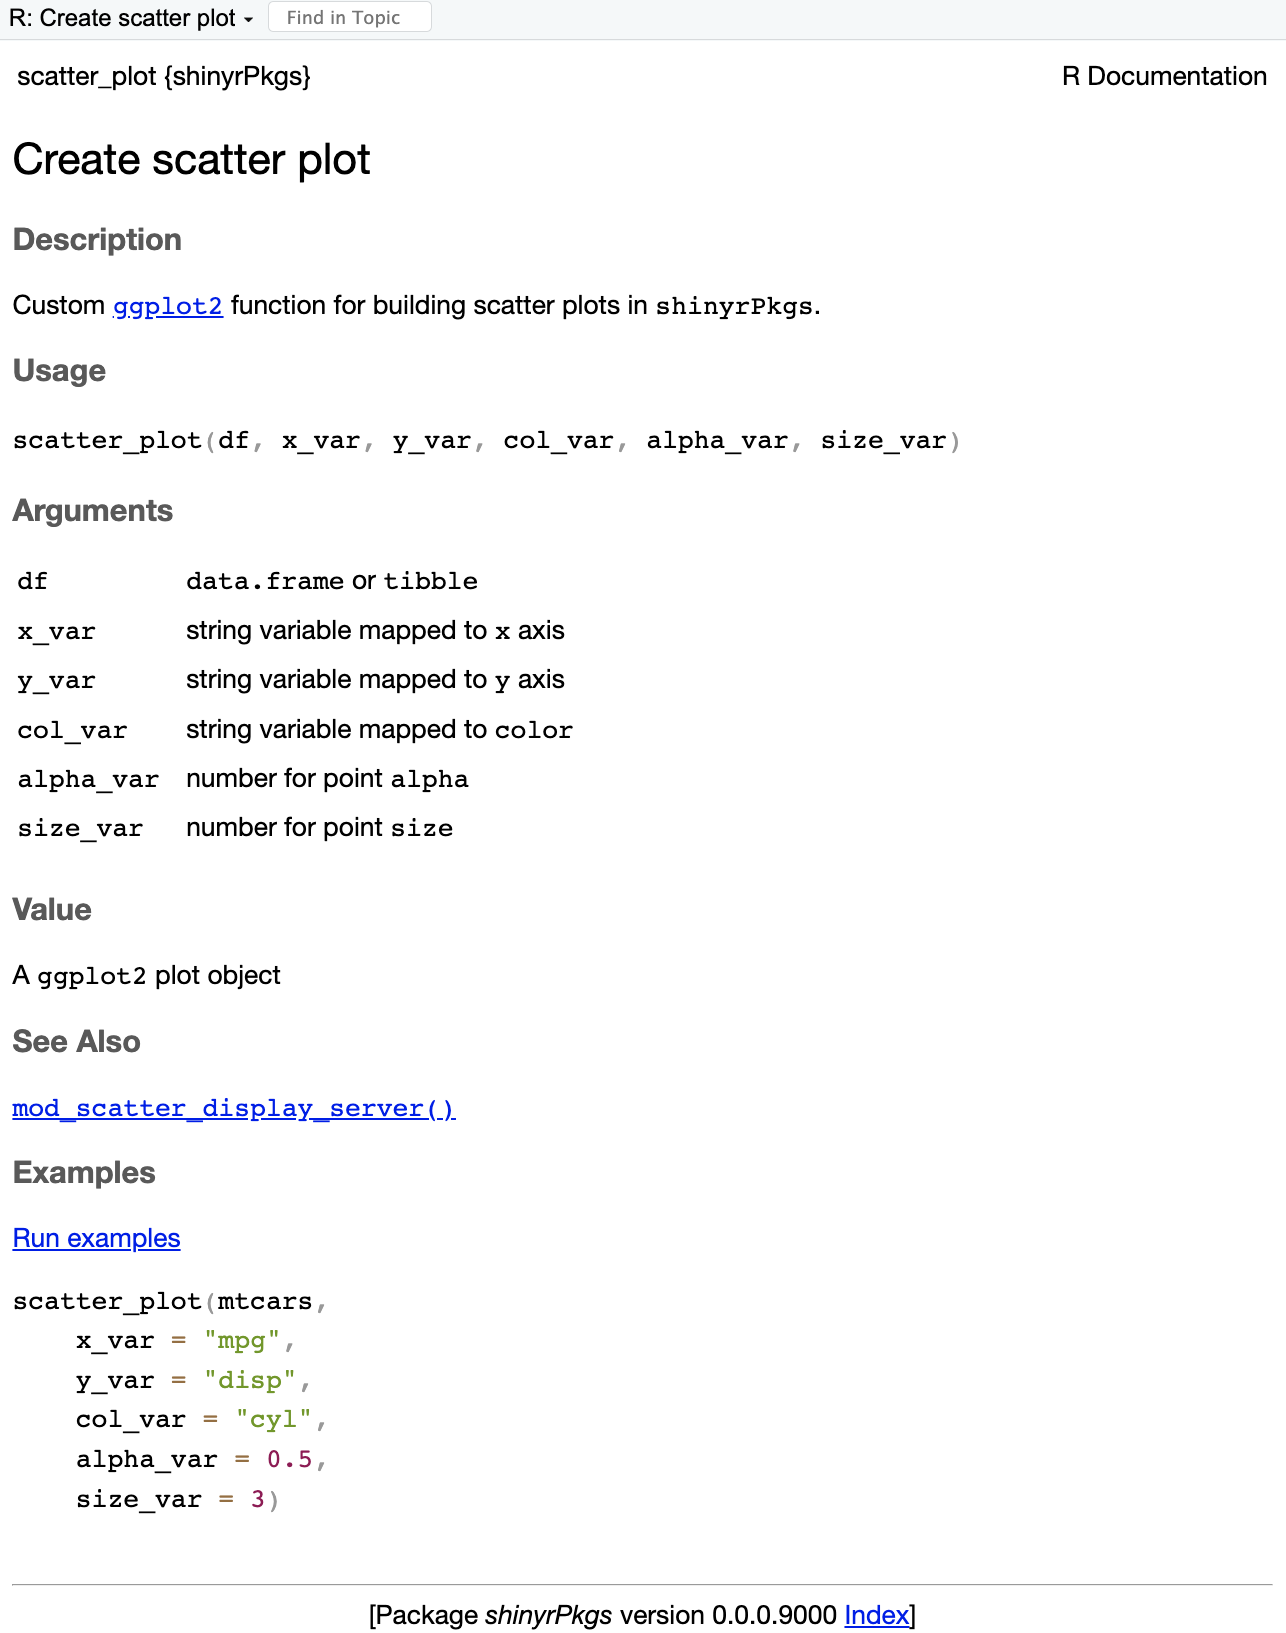
To view the help file, I can enter ?scatter_plot in the console:
?scatter_plot
Help file
Previewing the development versions of our documentation is a great way to verify the content in each .Rd file meets our expectations.
5.1.7 Checking documentation status
roxygen2 8.0.0 introduced needs_roxygenize(), which checks whether the .Rd files in man/ are out of date relative to the source files in R/ (without running a full devtools::document() pass):
roxygen2::needs_roxygenize(".")
This will return TRUE if any .Rd file needs regeneration and FALSE if everything is current, which makes it useful in two places:
Pre-commit hooks will fail fast if documentation was forgotten:
if (roxygen2::needs_roxygenize(".")) {stop("Documentation is out of date. Run devtools::document() before committing.")}
CI checks will verify that committed docs match their source:
if (roxygen2::needs_roxygenize(".")) {stop("man/ is out of sync with R/. Re-run devtools::document() and commit the result.")}
Because needs_roxygenize() compares file modification times rather than regenerating output, it’s much faster than running devtools::document() and adds no meaningful overhead to either hook.6
5.1.8 Examples
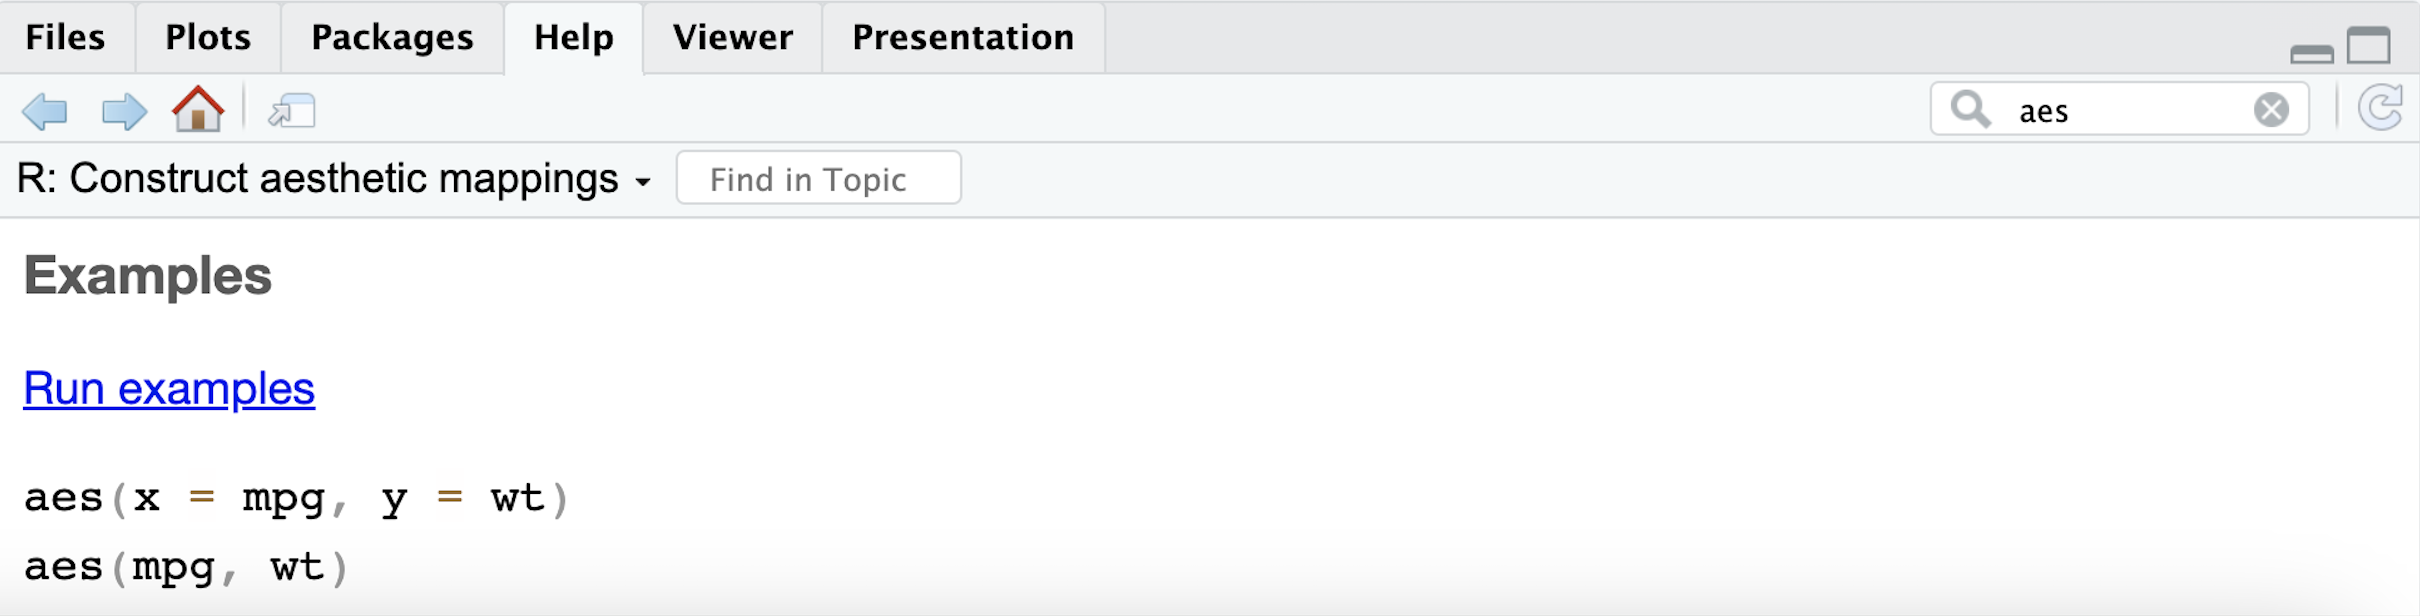
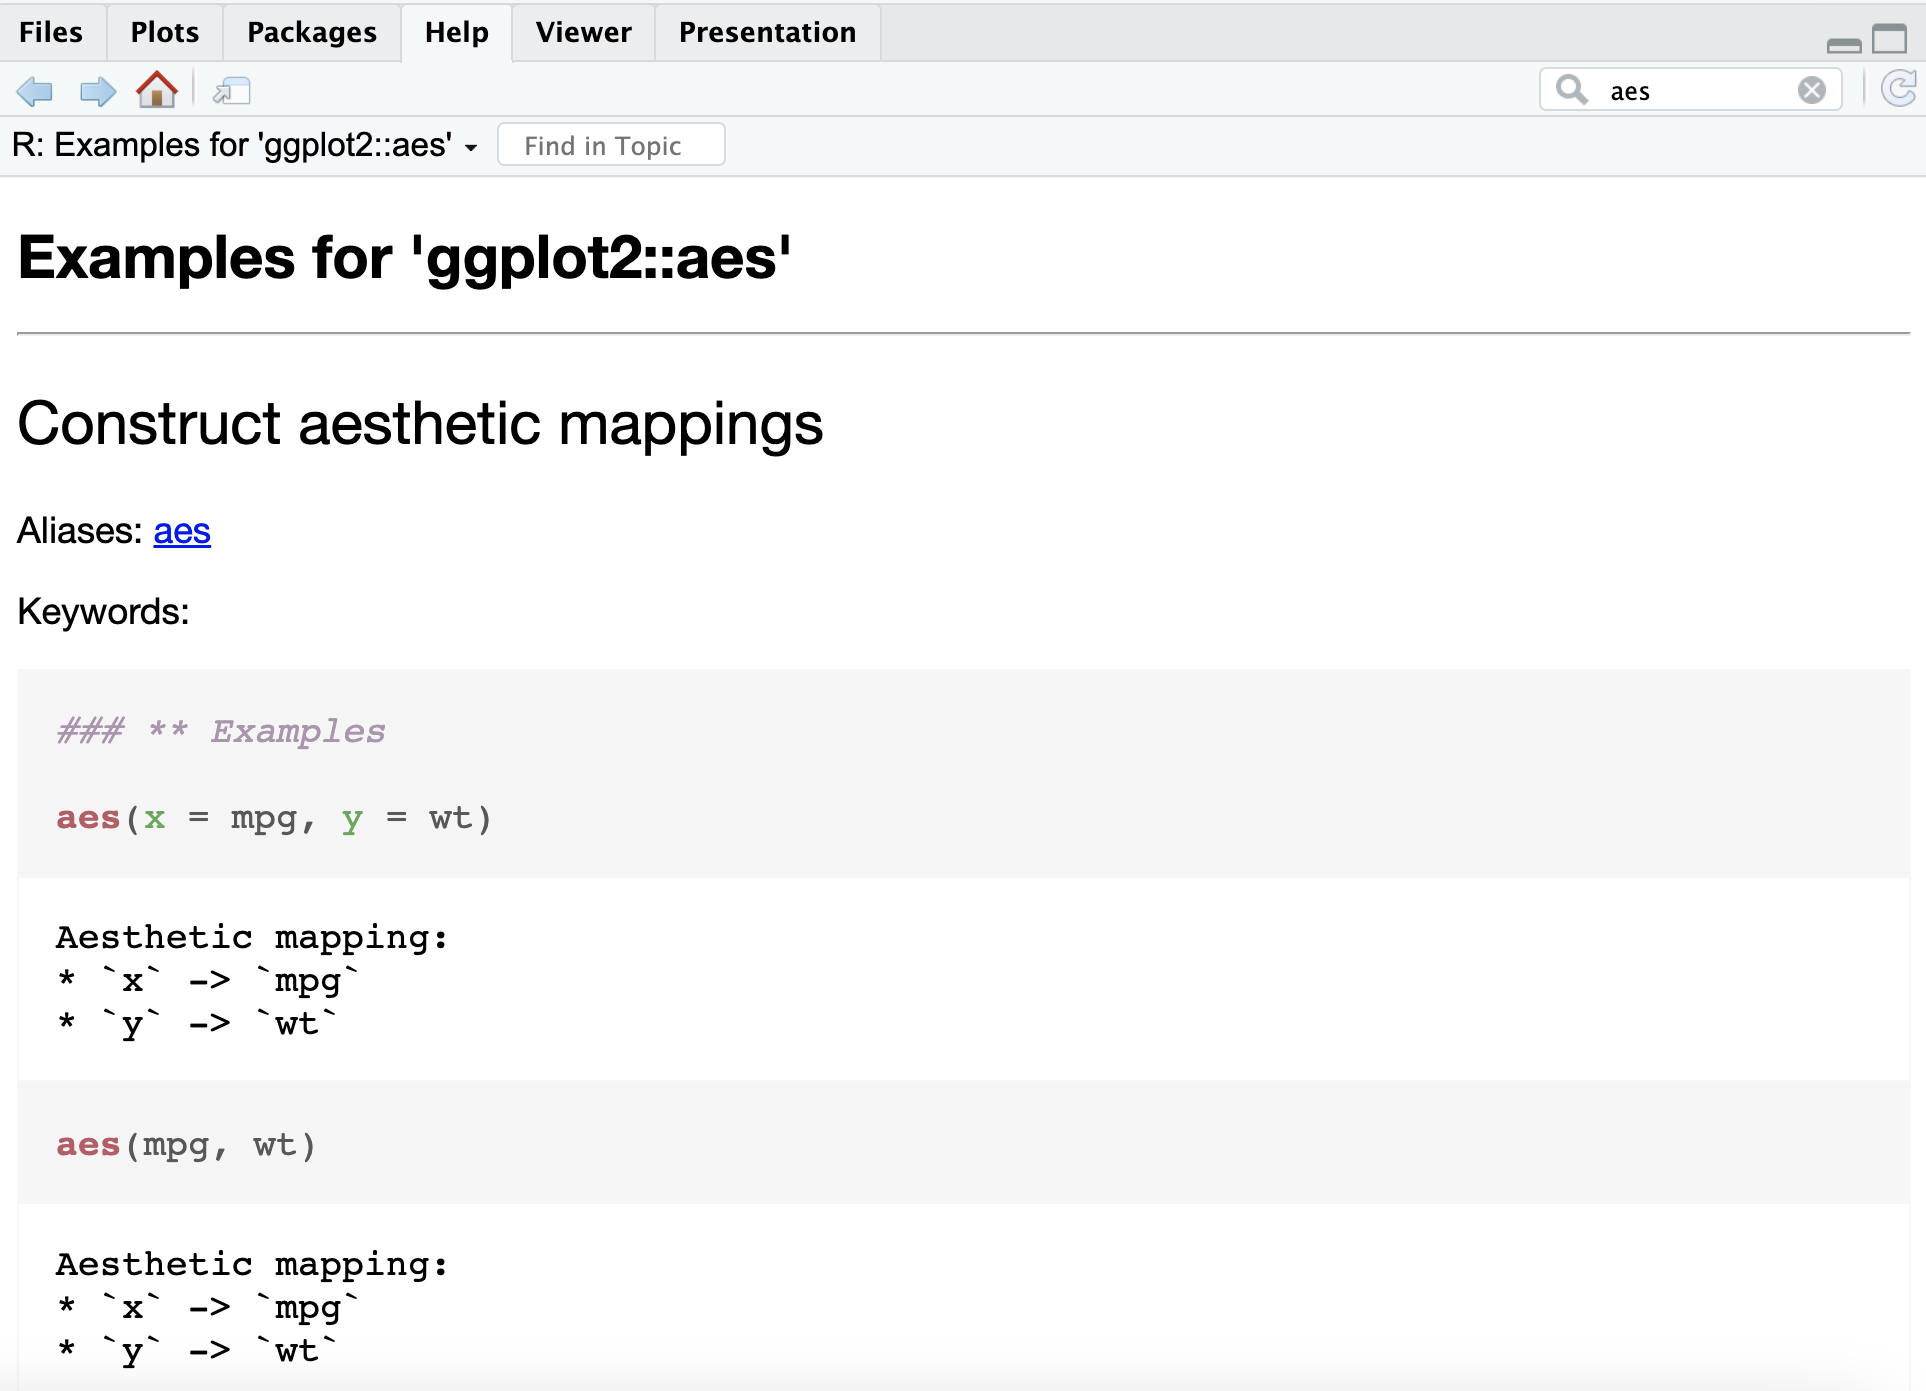
@examples are unique because they include executable code that demonstrates how a particular function works. In the Posit Workbench IDE, @examples are especially helpful because they come with a clickable hyperlink (the @examples from ggplot2::aes() are below):
(a) Run examples hyperlink
(b) Executed @examples code
Figure 5.1: Run examples in help files
Below is an example demonstrating how the scatter_plot() utility function works:
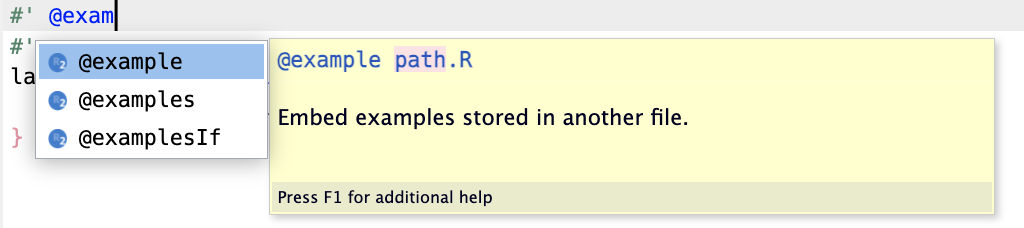
If you’re documenting your package functions in Positron, tab-completion is your friend! The help text displayed with each tag ensures you’re including the correct version (see @example vs. @examples below).
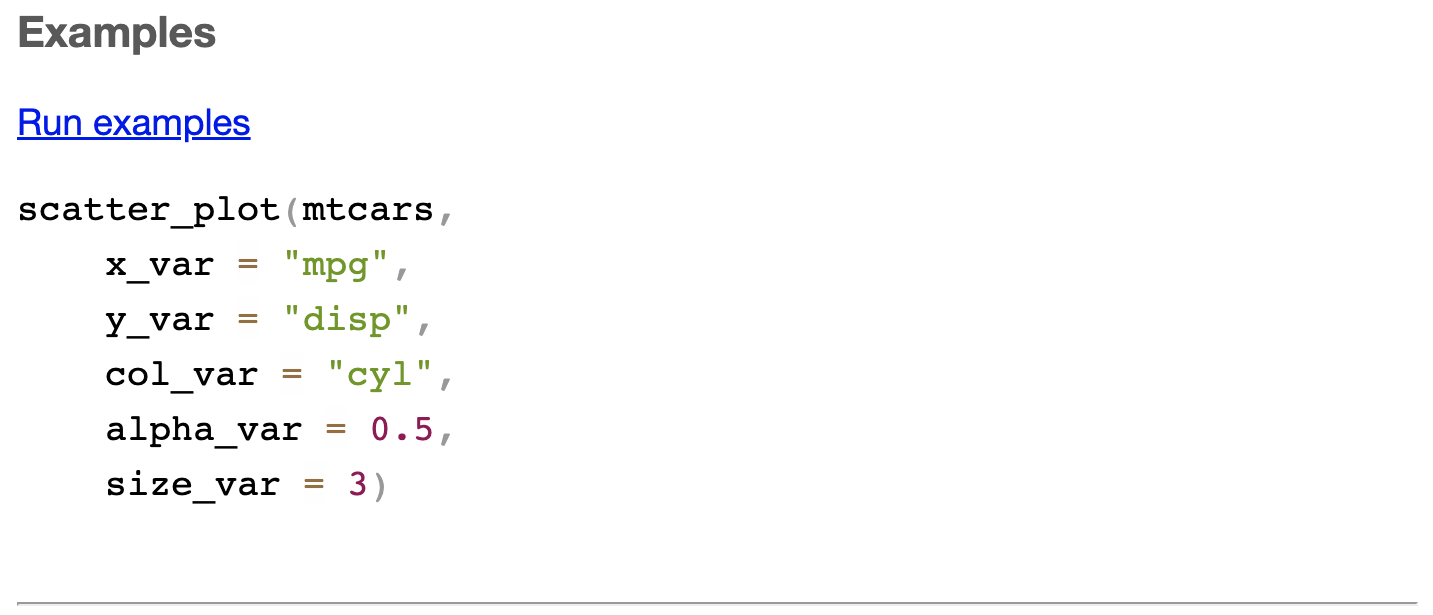
To preview the @examples in the help file, I’ll document() and open the development .Rd file:
Ctrl/Cmd + Shift + D
?scatter_plot
Preview of examples
The Run examples hyperlink won’t be active in the .Rd file preview, but reviewing the code in @examples allows me to correct any errors or typos early.
The scatter_plot() function now has a Title, Description, Usage, Arguments, Value, and Examples documented. Consider these tags as the minimum level of documentation for the functions in your app-package.
5.2 Documenting app functions
Using Markdown in roxygen2 can improve the clarity of our documentation, especially in Shiny app-packages, where modules and functions often need detailed explanations.
5.2.1 Section
Markdown shines in sections, where you can use headings (###), bold text, or lists to structure detailed explanations.
Example for mod_var_input_server:
#’ @section Inputs:#’ This function expects inputs provided via the `shiny` session namespace:#’#’ - `y`: Variable for the y-axis.#’ - `x`: Variable for the x-axis.#’ - `z`: Variable for the color aesthetic.#’ - `alpha`: Transparency level of points (0-1).#’ - `size`: Size of the points.#’ - `plot_title`: Title for the plot.#’#’ @section Outputs:#’ - A **reactive expression** that returns a list of selected inputs.
For scatter_plot:
#’ @section Usage:#’ Use this function to create a scatter plot as part of a Shiny app or in a#’ standalone script. This is particularly useful when integrated with reactive#’ inputs from Shiny modules.
5.2.2 See also
When documenting Shiny modules, I tend to think of the audience as anyone looking to understand the execution path through an application. For example, in our sap application, the inputs are collected in the UI and returned from the mod_var_input_server() function:
Example for mod_var_input_ui:
#’ @seealso#’ - [`mod_var_input_server()`] for server-side logic.#’ - [`shiny::tagList()`](https://shiny.posit.co/r/reference/shiny/latest/tagList.html)#’ for containing UI elements.#’ - [`shiny::NS()`](https://shiny.posit.co/r/reference/shiny/latest/NS.html)#’ for namespacing.
With Markdown, you can use backticks for inline code, bulleted lists, and links for external references. To make references more readable and user-friendly, we can use @seealso to connect modules, utility functions, and links to external documentation.
5.2.3 Family
The @family tag works the same way, but can be used to group functions by type. Markdown gives us the ability to use bold or italic text for emphasis.
Markdown doesn’t drastically change @family, but it improves the consistency of formatting across related functions.
5.2.3.1 Variable input
Below are full example of variable input module documented with Markdown. Note the use of @family and interactive() in the @examples:
mod_var_input_ui():
show/hide mod_var_input_ui documentation
#' Variable Input Module - UI#'#' Creates a UI for selecting variables and attributes for a scatter plot.#'#' @param id *(character)* Namespace ID for the module.#'#' @return A `shiny::tagList()` containing UI elements for variable #' selection.#'#' @section Details: #' `mod_var_input_ui()` provides UI controls for customizing scatter plots. #' It includes: #' - **Dropdowns**: #' - X-axis variable#' - Y-axis variable#' - Color aesthetic variable#' - **Sliders**:#' - Transparency (`alpha`) ranging from 0 to 1.#' - Point size ranging from 0 to 5.#' - **Text Input**:#' - Plot title.#'#' The function uses `shiny::NS()` to namespace all input IDs.#'#' @seealso#' - [`mod_var_input_server()`] for server-side logic.#' - [`shiny::tagList()`](https://shiny.posit.co/r/reference/shiny/latest/tagList.html) #' for containing UI elements.#' - [`shiny::NS()`](https://shiny.posit.co/r/reference/shiny/latest/NS.html) #' for namespacing.#'#' @family **Variable Input Module**#'#' @examples#'#' if (interactive()) {#' shiny::shinyApp(#' ui = shiny::fluidPage(mod_var_input_ui("vars")),#' server = function(input, output, session) {#' selected_vars <- mod_var_input_server("vars")#' shiny::observe(#' print(selected_vars())#' )#' }#' )#' }#'
mod_var_input_server():
show/hide mod_var_input_server documentation
#' Variable Input Module - Server#'#' Handles the server-side logic for the variable input module.#'#' @param id *(character)* Namespace ID for the module.#'#' @return A **reactive expression** that returns a list of selected input#' values: #' - `y`: Variable for the y-axis.#' - `x`: Variable for the x-axis.#' - `z`: Variable for the color aesthetic.#' - `alpha`: Transparency level of points (0-1).#' - `size`: Size of the points.#' - `plot_title`: Title for the scatter plot.#'#' @section Details: #' `mod_var_input_server()` reads user input from the corresponding UI #' function created with #' `mod_var_input_ui()`. It processes and returns a reactive object #' containing the selected variables and plot attributes.#'#' @seealso#' - [`mod_var_input_ui()`] for the UI counterpart of this module.#' - [`mod_scatter_display_server()`] for displaying the scatter plot.#'#' @family **Variable Input Module**#'#' @examples#' if (interactive()) {#' shiny::shinyApp(#' ui = shiny::fluidPage(mod_var_input_ui("vars")),#' server = function(input, output, session) {#' selected_vars <- mod_var_input_server("vars")#' shiny::observe(print(selected_vars()))#' }#' )#' }#'
5.2.3.2 Graph display
mod_scatter_display_ui:
show/hide mod_scatter_display_ui documentation
#' Scatter Plot Display Module - UI#'#' Creates a UI for displaying a scatter plot with user-selected options.#'#' @param id *(character)* Namespace ID for the module.#'#' @return A `shiny::tagList` containing the plot output and metadata.#'#' @section Details: #' `mod_scatter_display_ui()` includes:#' - A **scatter plot** created dynamically based on user input.#' - Metadata about the app, including the data source.#'#' @seealso#' - [`mod_scatter_display_server()`] for the server-side logic of this #' module.#' - [`scatter_plot()`] for the utility function generating the plot.#'#' @family **Plot Display Module**#'#' @examples#' if (interactive()) {#' shiny::shinyApp(#' ui = shiny::fluidPage(mod_scatter_display_ui("plot")),#' server = function(input, output, session) {#' # Example usage - server logic is minimal for standalone testing.#' }#' )#' }#'
#' Scatter Plot Display Module - Server#'#' Handles the server-side logic for rendering a scatter plot.#'#' @param id *(character)* Namespace ID for the module.#' @param var_inputs *(reactive)* A reactive expression containing #' user-selected variables and attributes.#'#' @return No direct return value. This function generates a plot output.#'#' @section Details: #' `mod_scatter_display_server()`:#' - Uses `var_inputs` to dynamically generate a scatter plot with #' user-selected variables.#' - Reads from the `movies` dataset, which must be loaded in the app #' environment.#' - Processes plot titles and axis labels to improve readability.#'#' @section Reactive Inputs:#' - `var_inputs()$x`: X-axis variable.#' - `var_inputs()$y`: Y-axis variable.#' - `var_inputs()$z`: Color aesthetic variable.#' - `var_inputs()$alpha`: Transparency level.#' - `var_inputs()$size`: Size of points.#' - `var_inputs()$plot_title`: Title of the plot.#'#' @seealso#' - [`mod_var_input_server()`] for variable selection.#' - [`scatter_plot()`] for generating the scatter plot.#'#' @family **Plot Display Module**#'#' @examples#' if (interactive()) {#' shiny::shinyApp(#' ui = shiny::fluidPage(#' mod_var_input_ui("vars"),#' mod_scatter_display_ui("plot")#' ),#' server = function(input, output, session) {#' selected_vars <- mod_var_input_server("vars")#' mod_scatter_display_server("plot", selected_vars)#' }#' )#' }#'
5.2.3.3 Utility function
scatter_plot():
show/hide scatter_plot() documentation
#' Generate a Scatter Plot#'#' Creates a scatter plot using `ggplot2` with the specified data and #' aesthetics.#'#' @param df *(data.frame)* The dataset containing the variables to plot.#' @param x_var *(character)* Name of the variable for the x-axis.#' @param y_var *(character)* Name of the variable for the y-axis.#' @param col_var *(character)* Name of the variable for the color aesthetic.#' @param alpha_var *(numeric)* Transparency level of points (0 to 1).#' @param size_var *(numeric)* Size of points.#'#' @return A `ggplot` object representing the scatter plot.#'#' @section Details:#' `scatter_plot()` is designed for use in Shiny applications but can also be #' used independently.#' It supports customization of transparency, size, and color aesthetics.#'#' @seealso#' - [`mod_scatter_display_server()`] for integrating this function into the#' scatter plot module.#' - [`ggplot2::ggplot()`](https://ggplot2.tidyverse.org/) for details on #' `ggplot2` usage.#'#' @family **Utility Functions**#'#' @examples#' scatter_plot(#' df = mtcars,#' x_var = "mpg",#' y_var = "hp",#' col_var = "cyl",#' alpha_var = 0.7,#' size_var = 3#' )#'
5.3 UI & Server functions
Splitting the standalone app function in app.R into separate UI and server functions has multiple benefits:
Documenting each function will be easier if they are stored in the R/ folder.
Having dedicated UI, server, and app function means we can develop and test them independently.
A standalone app function can have multiple applications in the same app-package.
I’ve split the UI and server from launch_app() into separate movies_ui() and movies_server() below.
The movies_ui() doesn’t have any arguments–it contains the theme, image, and application title:
show/hide movies_ui documentation
#' User Interface for the Movies Review Application#'#' Creates the user interface (UI) for the Movies Review application, which#' allows users to create customizable scatter plots based on movie data.#'#' @return A `bslib::page_sidebar()` UI object.#'#' @section Details:#' The interface is built using:#' - **Theme**: `bslib::bs_theme(bootswatch = "spacelab")`.#' - **Title**: Displays the app title and a logo.#' - **Sidebar**: Includes the variable selection module#' ([`mod_var_input_ui`]).#' - **Main area**: Displays the scatter plot module#' ([`mod_scatter_display_ui`]).#'#' @seealso#' - [`movies_server()`] for the server logic of the app.#' - [`mod_var_input_ui()`] and [`mod_scatter_display_ui()`] for the modules#' included in the UI.#'#' @family **Application Components**#'#' @examples#' if (interactive()) {#' shiny::shinyApp(ui = movies_ui(), server = movies_server)#' }#'movies_ui <-function() { bslib::page_sidebar(title =div(img(src ="shiny.png",height =60,width =55,style ="margin:10px 10px" ),"Movie Reviews" ),theme = bslib::bs_theme(bootswatch ="spacelab"),sidebar = bslib::sidebar(mod_var_input_ui("vars") ),mod_scatter_display_ui("plot") )}
movies_server() is written to be passed to the server argument in shinyApp():
show/hide movies_server documentation
#' Server Logic for the Movies Review Application#'#' Handles the server-side logic for the Movies Review application.#'#' @param input The Shiny `input` object.#' @param output The Shiny `output` object.#' @param session The Shiny `session` object.#'#' @return No direct return value. Defines server logic for reactive outputs #' and module integration.#'#' @section Details:#' The server integrates the following modules:#' - **Variable Input Module**: Processes user input for scatter plot #' customization using [`mod_var_input_server()`].#' - **Plot Display Module**: Generates and displays a scatter plot #' based on user inputs using [`mod_scatter_display_server()`].#'#' @seealso#' - [`movies_ui()`] for the corresponding user interface.#' - [`launch_app()`] for the entry point of the application.#'#' @family **Application Components**#'#' @examples#' if (interactive()) {#' shiny::shinyApp(ui = movies_ui(), server = movies_server)#' }#'movies_server <-function(input, output, session) { selected_vars <-mod_var_input_server("vars")mod_scatter_display_server("plot", var_inputs = selected_vars)}
This will change the grouping in our @family tags to the following:
%%{init: {'theme': 'neutral', 'themeVariables': { 'fontFamily': 'monospace', "fontSize":"14px"}}}%%
flowchart TD
    subgraph AppCom["<strong>Application Components</strong>"]
        launch_app["Standalone Function:<br><code>launch_app()</code>"]
        UI["UI:<br><code>movies_ui()</code>"]
        Server["Server:<br><code>movies_server()</code>"]
    end
    subgraph Vars["<strong>Variable Input Module</strong>"]
        mod_var_input_ui["UI Module:<br><code>mod_var_input_ui()</code>"]
        mod_var_input_server["Server Module:<br><code>mod_var_input_server()</code>"]
    end
    subgraph Graph["<strong>Plot Display Module</strong>"]
        mod_scatter_display_ui["UI Module:<br><code>mod_scatter_display_ui()</code>"]
        mod_scatter_display_server["Server Module:<br><code>mod_scatter_display_server()</code>"]
    end
    subgraph Utils["<strong>Utility Functions</strong>"]
        scatter_plot["Utility Function:<br><code>scatter_plot()</code>"]
    end

    launch_app --> UI
    launch_app --> Server
    UI --> mod_var_input_ui
    UI --> mod_scatter_display_ui
    Server --> mod_var_input_server
    Server --> mod_scatter_display_server --> scatter_plot
The updated @family tag
The @export tag controls which functions become part of our package’s public API. Any function tagged with @export is written to the NAMESPACE file by devtools::document() and is available to users after devtools::install().
In app-packages, the standalone app function is the one function users need to call directly, so it should always carry @export. Internal functions (like movies_ui(), movies_server()) and the individual module functions don’t need to be exported, unless you intend for users to call them outside the app.
Using @export with discretion keeps the package namespace clean and signals which functions are internal and only for implementation.
#' @exportlaunch_app <-function() { shiny::shinyApp(ui = movies_ui, server = movies_server)}
The complement to @export for internal functions is @noRd. Adding @noRd to a roxygen2 block tells devtools::document() to skip generating an .Rd file for that function.
This is useful when we want to keep roxygen2 comments for our own reference (parameter types, internal notes) without creating a help page that would show up in the package index.
Functions with no roxygen2 block at all behave the same way, so @noRd is most valuable when we already have comments and want to be explicit that the function is intentionally undocumented:
#' Build the movies UI#'#' @param ... passed to `shiny::fluidPage()`#'#' @noRdmovies_ui <-function(...) {# internal — not exported, no help page generated}
Together, @export and @noRd give precise control over the NAMESPACE and the man/ folder:
@export promotes a function to the public API
@noRd keeps internal comments tidy without polluting the documentation index.
5.3.1 Usage
roxygen2 auto-generates a @usage block from the function signature, which is exactly what you want for functions with meaningful parameters. For a no-argument wrapper like launch_app(), however, the auto-generated line would simply be:
launch_app()
That adds nothing a reader couldn’t already see from the function name. Setting @usage NULL suppresses the auto-generated line entirely, keeping the focus on the @details and @section blocks that actually explain how the function works.
It’s the right choice any time the signature itself is uninformative and the prose explanation does the real work.
show/hide launch_app documentation
#' Launch the Movies Review Application#'#' Starts the Movies Review Shiny application, which provides a customizable#' scatter plot interface for analyzing movie data.#'#' @usage NULL#' #' @details#' The [launch_app()] function is as a wrapper for `shiny::shinyApp()`: #' #' ```#' shinyApp(ui = movies_ui, server = movies_server)#' ```#' #' In [launch_app()]:#' * UI is stored in `movies_ui()` #' * server is stored in [movies_server()]#' #' @section `var_input` module: #' [mod_var_input_ui()] is used to collect the following inputs:#' * `input$x`#' * `input$y`#' * `input$z`#' * `input$alpha`#' * `input$size`#' * `input$plot_title`#' #' @seealso [mod_var_input_server()]#' #' @section `scatter_display` module: #' [mod_scatter_display_ui()] displays the graph output using [scatter_plot()]#' #' @seealso [mod_scatter_display_server()]#'#' @return `ui` argument in `shiny::shinyApp()` #' launch_app <-function() { shiny::shinyApp(ui = movies_ui, server = movies_server)}
Recap
Good documentation aims to make it as easy as possible for others (and future you) to understand what your function does and how to use it.
Below is a recap of the topics covered in this chapter.
Tip Documentation Recap
This chapter covered:
DESCRIPTION format: Markdown support is now declared as Config/roxygen2/markdown: TRUE; the older Roxygen: list(markdown = TRUE) and RoxygenNote: fields are migrated automatically on the next devtools::document() run.
Function @title and @description: The @title should be a short one-line description of the function, followed by a more detailed paragraph @description. These tags should give users an idea of what the function does (you can also use @details)
Arguments (@param) and outputs (@return): List all function arguments with @param. Include the argument type (e.g., integer, character, etc.) and a brief description of what the argument does. Be sure to mention any default or optional arguments. Function outputs should be listed with @return and describe the type or class of the object, whether or not it’s reactive, and mention any related functions.
Tag values on the same line: roxygen2 8.0.0 warns when a tag value starts on the line below the tag. Put values on the same line as the tag; continuation lines that wrap a long description are still fine.
Inheriting parameters (@inheritParams): Use @inheritParams source_fun to pull parameter docs from another function instead of duplicating them. Filter with an explicit argument list (@inheritParams source_fun id) or exclude specific params with a - prefix (@inheritParams source_fun -var_inputs).
Examples: @examples provide executable R code that captures how the function is used in your app-package. These are incredibly valuable for new users trying to understand how a function (and your app-package) works.
Checking documentation status: roxygen2::needs_roxygenize('.') returns TRUE if any .Rd file is out of date, making it useful in pre-commit hooks and CI checks without the overhead of a full devtools::document() run.
App-package specific considerations:
Connect functions with @seealso and @family: Use @seealso to provide links to related functions (i.e., modules) so users can click through a ‘guided tour’ of your application’s code; group similar functions using @family {description}.
Give more info with @sections: Use @section to give in-depth explanations and specific details about how a function works, including any information about the @usage or its @params.
@usage: This field will be automatically generated by roxygen2, but in some circumstances, it makes sense to set it to NULL and describe a function’s use explicitly.
In the next section, we’ll use roxygen2 to manage our app-package dependencies.
‘More often, a single .R file will contain multiple function definitions: such as a main function and its supporting helpers, a family of related functions, or some combination of the two.’ - Organise functions into files, R Packages, 2ed↩︎
Making .R file/function names brief but descriptive will also make writing and running tests easier.↩︎
Git hooks are scripts that run automatically at specific points in the Git workflow (e.g., before a commit with pre-commit, or before a push with pre-push). They live in .git/hooks/ and can be used to enforce checks — like ensuring documentation is current — before changes are recorded or shared. Read more about Git hooks.↩︎