Access these settings via Tools > Project Options > Build Tools
devtools installed
install.packages('devtools')library(devtools)
This chapter covers the necessary ingredients of R packages. We’ll start by exploring the differences between Shiny projects, R packages, and Shiny app-packages. Then, we’ll dive into the requirements for 1) creating new Shiny app-packages from scratch, and 2) converting Shiny app projects into app-packages.
TipAccess the applications in this chapter
I’ve created the shinypak R package in an effort to make each section accessible and easy to follow. Install shinypak using pak (or remotes):
Before we start, we should establish some operational definitions of what is meant by the terms ‘project,’ ‘package,’ and ‘app-package.’
Shiny Projects
I consider a Shiny app project to be a directory containing a Shiny application (in an app.R file or ui.R/server.R files)1
R Packages
I’ll use the term R package to describe a directory with the necessary dependency management (NAMESPACE), metadata files (DESCRIPTION), and R code to be successfully installed and loaded into an R session2
Shiny app-packages
A Shiny app-package–which you have probably already guessed–is an R package containing a Shiny application.
I’ll differentiate Shiny app projects, R packages, and Shiny app-packages using icons
There are multiple reasons for deciding to develop a Shiny app-package, but if you’re reading this book, you’ve likely found yourself in one of two circumstances:
You want to develop a new app, but want it structured as an R package .
You’ve already developed a Shiny project , but now you need to convert it into an R package
The previous chapters covered a few practices to adopt during development that improve the extensibility of your app and will make it easier to convert into a Shiny app-package.3
3.1 R packages
R packages can be easily shared, reused, and reproduced because they all have a similar structure, and each folder and file plays an essential role in extending R’s capabilities. Below is a folder tree with some of the typical files and folders found in R packages:4
Metadata file with the package’s purpose, dependencies, authors, and other essential information.
2
RStudio project file for managing and organizing the package’s development environment.
3
Specifies the terms under which the package can be used, modified, and distributed.
4
Defines the functions and datasets exported by the package and the imports from other packages.
5
Contains a changelog detailing updates and changes made across package versions.
6
Provides an overview of the package, usage examples, and installation instructions (typically for display on GitHub).
7
Contains he exact package versions and dependencies for a reproducible development environment.
8
All the R scripts with the package’s functions and main code.
9
Documentation files for functions and datasets in .Rd format, generated using tools like roxygen2.
10
Stores unit tests to validate the functionality of the package, often using frameworks like testthat.
11
Includes preprocessed datasets provided with the package, saved in .RData or .rda format.
12
Raw data and scripts for processing it into the format stored in the data/ folder.
13
Long-form documentation and tutorials, written in RMarkdown, explaining package usage in depth.
14
directory for additional files installed with the package, such as documentation, examples, or datasets.
15
Manages the package’s dependencies in an isolated environment, ensuring reproducibility.
The sections below cover the minimum requirements for an R package, so you can handle both creating new Shiny app-packages and converting existing Shiny projects into Shiny app-packages.
3.1.1 Essential ingredients
If you’ve done some research on R packages, you’ve probably encountered one (or both) of the following statements,
Package development kicks off with the load_all() function from devtools, which is similar to calling library() (we’ll cover this function extensively in the Development chapter).
However, when we attempt to load the code in the R/ folder with load_all(), we see the following error:
The official R documentation5 lists the following required fields for the DESCRIPTION in R packages:
The ‘Package’, ‘Version’, ‘License’, ‘Description’, ‘Title’, ‘Author’, and ‘Maintainer’ fields are mandatory.
Below is an example DESCRIPTION file for our new sap package with the mandatory fields:6
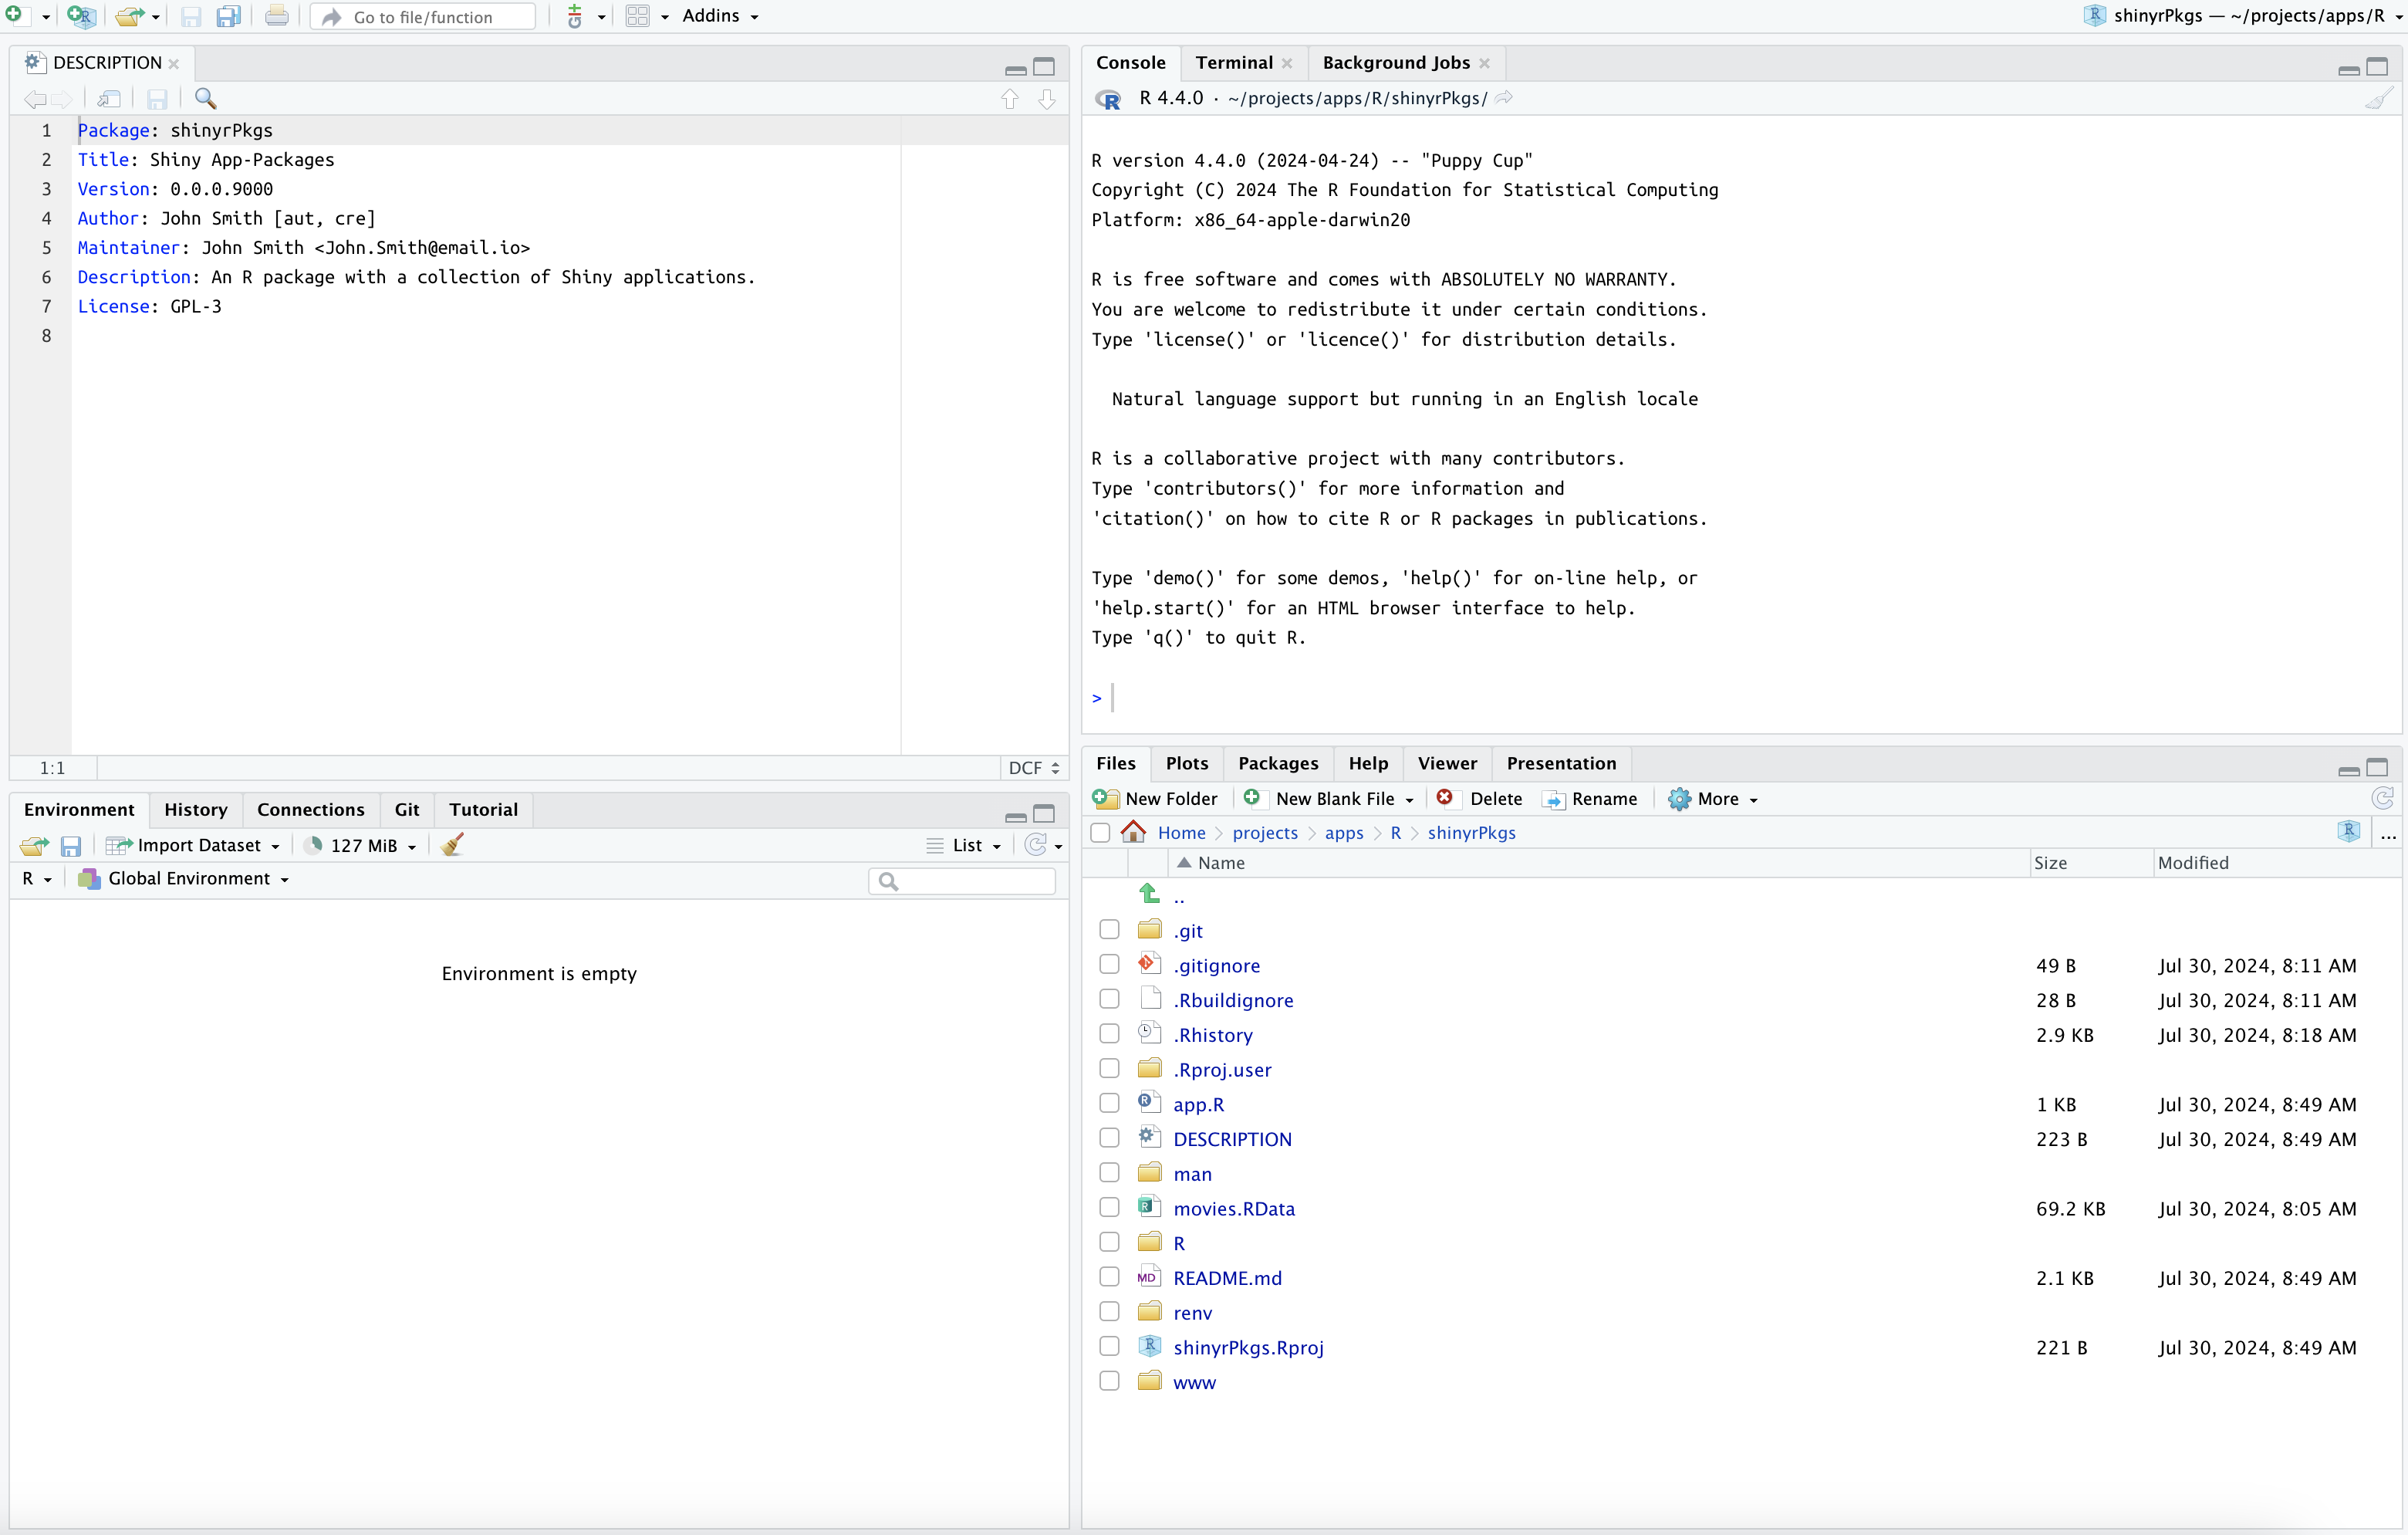
Package: sapTitle: Shiny App-PackagesVersion: 0.0.0.9000Author: John Smith [aut, cre]Maintainer: John Smith <John.Smith@email.io>Description: An R package with a collection of Shiny applications.License: GPL-3
TipAuthor and Maintainer fields
Note that the Author and Maintainer fields require additional information beyond first and last name (i.e., John Smith). These can be created with the utils::person() function:
# Authorutils::person(given ="John", family ="Smith", role =c("aut", "cre"))## [1] "John Smith [aut, cre]"# Maintainerutils::person(given ="John", family ="Smith", email ="John.Smith@email.io")## [1] "John Smith <John.Smith@email.io>"
3.1.2 RStudio’s Build pane
If you’re using RStudio, then functioning R packages also have access to the Build pane, which allows us to quickly load, install, and test code. When we open sap, the Build pane is not displayed in the IDE:
The Build pane is normally between Connections and Git
After adding the seven mandatory fields to the DESCRIPTION file, devtools::load_all() runs without the previous error, but the IDE still doesn’t display the Build pane:
Where is the Build pane?
3.1.2.1 RStudio projects
.Rproj files are plain text files with various configurations for the RStudio IDE. We were able to run devtools::load_all() above without the presence of the Build pane because RStudio displays the Build pane after reading the fields in the .Rproj file.
The quickest way to access the fields in the .Rproj file is under Tools > Project Options….
3.1.2.2 Project options
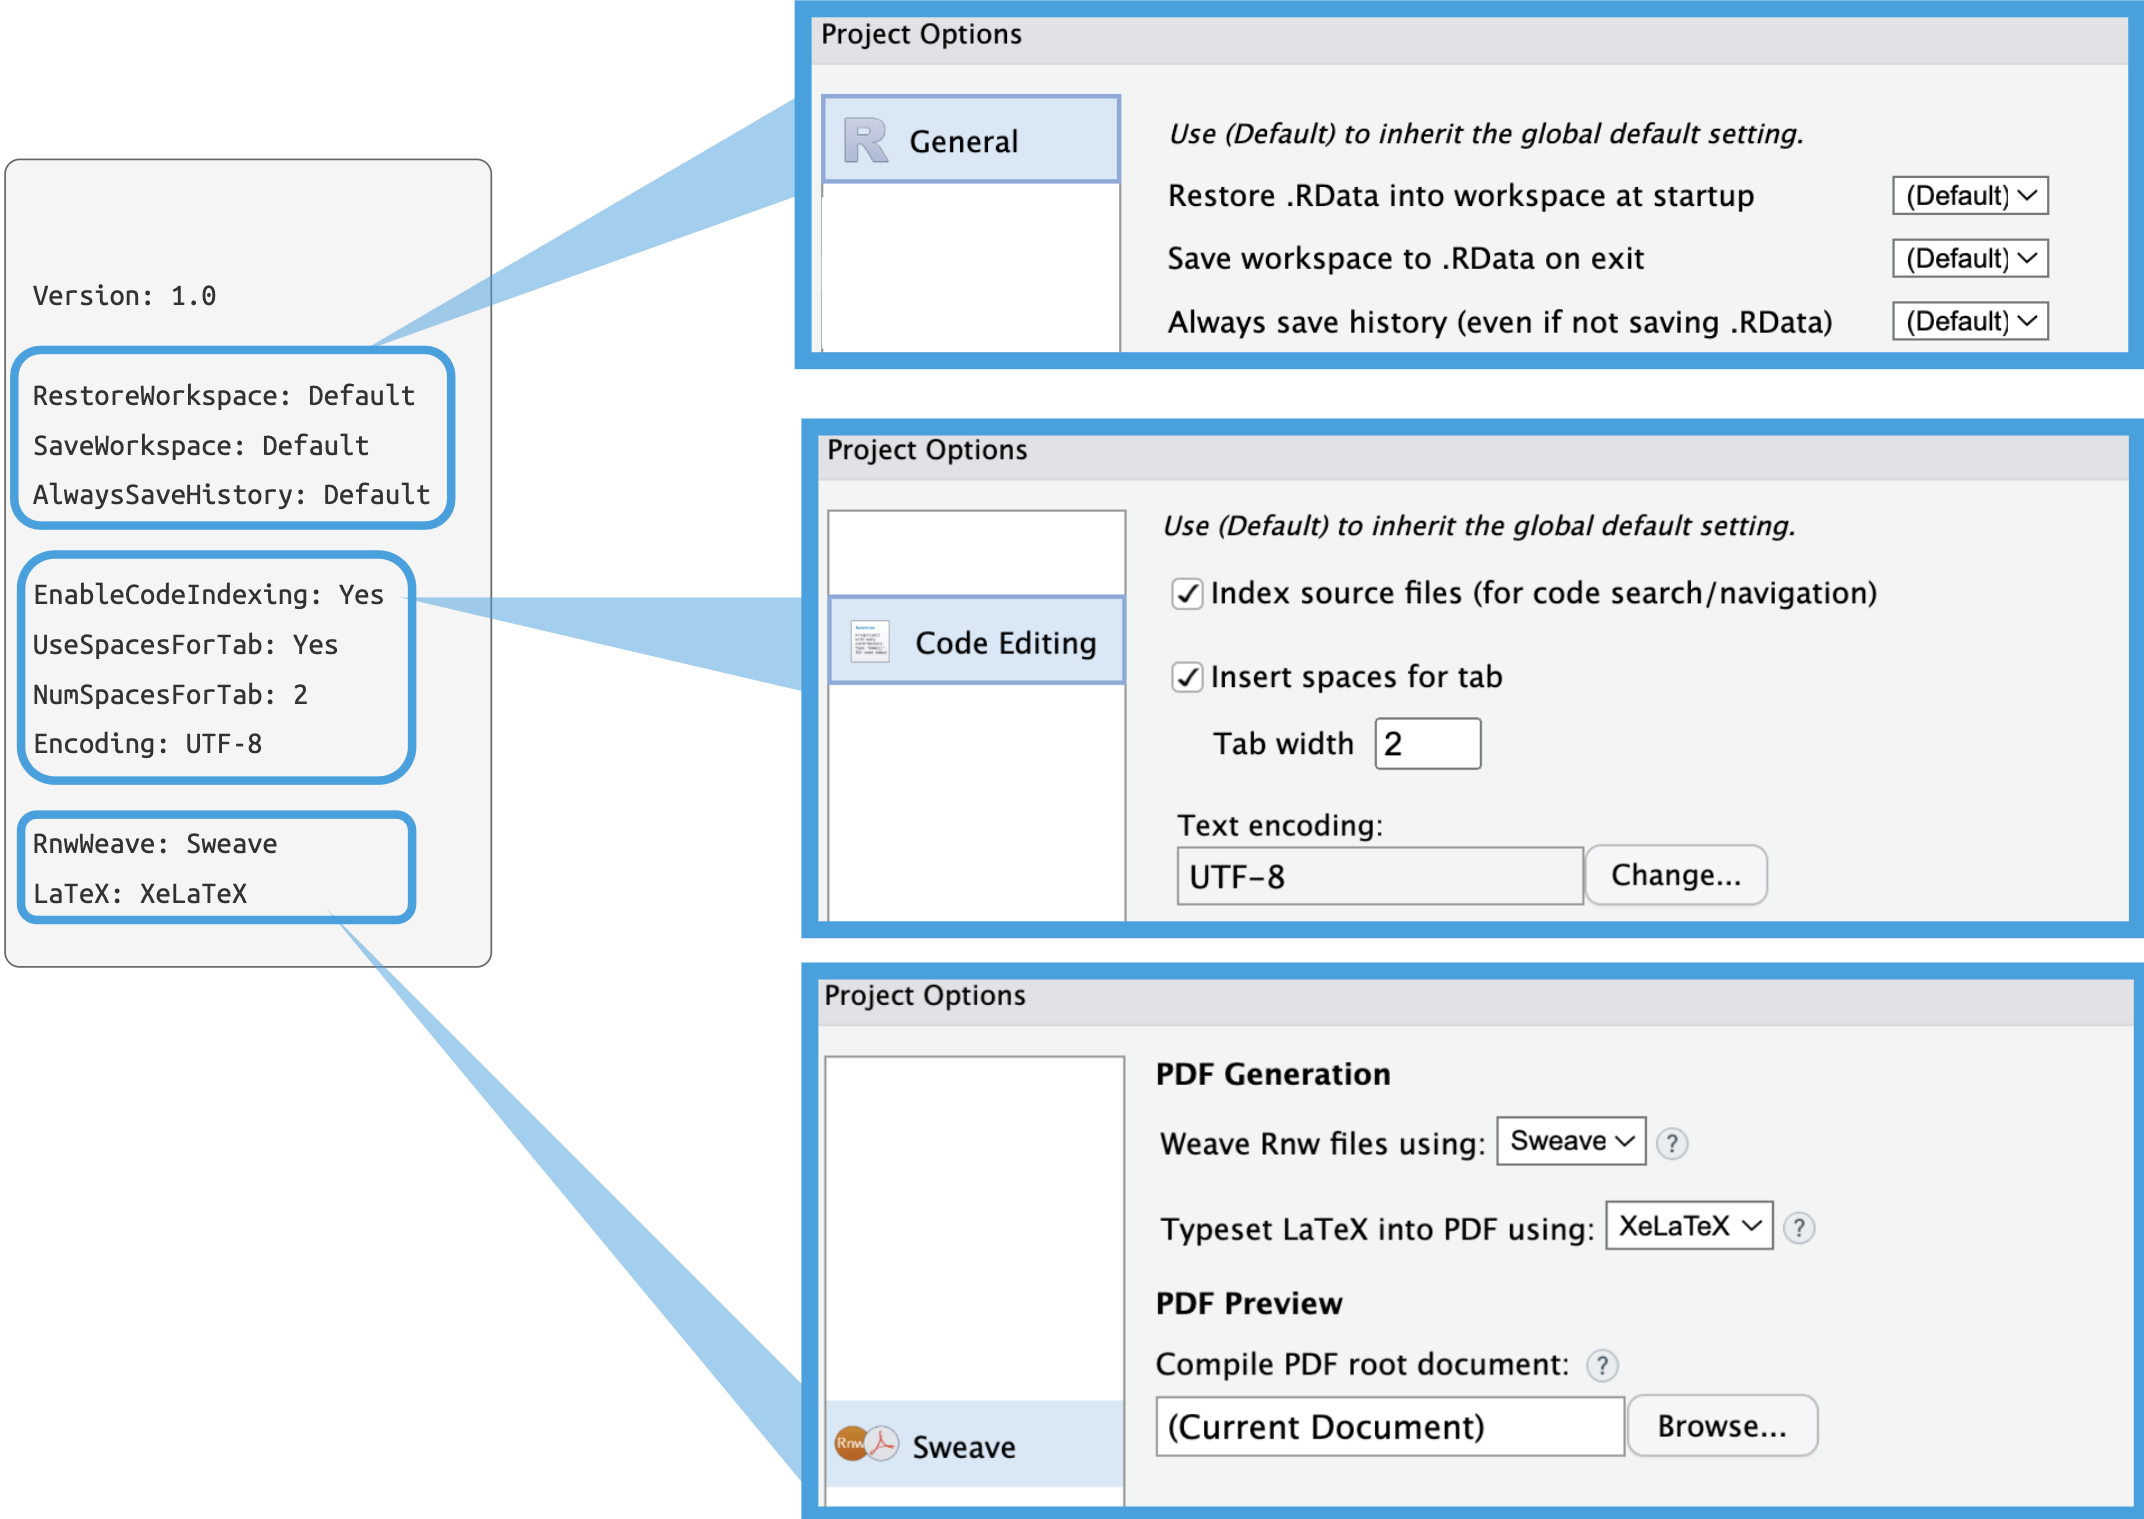
Selecting Tools > Project Options… will provide us access to the project-level options. For example, fields 2 - 4 are available under General, 5 - 8 affect the Code options, and the final two fields deal with Sweave.
Field settings from sap.Rproj file
The default settings were created when we selected the Shiny app project from the New Project Wizard in the last chapter.
3.1.2.3 Build tools
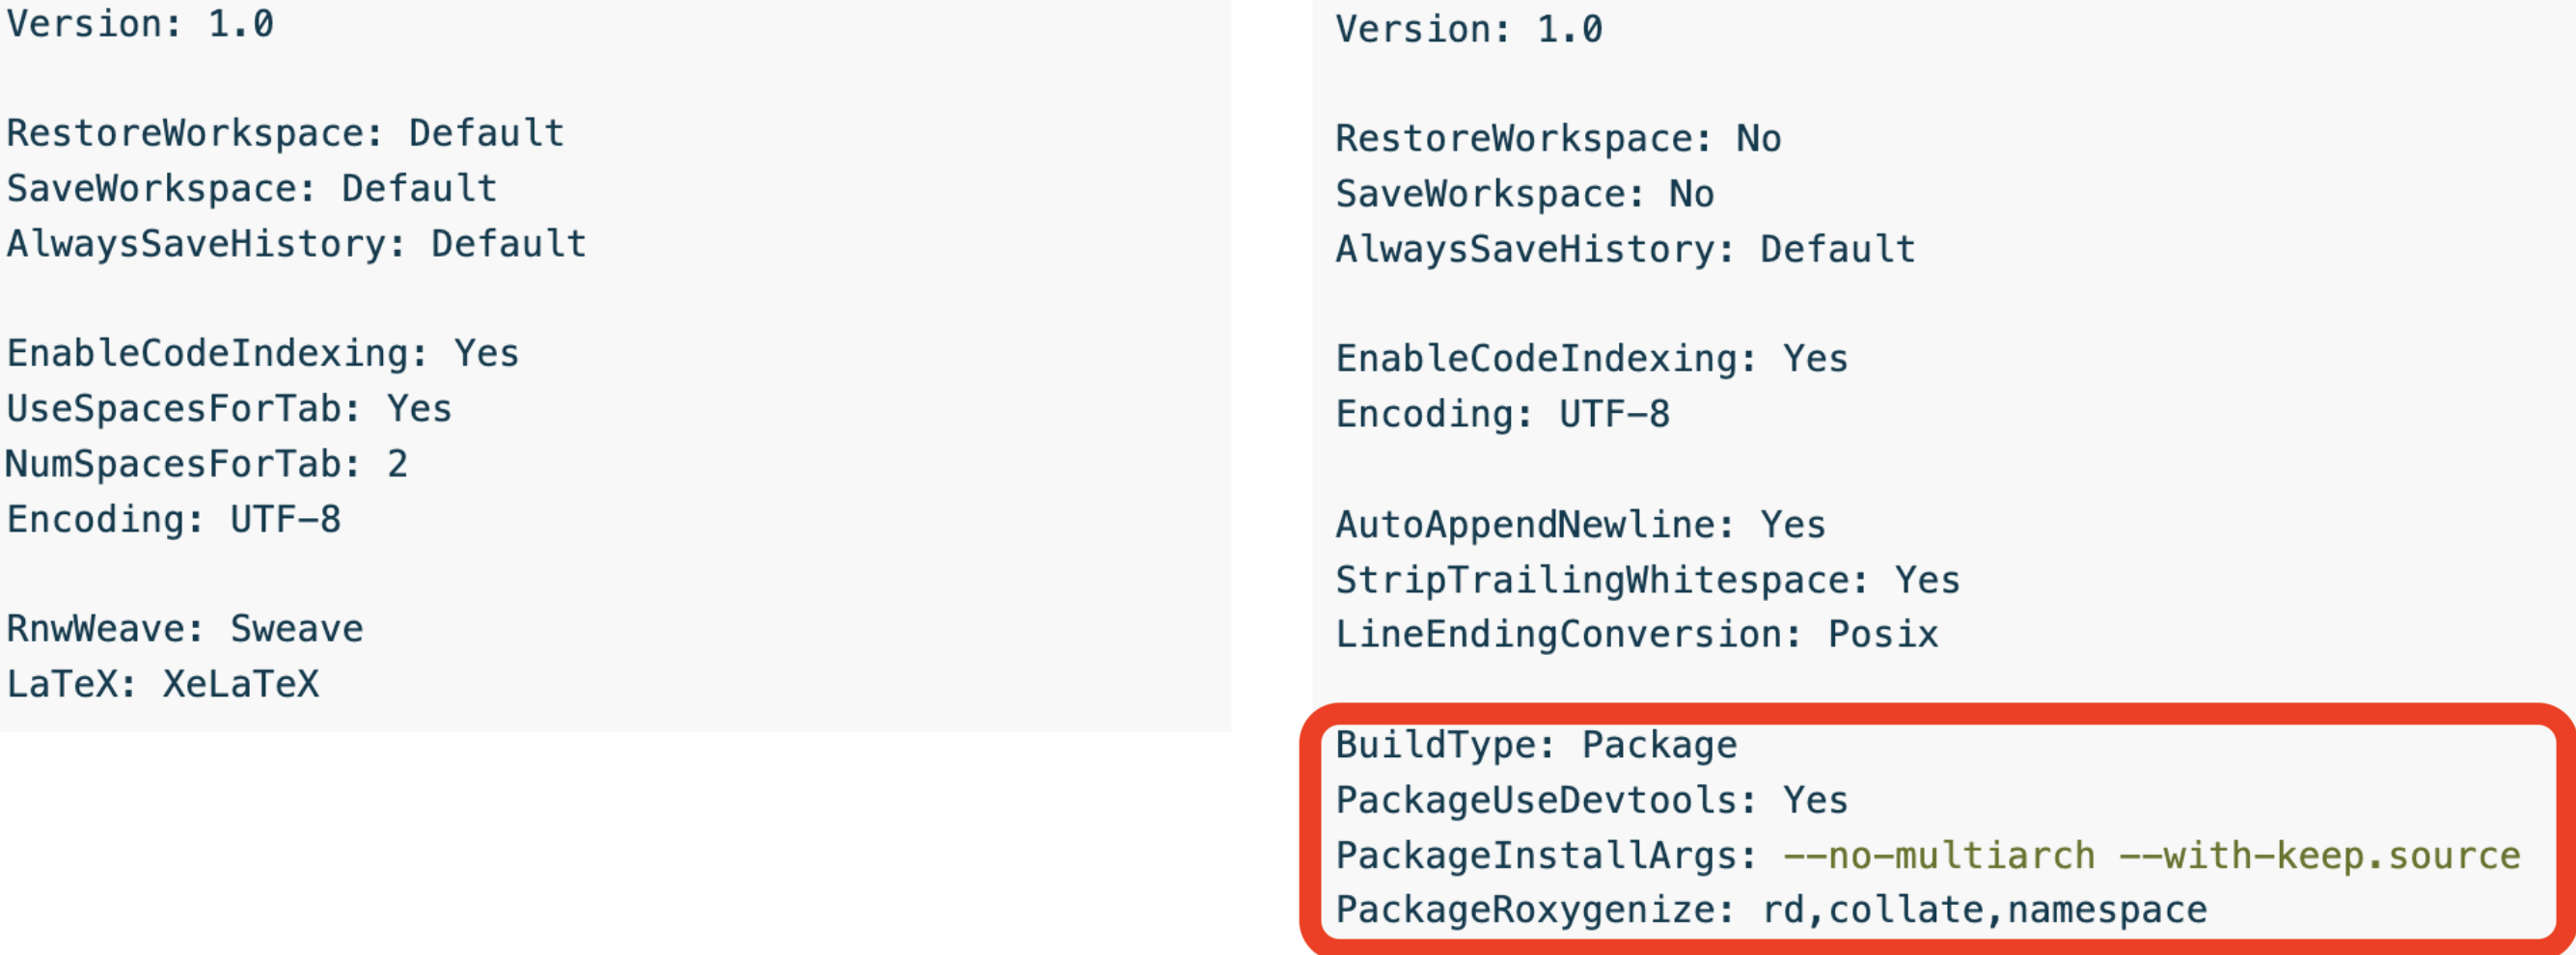
I’ve placed the .Rproj file from sap with the example .Rproj file from R Packages, (2ed) side-by-side so you can compare them below:7
(a) .Rproj files
Figure 3.1: Comparison of sap.Rproj file and .Rproj file in R Packages, 2ed
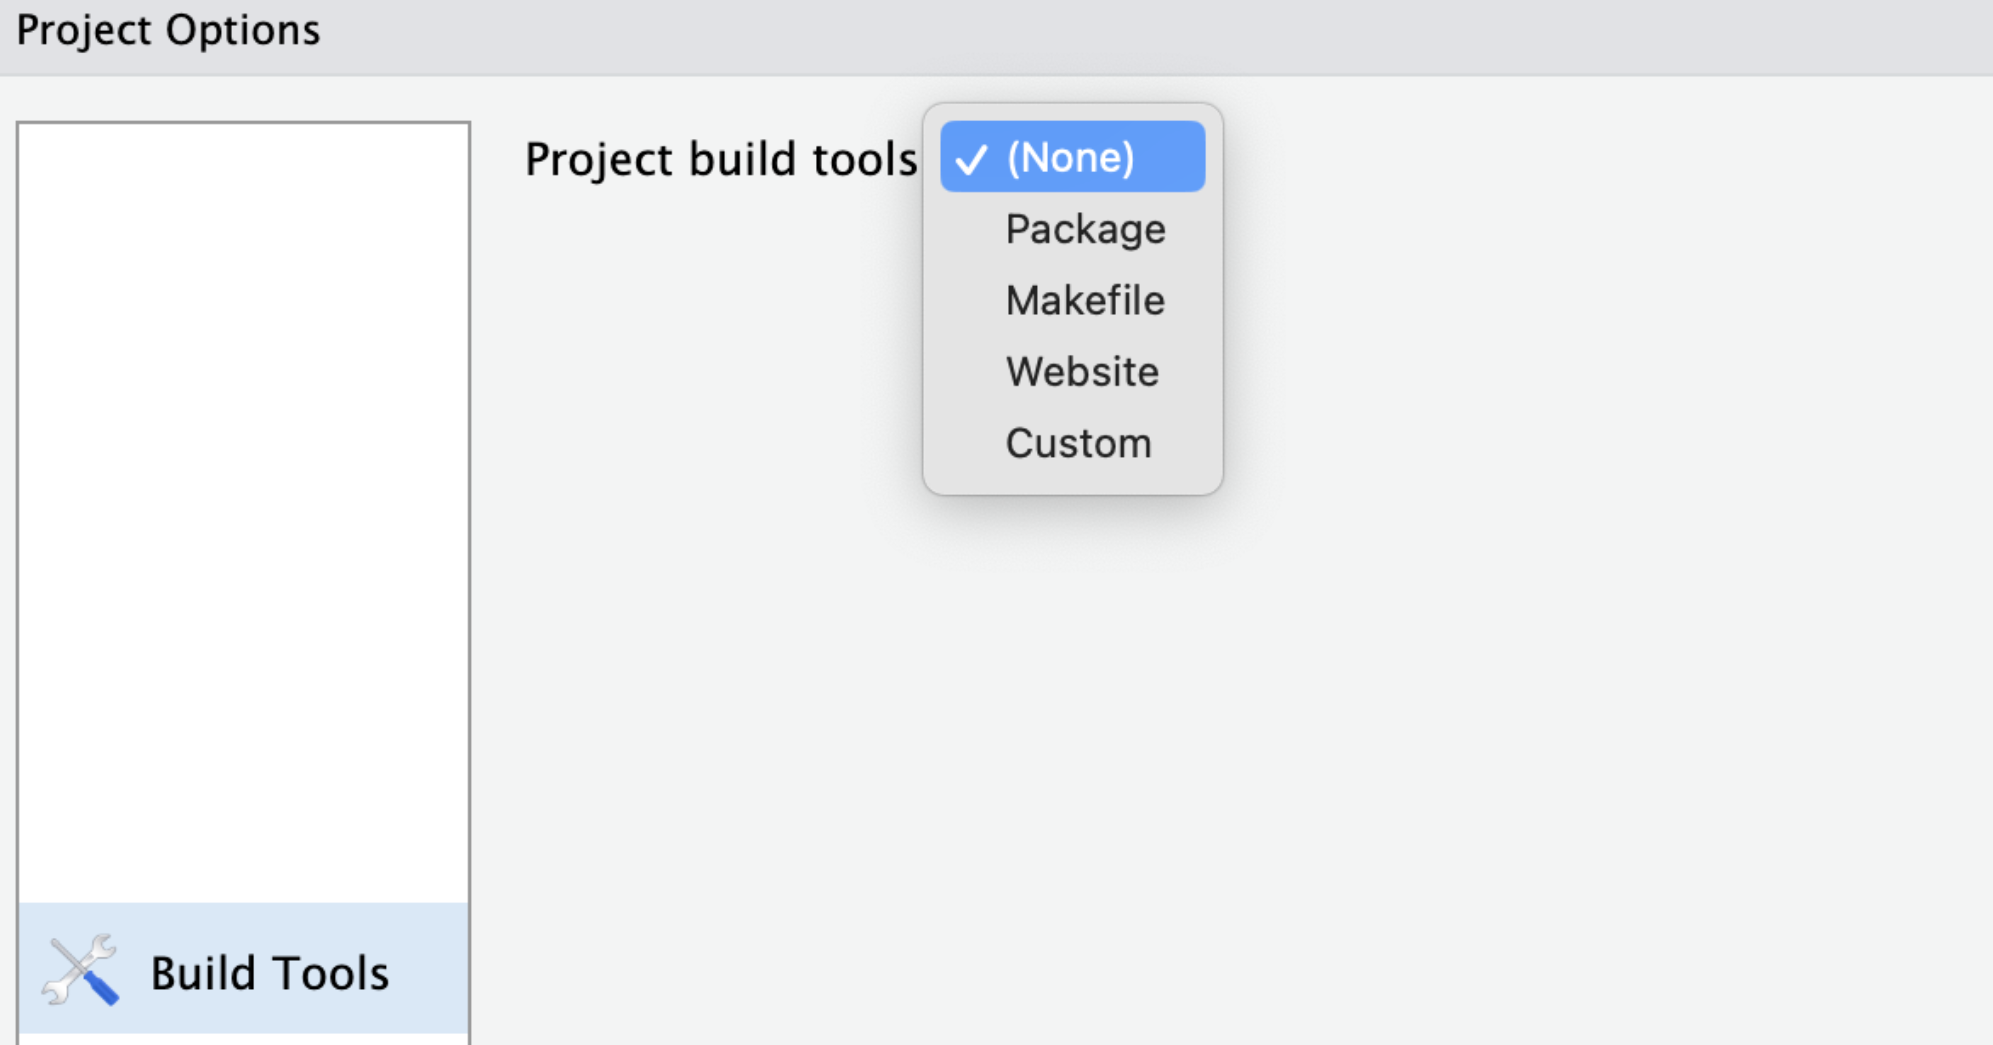
I’ve circled the fields in the .Rproj file that illustrate it’s configured to work with an R package. Note that in sap, the Project build tools are initially set to (None) under Build Tools:
(a) sap.Rproj build tools
Figure 3.2: Build tool settings in sap.Rproj file
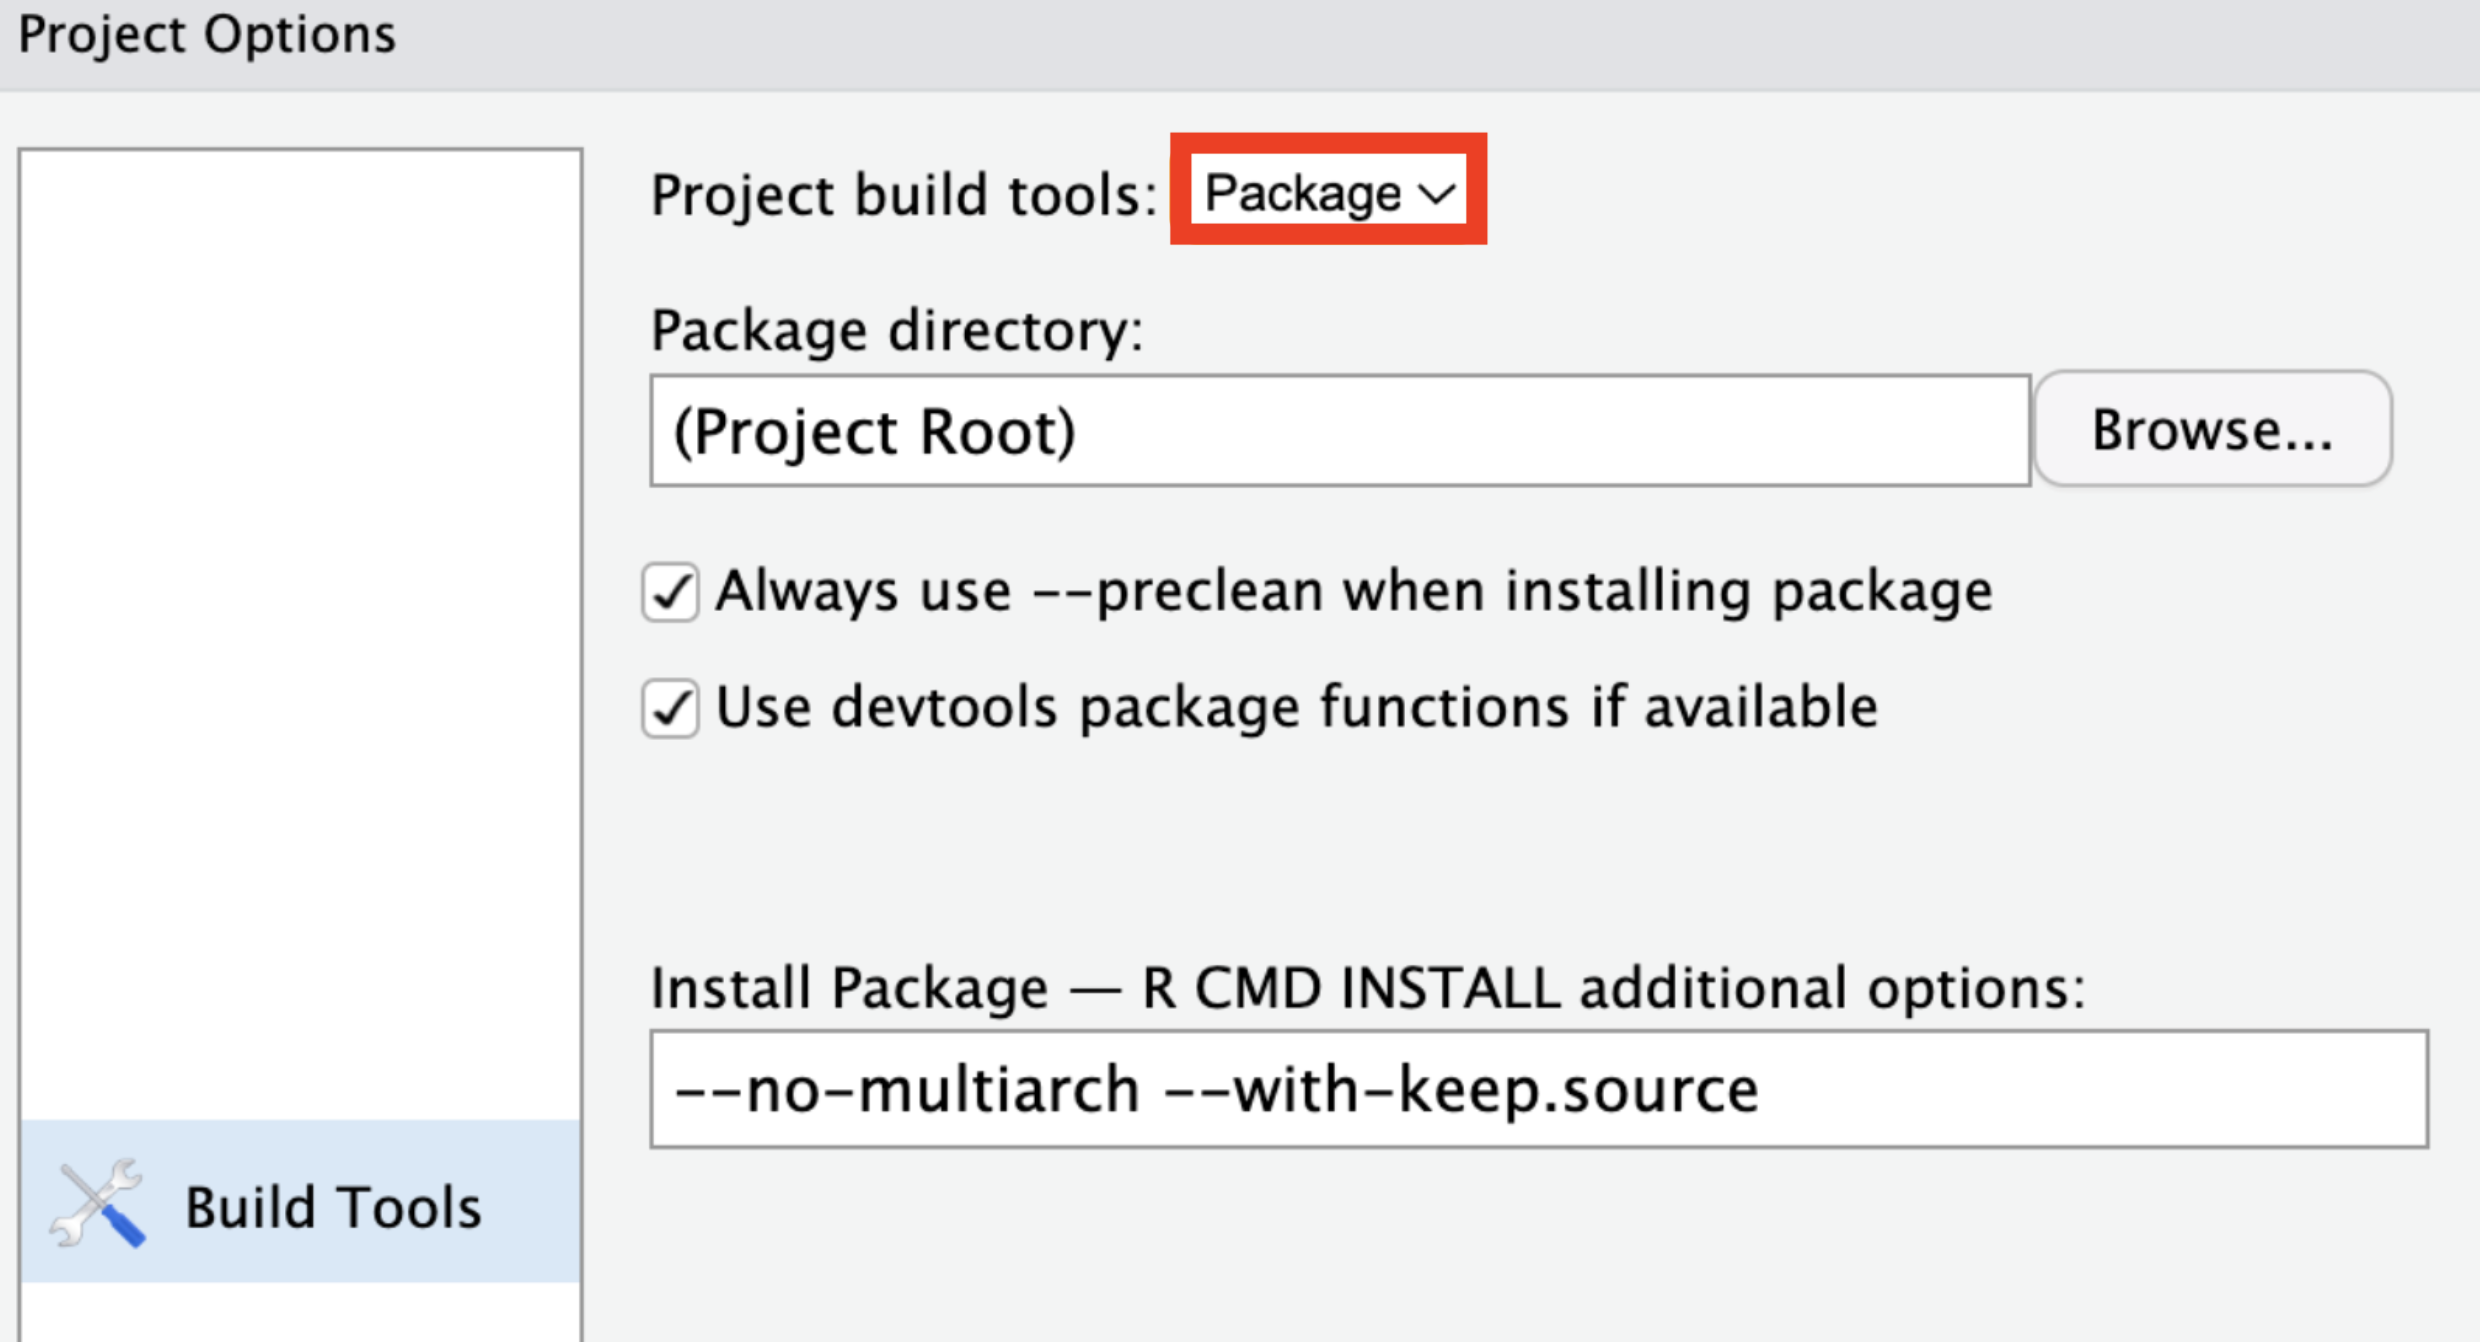
Changing the Project build tools option to Package will set the default Build Tools options:8
(a) Default package build tools
Figure 3.3: Default build tool settings
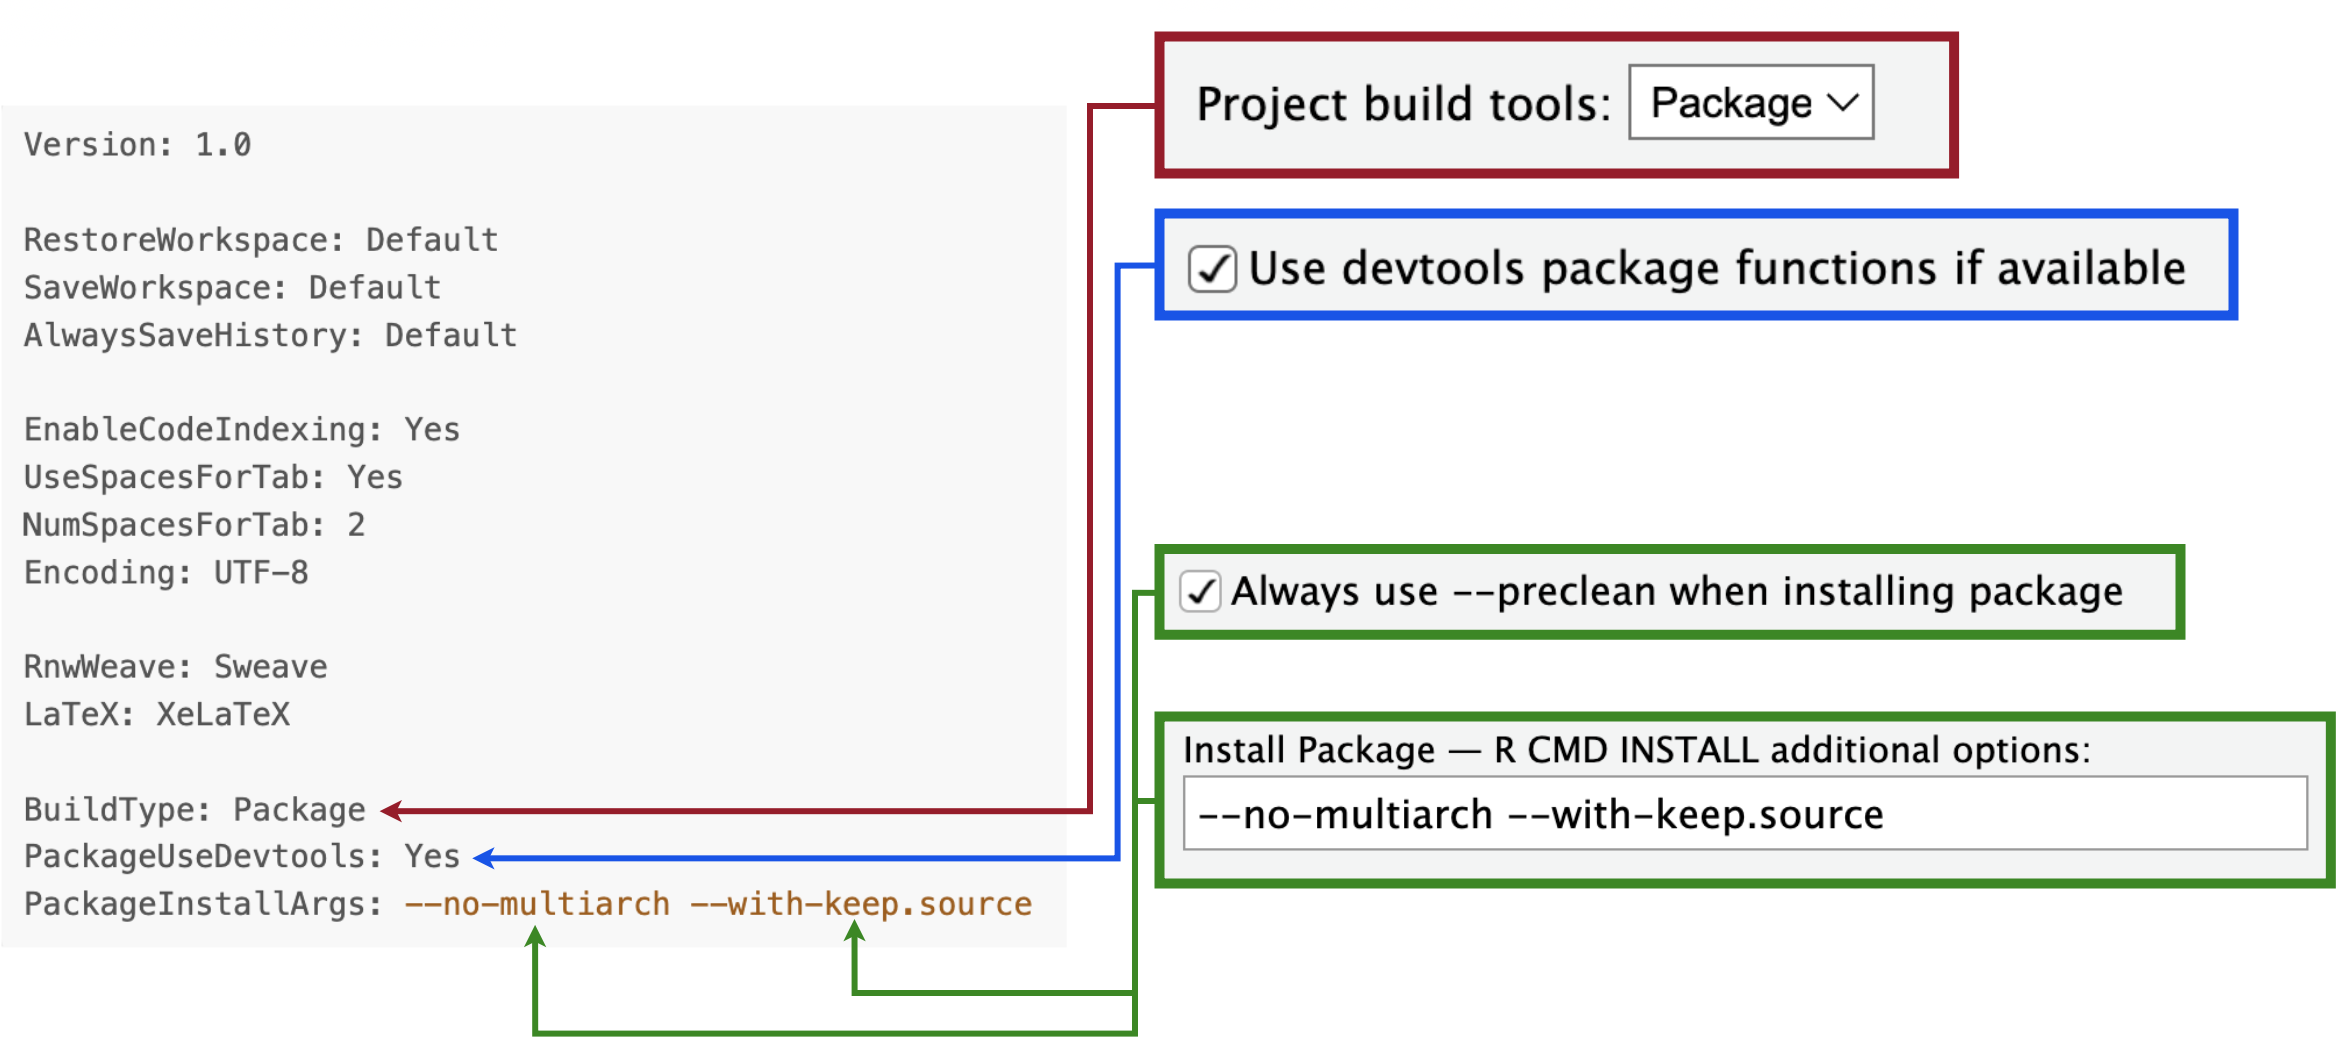
The links between the Build Tools options and fields in sap.Rproj are in the figure below:
(a) sap.Rproj build tool fields
Figure 3.4: Default build tool settings in sap.Rproj file
BuildType: Package tells the IDE sap is an R package and triggers the Build pane.
PackageUseDevtools: Yes links the options in the Build pane to the devtools package.
The PackageInstallArgs are complicated, but I’ve included some information about them in the callout block below (and you can read more in the official R documentation)
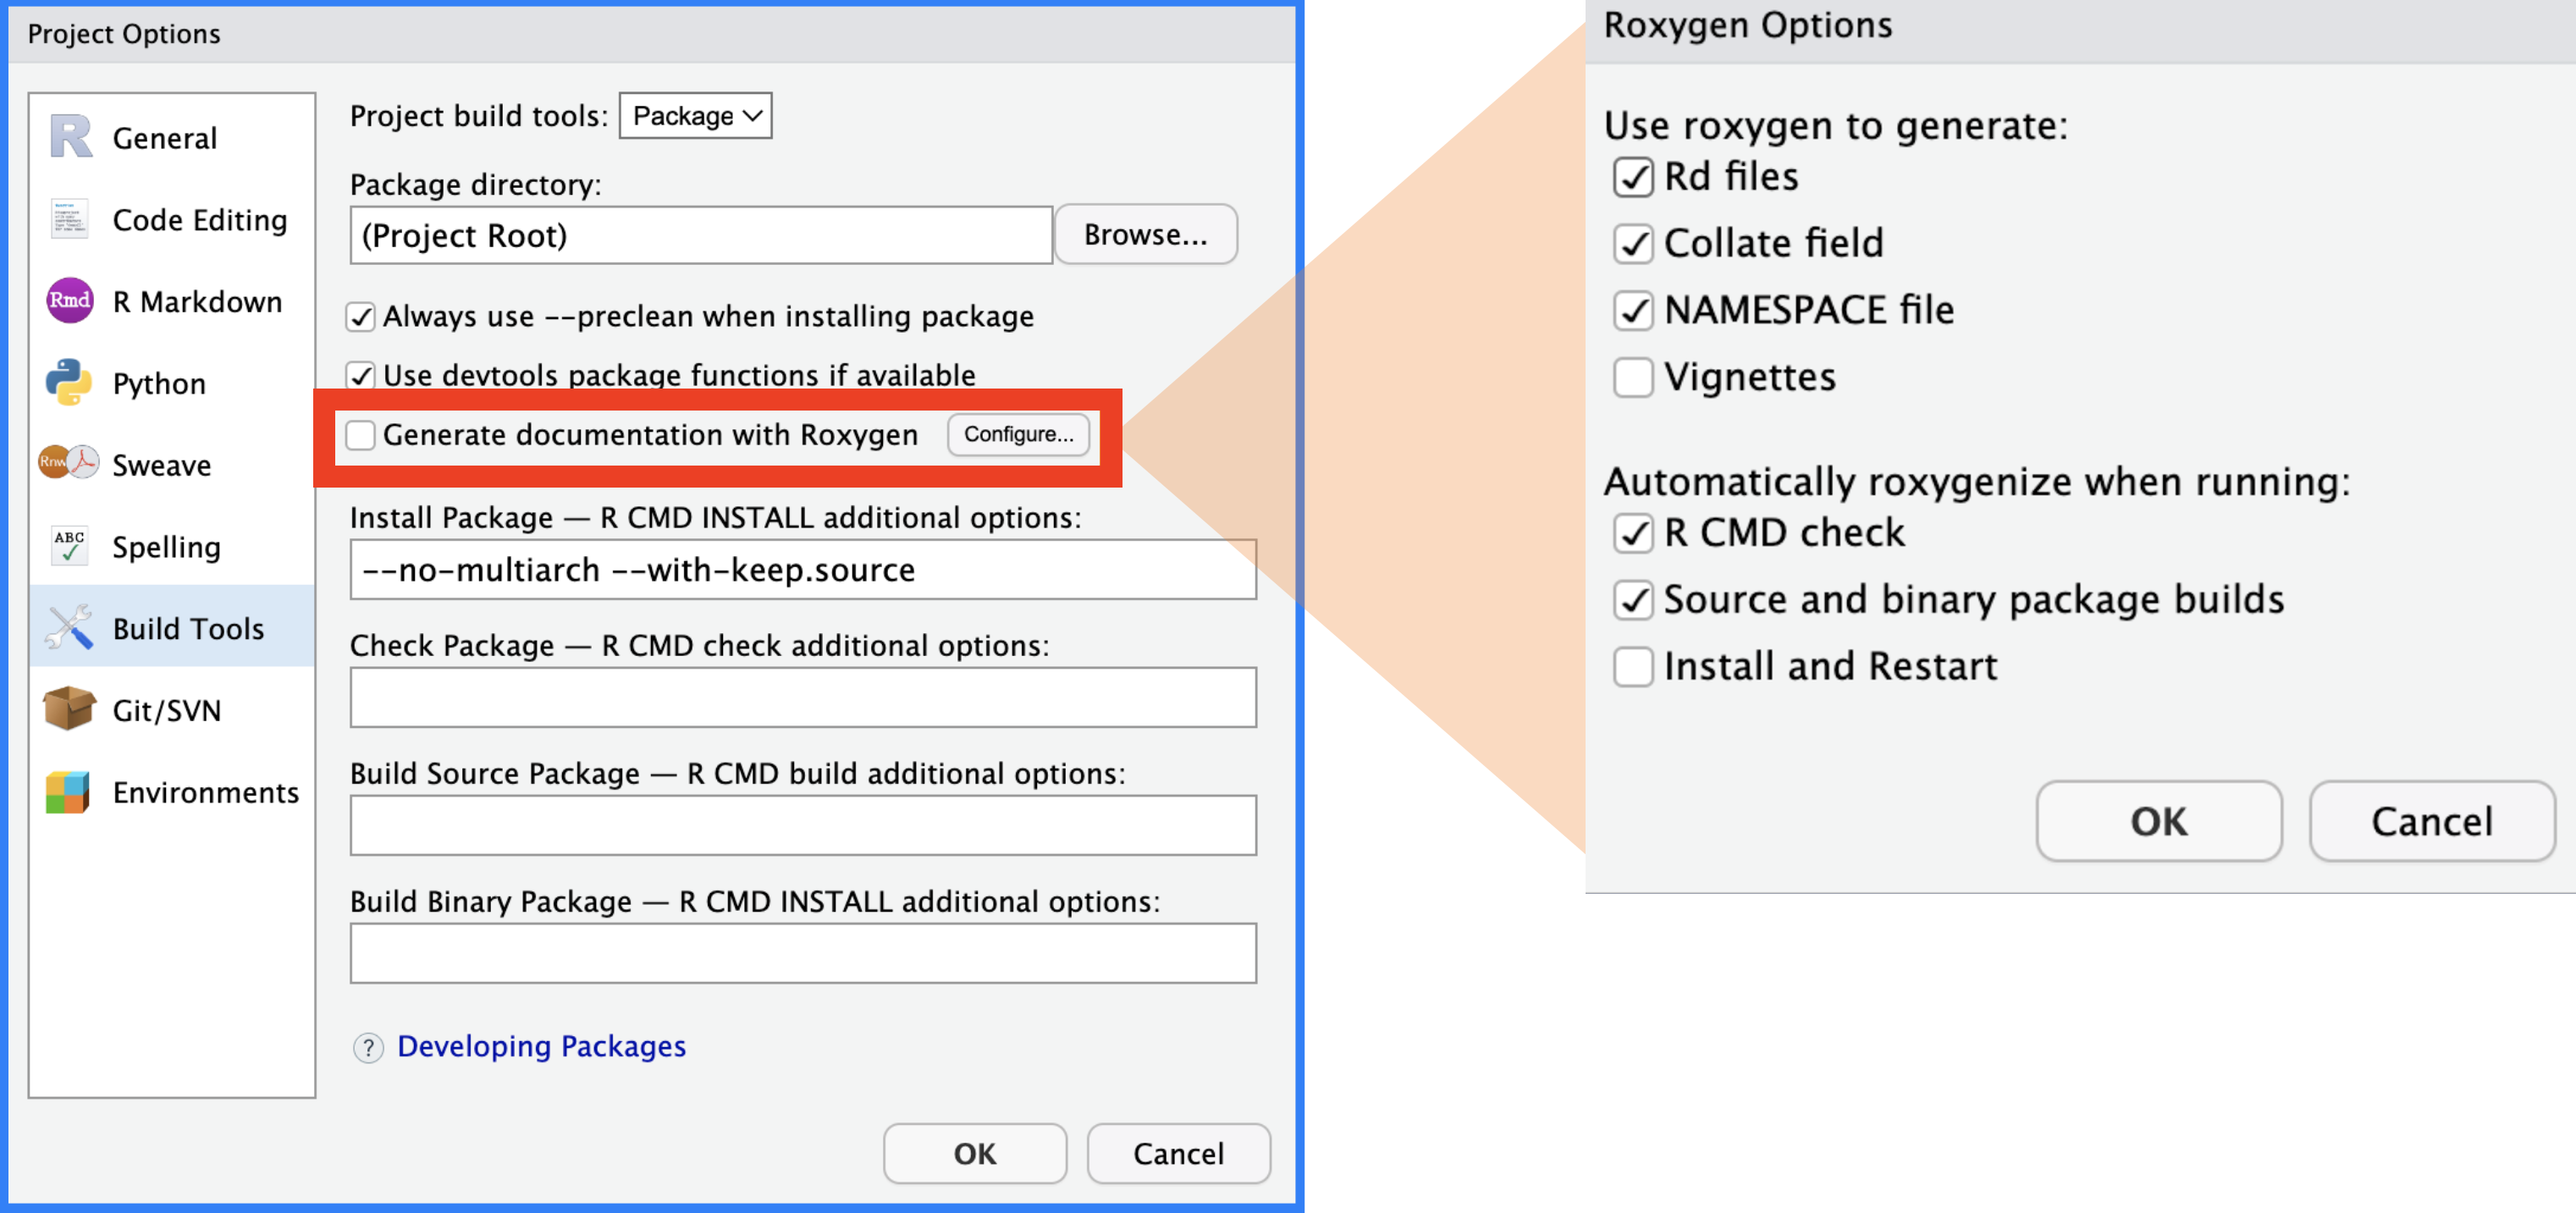
The fourth option (PackageRoxygenize) is available under Generate documentation with Roxygen > Use roxygen to generate:
These options affect the documentation in an R package. To match the example from R Packages, 2ed above, make sure Rd files, Collate field, and NAMESPACE file are selected and click OK.
(a) PackageRoxygenize in .Rproj file
Figure 3.5: roxygen2 build settings
After clicking OK, the IDE will automatically reboot, and the additional fields will be added to the bottom of the sap.Rproj:
ProjectId is a relatively new field, and it helps keep each project configured with the RStudio IDE.
TipWhat is --no-multiarch --with-keep.source?
--no-multiarch: refers to the option for the package installer to only compile the package for the architecture of the current R session. By default, R tries to compile packages for 32-bit and 64-bit architectures if running in a 64-bit R session on Windows. This flag can help avoid problems if a package can only be compiled on one architecture. Read more here.
--with-keep.source: In R, when a function is created, its body can be stored in two ways: 1) as a parsed but unevaluated expression and 2) as a character string containing the function’s source code. By default, only the parsed expression is kept. If –with-keep.source is specified, R will also keep the source code as a character string, which can be helpful for debugging and tools that analyze or modify source code. Read more here.
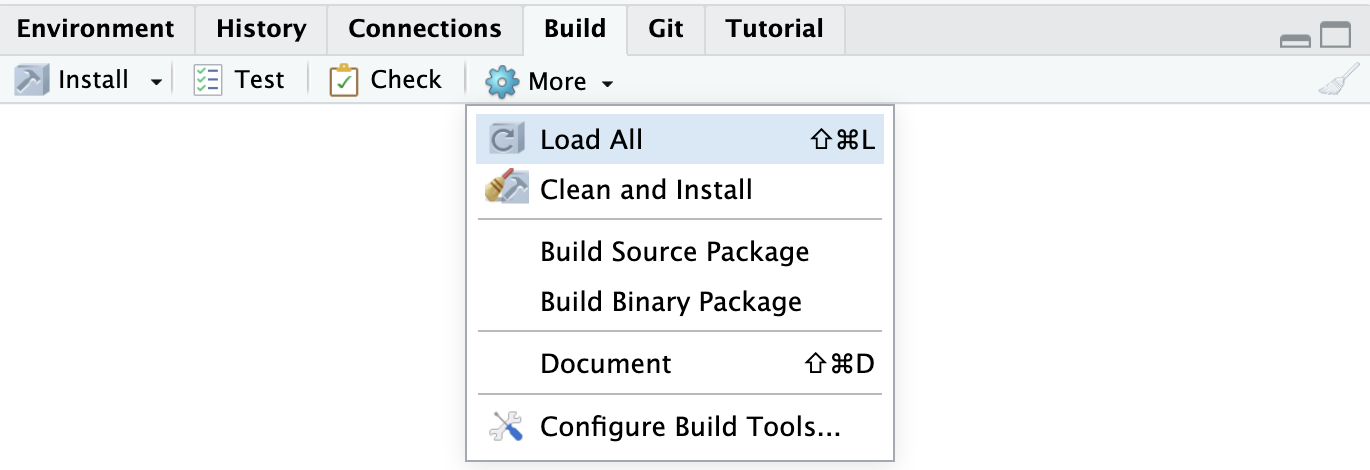
When the new session starts, the new project-level options activate the Build pane in the IDE, and I can check the R package functionality by loading the code with Build > Load All
Identical to running devtools::load_all()
3.1.3 Positron’s workspaces
Positron doesn’t recognize RStudio’s project files (.Rproj) or their build tools configuration. Instead, Positron organizes files and paths around workspaces.9
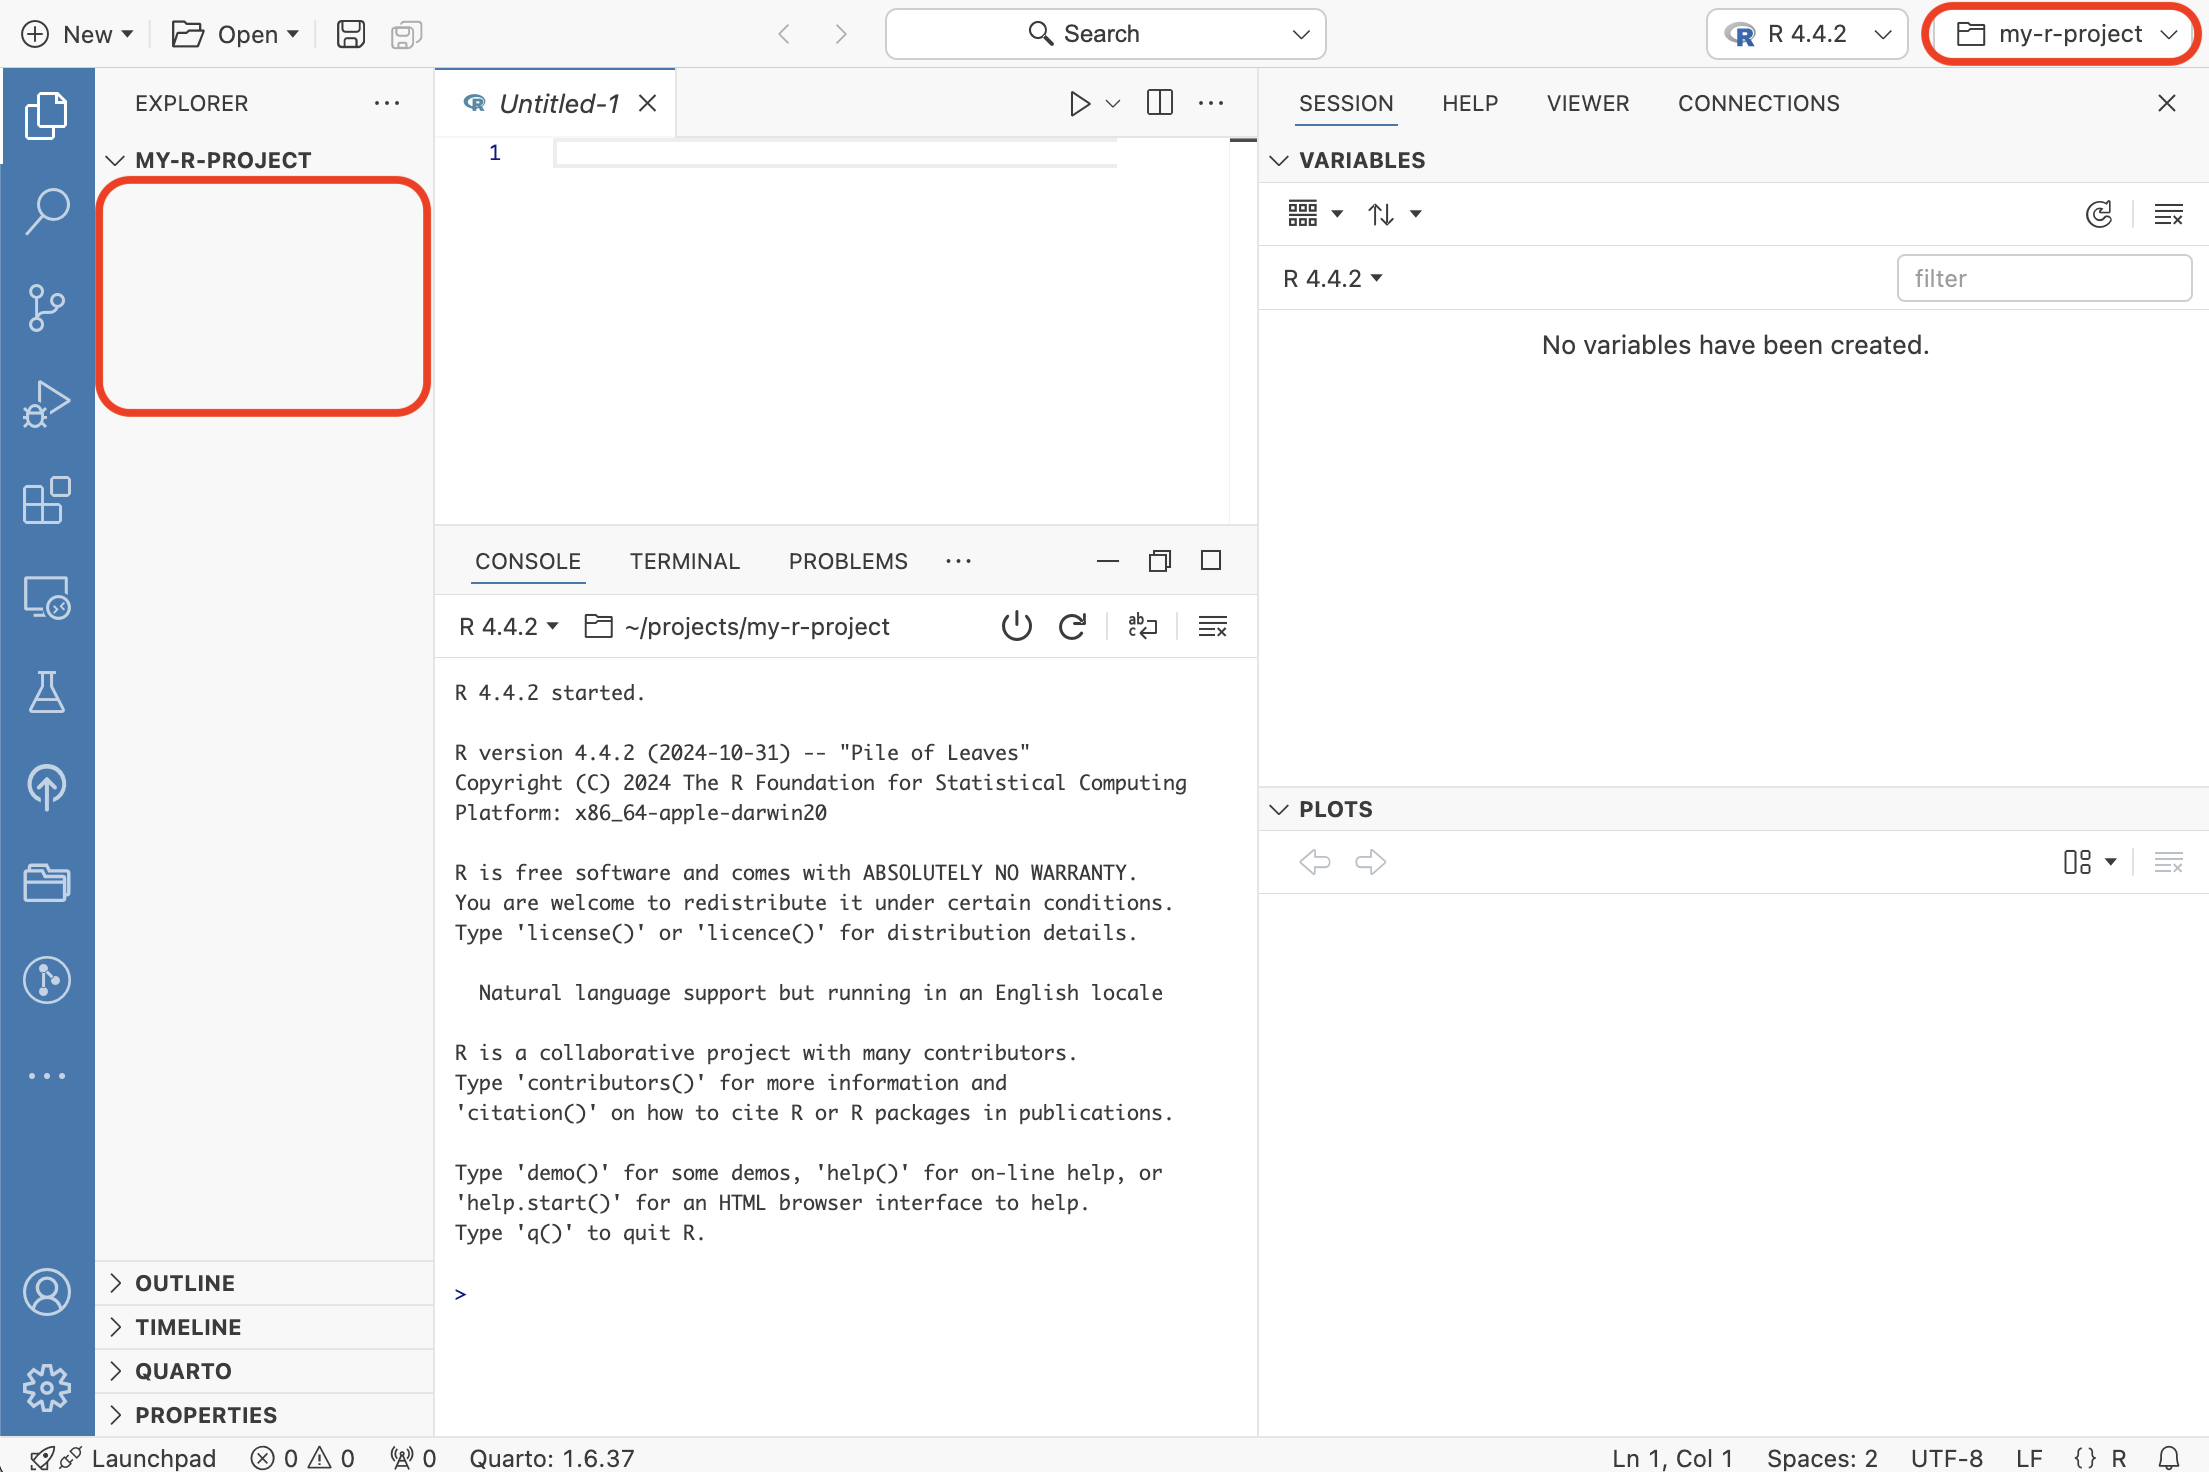
A workspace is any folder that contains your project’s files. You can open an existing folder or create a new one from Positron’s welcome pane:
3.1.3.1 Positron projects
The Welcome pane also offers an option for creating a New Project, but this shouldn’t be confused with creating an RStudio project.
If we follow the steps for a new project by specifying the type, name, and location:
We see this opens a folder in the IDE without an .Rproj file:
If you’re building your Shiny app from scratch, this is still a great way to get started because it makes it easy to adopt best practices (i.e., using Git and renv).
3.1.3.2 Build tools
In Positron, all of the package development tools from devtools are available, but they are executed and handled a little differently by the IDE. We’ll cover these differences more in the Development, Degbug, and Tests chapters.
3.1.4 R packages recap
In summary, to turn a Shiny Project into a functioning R package that can be installed and loaded into an R session we need:
A DESCRIPTION file containing the seven mandatory fields (Package, Version, License, Description, Title, Author, and Maintainer), making running the necessary devtools functions possible.10
If we’re using RStudio, the .Rproj file must contain the three package configuration fields, which makes the Build pane accessible and functional.11
TipR Package Development Cheatsheet
Posit has an excellent ‘Package Development :: Cheatsheet’ that provides a quick summary of the essentials of R package development.
Shiny app-packages have all of the functionality of a standard R Package but also contain the files and folders required to successfully develop, run, and deploy a Shiny app . The Posit documentation lists the following way(s) to create R packages:12
Call usethis::create_package().
In Posit Workbench, do File > New Project > New Directory > R Package. This ultimately calls usethis::create_package(), so really there’s just one way.
create_package() is a great option if you’re looking for a way to quickly create or convert your Shiny project into a Shiny app-package. In the following sections I’ll cover some suggestions for using create_package().13
3.2.1 New app-packages
If you haven’t written any code and want to create a new Shiny app-package, create_package() is the quickest way to get started.
First, install devtools:
install.packages("devtools")library(devtools)
devtools automatically loads usethis
Loading required package: usethis
Assuming your current working directory is where you want your new Shiny app-package, call usethis::create_package() with the path argument set to getwd()
usethis::create_package(path =getwd())
This call launches a series of actions:
First, the active project is set to whatever was given to the path argument.
✔ Setting active project to 'path/to/newApp'
The R/ folder and DESCRIPTION/ file are created:
✔ Creating 'R/'✔ Writing 'DESCRIPTION'
The NAMESPACE and .Rproj files are created:
✔ Writing 'NAMESPACE'✔ Writing 'newApp.Rproj'
The .Rproj is added to the .Rbuildignore file, the .Rproj.user folder is added to the .gitignore and .Rbuildignore files.
✔ Adding '^newApp\\.Rproj$' to '.Rbuildignore'✔ Adding '.Rproj.user' to '.gitignore'✔ Adding '^\\.Rproj\\.user$' to '.Rbuildignore'
A new session is opened from the new .Rproj file:
✔ Opening 'path/to/newApp/' in new RStudio session
When the new session opens, newApp has the following contents:
You’re now free to develop newApp. Store and document any .R files in the R/ folder, edit the DESCRIPTION file with details about the application, read through R Packages and Mastering Shiny, and add the Shiny code to complete your Shiny app-package.
3.2.2 Converting a Shiny project
If you already have a Shiny app project that needs to be converted into a Shiny app-package, you can also use create_package(path = getwd()) in your root folder, but I recommend using the following arguments:
3.2.2.1DESCRIPTION arguments
fields: these are arguments passed to usethis::use_description(). If the fields argument is empty, a boilerplate DESCRIPTION file is created (similar to this one).
These boilerplate fields in the DESCRIPTION work, but I’ve found some of the fields are unnecessary (i.e., I’ve never needed Authors@R: or ORCID) and inevitably require revision, so I’d prefer to handle this during the creation process (and remove the risk of forgetting to change it later).
All fields should be passed in a list() as field = 'value' pairs.
usethis::use_description(list(Package ='sap',Version ='0.3.3',Title ='Shiny App-Packages',Description ='An R package with a collection of Shiny applications.',"Authors@R"=NULL,Author = utils::person(given ="John", family ="Smith", role =c("aut", "cre")),Maintainer = utils::person(given ="John", family ="Smith",email ="John.Smith@email.io"),License ="GPL-3"))
A few fields require specially formatted values (see the utils::person() examples below).
utils::person("John", "Smith", email ="John.Smith@email.io", role =c("aut", "cre"))
[1] "John Smith <John.Smith@email.io> [aut, cre]"
Two additional arguments from use_description() are passed to create_package():
check_name: verifies your Shiny app-package name is valid for CRAN, so we can set this to FALSE (unless you’re planning on submitting to CRAN)
roxygen2: is TRUE by default and adds the fields required to use roxygen2 (which I won’t cover here because we’ll cover documentation in-depth in a future chapter).
ImportantDon’t use "." with create_package()
When converting your existing Shiny app project into a Shiny app-package with usethis::create_package(), don’t use '.' in the path argument:
usethis::create_package('.')
This will return the following warning about creating nested projects, and ask if you want to proceed anyway:
New project 'sap' is nested inside an existing project'./', which is rarely a good idea. If this is unexpected, the here package has a function,`here::dr_here()` that reveals why './' is regarded as aproject.Do you want to create anyway?1: Yes2: No way3: Not now
We can avoid this warning altogether by passing getwd() to the path argument, so I recommend cancelling the project creation:
Selection:2Error: Cancelling project creation.
3.2.2.2 IDE arguments
rstudio: adds the necessary Build Tools fields in the .Rproj file (leave as TRUE)
open: can be set to FALSE because we don’t need RStudio/Posit Workbench to open in a new session
usethis::create_package(path =getwd(),fields =list(Package ='sap',Version ='0.3.3',Title ='Shiny App-Packages',Description ='An R package with a collection of Shiny applications.',"Authors@R"=NULL,Author = utils::person(given ="John", family ="Smith", email ="John.Smith@email.io", role =c("aut", "cre")),Maintainer = utils::person(given ="John", family ="Smith",email ="John.Smith@email.io"),License ="GPL-3"),roxygen =TRUE,check_name =FALSE, rstudio =TRUE,open =FALSE)
After running usethis::create_package() with the arguments above, the IDE will present us with a few prompts to confirm:
The DESCRIPTION file (shown below) has a few additional fields (Encoding, Roxygen, and RoxygenNote) we didn’t include when we converted sap above, but we will cover these in the upcoming chapters.
Package: sapTitle: Shiny App-PackagesVersion: 0.3.3Author: John Smith [aut, cre]Maintainer: John Smith <John.Smith@email.io>Description: An R package with a collection of Shiny applications.License: GPL-3Encoding: UTF-8Config/roxygen2/markdown: TRUE
This chapter has covered the mandatory fields in the DESCRIPTION file and the R package configuration fields in .Rproj. We also covered creating and converting Shiny app projects using the usethis::create_package() function.
TipRecap: Packages!
The DESCRIPTION file ultimately controls whether you have a functional Shiny app-package.
The mandatory fields are Package, Version, License, Description, Title, Author, and Maintainer.
usethis::create_package() can be used to create a new R package and to convert an existing Shiny project into a Shiny app-package.
The RStudio IDE reads project (.Rproj) files and determines R session settings at the project-level (i.e., working directory, workspace, history, code formatting, etc.)
Package development settings can be accessed via Project Options > Build Tools.
In the next chapter, I’ll cover how you can quickly Load, Document, and Install your package!
If you’re developing in RStudio , your Shiny project might also include a Posit workbench project file (.Rproj).↩︎
If you’re working in RStudio , your R package will also likely include a project file (.Rproj).↩︎
Shiny app project features are covered in Section 2.3 and Section 2.4 of the previous chapter.↩︎
Fortunately, Shiny app-packages don’t require all the files and folders displayed in the folder tree to gain the functionality and benefits of an R package.↩︎
The initial Build Tools settings (i.e., (None)) should help explain the absence of any R package development fields in the sap.Rproj when we compared it to the version in R Packages, 2ed (i.e., BuildType, PackageUseDevtools, PackageInstallArgs, and PackageRoxygenize).↩︎